Introduction
Assets are a very important element in Joblogic. You can add assets against your sites to then monitor installations and services via your jobs and contracts.
This guide will show you how to find asset records in your system and how to integrate the record to find history behind a specific asset and make updates to the record itself.
Your Assets can be added to the system in a few ways. To read more about adding assets, click here.
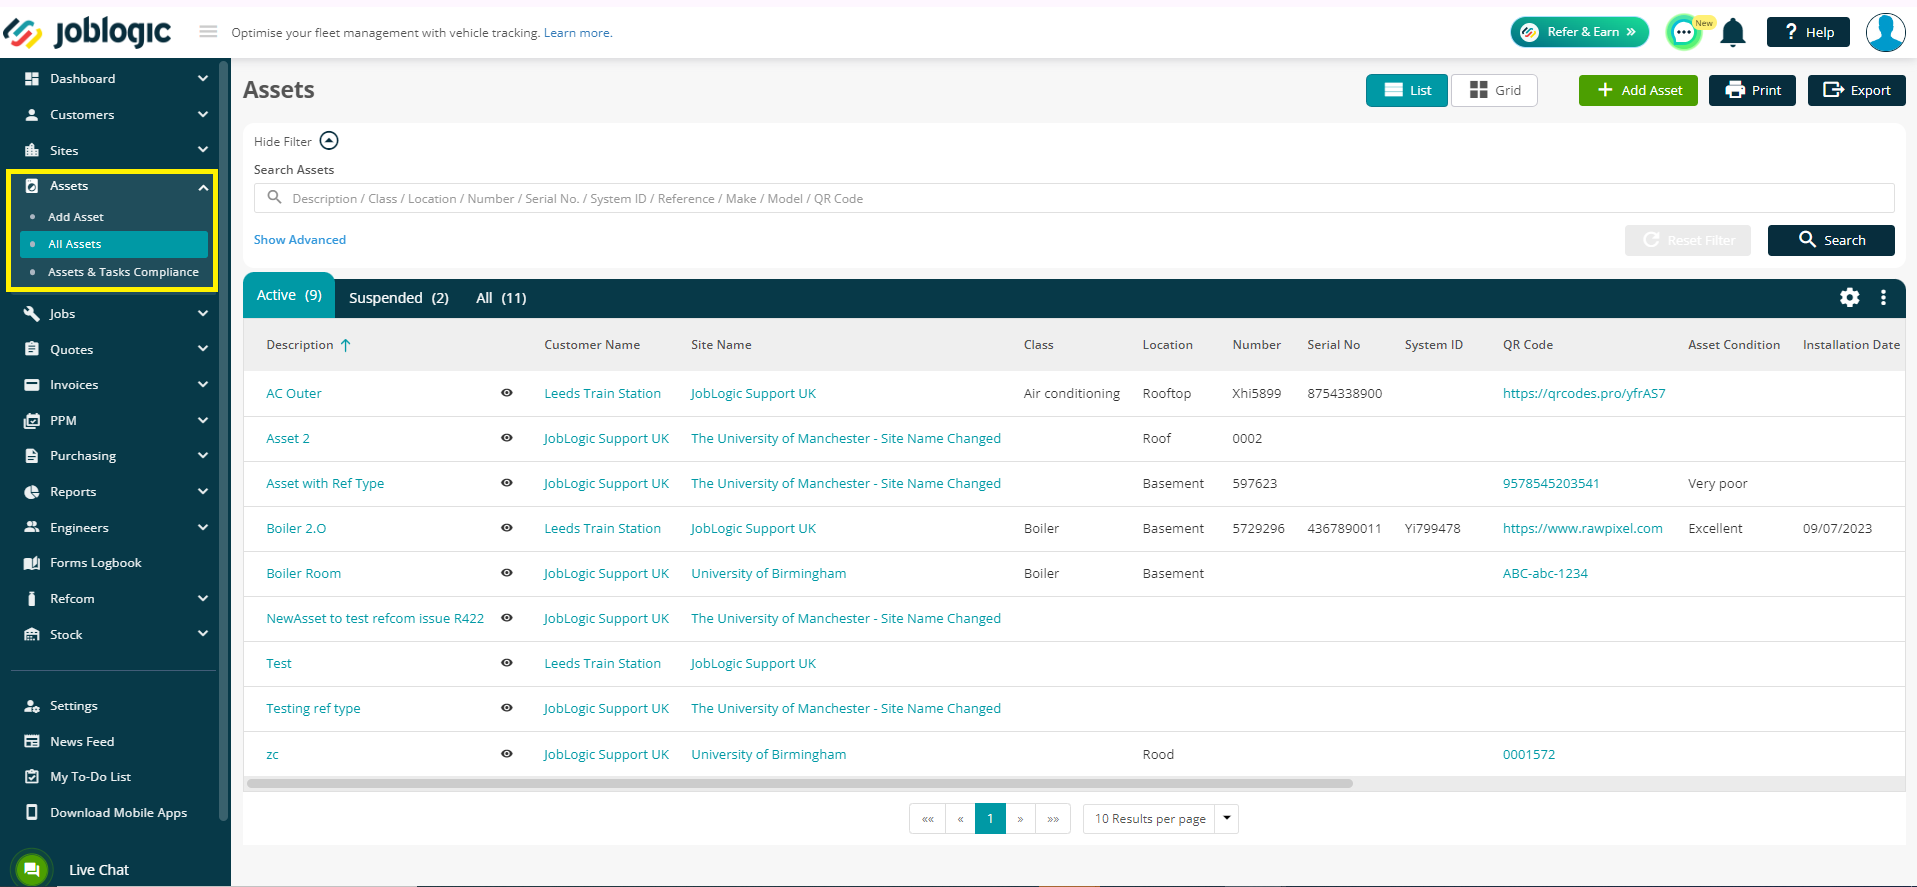
Accessing the All Assets page
To access the asset library, navigate to the modules pane on the left-hand side of the screen. Click on 'Assets,' and then select 'All Assets.'
Navigating the Asset page
Now that you have entered the Assets section, take a moment to explore. The layout of the asset desk closely mirrors other search pages within the system. Once you have acquainted yourself with the asset desk, navigating through other desks in the system will be seamless. The only discernible distinction from page to page lies in the varied filters at your disposal.
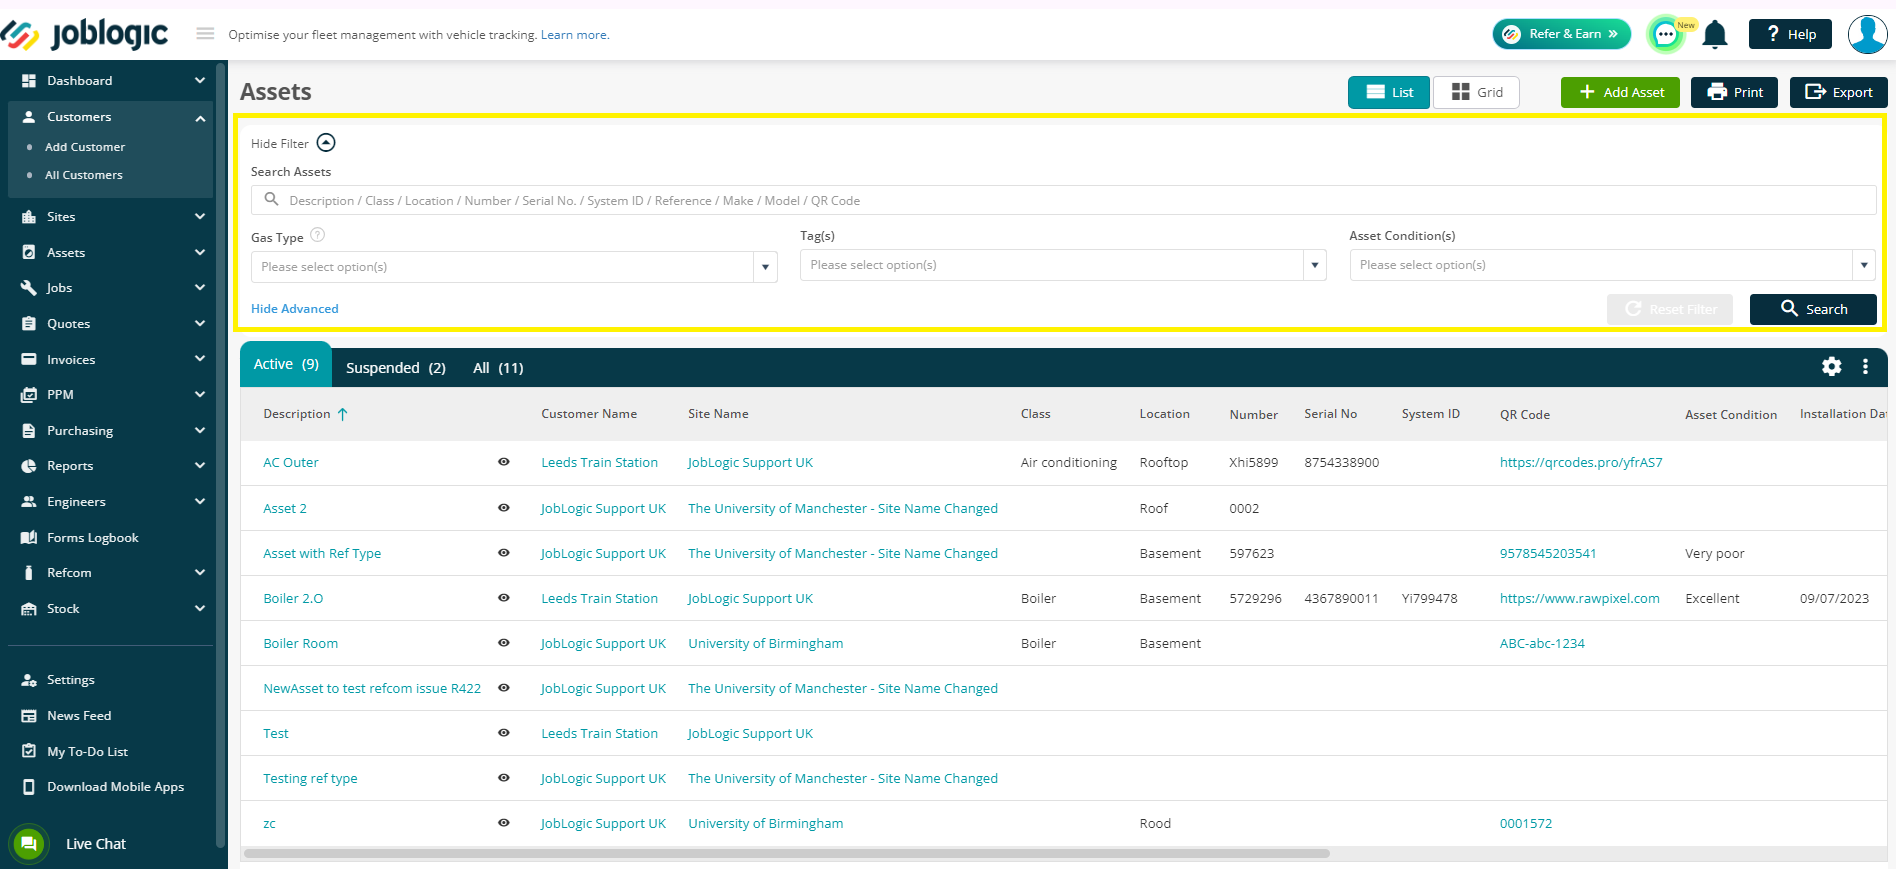
Filters
- Search Customers – This is a free type search bar, allowing you to free type either the Description, Class, Location, Number, Serial Number, System ID, Reference, Make, Model or QR Code assigned to that Log.
NOTE that you do not have to type the full word into the search bar to bring results. For example, if you only knew the first 3 characters of a post code, you could type these in and Joblogic will show you every record that contains these.
You can also search for multiple fields in one go. For example, you could search for part of the description and the location to reduce the results shown on the screen.
If you click on the ‘Show Advanced’, you'll be able to see further filters such as Gas Type, Tags, and Asset Conditions.
-
Gas Type - Some assets can store gas, predominantly those associated with the HVACR industry, such as heaters and air conditioners, among others. This search functionality enables you to specifically look for assets based on their gas type.
-
Tags - Tags will be available in all of the Navigation sections, including the assets. A Tag is simply a label that you can apply to an asset record to allow you to search for it later.
-
Asset Conditions - This filter will allow you to search for the assets based on their last marked condition. Engineers can update asset conditions during a service, or you can manually update this against the Asset in the back office.
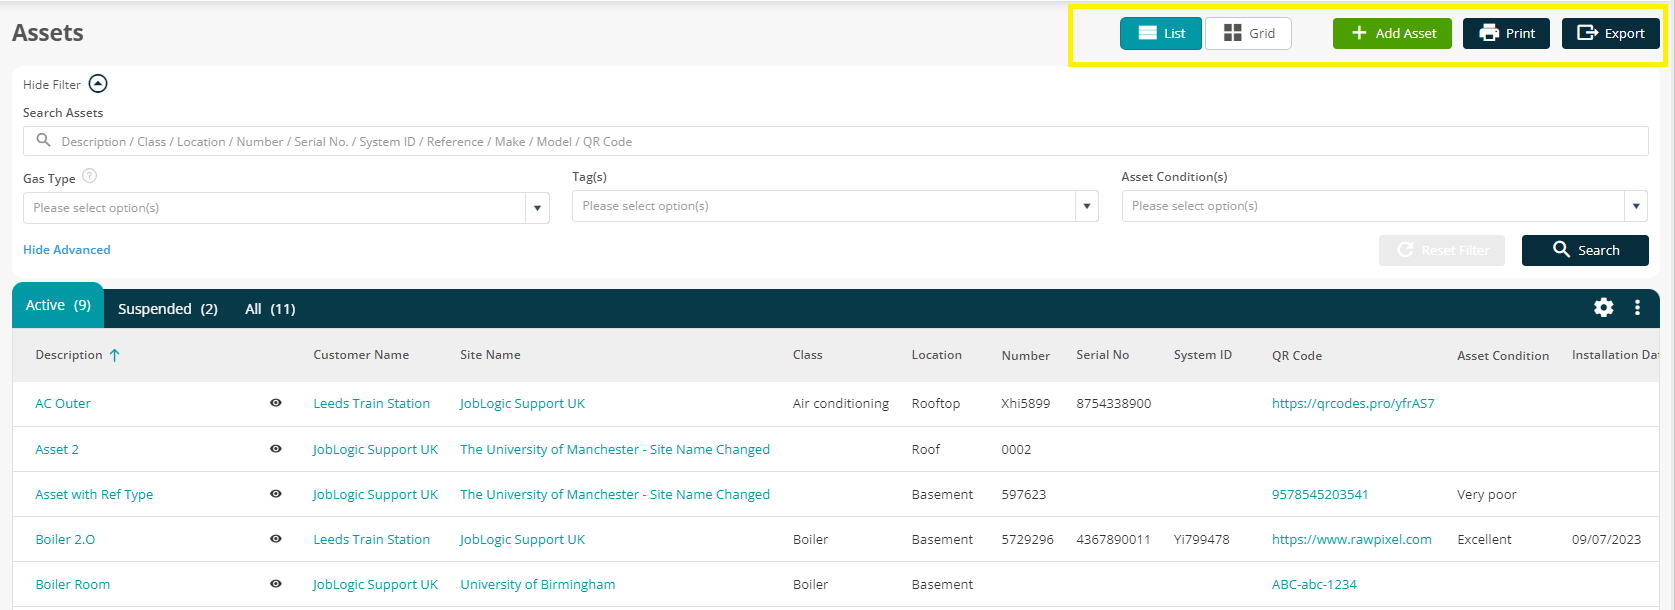
Action buttons
- List - This is the default and will show you a view of all assets in the form of a list.
- Grid - This is an option to view the assets with their associated image thumbnails
- Add Asset – This is one way you can create a new asset in your system. Simply click on it and fill out the form. Once saved it will be a record in your system.
- Print – Allows you to Print your search results to paper or to a PDF.
- Export – This button, similar to print, allows you to export your results into a CSV (Excel) file.
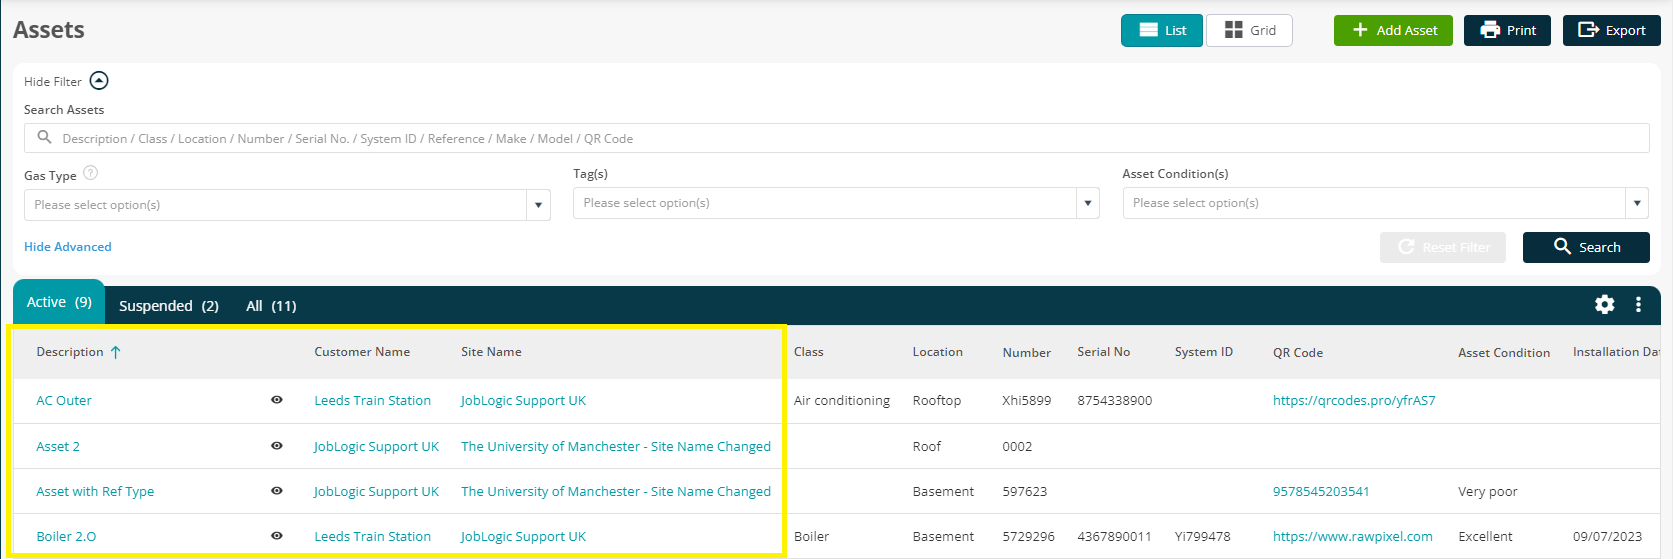
Results Table
The main part of the page is your results table. This will update based on the filters you have applied.
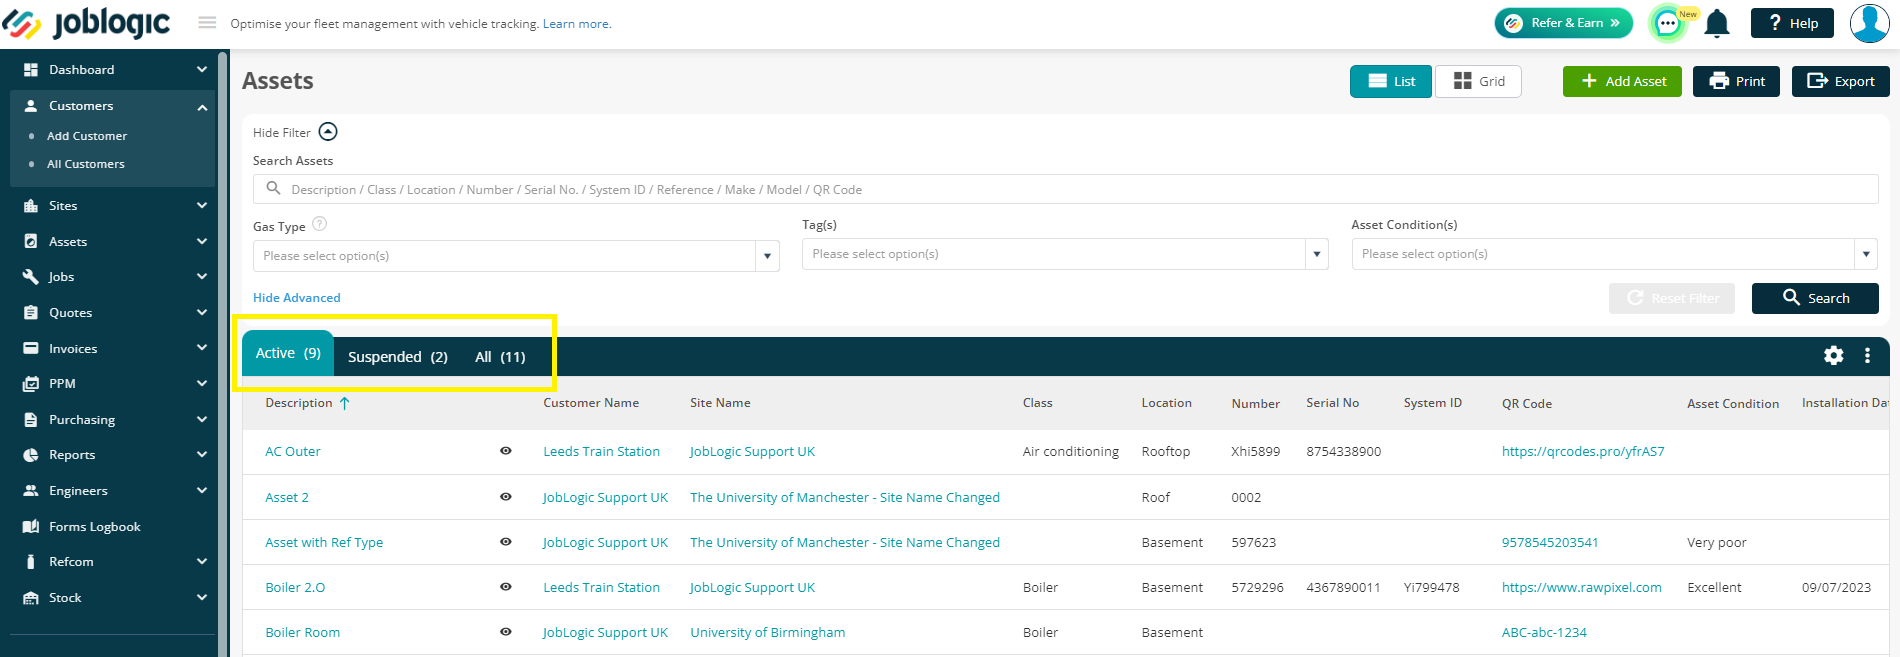
Tabs
There are three tabs to help you view your data more easily.
- Active – This will show you all of your assets marked as ACTIVE.
- Suspended – Will show you any assets you have marked as INACTIVE
- All – Will show you both active and inactive assets.
Further Actions
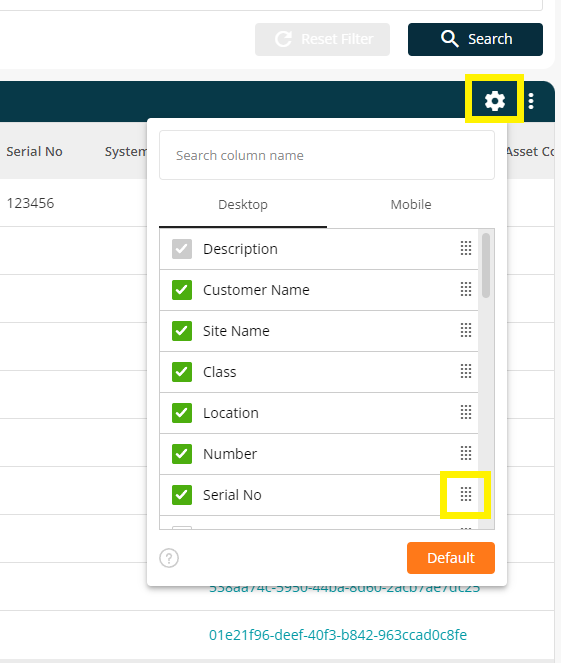
There are 2 more buttons to the right of the screen which include a settings cog and a menu button.
- Settings Cog - Here you can pick and choose what headers you see in your results table. As an example, if you’re not interested in the Serial number field being displayed, you can untick this and it will not show in the table.
Please note that these are user specific, so any changes you make in the cog will only update your profile.
You can also choose the order in which your headers show by dragging and dropping them into different orders.
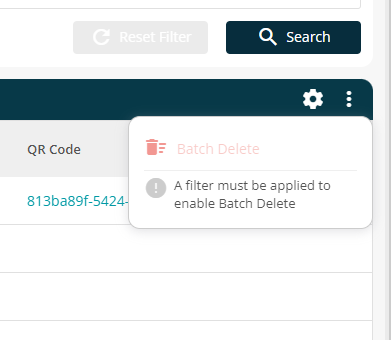
- Menu – This is where you can Batch delete assets. You will notice that this is greyed out with no selection. To use this tool you need to apply either a tag or a search filter to batch delete.
Main Table
The results table itself provides a quick overview of essential asset information. Certain columns are hyperlinked (displayed in blue), indicating their interactive nature:
- Description – Clicking on the Description will redirect you to the Asset details page.
- Customer Name – Clicking on the Customer name would redirect you to the Customer detail page.
- Site Name – Clicking on the Site name would redirect you to the Site detail page.
- QR Code – Clicking on the QR code would allow you to view, download or print the QR code for the asset.
You will also find an eye icon next to the Asset Description. This will open up a quick view screen, on the right-hand side, to show you some more key data without having to go into the record itself.
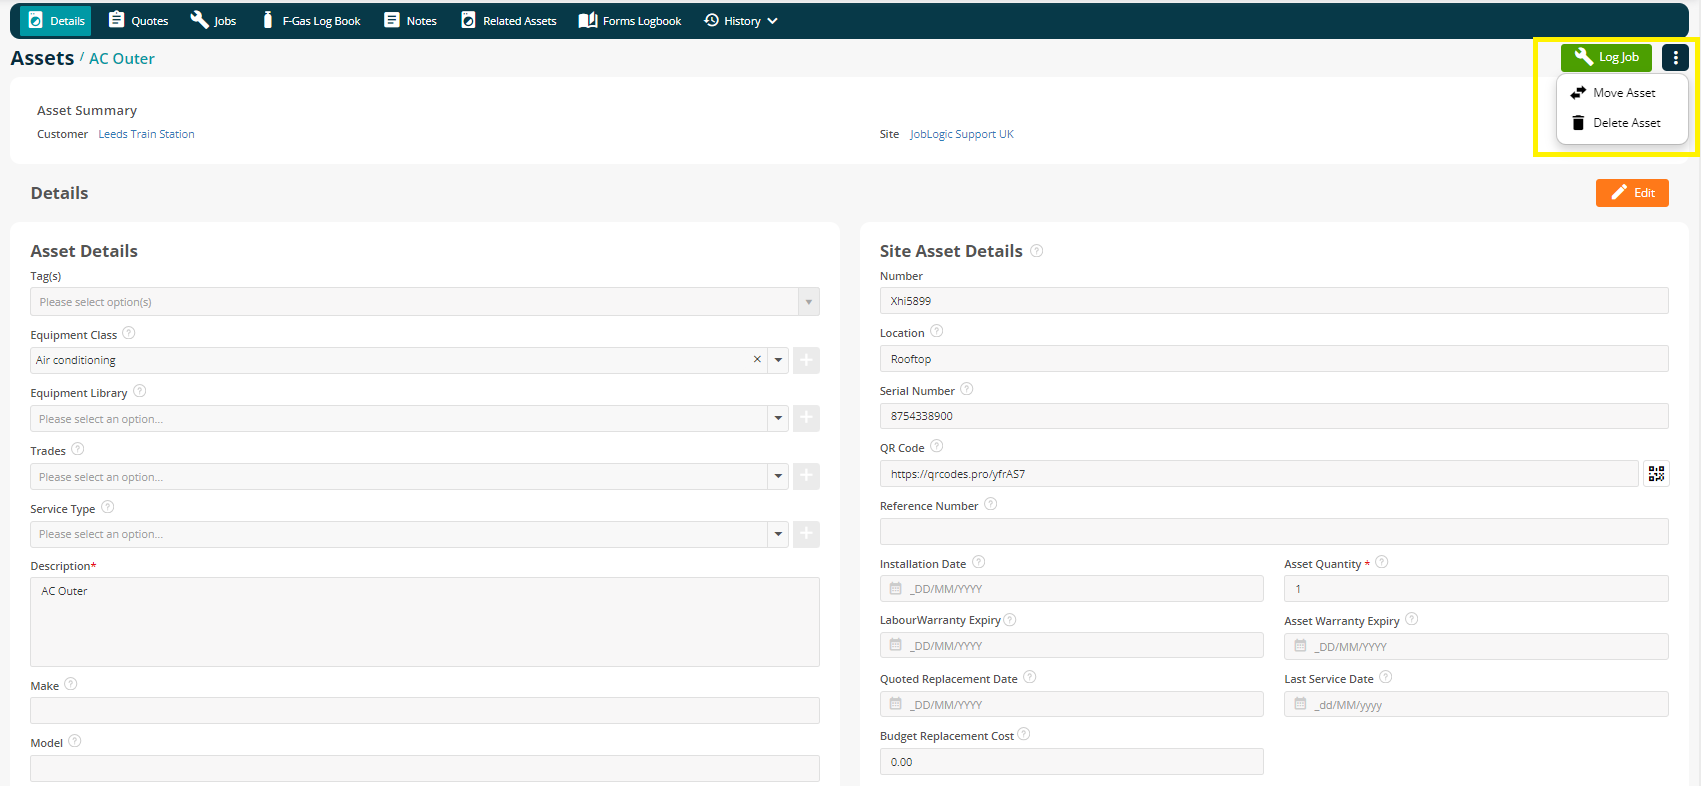
The Asset Record
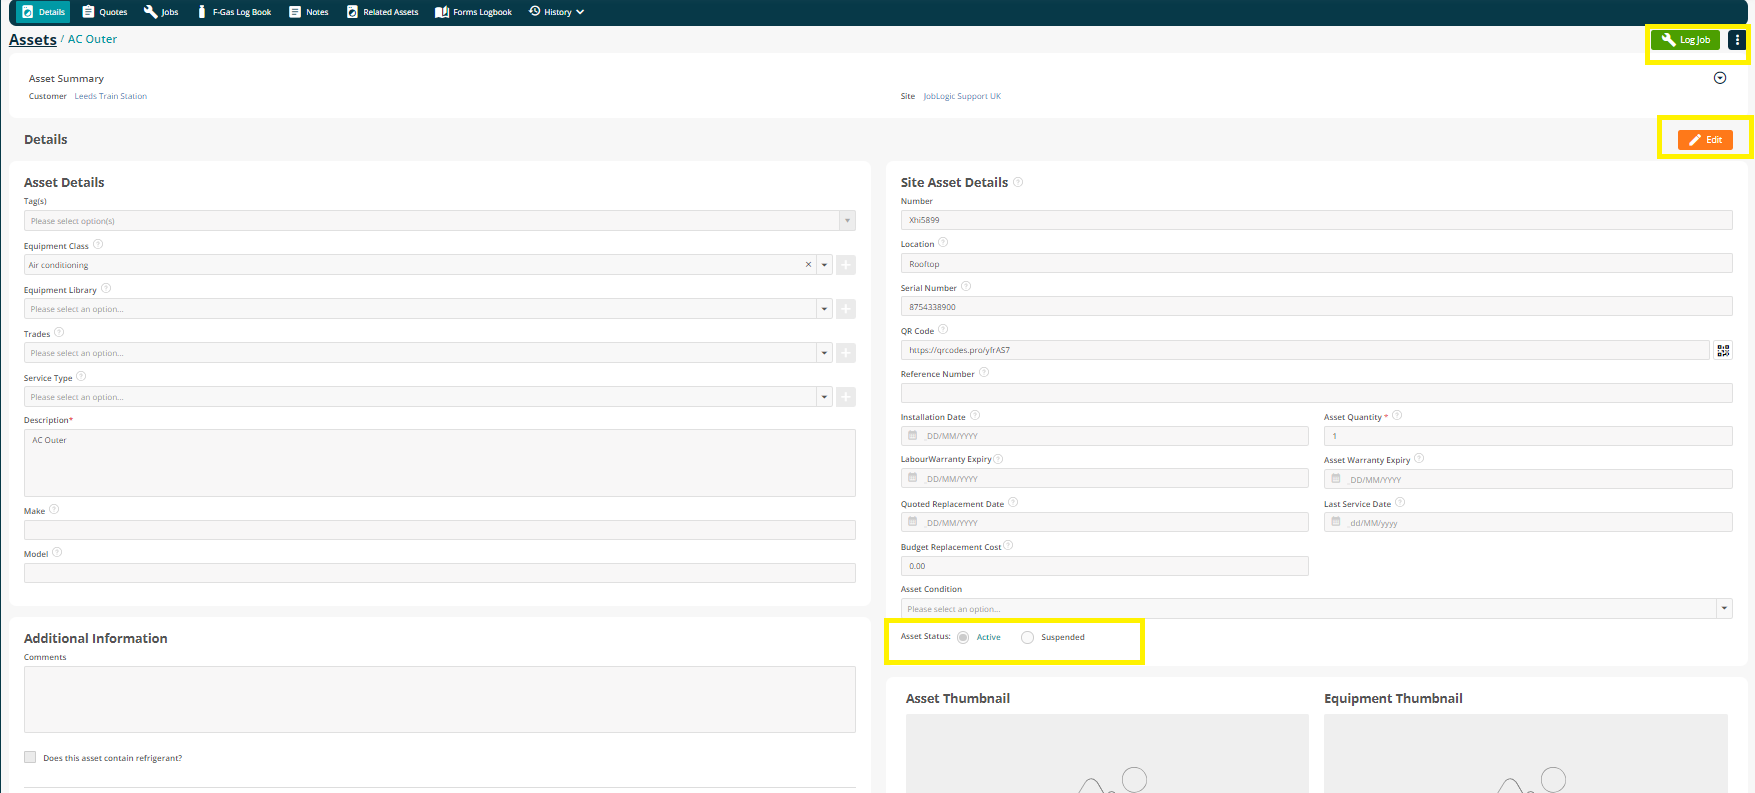
As mentioned above, click on the Asset Description to access an individual asset.
Upon selecting an Asset, detailed asset information will be displayed under the "Details" tab. You can further explore and edit various aspects of the asset by navigating through the tabs at the top. Let’s explore this below:
Details
The details tab will give you access to all standard information regarding your Asset including Asset Class, Description, QR code etc.
You can also edit all this information using the edit button. Just remember to save once you have made all the required edits.
You also have a radio button to select as “Asset Status”. Selecting Active would mark the status as Active, and Suspended would make the asset suspended and no longer available for future jobs keeping the historical information intact.
Delete Asset: If the Asset requires to be deleted, you can do this by clicking on the ellipsis (three vertical dots) in the top right and selecting Delete Asset.
Move Asset: This action allows you to move assets from one site to another. It is permission based so you’ll need to make sure the relevant staff members have access via Settings > Staff > staff name > Asset – Move
Doing this will not erase any historical data, and you can always track the asset's locations and movements through the 'Asset > History' tab, specifically the 'Moving History' section.
It's important to note that if the asset is currently associated with an active job, a warning will appear, preventing you from moving the asset at that moment.
To read more on moving assets between sites, click here.
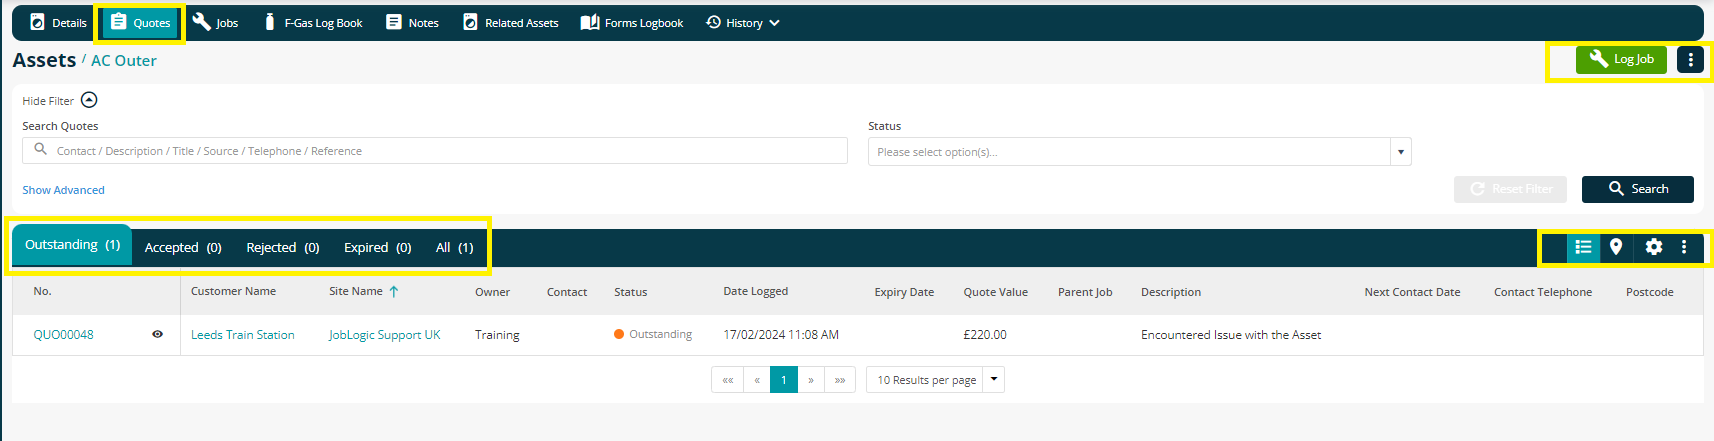
Quotes
Within the Quotes tab, you will see a list of all Quotes that have been logged for the Asset.
You can search the Quotes logged for the Asset using the search bar and also utilize the advanced filters.
You will also have the additional options to view the Quotes in list view, or Map view, which would allow you to see the location of the sites on Map view for which the quotes are logged.
Additionally you will get the option to control the header as we do with every Settings cog.
You can also Batch Delete as needed by clicking on the three dots.
Jobs
Within the Jobs tab, you will see a list of jobs which are logged for this particular Asset.
You can click on the Job number, and this will redirect you to the Job Details screen.
The eye icon would allow you to remain on the existing screen but have a quick view of the job details.
You can view the Asset condition and whether it has been completed or not.

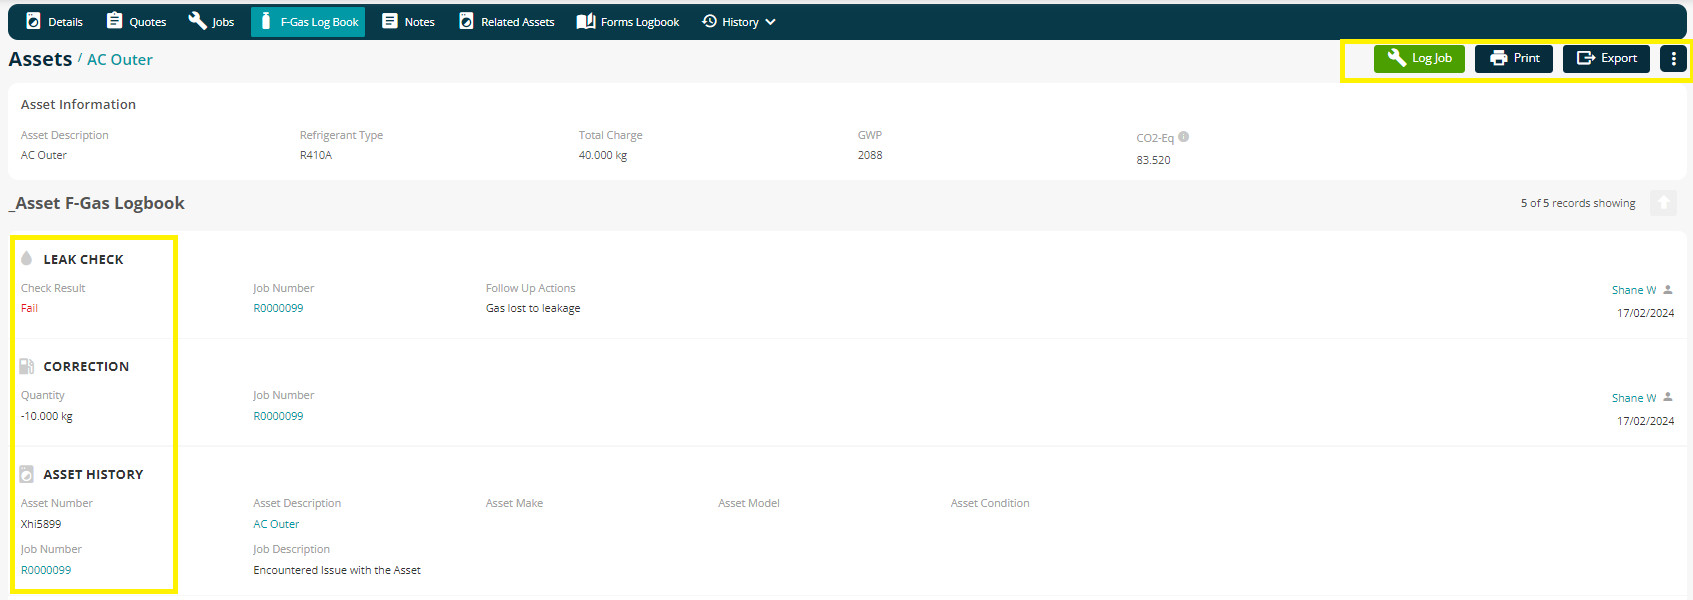
F-Gas Log Book
In the F-Gas Logbook section, a comprehensive record of all Refcom transactions related to the asset is available, including additions, removals, corrections, and leak checks. This page displays essential details of these transactions.
Additionally, convenient shortcuts are provided for logging a job, as well as printing and exporting the F-Gas transactions for easy access and documentation.
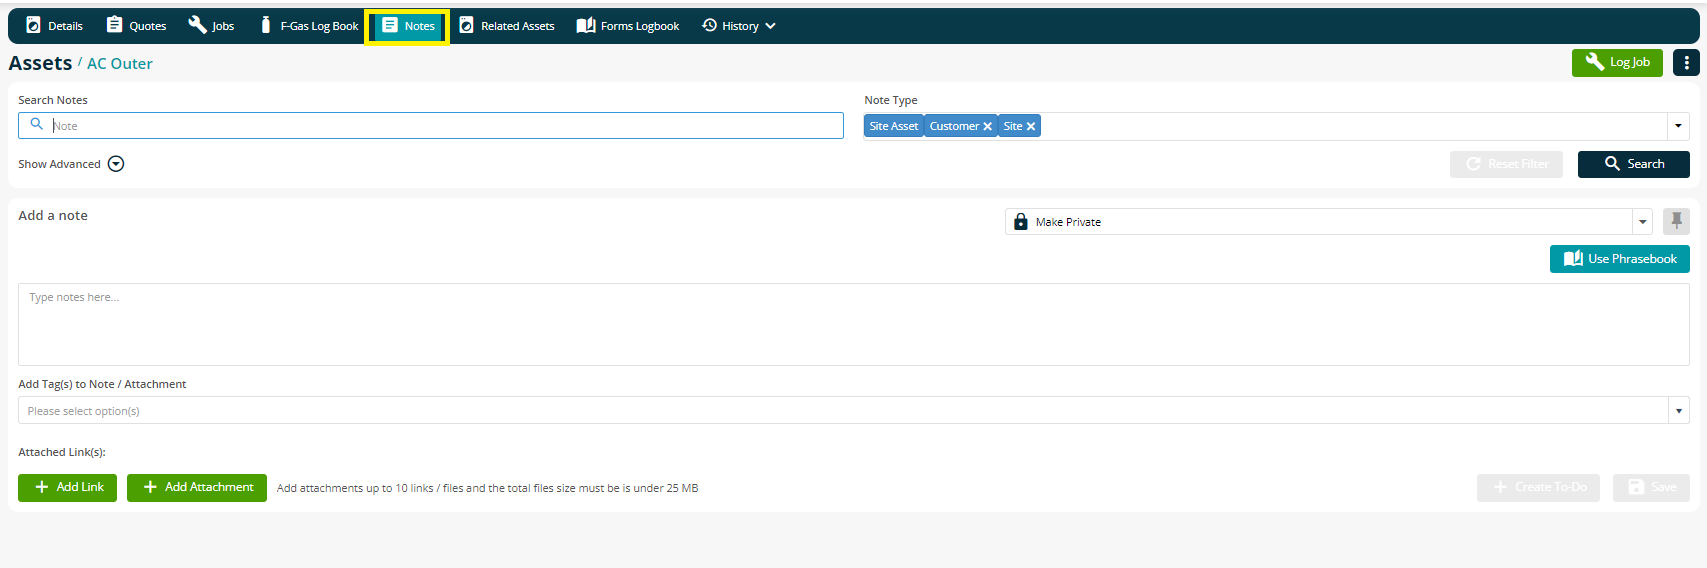
Notes
Here, you can view or add Notes, Attachments and Links that are specific to the Asset.
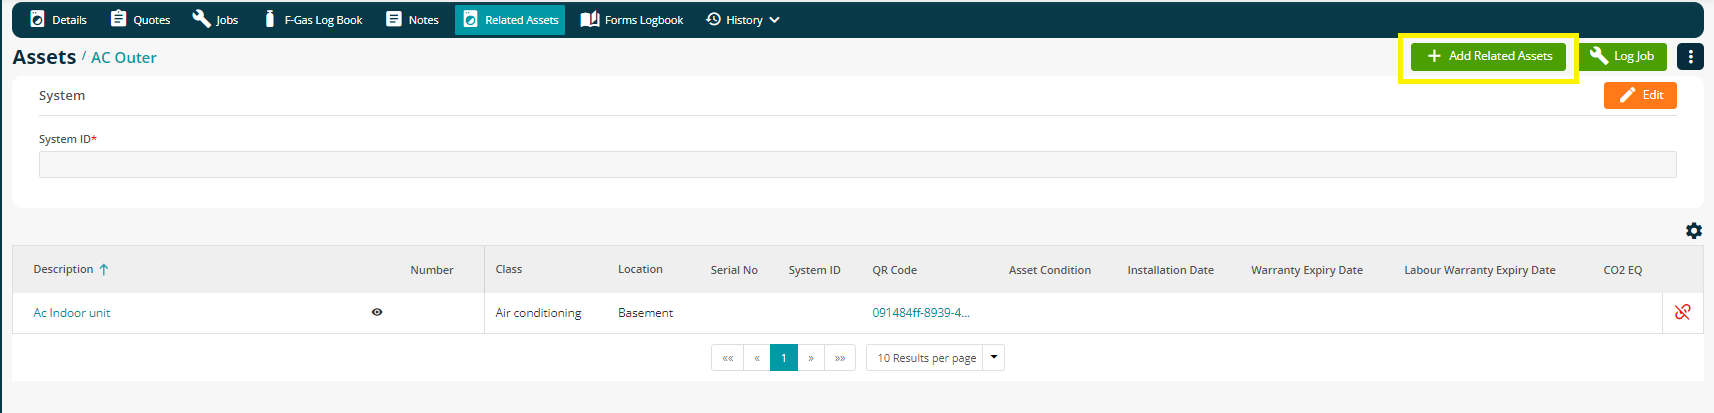
Related Assets
You can link assets together for ease when reporting and servicing. For example, an outdoor AC unit can be linked with its indoor AC counterpart if required. A System ID can be added to easily search for linked assets too.
This page will show you any linked assets, but you can also click Add Related Asset to link as needed.
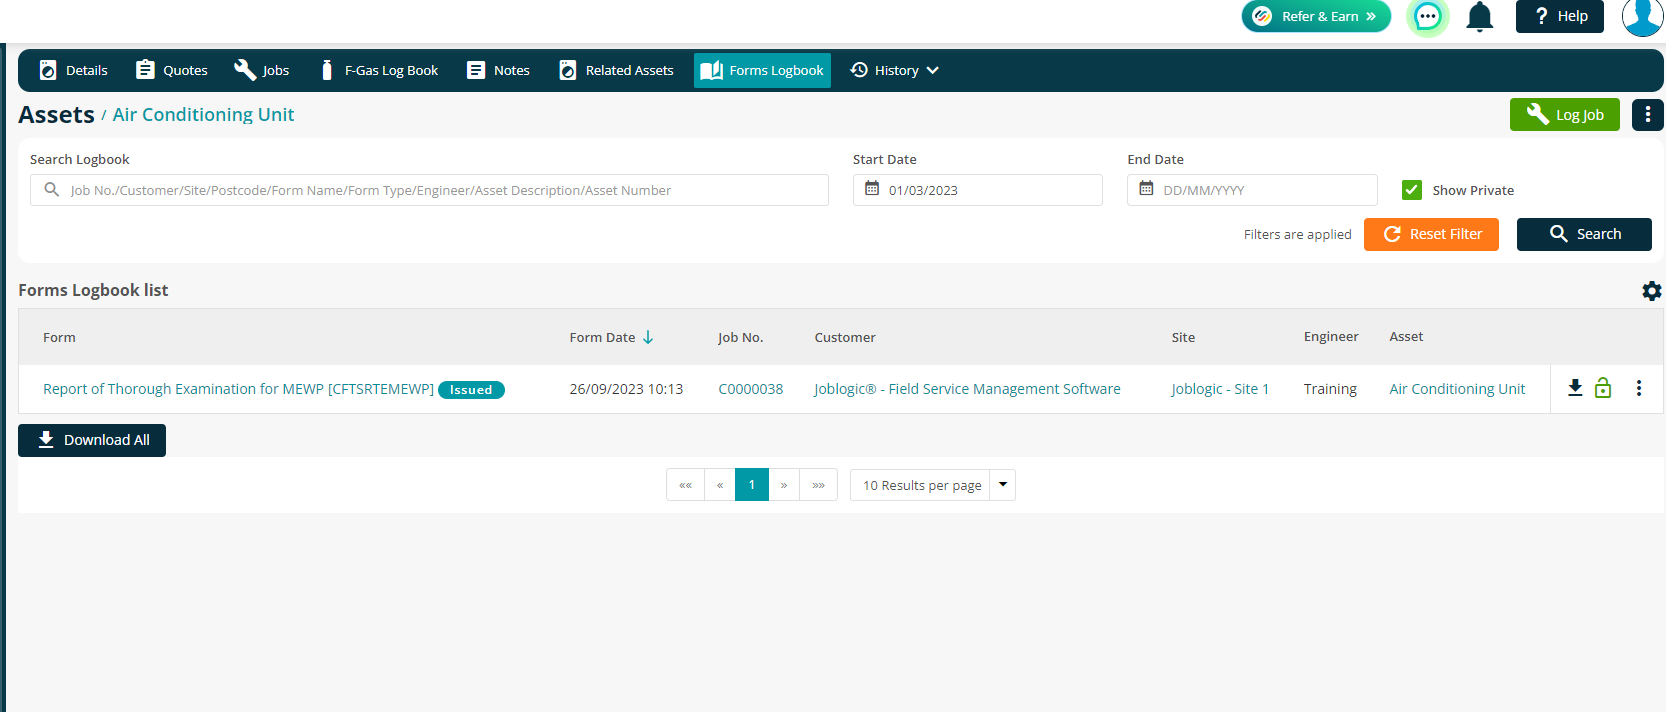
Forms Logbook
This page is a handy list of all forms completed by your engineers, for this asset.
You can easily view, download or mark forms as Private.
History - Moving History
This page will allow you to see an Audit of the asset moving history from one site to another.

History - Audit
Any changes you make to a Asset record are tracked. In this section of the Asset record you will find a list of all changes that have been made with a name, a time stamp and details of what was changed.
To see the details of what was changed, click the Audit Type description.

Further Support
For further information or assistance with the above, contact our Support Team on 0800 326 5561 or email support@joblogic.com. Alternatively, our Customer Success Management team can be reached by emailing customersuccess@joblogic.com
Publishing Details
This document was written and produced by Joblogic’s Technical Writing team and was last updated on the date specified above. Be aware that the information provided may be subject to change following further updates on the matter becoming available. Additionally, details within the guide may vary depending on your Joblogic account’s user permissions.