Introduction
The Advanced Equipment Hire Module builds on the core hire functionality to provide greater control, visibility, and flexibility across your hire operations. In addition to standard contract creation, invoicing, and on-hire tracking, the Advanced module includes a range of tools designed to help you manage assets, financial performance, and operational processes more effectively.
Key features include:
- Bulk Asset Import
- Cross Hire Management
- Hire Assets on Jobs and PPM Contracts
- Off-Hire Asset Management
- Asset Depreciation
- Hire Dashboard Reporting
Together, these features help you maintain accurate asset records, improve financial oversight, streamline hire processes, and gain greater visibility into the performance of your hire operation.
This guide will walk you through each feature, helping you get the most from the Advanced Equipment Hire Module.
If you are looking for guidance on the standard version of Equipment Hire, you can access the guide here.
Bulk Asset Import
The Bulk Asset Import feature allows you to quickly add multiple hire assets into the system using a structured Excel template. This helps streamline setup and ensures asset data is captured accurately and consistently.
To import your hire assets, click Hire Assets and select the Import option in the top right.
.jpg)
Click 'this template' to download the Excel file.
.jpg)
Add your asset data to the template, then return to the import screen and click Upload File.
.jpg)
Once your file has been uploaded, click Request Import.
.jpg)
You'll receive a notification once the import has either completed successfully or failed.
To review any errors or issues, navigate to Settings > History of Imports.
.jpg)
.jpg)
Cross Hire Management
The Cross Hire feature allows you to hire equipment from a supplier and then supply it to your customer through a standard Hire Contract.
This is useful when the required asset isn’t available in your own fleet, while still allowing you to track the equipment and maintain visibility of costs and margins.
Adding a Hire Supplier
Before creating Cross Hire Purchase Orders, the supplier must be marked as a Hire Supplier in the system.
Navigate to Settings > Library > Suppliers
.png)
To mark an existing supplier as a Hire Supplier, click the Supplier Name to open the record.
Click edit, tick the Is Hire Supplier checkbox and save.
.png)
Alternatively, if the supplier does not already exist in the system, click the Add Supplier button.
Enter the supplier details as required and tick the Is Hire Supplier checkbox before saving.
.png)
Creating a Hire PO
A Hire PO is used to request equipment from a Hire Supplier for a specific Hire Contract.
To create a Hire PO, navigate to Hire Contracts > All Hire Contracts
.png)
Open the relevant Hire Contract, then select the Hire PO tab at the top of the page.
Click Add Hire PO to begin.
.png)
Enter the Supplier and Delivery Address information.
Use the Show Hire Supplier Only checkbox to filter your list.
Additional fields can be completed if required but are not mandatory.
.png)
Add Hire PO Items
Once the Hire PO has been created, you can add the equipment that will be hired from the supplier.
Select the Hire PO Items tab and click Add Items.
.png)
Select the required equipment from the dropdown list and complete any additional fields as needed.
Entering the Hire Rate (Cost) and Markup will automatically calculate the Cross Hire Rate (Price).
.png)
Mark the Equipment as Delivered
Once the supplier delivers the equipment, the item must be marked as delivered within the Hire PO.
Click the 3 dots next to the item, and then select Deliver.
.png)
Confirm or amend the delivery details, then click Save.
.png)
Once an item is delivered, the system automatically creates a Cross Hired Asset, which can then be added to the Hire Contract.
Add a Cross Hired Asset to a Hire Contract
To add a Cross Hired Asset to a contract, navigate to Hire Contracts > All Hire Contracts
.png)
Open the relevant Hire Contract, then select the Hire Items tab.
Click Add Hire Items.
.png)
Tick the checkbox Show Cross Hire Assets Only to filter the list and display only assets that have been received through Cross Hire Purchase Orders.
.png)
Select the required Cross Hired Asset from the list and complete any additional details if required.
Click Save to add the asset to the Hire Contract.
Important Notes
- Only delivered items from a Hire PO will appear in the Cross Hire Asset list.
- Cross Hired Assets are linked to their supplier and Hire Purchase Order for full traceability.
- The Cross Hire Rate (Price) applied to the contract is based on the cost and markup defined when the item was added to the Hire PO.
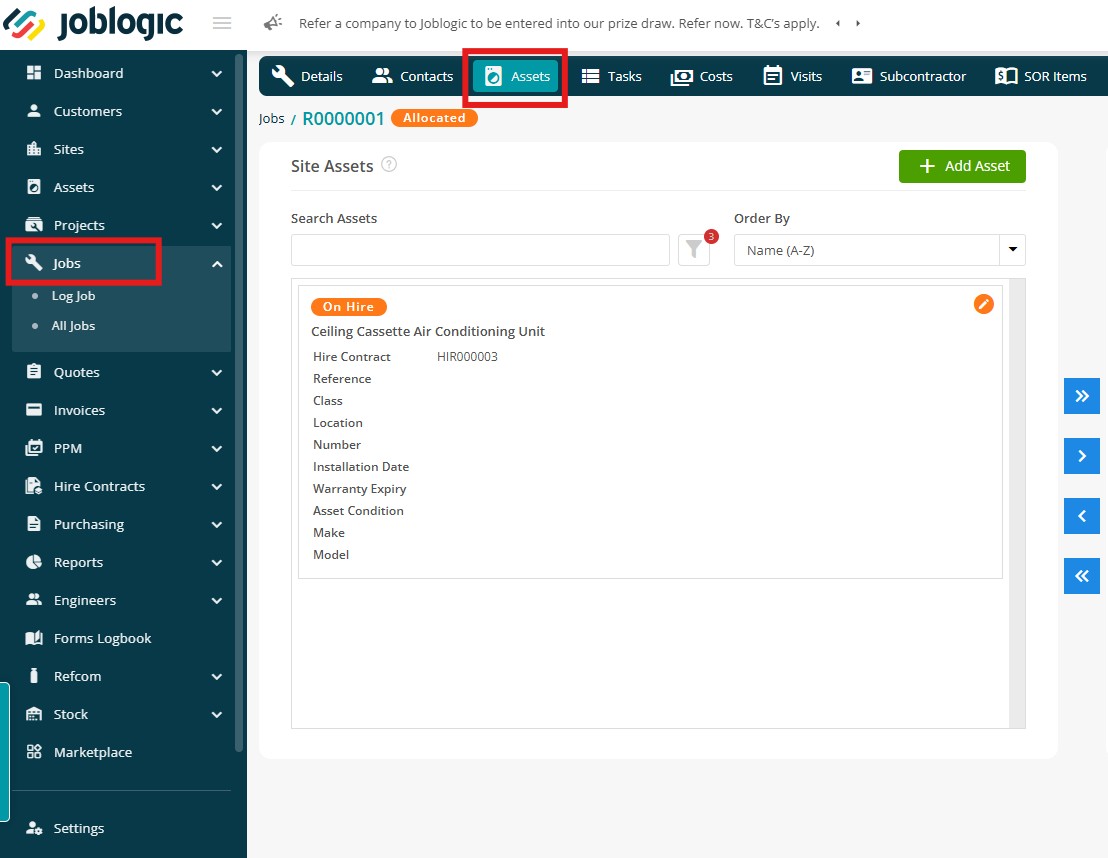
Hire Assets on Jobs & PPM Contracts
Hire assets can be assigned directly to Reactive Jobs and PPM Contracts, providing visibility and control when managing equipment alongside maintenance activities.
This ensures that you can clearly see which assets are in use, their current hire status, and the associated hire contract within the context of the job or contract.
Assigning Hire Assets
Hire assets can be assigned in the same way as standard assets across the system.
Reactive Jobs
Navigate to Jobs > All Jobs > select Job Number > Assets tab
PPM Contracts and Visits
Navigate to PPM > All PPM Contracts > select PPM No > Visits tab > Add/Edit your visit > Assets
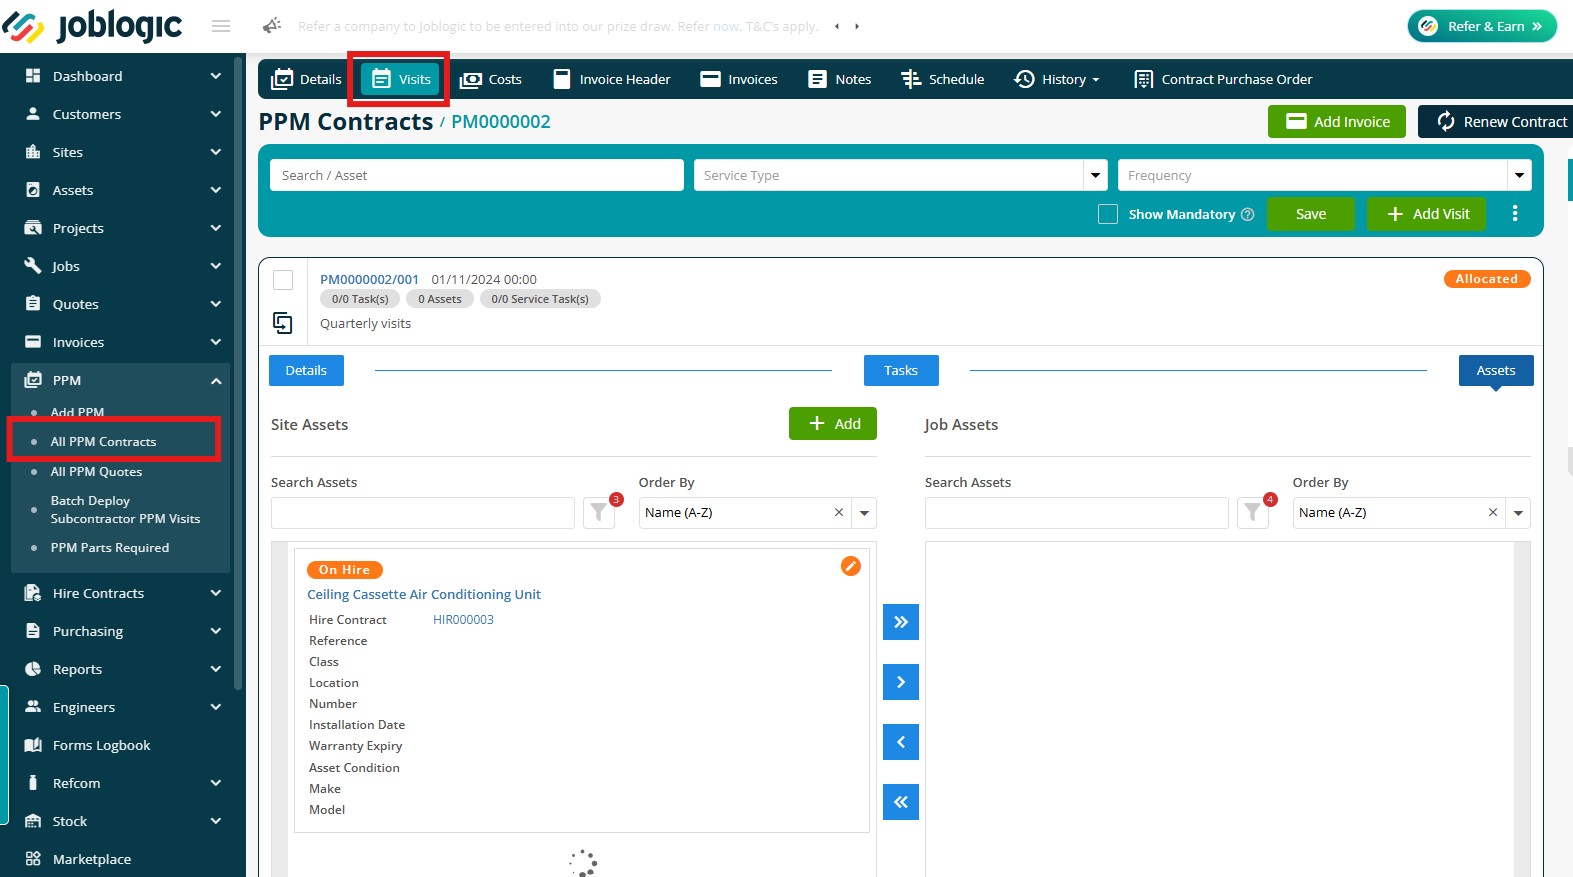
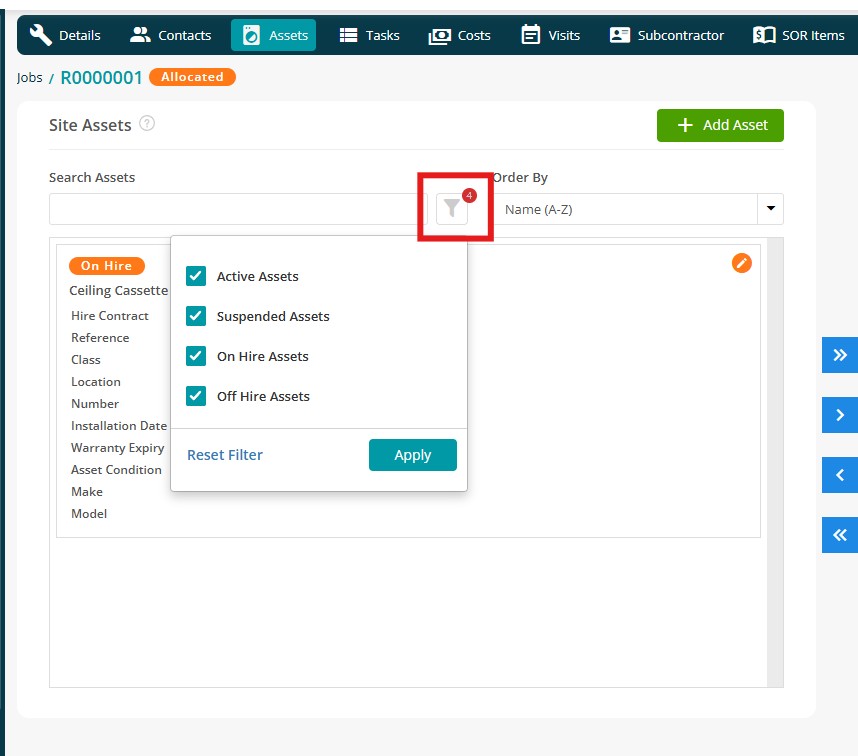
Within the Assets tab, hire assets are displayed alongside standard assets, and you can filter the asset list using the available options:
- Active Assets
- Suspended Assets
- On Hire Assets
- Off Hire Assets
For each hire asset, the following information is available:
- Current hire status
- A clickable Hire Contract reference, allowing you to quickly open the associated contract
.jpg)
Filters
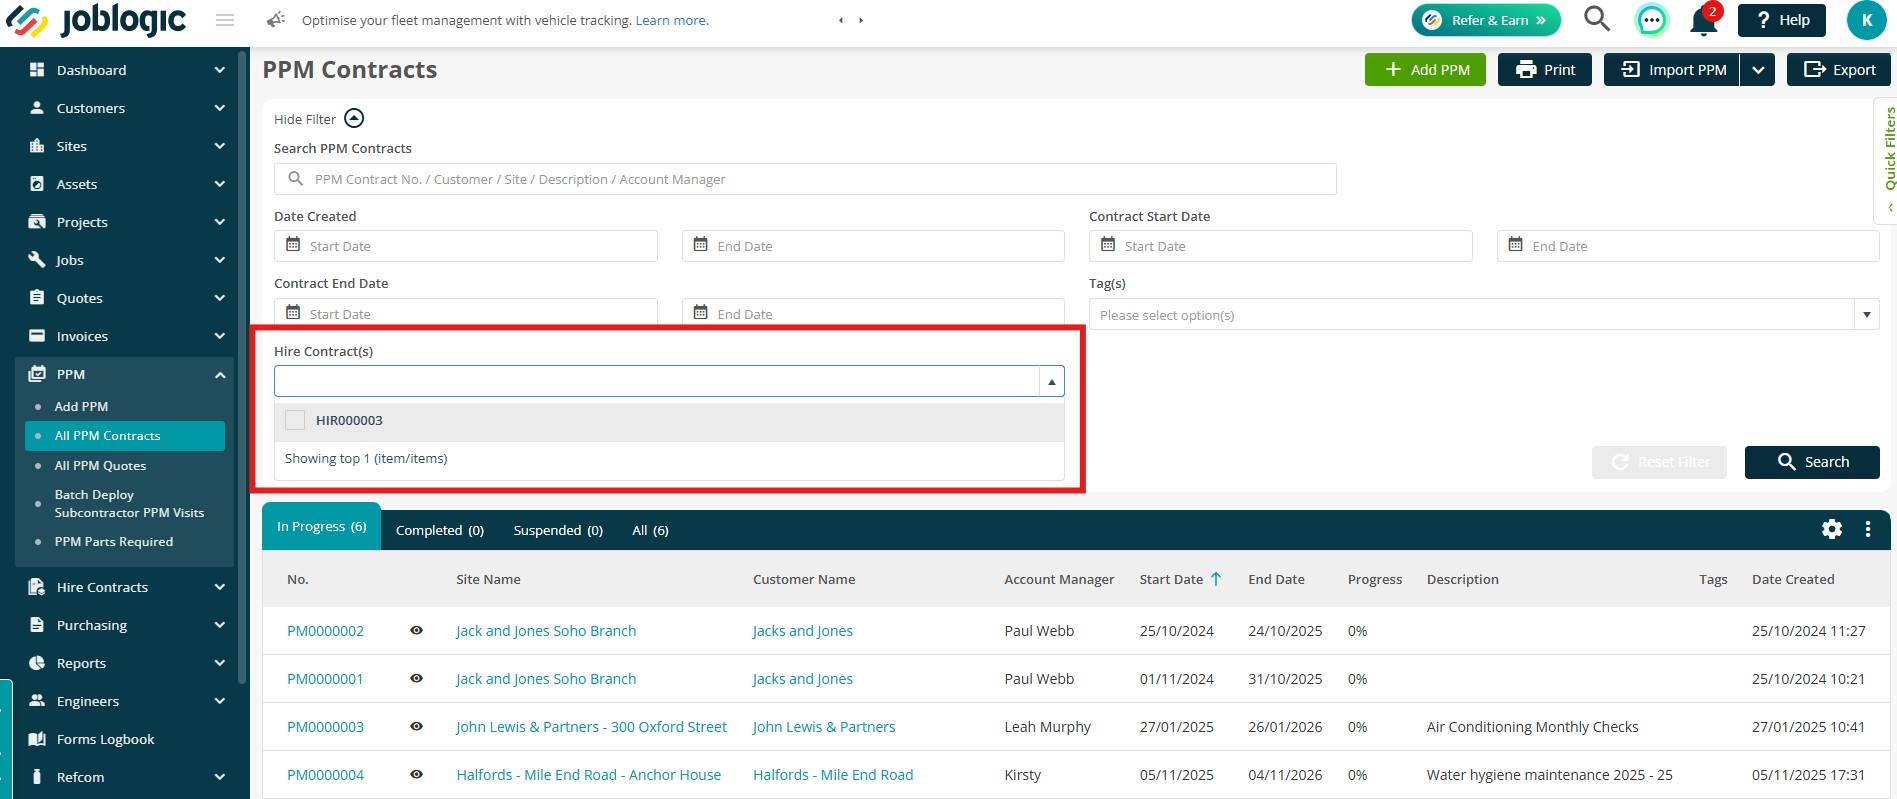
Filtering options are available across key areas of the system to improve visibility between hire activity and operational work.
On the All Jobs and All PPM Contracts pages, you can filter records by Hire Contract (under Show Advanced)
This allows you to quickly identify jobs and PPM contracts associated with specific hire agreements.
.jpg)
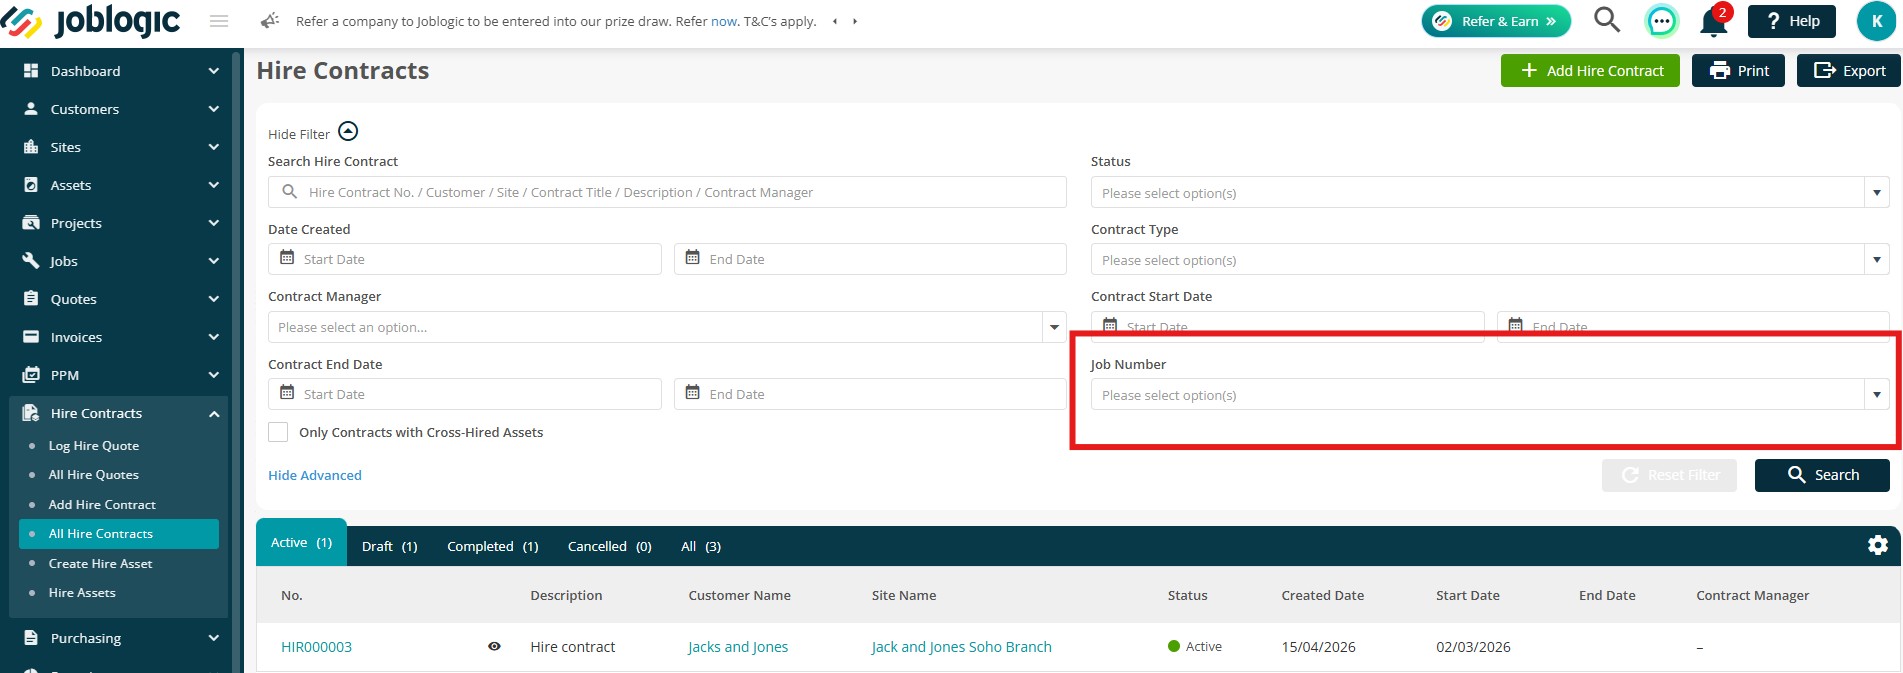
On the Hire Contracts page, you can also filter by Job Number, making it easier to trace which hire contracts are linked to specific jobs.
Off-Hire Asset Management
Marking an asset as Off-Hire
To mark an asset as Off Hire, navigate to Hire Contracts > All Hire Contracts and select the relevant contract.
Next, open the Hire Items tab and click the 3 dots next to the relevant asset, then select Mark as Off Hire.
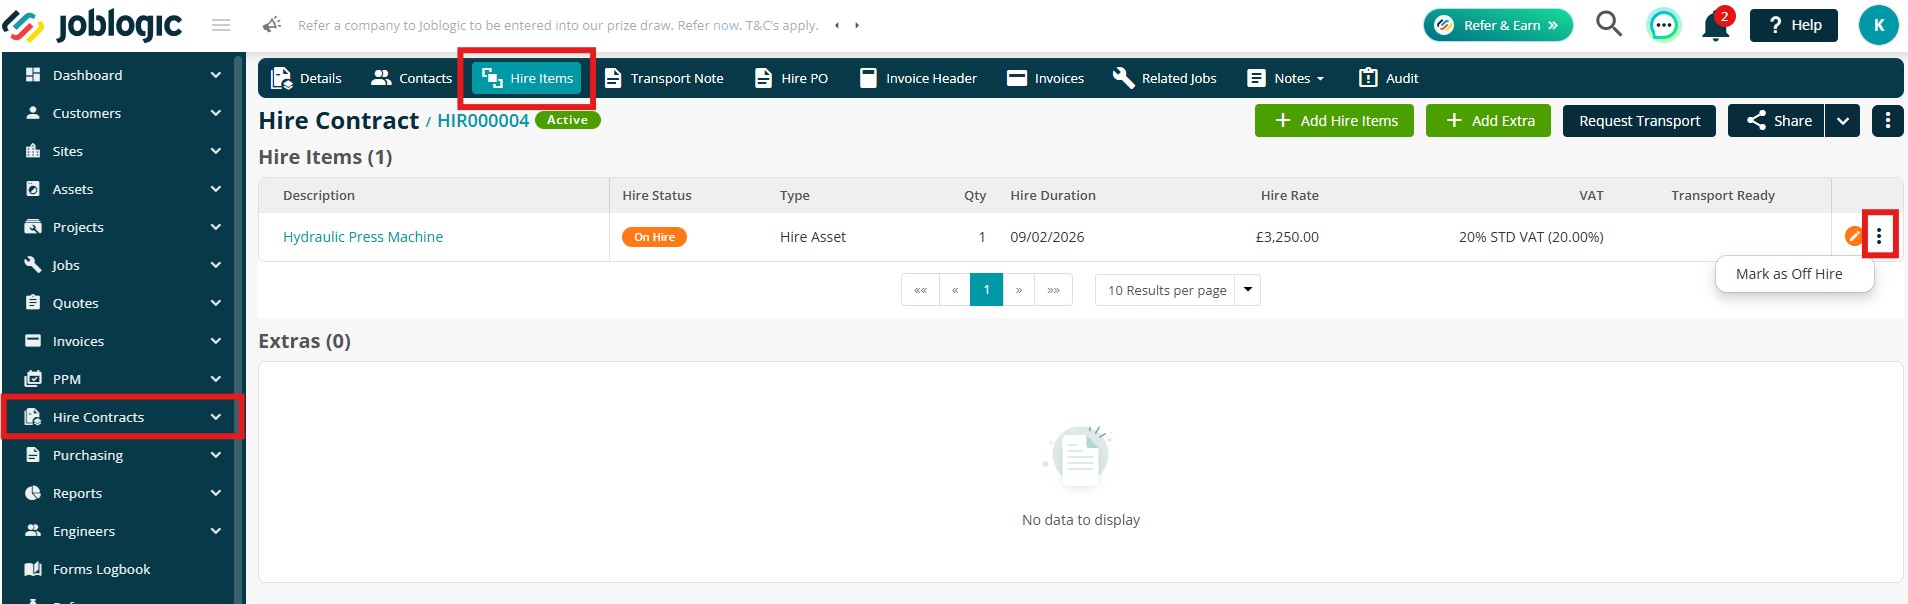
A confirmation pop-up will be displayed showing the impacted jobs, including any affected Job and Visit details.
You will also have the option to redeploy any related incomplete visits.
Click Confirm to proceed.
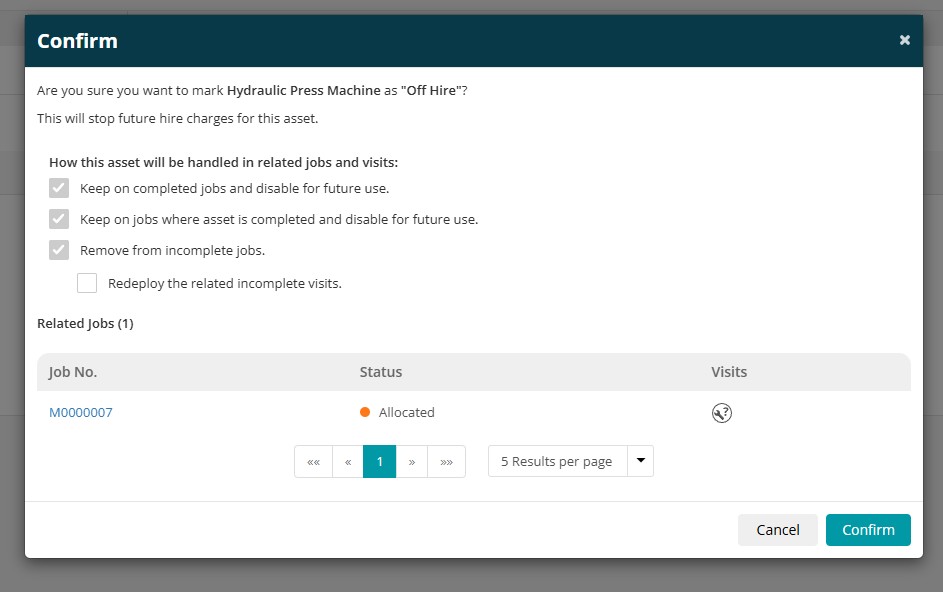
Job and Visit Rules
When an asset is marked as Off Hire, the system automatically manages its relationship with linked jobs and visits to ensure scheduling accuracy and data integrity.
The following rules apply:
- Assets linked to jobs in New Job status are automatically removed.
- Assets linked to completed visits remain recorded for historical purposes but are disabled for future use.
- Off Hire assets are no longer available for selection on active or future visits.
Redeployment of Visits
As mentioned above, where incomplete visits are impacted, you can choose to redeploy them during the Off Hire confirmation process. This allows scheduling to be updated without manual recreation of visits.
Audit Trail
All automatic removals and updates triggered by Off Hire actions are recorded in the system audit trail for full traceability.
Asset Depreciation
Depreciation allows you to track the reduction in value of your tenant-owned hire assets (My Assets) over time.
Using the straight-line method, the system reduces the asset’s value evenly across its useful life and automatically updates the Book Value, helping maintain accurate asset records and reliable financial reporting.
How to enable Depreciation on a Hire Asset
Navigate to Hire Contracts > Hire Assets or Create Hire Asset
.png)
Within the asset record toggle the Depreciation button to enable the feature.
.png)
Complete the required depreciation fields.
Click Save once you are happy with the asset details.
.png)
Pause / Resume Depreciation
In some cases, you may need to temporarily stop depreciation on an asset. For example, if the asset is taken out of use, under review, or requires financial adjustment.
To do this, open the relevant asset within Hire Contracts > Hire Assets
Click Pause Depreciation in the top right.
.png)
Confirm the action.
.png)
Your asset is now paused and you can resume if required.
.png)
.png)
Important Notes
- Residual value must be less than the purchase price.
- If no residual value is entered, the system defaults to zero.
- If a depreciation rate is entered, this rate is used in calculations.
- If no depreciation rate is entered, the system calculates the rate automatically using useful life and residual value.
- If no depreciation fields are completed, the asset status will show as Not Started/Awaiting Start.
Hire Dashboard Reporting
The Hire Dashboard provides a clear, visual overview of key performance metrics across your hire operations. It brings together important data such as asset utilisation, contract performance, and cross hire spend into a single, filterable view.
This helps you quickly identify trends, monitor profitability, and make more informed operational decisions without needing to review multiple reports or screens.
To take a look head over to Hire Contracts > Hire Dashboard
.png)
You can filter your dashboard using the dropdown options along the top.
.png)
The summary cards along the top are clickable and will take you to a more detailed overview. From here, you can view the details and navigate directly to the relevant Hire Contracts or Quotes.
.png)
.png)
Further Support
For further information or assistance with the above, contact our Support Team on 0800 326 5561 or email support@joblogic.com. Alternatively, our Customer Success Management team can be reached by emailing customersuccess@joblogic.com
Publishing Details
This document was written and produced by Joblogic’s Technical Writing team and was last updated on the date specified above. Be aware that the information provided may be subject to change