Introduction
Welcome to the comprehensive guide on importing jobs into JobLogic field management software.
This guide is designed to assist you in efficiently importing job items within Joblogic, using the job import template.
Additionally, it will offer detailed instructions on rectifying common errors that may occur during the import process. By following the steps outlined in this guide, you can streamline the job management workflow and ensure accurate data integration into the system.
Let's dive in and simplify the job import process for enhanced efficiency and productivity.
Permissions
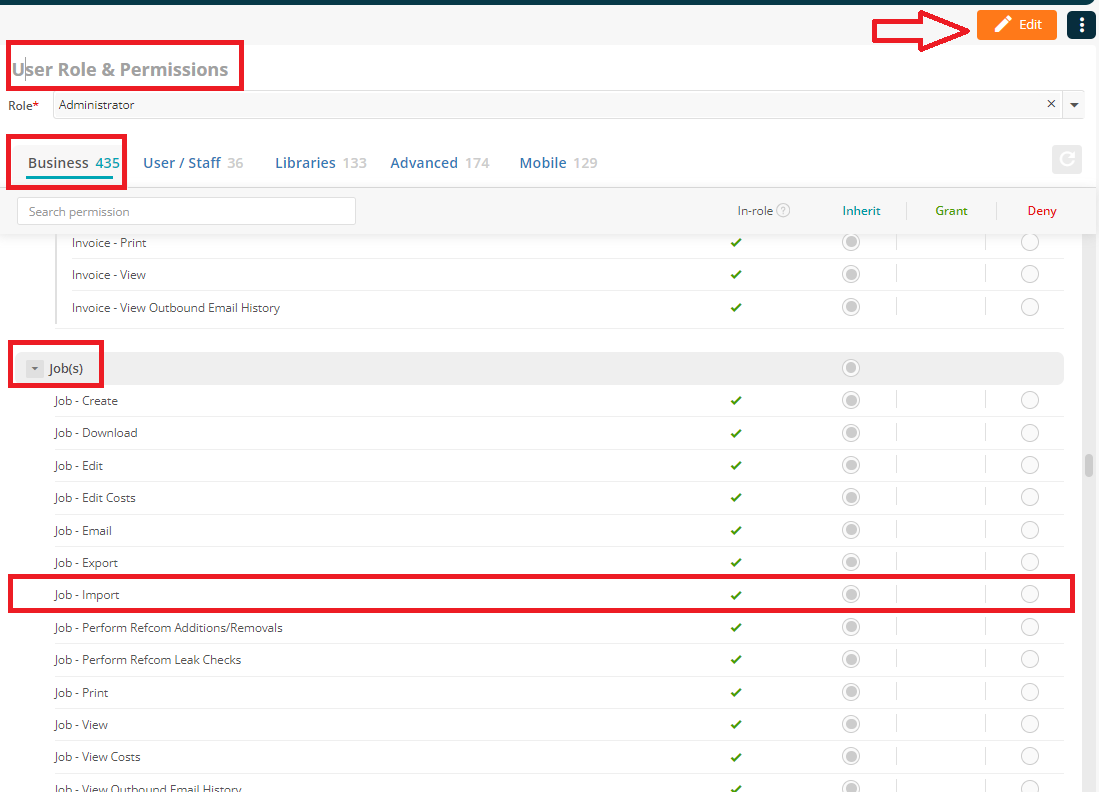
To grant or remove the permission to import jobs, navigate to the ‘Users’ page by clicking ‘Settings’ within the left navigation pane, and select ‘Staff’.
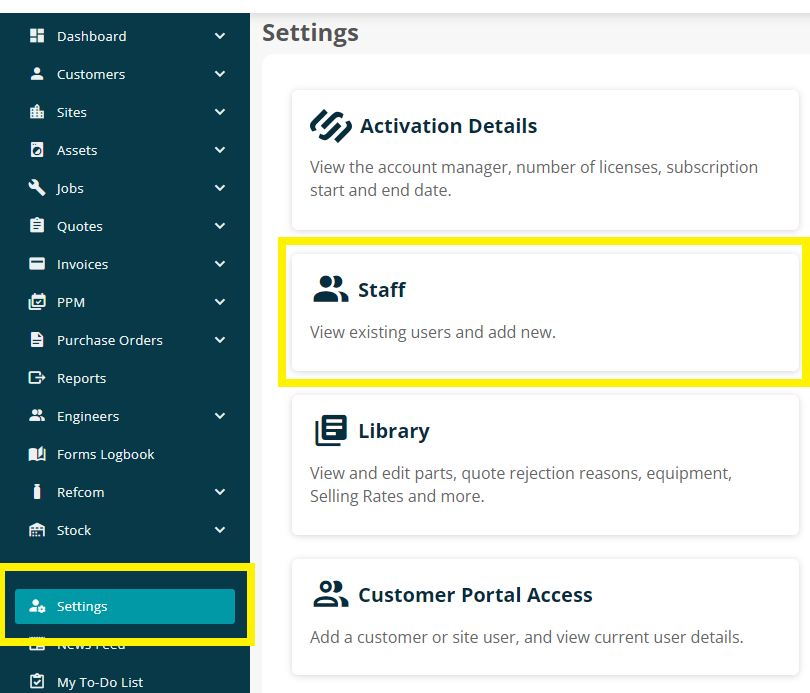
Select a user from the ‘Staff List’. This will direct you to the ‘User Details’ page of the selected user.
Under the ‘Business’ section, ensure the Job - Import has either a green tick, or the Grant column is selected
How to download the Job Import template
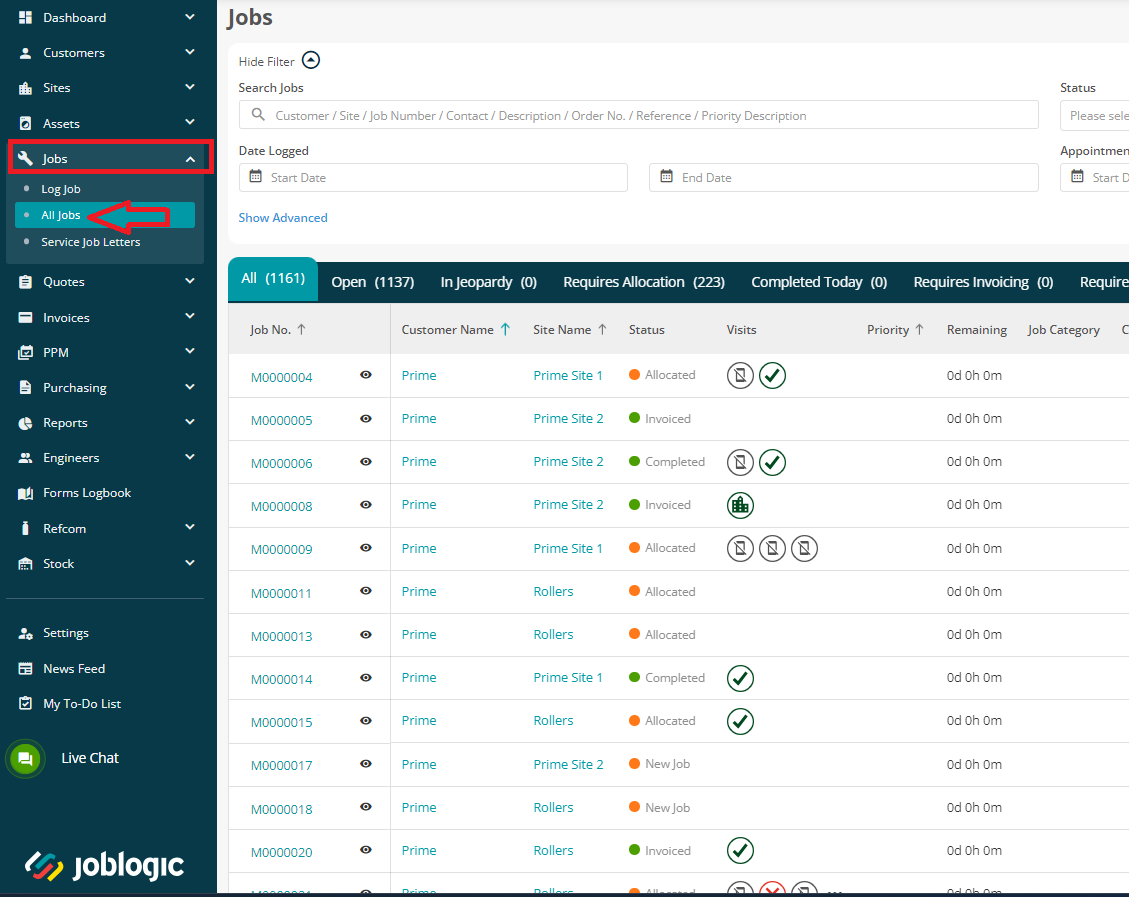
Navigate to the ‘All Jobs’ page by clicking All jobs option within the left navigation pane.

Next, click on the Import button at the top right corner of the page, and then click Download Template

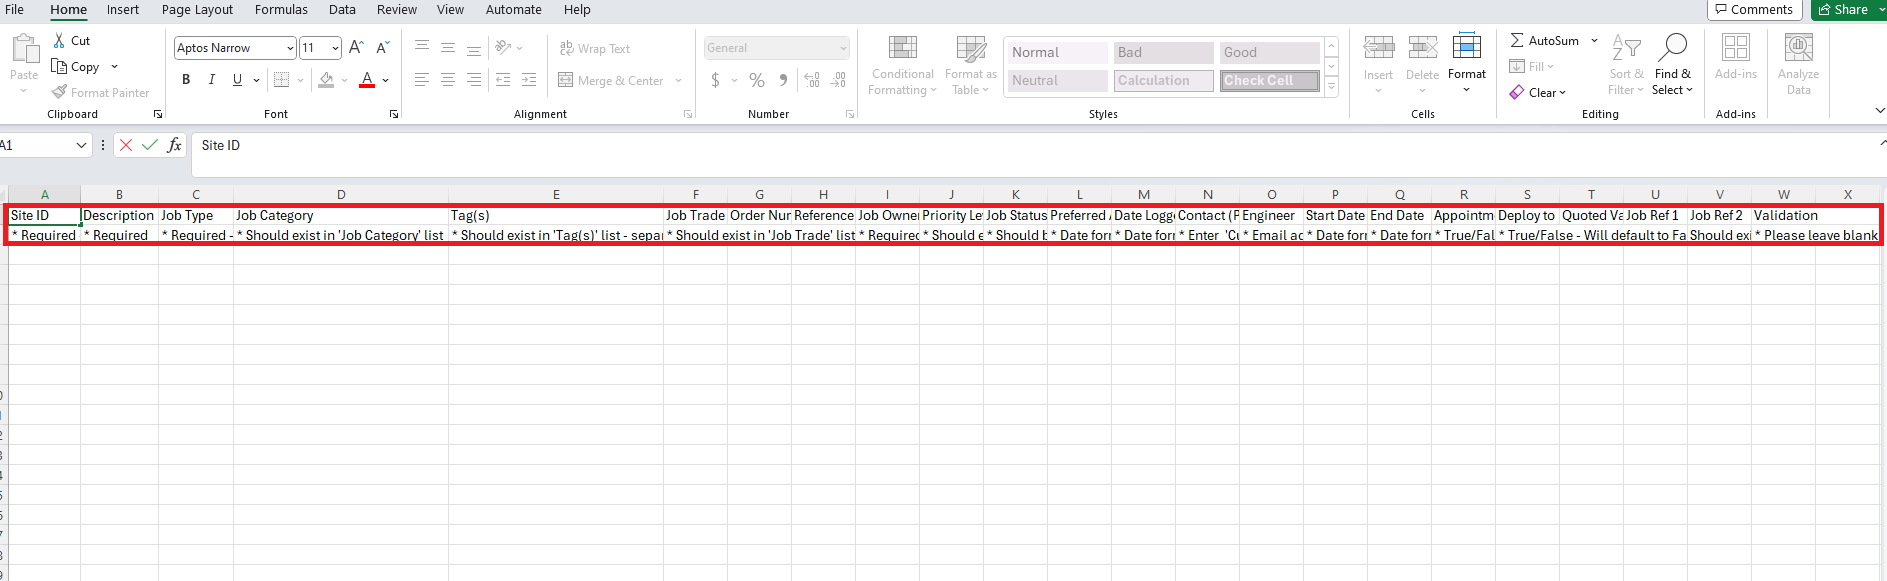
Doing this will download a CSV (comma-separated values) Format spreadsheet in your system (generally in the Downloads folder).
Once the sheet is opened, there will be a few columns listed in the first row and the second row details the explanation and the information required for the respective column.
How to fill in the Job Import template
There are a few points that should be kept in mind while filling out the template.
- The data should be entered starting from the third row.
- The first two rows should not be edited or removed otherwise it will fail the import.
- In the second row if it is marked as 'Required' then it means it is mandatory to fill out the information for that column. However, further in this guide each column will be explained for clarity.
- When it comes to cost-related columns, no currency sign should be added.
Template Columns
Site ID: Mandatory
This refers to the ID of the site against which the job will be imported. The site IDs can be obtained by navigating to the Reports page and then clicking on the Dynamic Reports option within the left navigation pane.
Find the ‘All Sites’ report and then click on the eye icon to preview it.
The IDs must be copied from the report and pasted on the job import template under the Site ID column, ensuring that the job-related data added in the row will be imported against the site of which the ID is used.
To read more about getting this Site ID, click here.
Description: Mandatory
This is the description of works to take place on the job.
Job Type: Mandatory
The highest level of categorization of the job that is being carried out at a site. E.g., Call out, Installation, Maintenance, Out of Hours, Reactive or Non-Productive etc.
The Job Type is required to be filled in and will need to exist in your Joblogic library. If not, then navigate to Settings > System Setup > Number Convention to set the Job Type up first. Click here to read more about setting this up.
Job Category: Not mandatory
Further details of the job being carried out can be added here.
This can help with reporting, searching and scheduling. E.g., AC - Leak, Boiler - Leak, Alarm Sounding, Roof - Leak or Plumbing, AC, Gas & Heating.
This column can be left blank as it is a non-mandatory column. If you do want to add a Job Category here, the Category should exist in your Joblogic Library.
Navigate to Settings > Library > Misc > Job Categories if you need to add one to your account before completing the import template.
Tag(s): Not mandatory
This column can be left blank as it is a non-mandatory column. A tag is a label attached to something for identification or to give further information.
In joblogic it also helps for filtering purposes. Again, if you’d like to add a tag here, you’ll need to make sure it exists in your Library already via Settings > Library > Tags
Moroever, you can add multiple tags and associate them with the job.
You will need to add them as comma separated and without spaces. For example, if you want to add multiple tags to the job then in the tags columns we can type in as Afternoon,Priority,Silver for example.
Job Trade: Not mandatory
This column can be left blank as it is a non-mandatory column. This represents the engineer trades (skills) like electrical, mechanical, etc.
If you do want to add a Job Trade here, the Trade should exist in your Joblogic Library.
Navigate to Settings > Library > Engineer Trades if you need to add one to your account before completing the import template.
Order Number: Not mandatory
This column can be left blank as it is a non-mandatory column and is for reference purposes. This is typically used as a reference or purchase order number sent by the customer.
It will reflect against the Customer Order Number field on the job details page.
Reference Number: Not mandatory
This column can be left blank as it is a non-mandatory column and is for reference purposes. This is an additional identifier you may want to give the job internally.
Once the job is imported, then it will reflect against the Reference Number field on the job details page.
Job Owner: Mandatory
The job owner is the user who is taking responsibility for the job (can be different from the user who logged it). Once the job is imported, then it will reflect against the Job Owner field on the job details page.
While adding the data against this column in the import template, only staff members added via Settings > Staff can be used, and the email address of the staff member should be added under this column. The staff members include Backoffice, Engineers, and Non-Login users.
Priority Level: Not mandatory
Priority Level also termed as Job KPIs are an agreed response/attendance timescale. This will display and count down hours, displaying alerts at different jeopardy times.
This column in the import template can be left blank as it is a non-mandatory column.
If you do want to add a Priority Level here, the Priority should exist in your Joblogic Library.
Navigate to Settings > Library > Priorities if you need to add one to your account before completing the import template.
Click here to read more about setting up Priorities.
Job Status: Not mandatory
This refers to the job status preferred once imported via the import template.
You will need to enter an existing Status:
-
- New Job
- Allocated
- Attended
- Awaiting Parts
- Parts to Fit
- Completed
- Costed
- Reqs. Invoice
- Invoiced
- Cancelled
- Paid
- Recall
To know more about the job statuses, refer to our guide here.
Preferred Appointment Date: Not mandatory
This column can be left blank as it is a non-mandatory column. The ‘Preferred Appointment Date’ refers to the desired time and date discussed with or asked for by the customer.
If you are entering a Preferring Appointment Date, the date format must match the system settings. Considering the UK, the format will be DD/MM/YYYY HH:mm in the import template. Example: 15/05/2024 14:20
Date Logged: Mandatory
Date logged is a timestamp showing when the job was logged. The date format must match the system settings. Considering the UK, the format will be DD/MM/YYYY HH:mm in the import template. Example: 01/05/2024 10:00
Contact (Primary): Not mandatory
The person who is the main point of connection for the job. This column can be left blank as it is a non-mandatory column.
Only ‘Customer’ or ‘Site’ can be entered here, and once the import is complete, it will take the Primary contact from the relevant area (customer or site).
To know more about adding contacts against customer/site, please refer to our guide.
Engineer: Not mandatory
This column can be left blank as it is a non-mandatory column. The email address of the relevant engineer can be found by navigating to Engineers > Engineers List.
Start Date: Not mandatory
This can be left blank at this stage.
It refers to the start date of the visit that you want to set once the job is imported via job import template. The Date format must match the system settings. Considering the UK, the format will be DD/MM/YYYY HH:mm in the import template. Example: 15/05/2024 14:20
End Date: Not mandatory / Mandatory if Start Date is added
It refers to the end date of the visit that you want to set once the job is imported via job import template. The Date format must match the system settings. Considering the UK, the format will be DD/MM/YYYY HH:mm in the import template. Example: 15/05/2024 22:00
Appointment: Not mandatory
This column can be left blank as it is a non-mandatory column. In this column only enter ‘True’ or ‘False’. If left blank, then it will default to False.
Setting it to True will automatically set the visit to confirmed and setting it to False means it requires the customer to confirm the job via the portal.
Deploy to Mobile: Not mandatory
This column can be left blank as it is a non-mandatory column. In this column only enter ‘True’ or ‘False’. If left blank, then it will default to False.
Setting it to True will automatically deploy the visit to the selected engineer and setting it to False means it requires manual deployment once the job is created.
Quoted Value: Not mandatory
This column can be left blank as it is a non-mandatory column. The Quoted Value in Joblogic is a feature that allows you to record one sell value for a job regardless of the individual cost items entered.
When a job is upgraded from a Quote, the quoted value is automatically populated. The Quoted Value is the estimated cost provided for a job or service before the work is carried out. If an amount is added in the template for this column, then the amount will appear against the job under the job costs page.
Job Ref 1 & 2: Not mandatory
This column can be left blank as it is a non-mandatory column. Job Ref 1 is a field in Joblogic that can be renamed and defined according to your preference. It is a customizable reference field that can be used to track and search for specific jobs based on the assigned reference number. Once populated, the data will show on the job details page.
To add your customizable fields, navigate to Settings > Library > User References.
You can read more about this here.
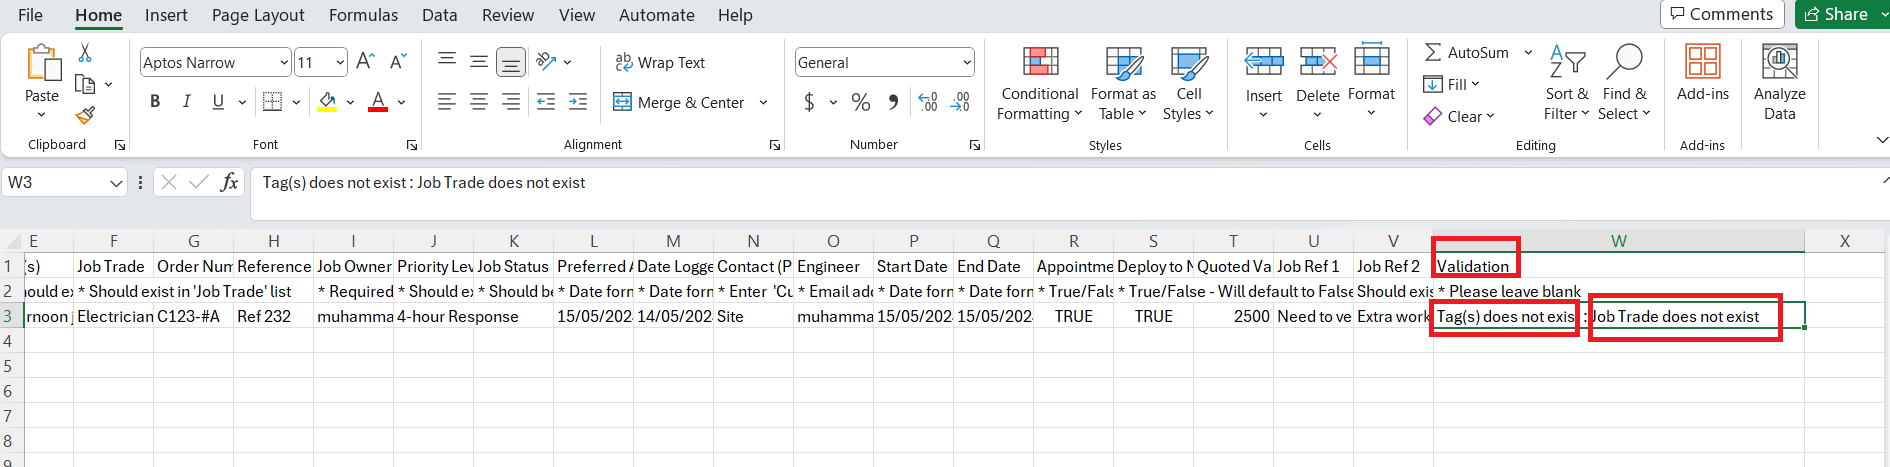
Validation:
The Validation column is a column located on the right-hand side.
It will provide information about any errors or failures in the data entered in the spreadsheet. It gives clear instructions on how to fix the errors and ensure successful data upload into Joblogic. Therefore, there is no need to input any data under this column. See below for more information on failed imports.
How to import the Job Import template
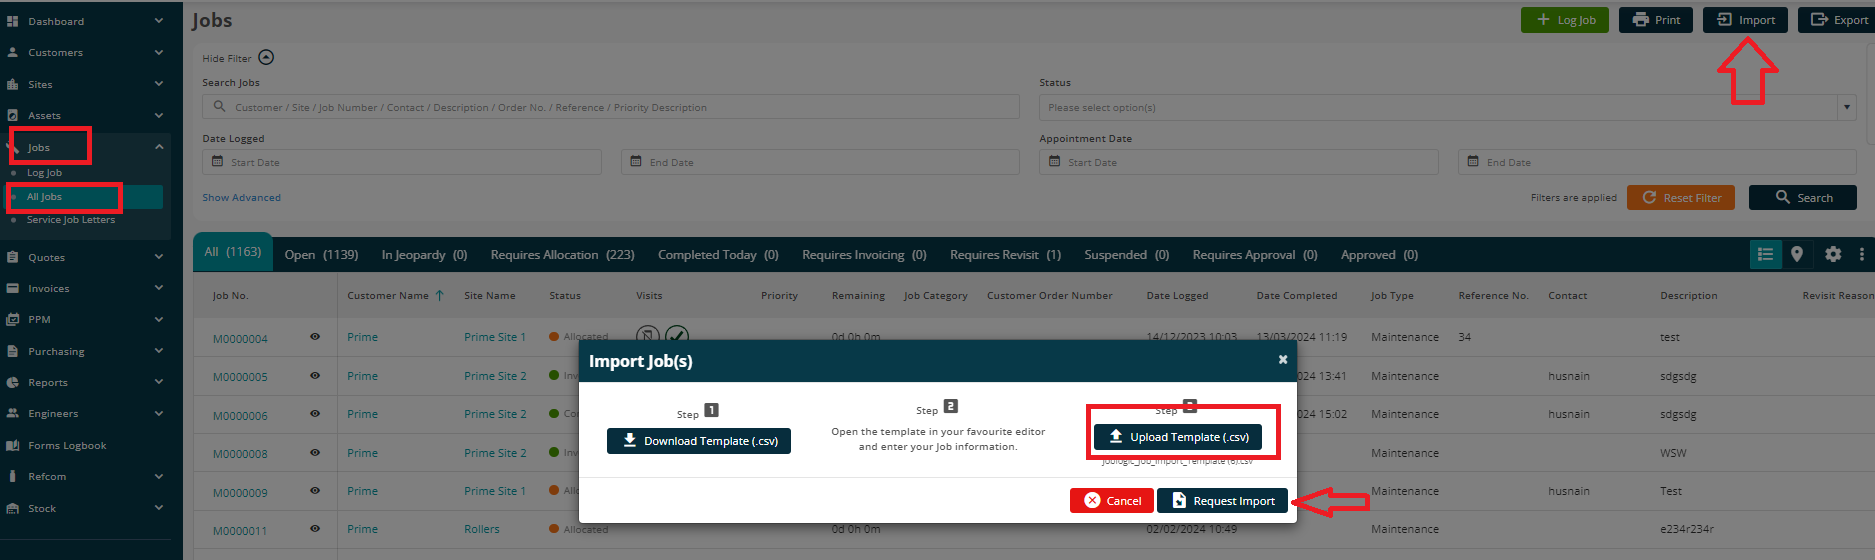
Navigate to Jobs > All Jobs
Click on the Import button at the top right corner of the page, and then click Upload Template.
Browse/locate the filled sheet and click on open once found. Finally, click Request Import.
Failed Import
After attempting an import, you will receive a notification via the Bell icon in the top right of the Joblogic page showing whether the import was a success or fail.
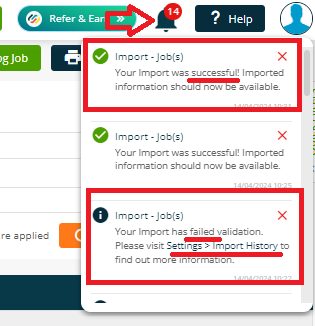
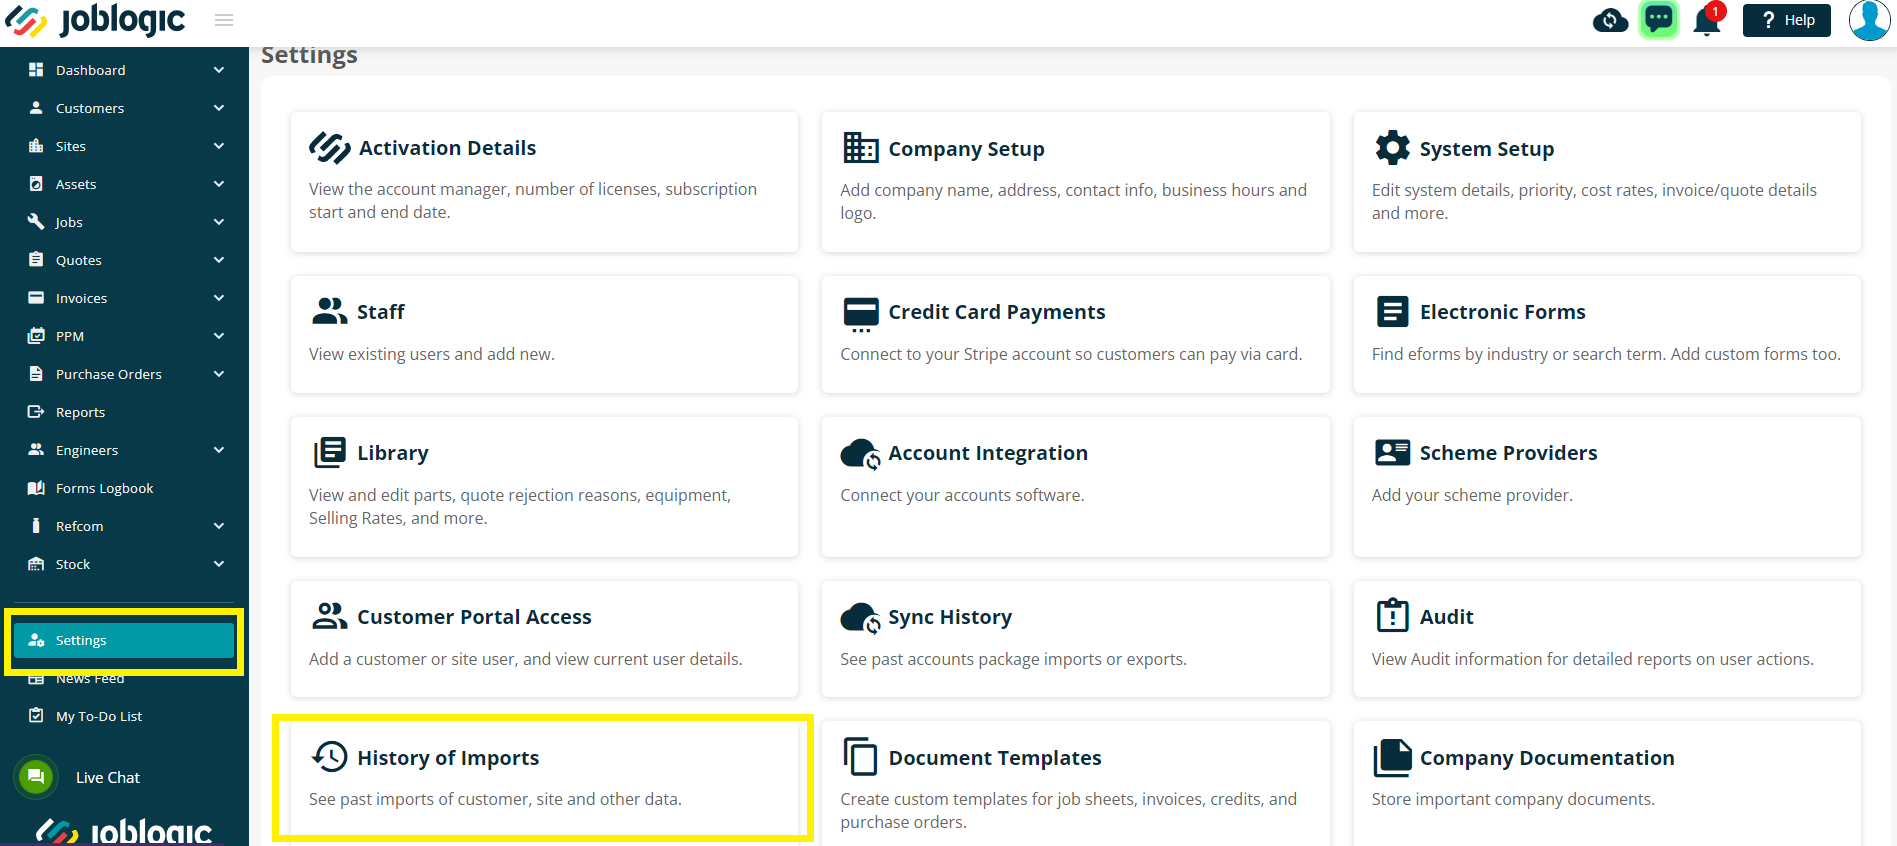
You can navigate to the Import History page, either by clicking the link within the notification, or by going through Settings > History of Imports.
Order by Import Date to get the most recent import attempt, and then click the Download button to download the file.
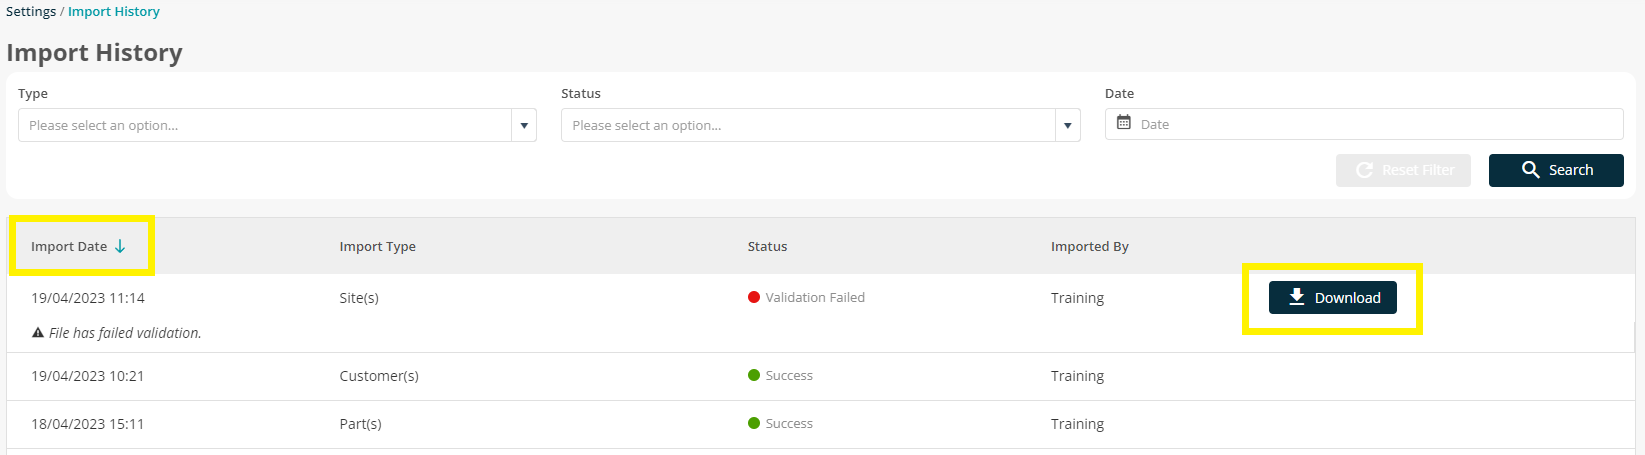
The downloaded file will show what the errors are, and which lines are affected.
Scroll to the far right of the document - ‘Validation’ will be the last column on the sheet.
The errors can be corrected on this sheet, or your original template.
If you are to amend this sheet, you will also need to remove the validation errors, so this column is left blank again. Also, it is recommended to download a fresh new template and paste the correct data into the newly downloaded file.
Further Support
For further information or assistance on the above, contact our Support Team on 0800 326 5561 or email support@joblogic.com. Alternatively, our Customer Success Managers team can be reached by emailing customersuccess@joblogic.com
Publishing Details
This document was written and produced by Joblogic’s Technical Writing team and was last updated on the date specified above. Be aware that the information provided may be subject to change following further updates on the matter becoming available. Additionally, details within the guide may vary depending on your Joblogic account’s user permissions.