Introduction
Setting and tracking Key Performance Indicators (KPIs) is crucial for operational efficiency and customer satisfaction. Joblogic offers the ability to establish and monitor job KPIs.
By defining clear priorities and grouping them effectively, businesses can ensure timely responses and successful job completions, aligning with service level agreements and customer expectations.
This guide explains how to use job KPIs in Joblogic along with its reflection on the mobile app, making it easy for businesses to prioritize tasks and meet deadlines. By setting up KPIs, you can improve your workflow and ensure that all jobs are completed efficiently and on time.
To read more about setting up your KPI's, click here.
Permissions
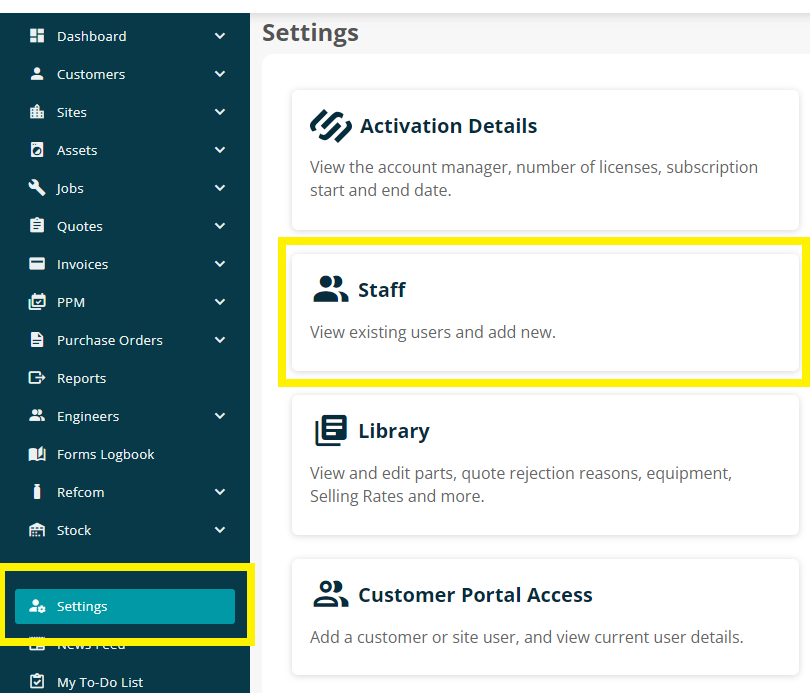
To grant or remove a user’s permission regarding Priority, navigate to the ‘Users’ page by clicking ‘Settings’ within the left navigation pane, and select ‘Staff’.
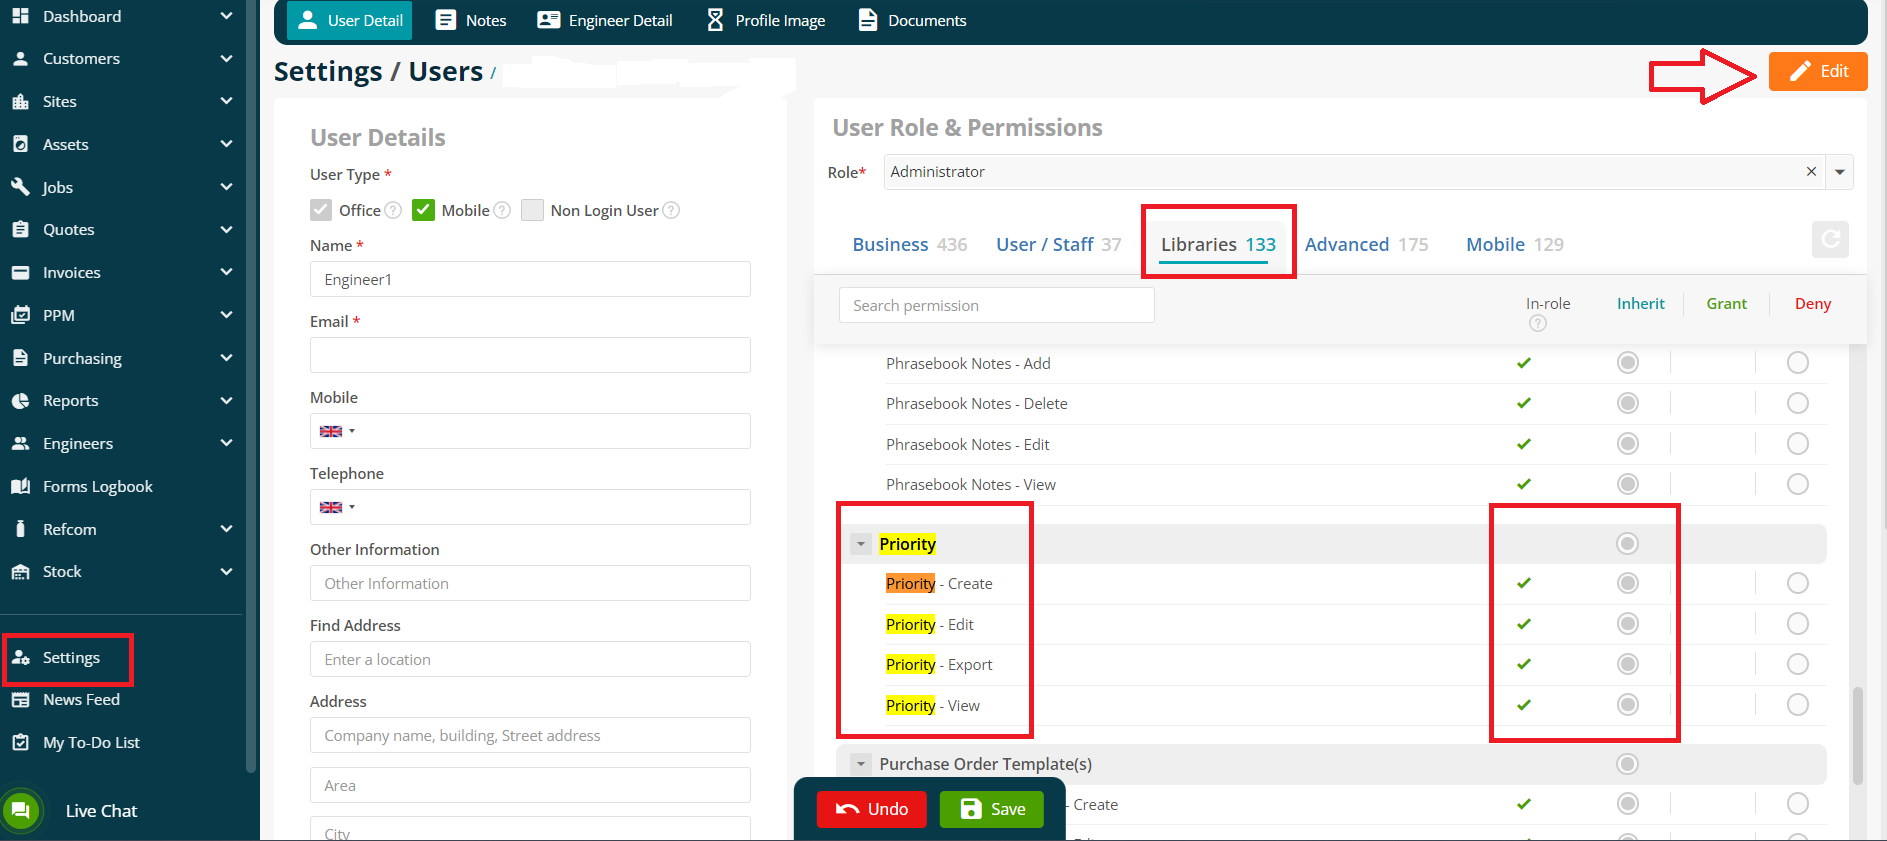
Select a user from the ‘Staff List’. This will direct you to the ‘User Details’ page of the selected user, and the ‘User Role’ this user has been assigned.
Under the ‘Libraries’ tab, ensure that the below permissions have either a green tick or the Grant column is selected:
- Priority - Create
- Priority - Edit
- Priority - Export
- Priority – View
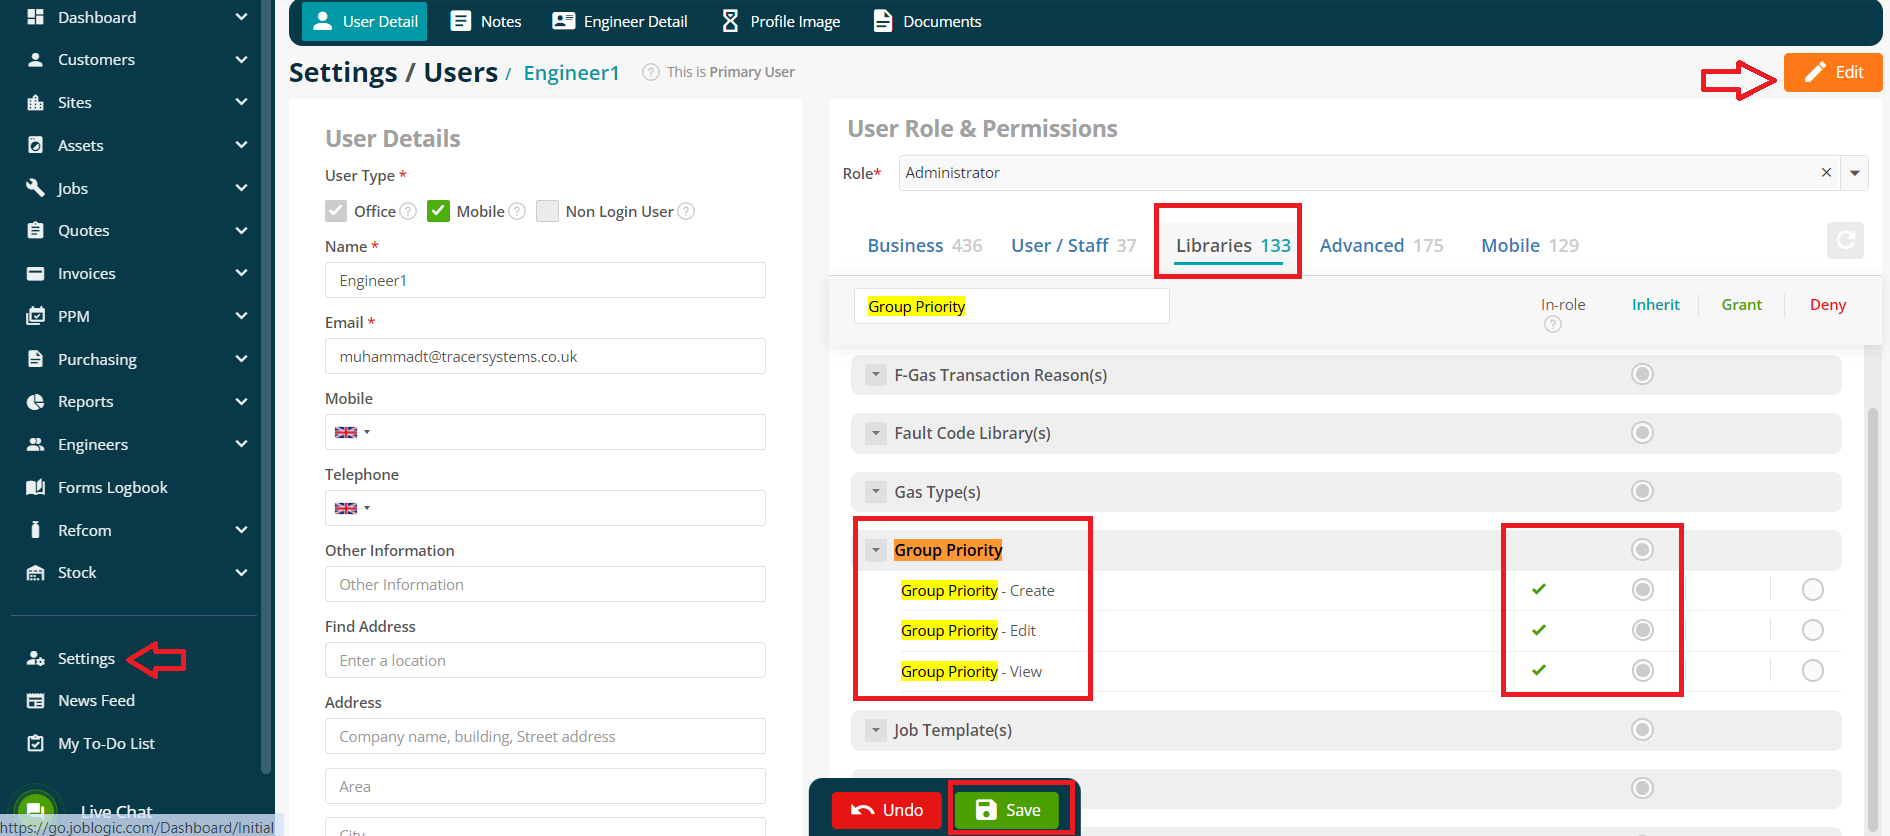
Below are the permissions for Group Priority:
- Group Priority - Create
- Group Priority - Edit
- Group Priority – View
Allocating a KPI while logging a Job
While creating a new job, a KPI can be allocated if you navigate to the Job KPIs tab/section. A drop-down will be available to select one of the KPIs that are listed under Settings > Library > Priorities.
Alternatively, click the green + sign to create a new KPI while remaining on the job creation page.

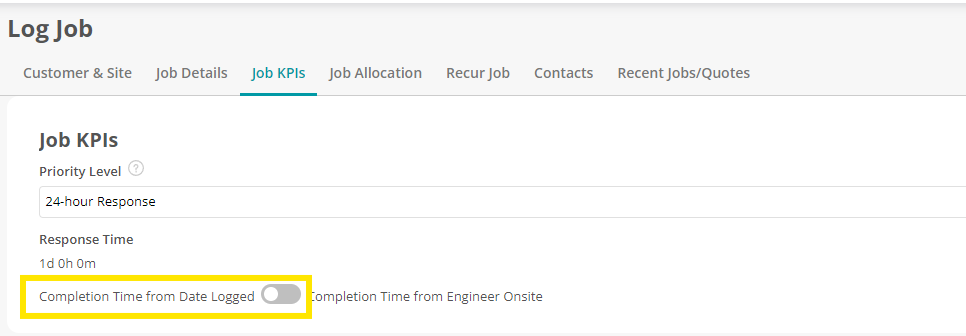
KPI Toggle options and their usage
The KPI toggle allows you to measure and track the performance of job completion based on two different metrics:
- Completion Time from Date Logged
- Completion Time from Engineer Onsite
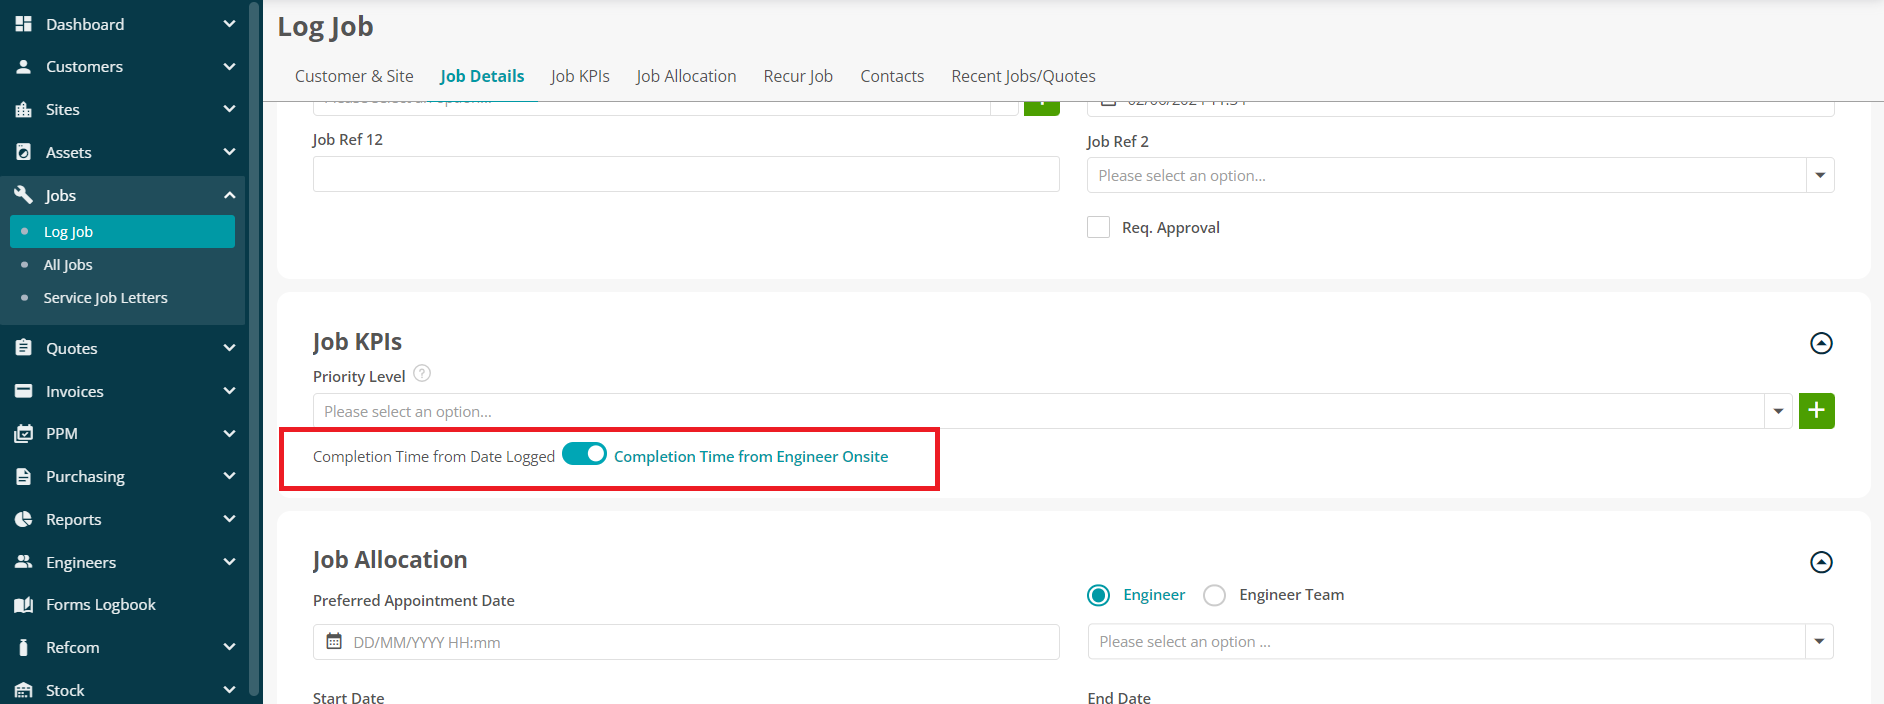
By default, it is toggled to ‘Completion Time from Engineer Onsite’ and currently, there is no option available in the system to change this default option ‘Completion Time from Date Logged’
By utilizing these two metrics, you can gain comprehensive insights into both the overall job handling process and the specific performance of your field engineering team. This dual approach enables targeted improvements in different areas of job management and service delivery.
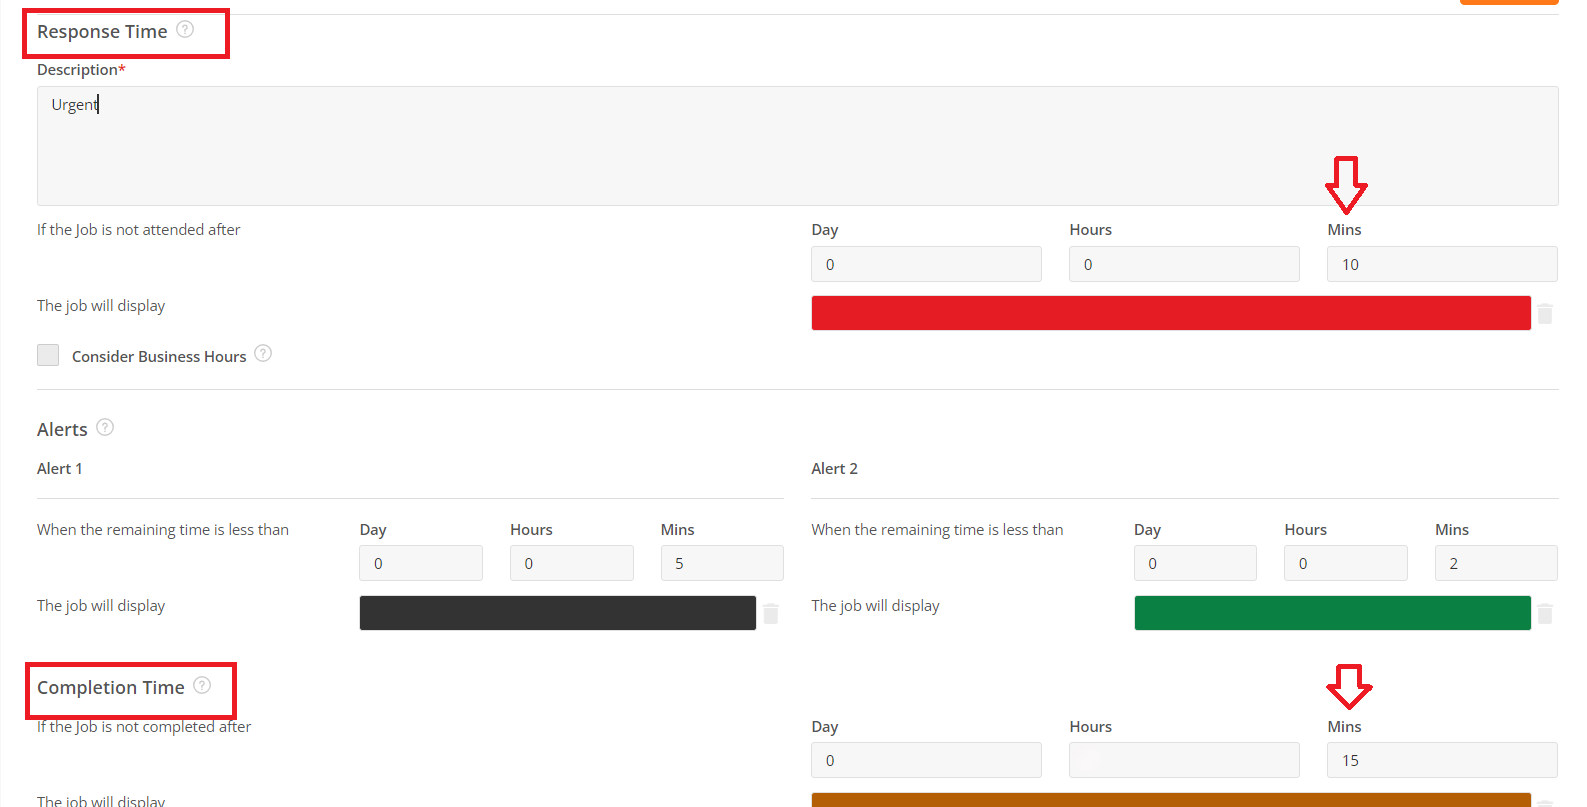
1. Completion Time from Date Logged
This metric measures the total time taken to complete a job starting from the moment the job is logged in the system. This is ideal for tracking the overall efficiency of the job handling process from start to finish.
2. Completion Time from Engineer Onsite
This metric measures the time taken to complete a job starting from when the engineer arrives on-site. This focuses on the efficiency of the job completion phase, excluding any delays that occur before the engineer starts working on-site. It can be useful for assessing the actual work time and performance of the engineering team once they are on the job location.
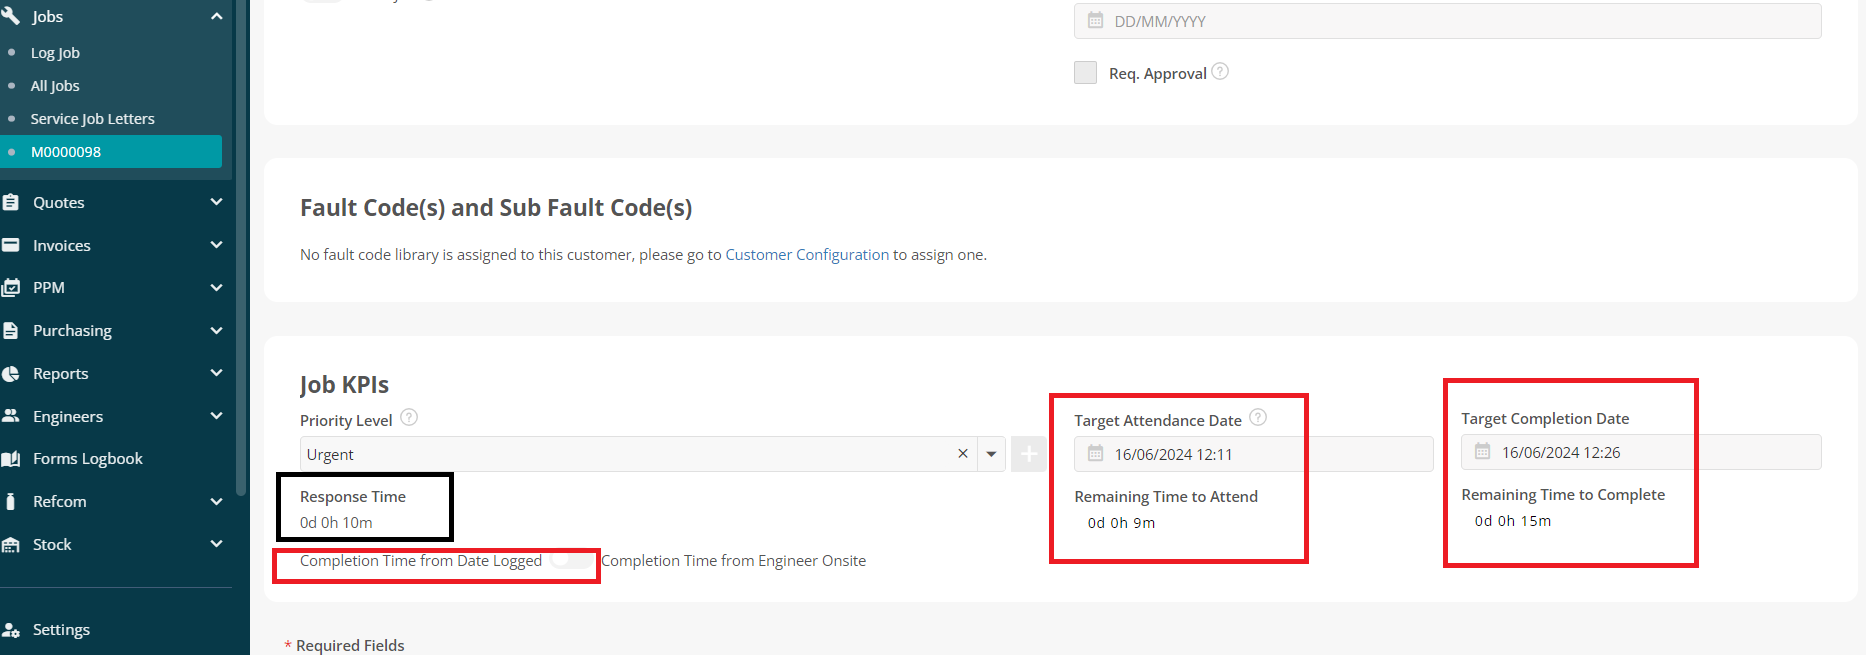
KPI's on Jobs
Once a job is created using the Completion Time from Date Logged OR from the Engineer Onsite KPI option, two fields will be populated automatically depending on what the date logged, and the duration was when you set up the Response and Completion time within the KPI Library. Those two fields are Target Attendance Date and Target Completion Date

Target Attendance Date is the quoted date that a job should be attended to according to the priority breach time, also considering company hours if selected. The date and time stamp on this field populates depending on what the Date logged of the job is and the duration defined for Response time within the selected KPI.
For example, if the response time was set up as 10 minutes and the date logged of the job was 02/06/2024 12:53 then the Target Attendance Date will reflect the date and time stamp as 02/06/2024 13:03.
Target Completion Date represents the deadline by which a job should be completed according to predefined priorities and business rules. This date is calculated based on various factors such as the job's priority level, business hours, and the specific requirements of the service agreement.
The date and time stamp on this field populates depending on what the Target Attendance Date of the job is, and the duration defined for Completion Time within the selected KPI.
For example, if the Target Attendance Date was populated as 02/06/2024 13:03 and the Completion time was defined as 15 minutes then the Target Completion Date will reflect the date and time stamp as 02/06/2024 13:18
This shows that the Target Completion Date is based/linked to Target Attendance Date and the Target Attendance Date is based/linked to Date Logged of the job.
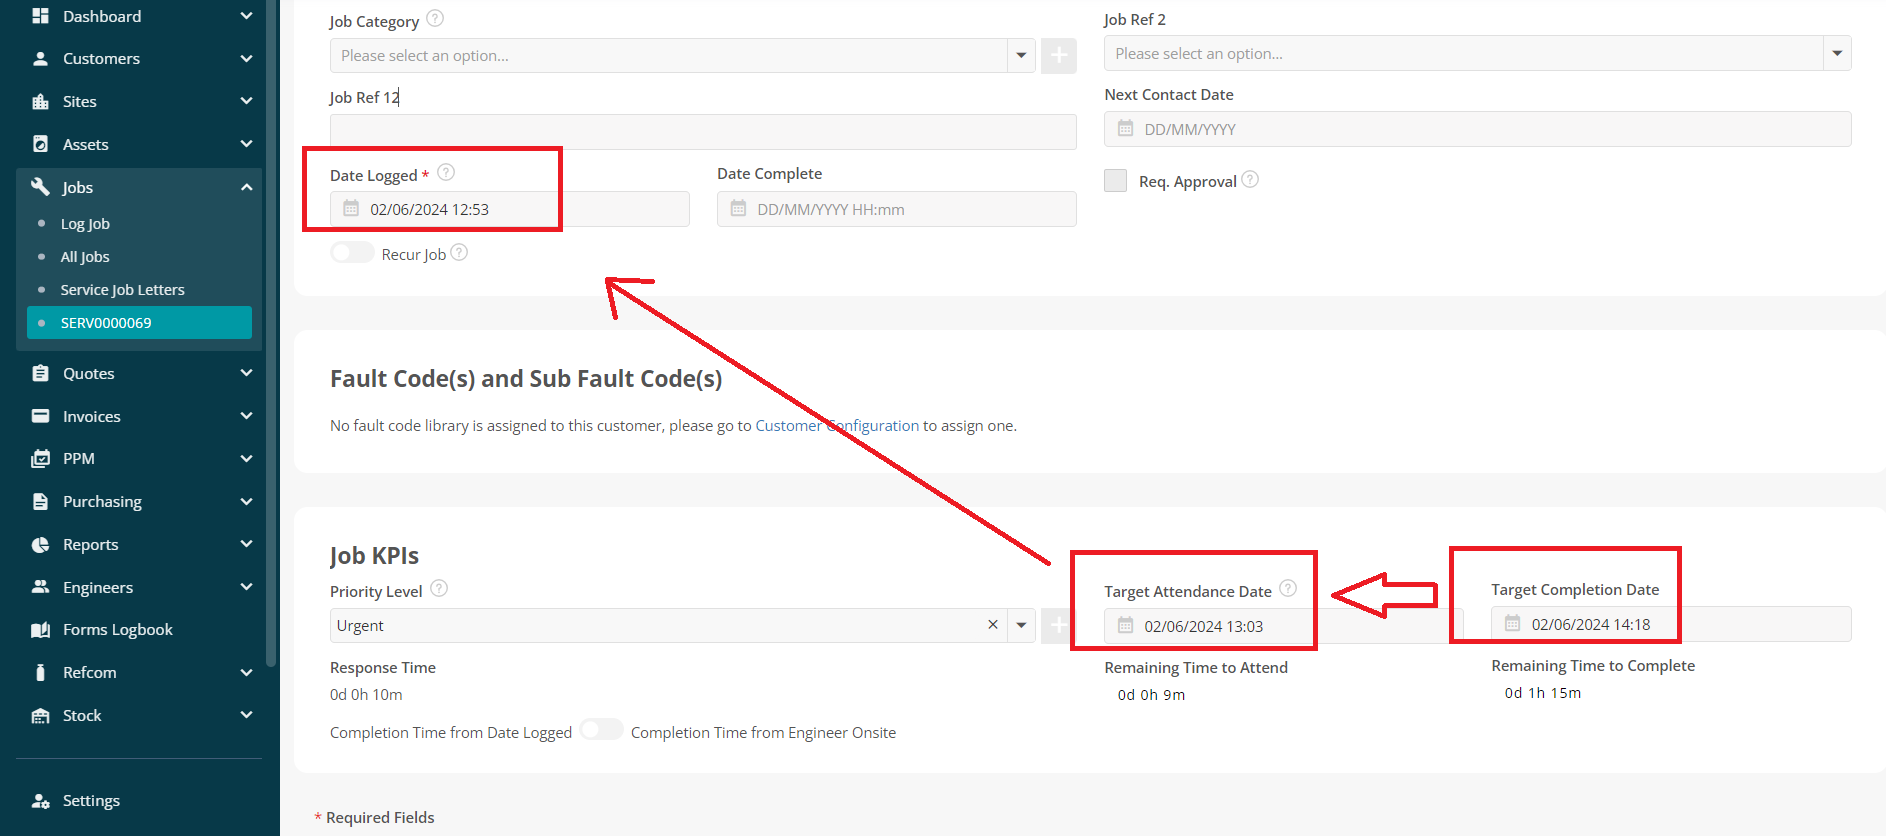
Two timer fields will populate as well against Target Attendance Date and Target Completion Date.
- Remaining Time to Attend against Target Attendance Date
- Remaining Time to Complete against Target Completion Date
Both these fields will provide visual cues using colour codes depending on what response and completion time along with their alerts were defined in your set up, to help you stay on top of pending tasks and avoid missing critical deadlines.

Example
In the set KPI, the Response Time is set as 10 minutes (Red) with 5 minutes on Alert 1 (Black) and 2 minutes on alert 2 (Green). Similarly, the Completion Time is set as 15 minutes (Brown) with 10 minutes on Alert 1 (Yellow) and 8 minutes on Alert 2 (Blue).
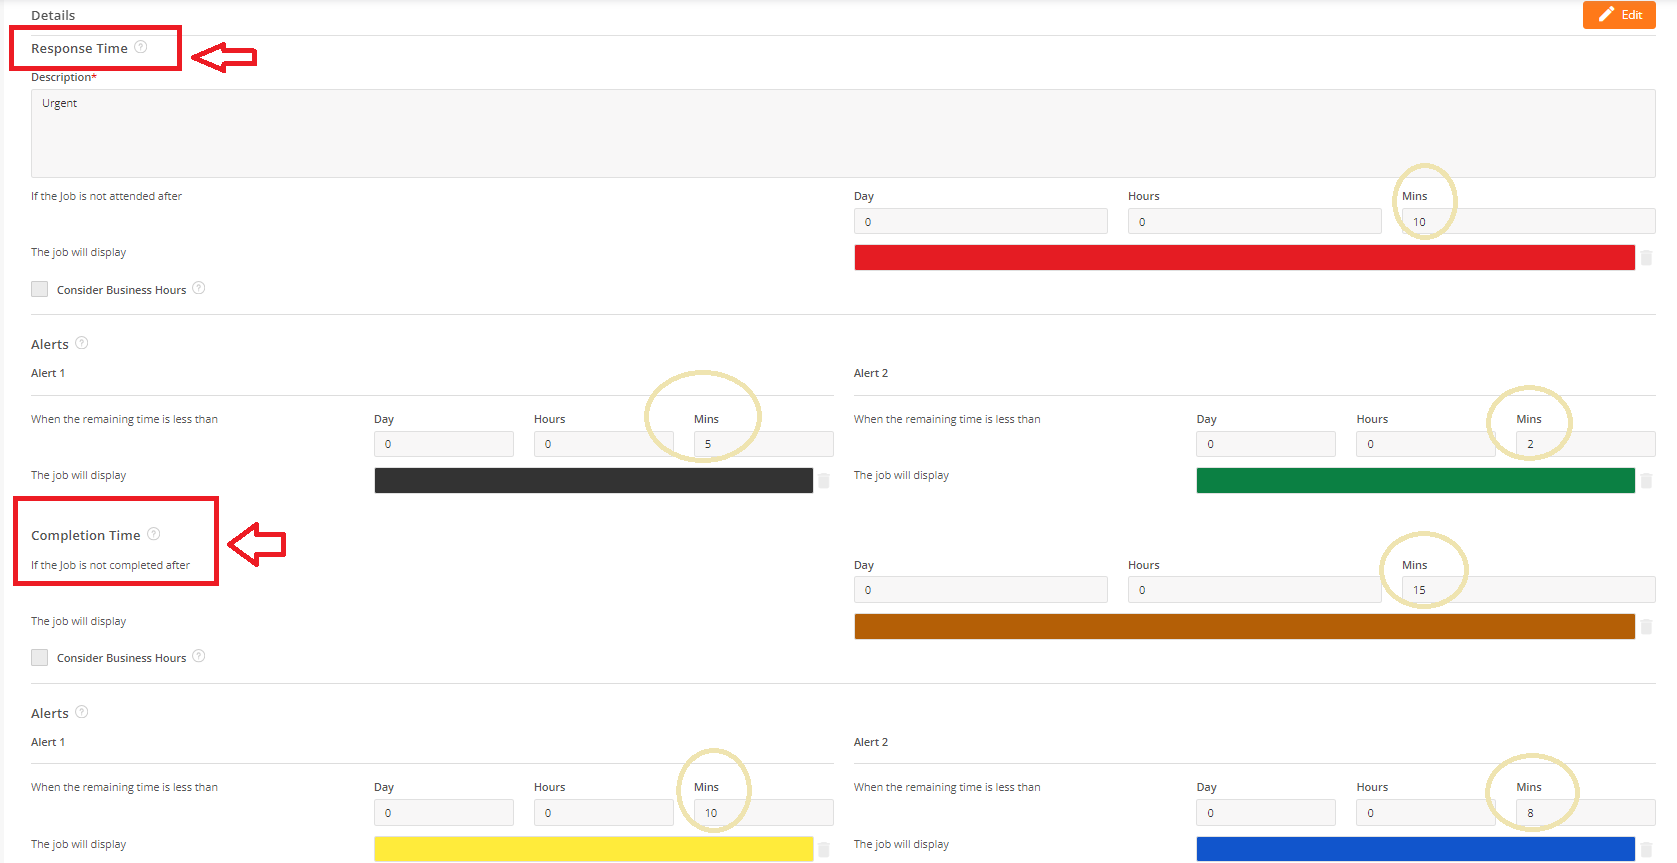
The KPI toggle is set to ‘’Completion Time from Date Logged’’ with date logged marked as 16/06/2024 12:01
Based on the date logged the Target Attendance Date will be 16/06/2024 12:11 followed by Target Completion Date as 16/06/2024 12:26
In the back-office the Remaining Time to Attend will show the timer with no colour unless the first alert is not triggered. Similarly, the mobile app will show the remaining time field with no colour.
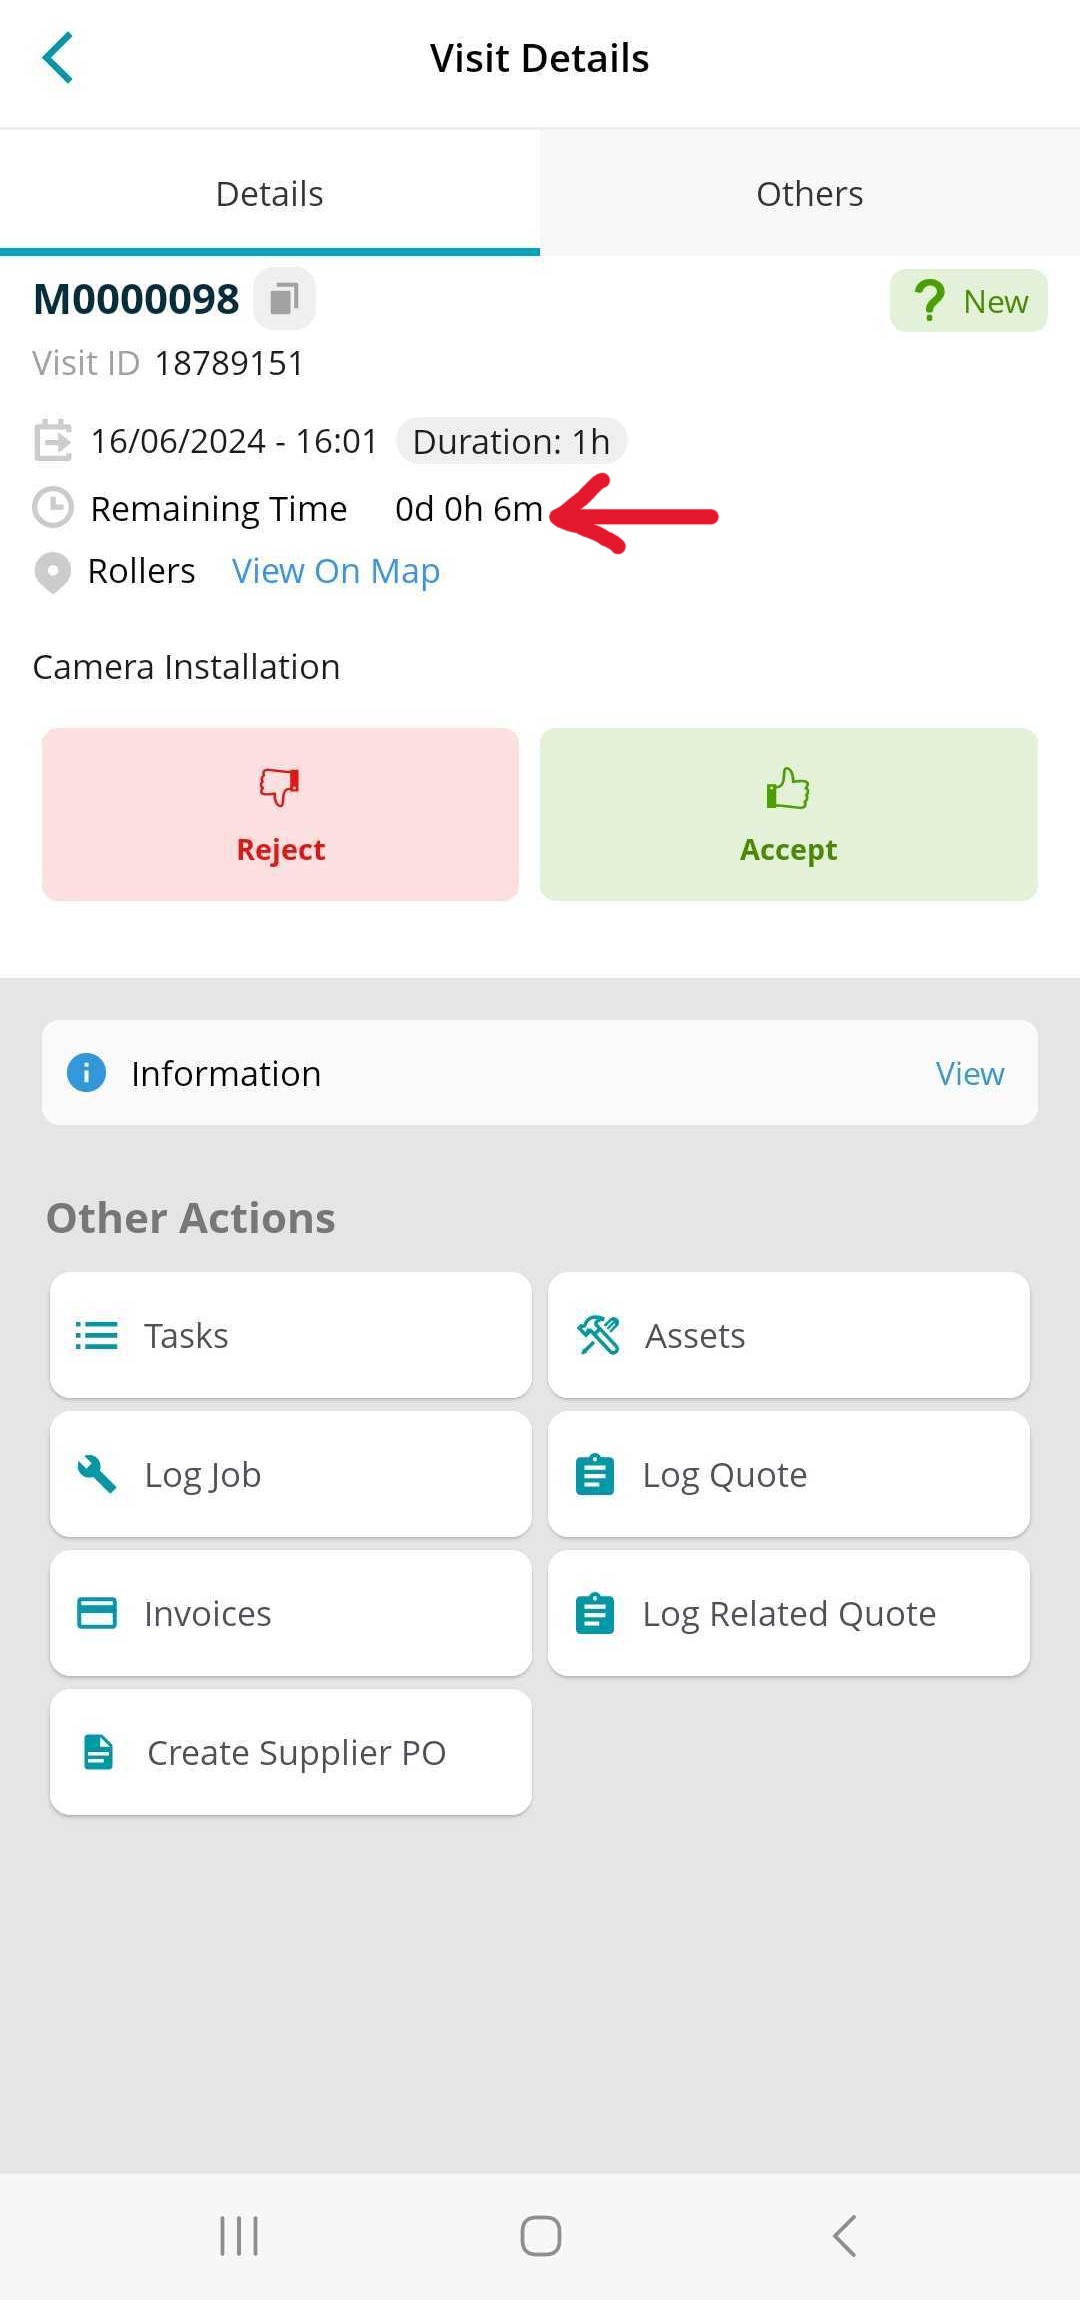
The job is not marked as on-site yet and 5 minutes have passed so Alert 1 will be activated and will show the timer in Black, both in the back office and on the mobile app.

When the remaining time is less than 2 minutes then Alert 2 will be activated and will show the timer in Green, both in back-office and in the mobile app.

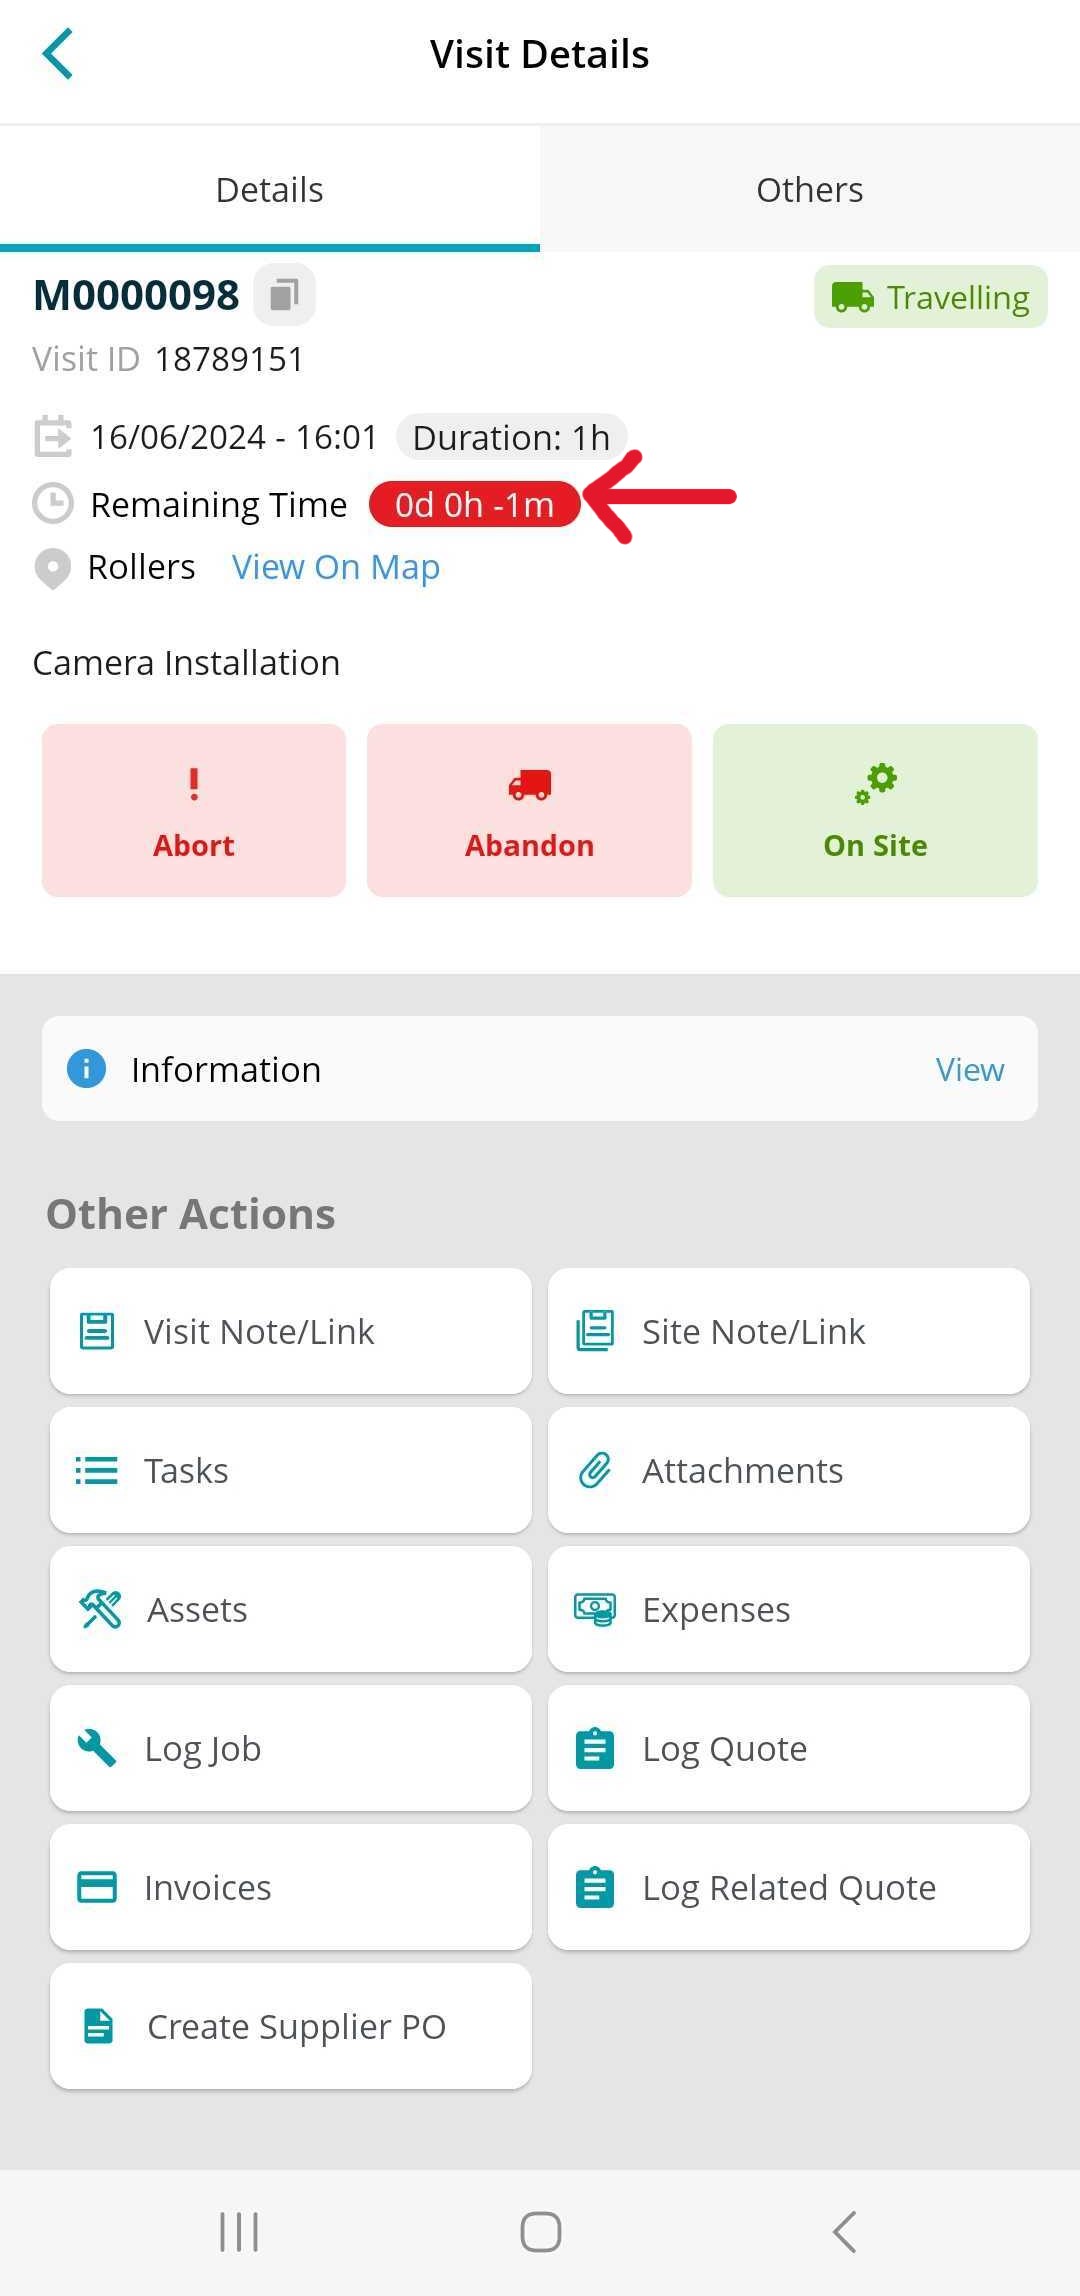
If the Job is not attended after 10 minutes (Response Time) then the colour of the timer will turn into Red in the back-office and on the mobile app.

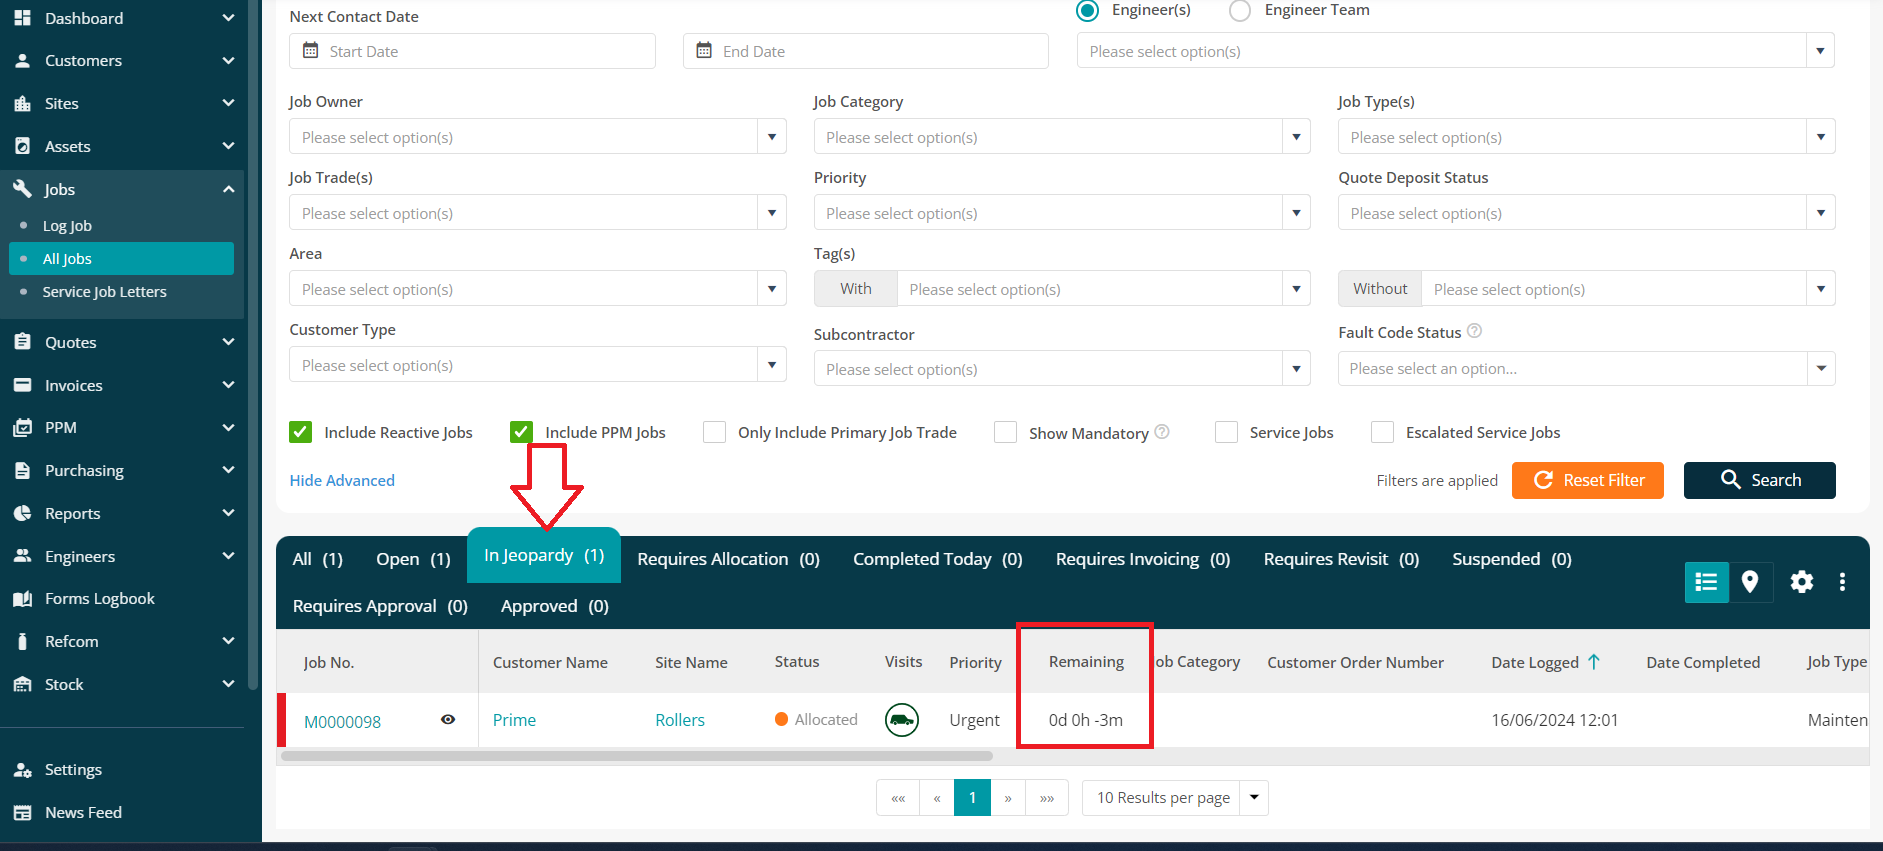
In Jeopardy
The job will fall into ‘In jeopardy’ based on the Remaining Time to Attend timer, unless the Remaining Time to Complete timer has started.
If Alert 1 or 2 has been triggered the job will be labelled as In Jeopardy.
If the job is still not marked as on-site and the time has been breached already, then the system will mark this job as In Jeopardy.
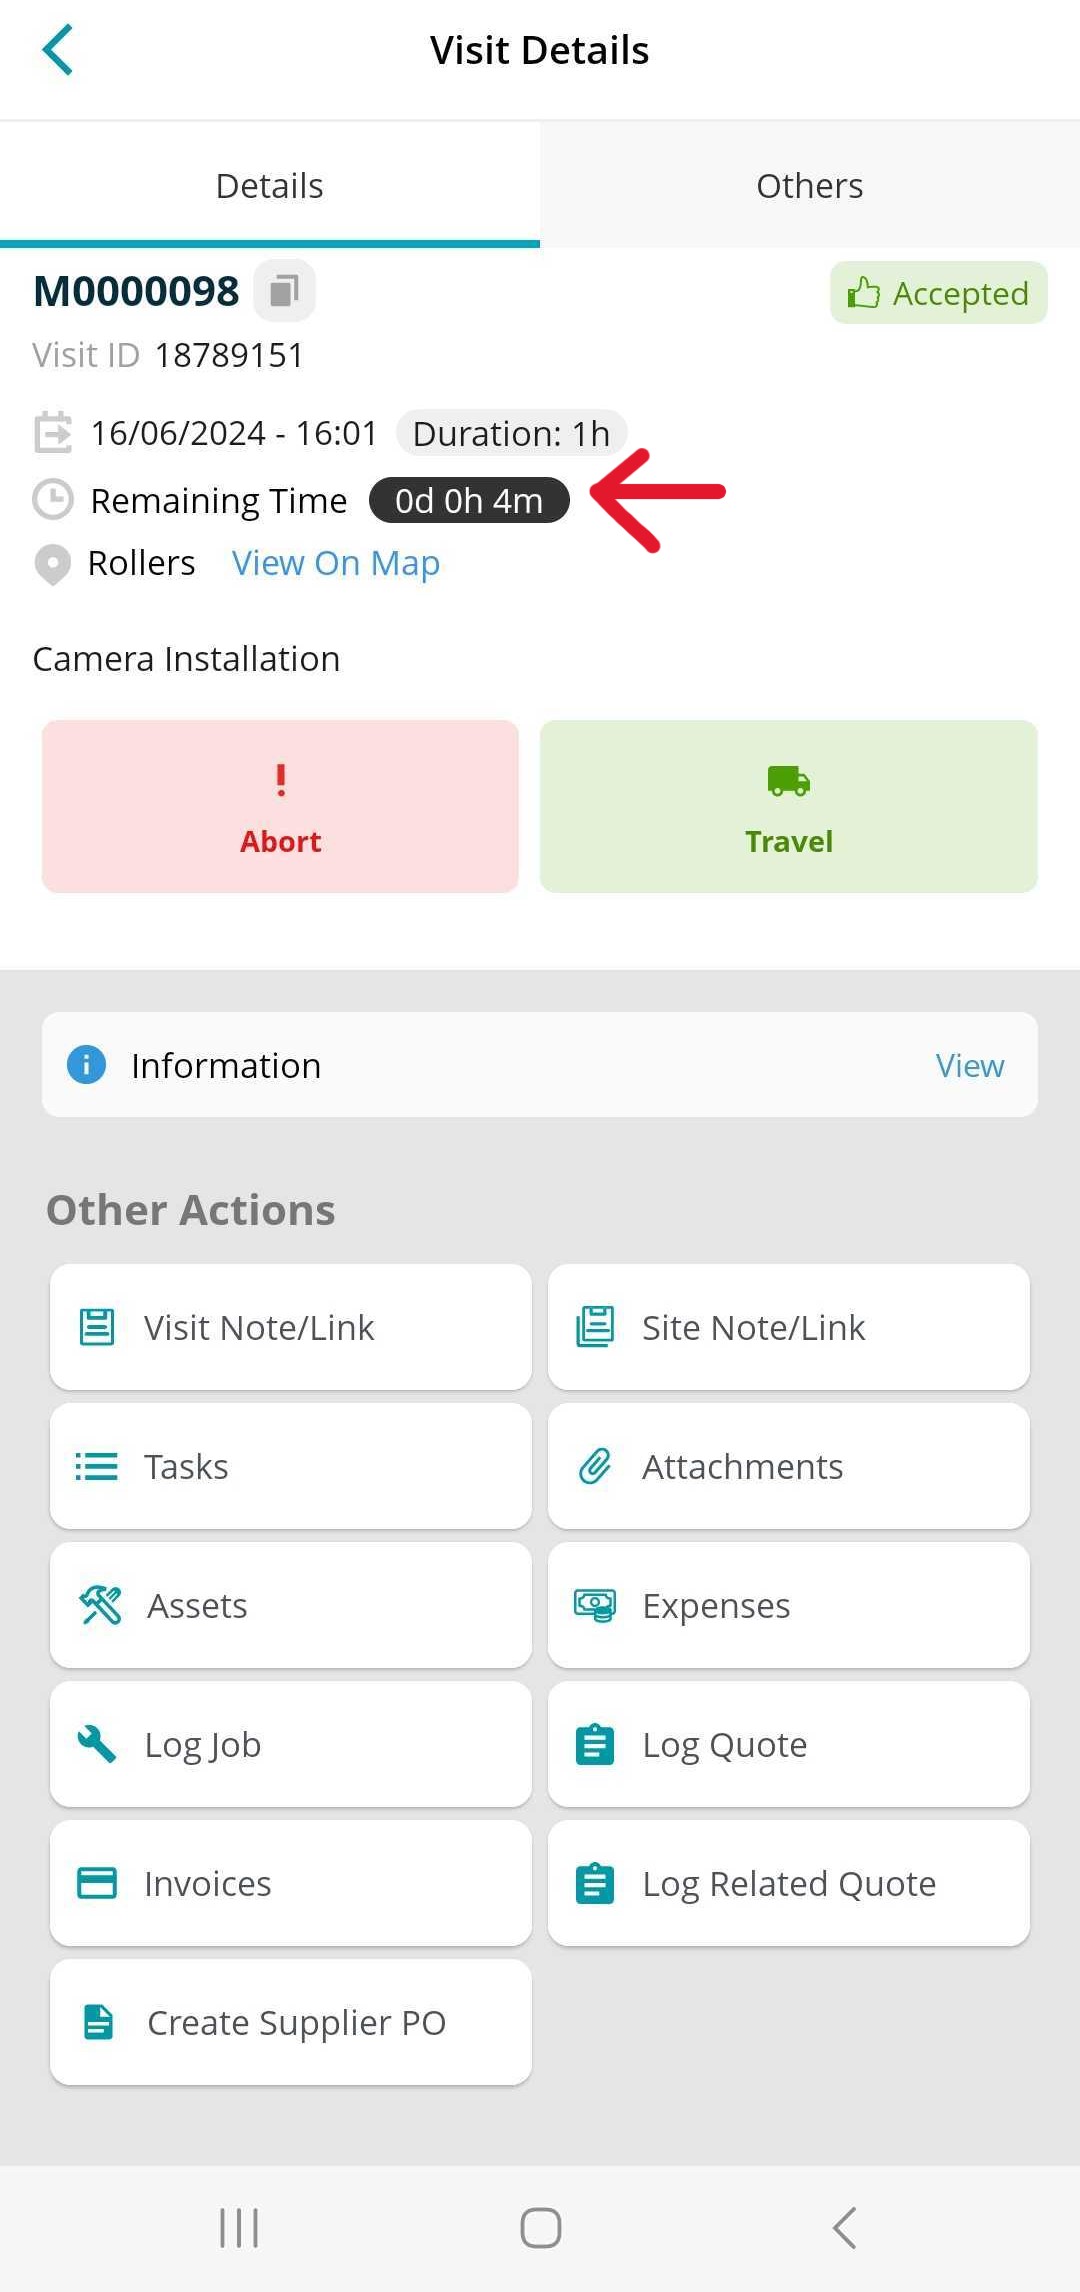
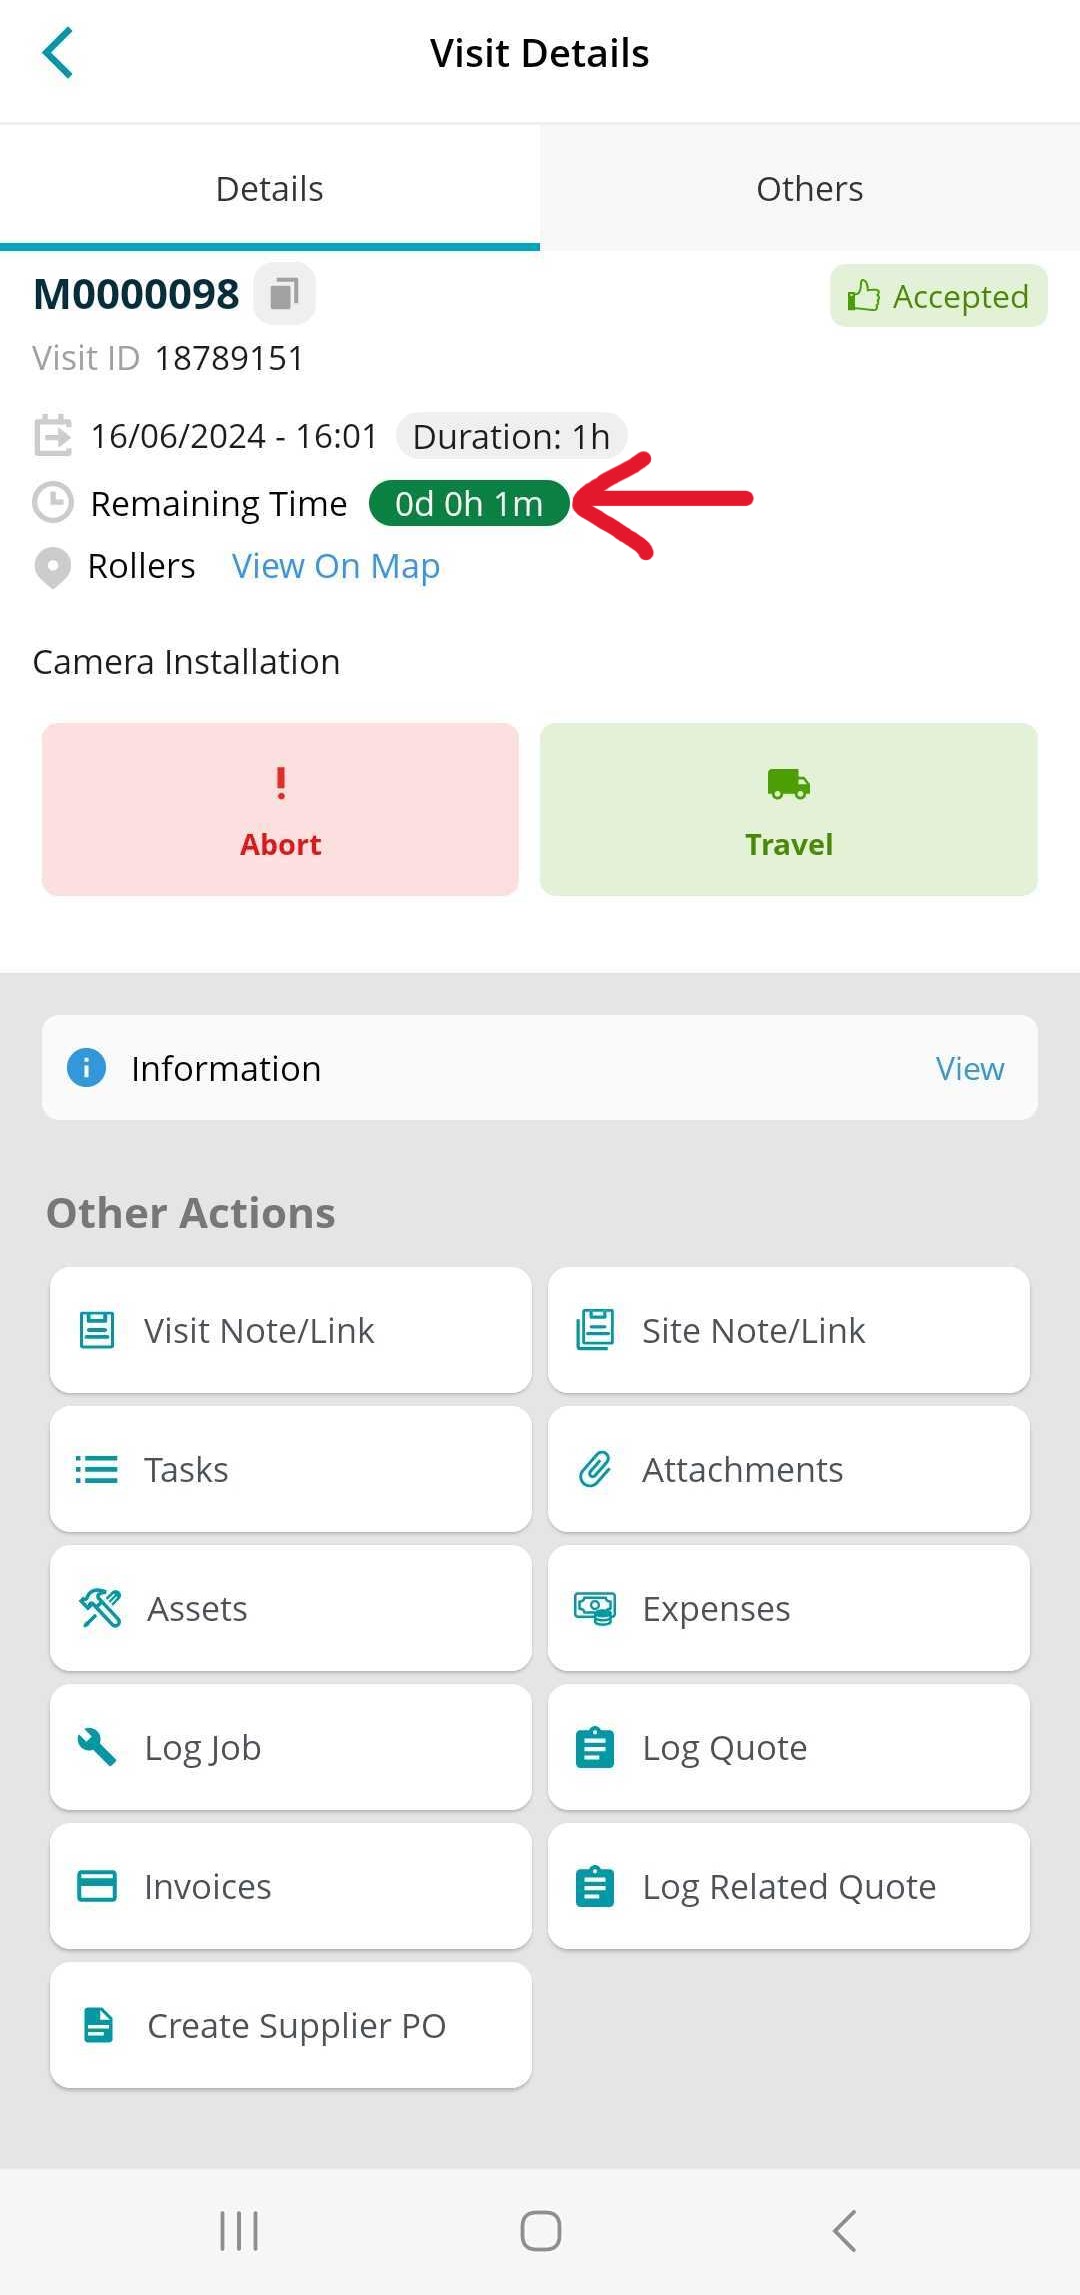
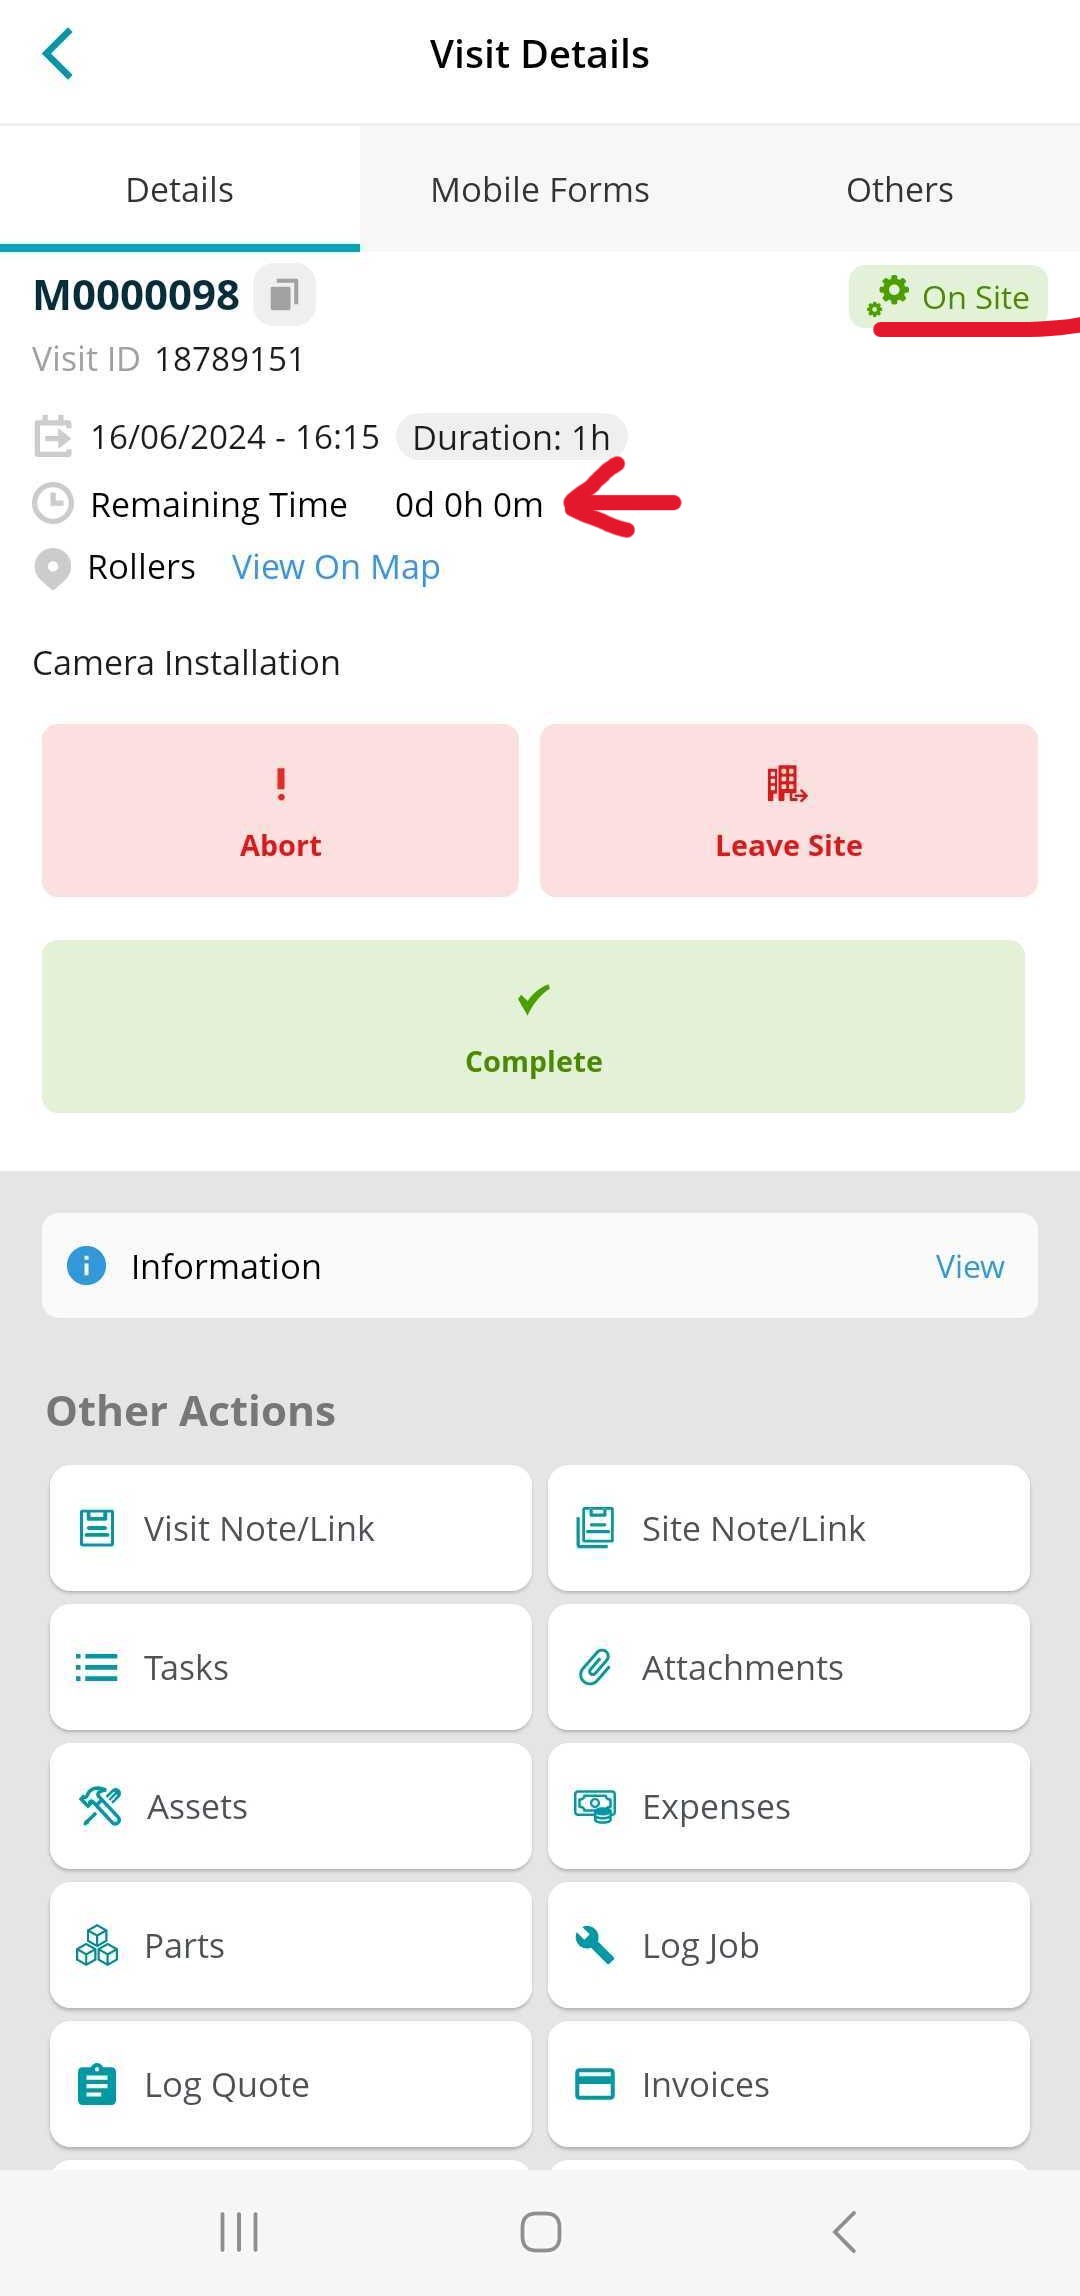
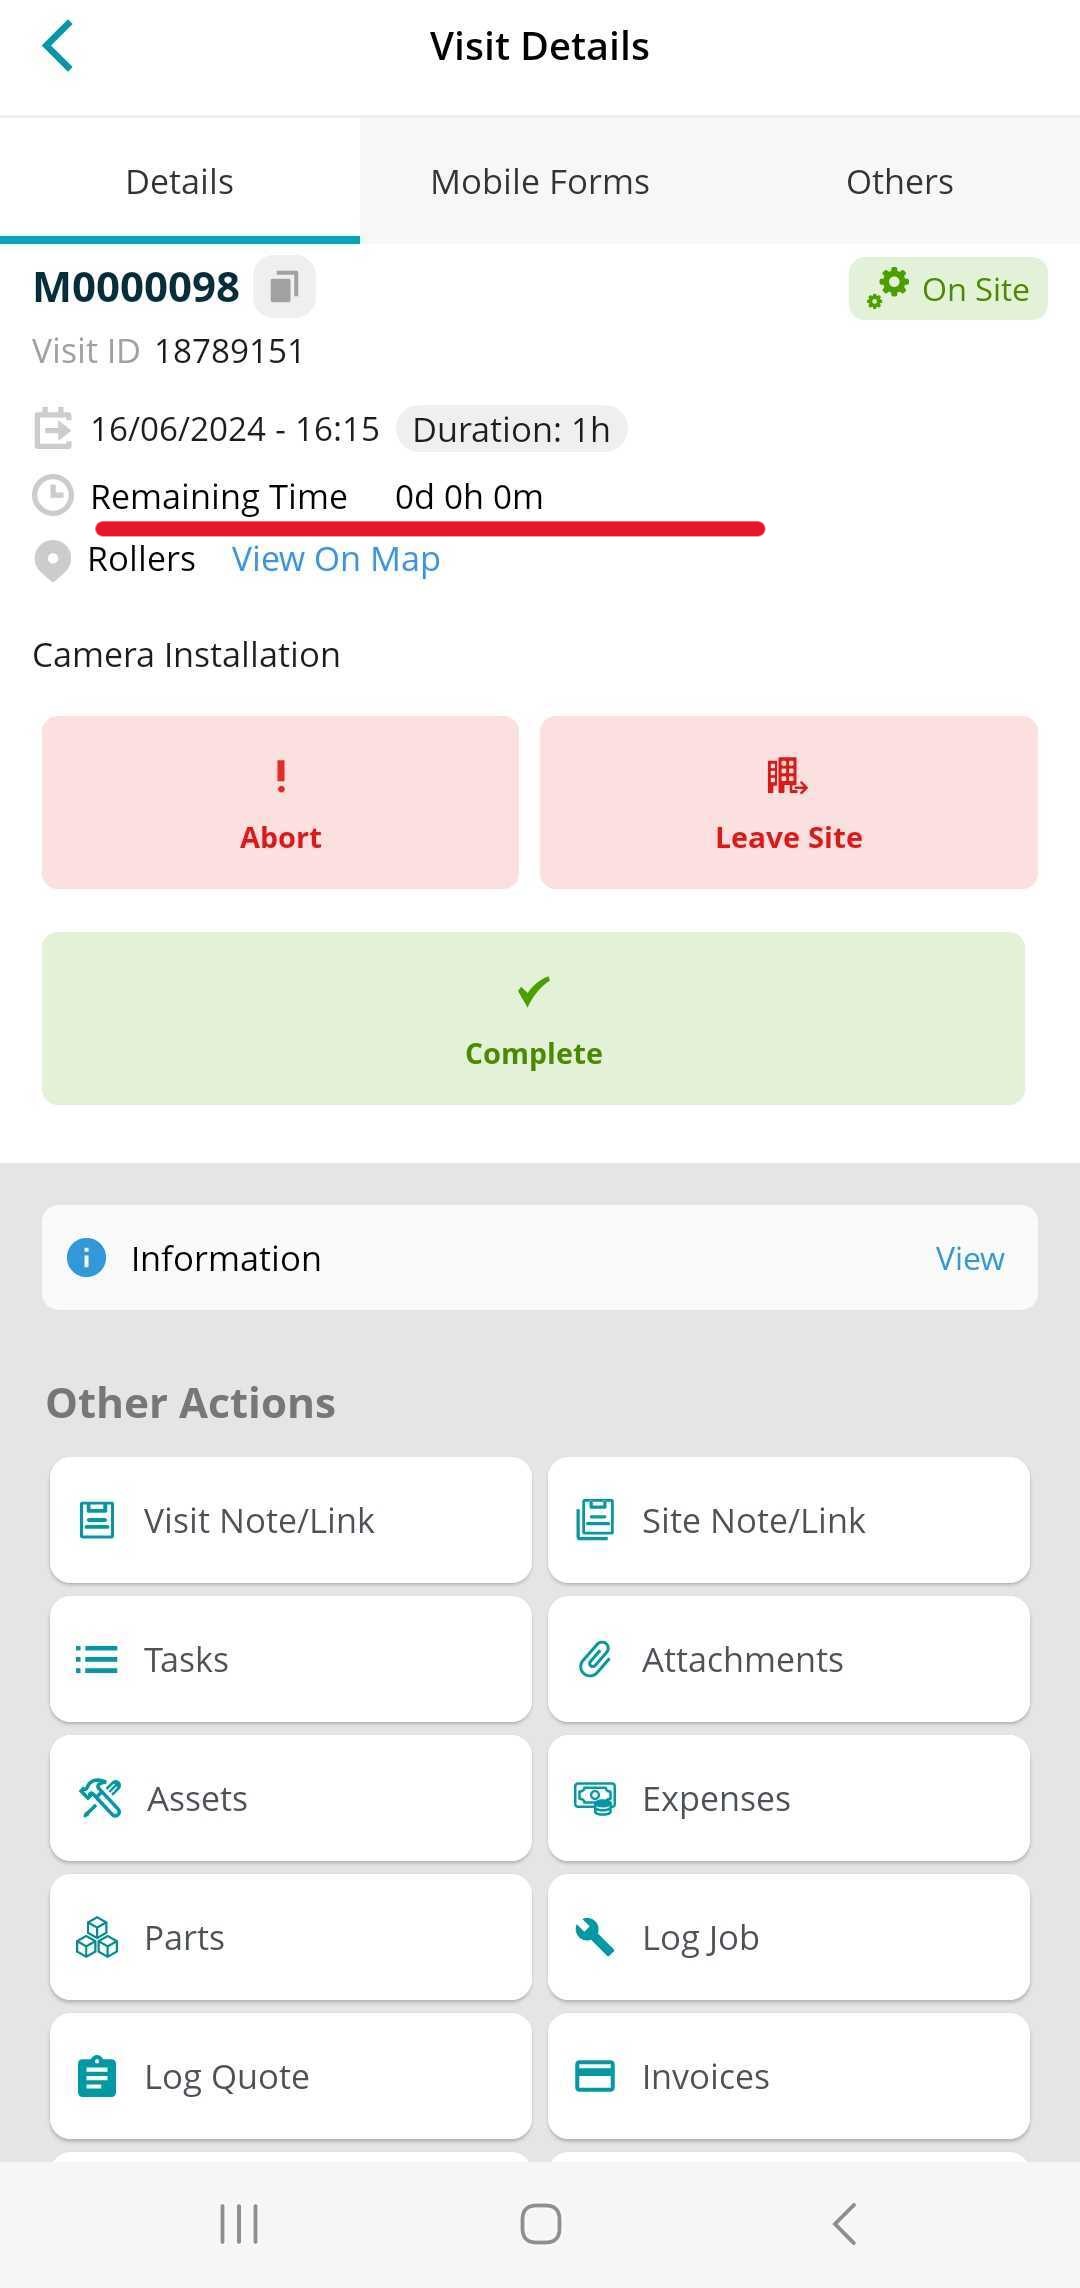
Once the engineer marks the job as On-site, the job will be taken out of the In Jeopardy status, even if the time had been breached previously.
Remaining Time to Complete
In the next phase, the timer for ‘’Remaining Time to Complete’ will start. The timer will either be in + or – figures depending on if the Completion time set for KPI is breached or not.
If it’s not breached, it will show as 0 in the back office. In the mobile app it will always show the timer as 0, whether the Alert is triggered or not. No colour coding or remaining time to complete will be reflected in the mobile app.

Further Support
For further information or assistance on the above, contact our Support Team on 0800 326 5561 or email support@joblogic.com. Alternatively, our Customer Success Management team can be reached by emailing customersuccess@joblogic.com.
Publishing Details
This document was written and produced by Joblogic’s Technical Writing team and was last updated on the date specified above. Be aware that the information provided may be subject to change following further updates on the matter becoming available. Additionally, details within the guide may vary depending on your Joblogic account’s user permissions.