Introduction
The Refcom Module is one of the most important features of Joblogic Service Management software and is widely used by our customers. The module was designed and built in compliance with Refcom, to ensure that the data of Refcom transactions/entries can be recorded, maintained and accurately reported on.
Due to the recent changes made by Refcom, the Joblogic Refcom module has been re-designed to improve user experience and efficiency, whilst still ensuring it is in-line with the regulatory requirements of Refcom.
This user manual details the new changes made to the Refcom Module, along with step-by-step instructions on how to set up and use the module within Joblogic‘s back-office system.
General Definitions and Functions within the Module
The Inability to Delete or Edit items
Users do not have the option to edit or delete items within the Refcom module once transactions have taken place. This rigidity is by design, and Refcom dictate this to ensure compliance. They have designed the module to work in this way by not allowing entries to be deleted or changed, so they can ensure a fully detailed and accurate log book. You can record corrections and revert mistakes if any values are entered in error or appear incorrect for any other reason.
The different transaction/action types
There are 5 main transactions/actions within the Refcom module. These are:
- Addition
- Removal
- Correction
- Revert
- Leak Check
Addition— Is a type of transaction used when any refrigerant/non-refrigerant gas is added to an asset from the cylinder.
Removal— Is a type of transaction used when any refrigerant/non- refrigerant gas is removed from an asset into a cylinder
Correction — Is a type of action used when the current recorded value for the asset in Joblogic is incorrect, when compared to the asset's real life recording. It is used to correct the recorded values in the system.
An example is if an asset was recorded as having 5kg of refrigerant in it when it was last attended to, but on an engineer's next visit to it they find that the asset has been vandalised whereby all the refrigerant has leaked out. They would use a correction to correct the value recorded for the asset in the system.
Revert— Is a type of action used to revert an entry which was recorded incorrectly (a ‘back' or 'reverse’ button).
Leak check— The engineer checks the asset for refrigerant leaks.
If no leaks = Pass.
If there is a leak = Fail.
Different Cylinder Types and their meanings
There are 4 cylinder types:
- Waste bottle
- Recovery/Receiver bottle
- Virgin bottle
- Non-Refrigerant
Waste bottle— A cylinder is considered as a waste when it is filled in with a mixture of gases from an asset, which won't be required for use in the future. This waste cylinder can then be returned to the supplier to be disposed of. When engineers attempt to fill in a second gas into the cylinder, they will be presented with a message asking if they would like to convert the receiver cylinder into a waste cylinder.
Recovery/Receiver bottle— Is used to remove the refrigerant from an asset and then recharge (refill) back into the same asset (but you would not then use this gas for a different asset). You do not mix the gases (only consist of one gas). This bottle can also be completely empty with no gas in it, which can be purchased from the supplier. It can still be returned to the supplier but isn’t considered a waste bottle as the one gas inside has not been mixed with another.
Virgin bottle— Is a brand-new bottle which comes pre-filled with one type of gas from the supplier. It is only ever used for additions to an asset.
Non-Refrigerant—These are gas types that are environmentally friendly, and are used by engineers. These are gases for which the Global Warming Potential is zero.
F-Gas certificates & Transfer Notes
An F-Gas certificate, also referred to as F-Gas log sheet or F-Gas sheet, is a document/certificate that is generated detailing all the Refcom transactions that have taken place against an asset.
A Waste Transfer Note, also referred to as a transfer note or removal transaction sheet, is another document/certificate that is generated, only when a removal transaction is conducted against an asset.
A Cylinder Transfer Note, also referred to as Return Transfer Note is a document/certificate that is generated when a Cylinder is marked as Returned to the Supplier by an Engineer using the Joblogic Mobile App. This document can be found in the back office against the returned cylinder in the 'Gas Cylinders' area.
When Refcom transactions are recorded via the mobile app, the F-Gas and Waste Transfer Note certificates are auto-generated within the Joblogic back office, under the ‘Notes’ section of the applicable ‘Asset’ page.
However, if the transactions are directly recorded in the back office, neither the Waste Transfer Note, the F-Gas certificate or Cylinder Transfer Note will be generated. In such cases, the certificates must be manually created/created using our templates as a basis and be uploaded to the Joblogic Back-office system.
Refcom Setup and Use – The Back Office
The Refcom information can be viewed from different parts of the Joblogic Back-office system.
The Navigation Menu
-
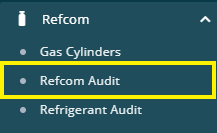
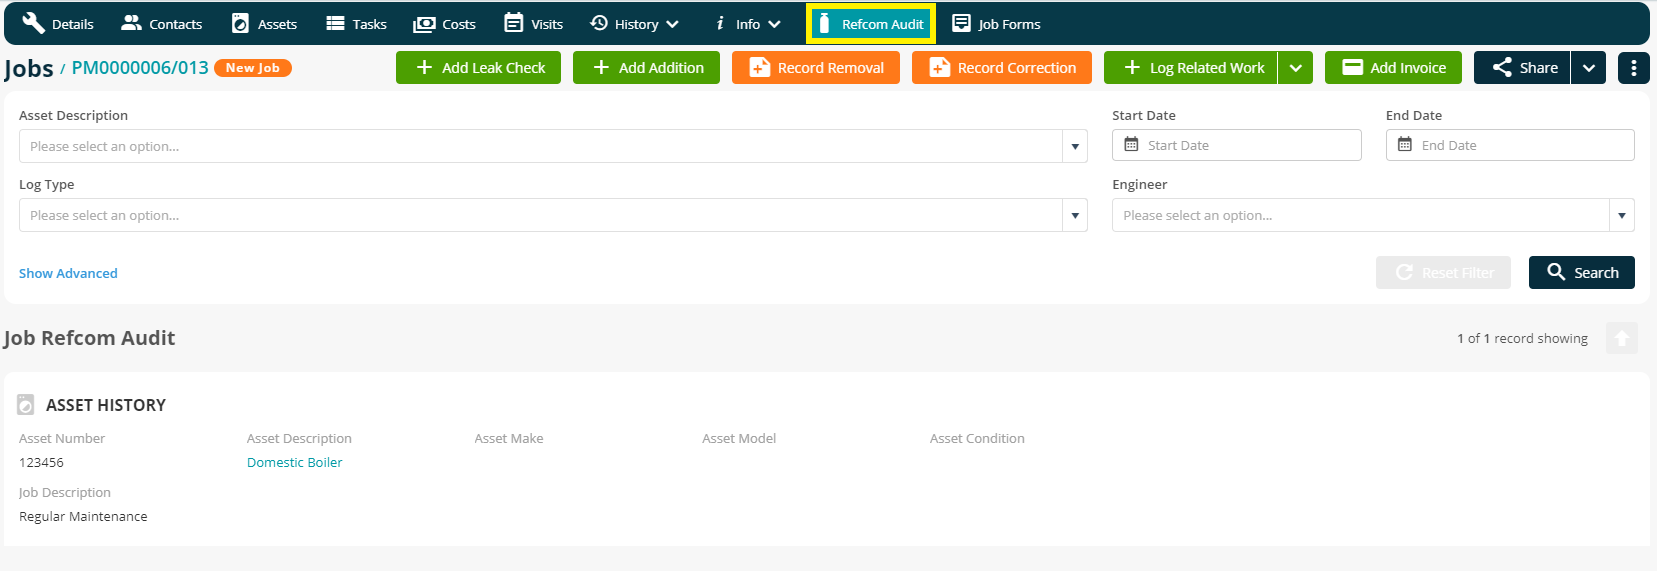
The Log Book and Leak Check pages within the Refcom dropdown menu, have been merged and renamed as ‘Refcom Audit’.
-
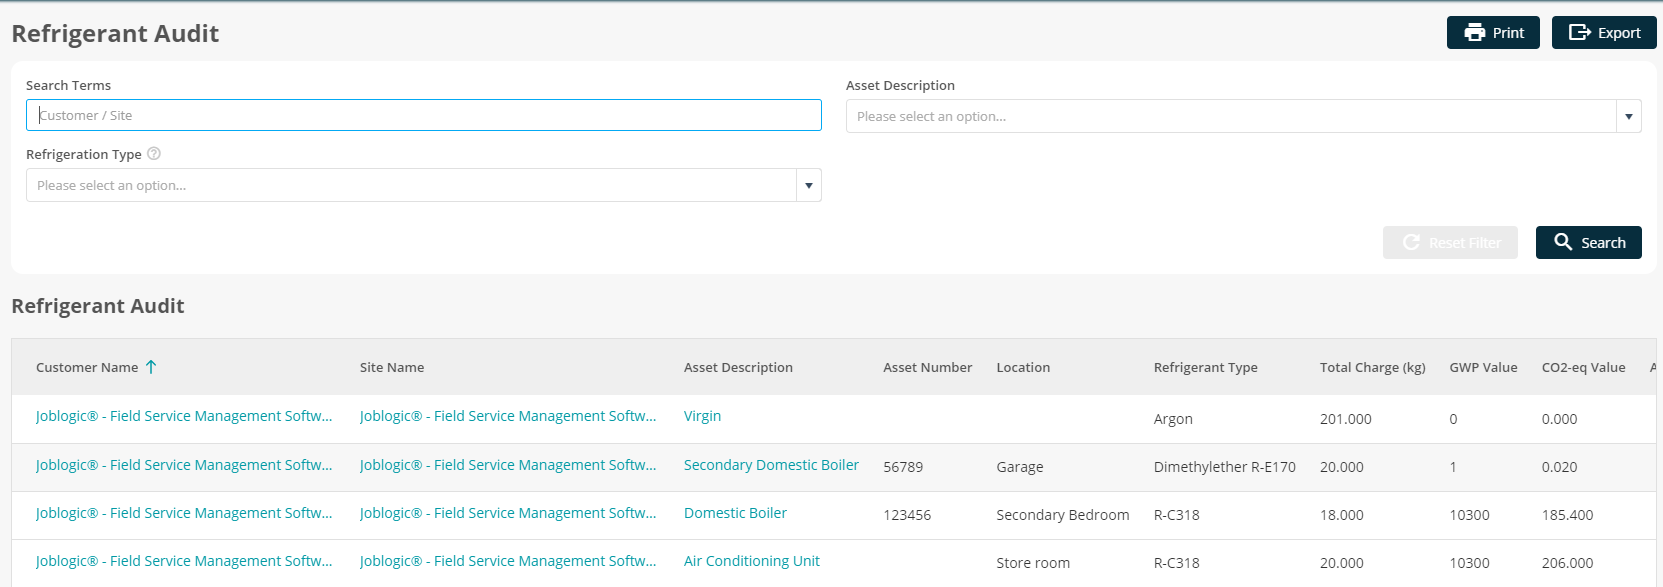
A new ‘Refrigerant Audit’ page has been added, where the whole list of Assets pertaining to a specific customer and site, with refrigerants are listed.
-
This enables the user to use the new improved search filter to view the Refcom transaction records (Logs and Leak checks) of all the Assets within the system. This list can be printed and exported by clicking the relevant buttons on the top right of the screen.
Customers and Sites
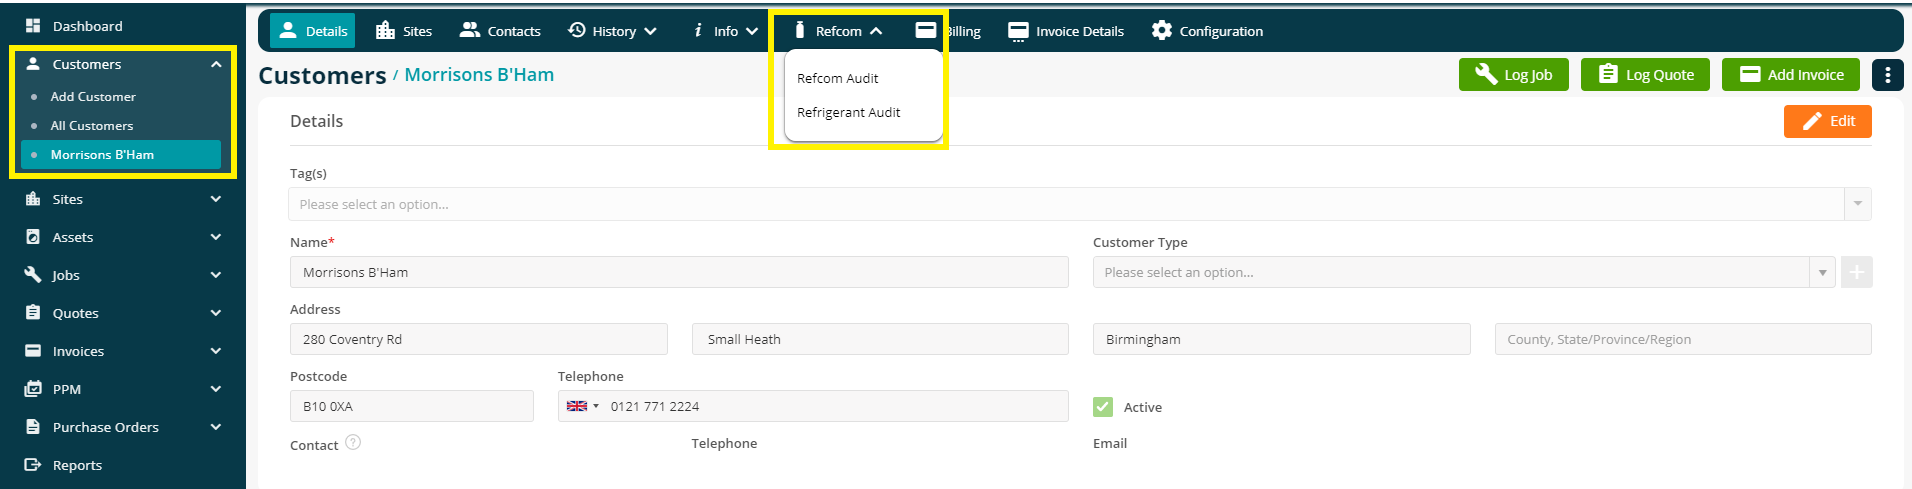
The Refcom Audit and Refrigerant Audit options have been added to the Refcom dropdown tab in the Customer and Site details pages. Users can access this section to view, export and print the Refcom transaction records of all the Assets related to the specific Customer or Site.

Asset Page – F- Gas Log Book
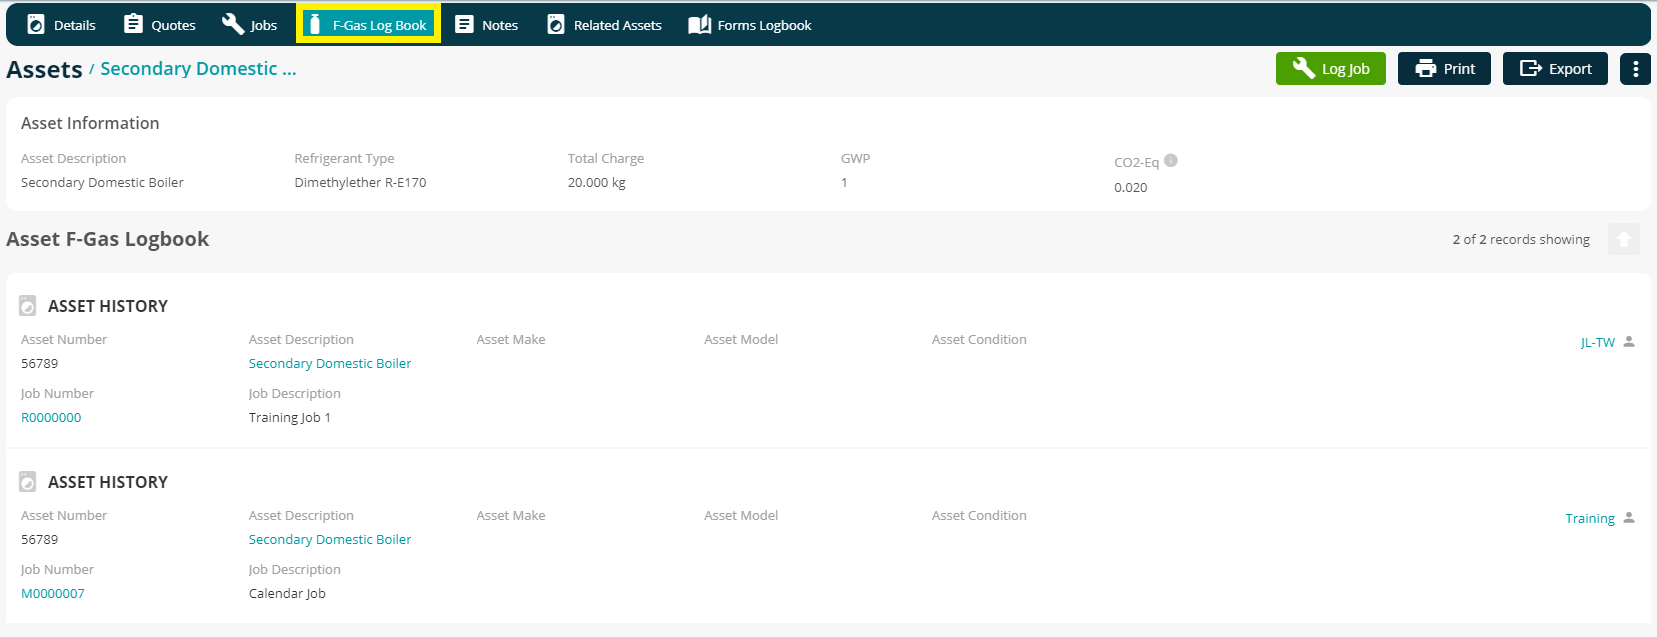
The ‘F-Gas Log Book’ tab, within an Asset's details page, contains a record of all the transactions, actions and leak checks related to a specific Asset. These details can be exported into a CSV (Excel) file or printed by clicking the options in the top right corner of the page.
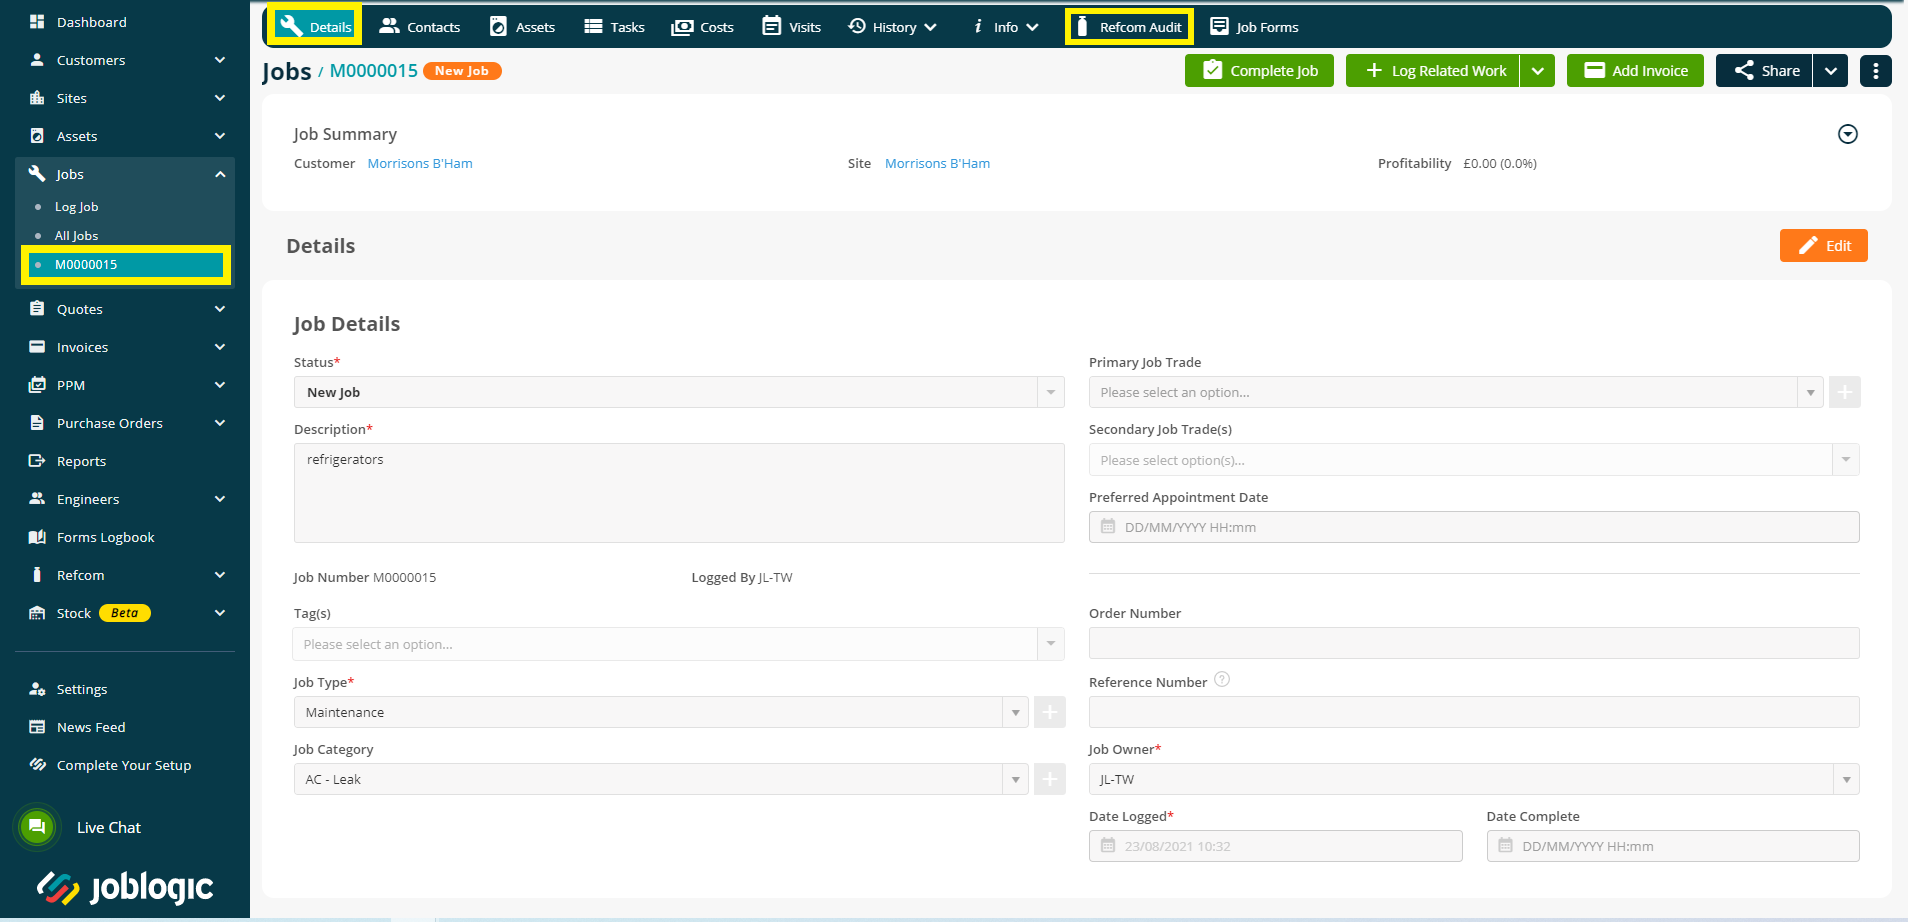
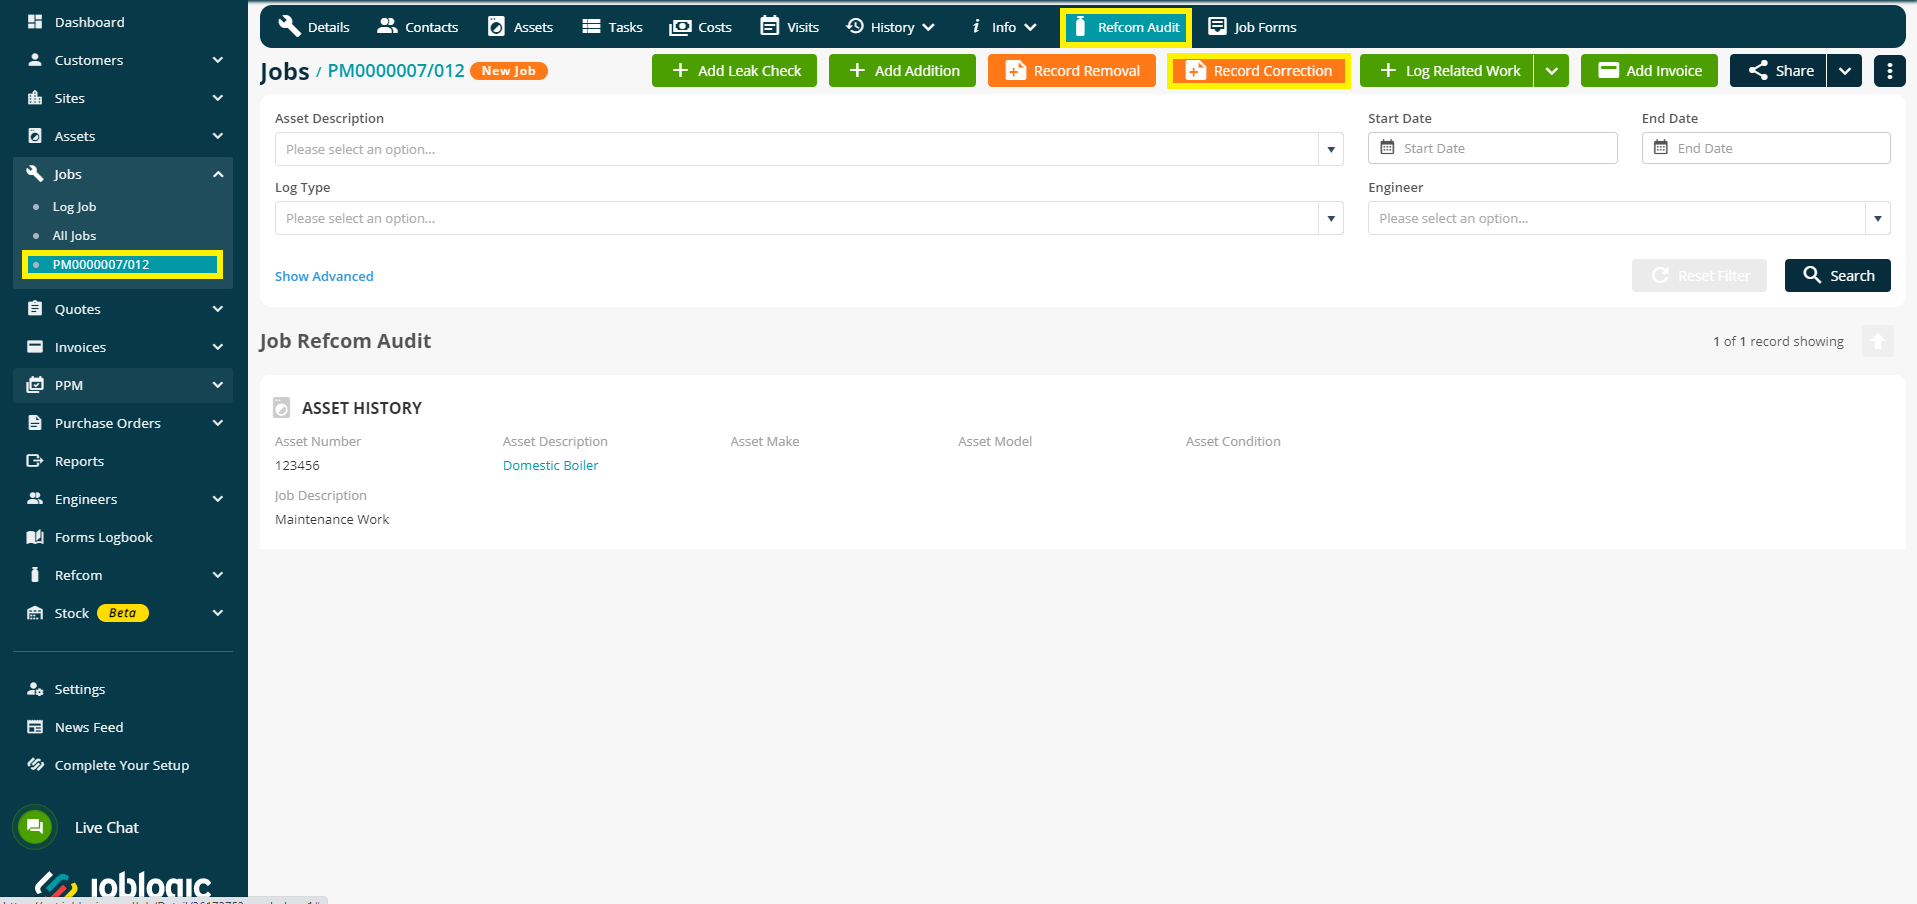
Job Page
Within the main job details page, the Log Books and Leak Checks options under the Refcom dropdown menu have been merged and renamed as Refcom Audit. Users can view the Refcom transaction records of Job-related Assets in this page.
Refcom Setup
Enabling Refcom
The first step towards setting up the Refcom module within your Joblogic account is to enable it.
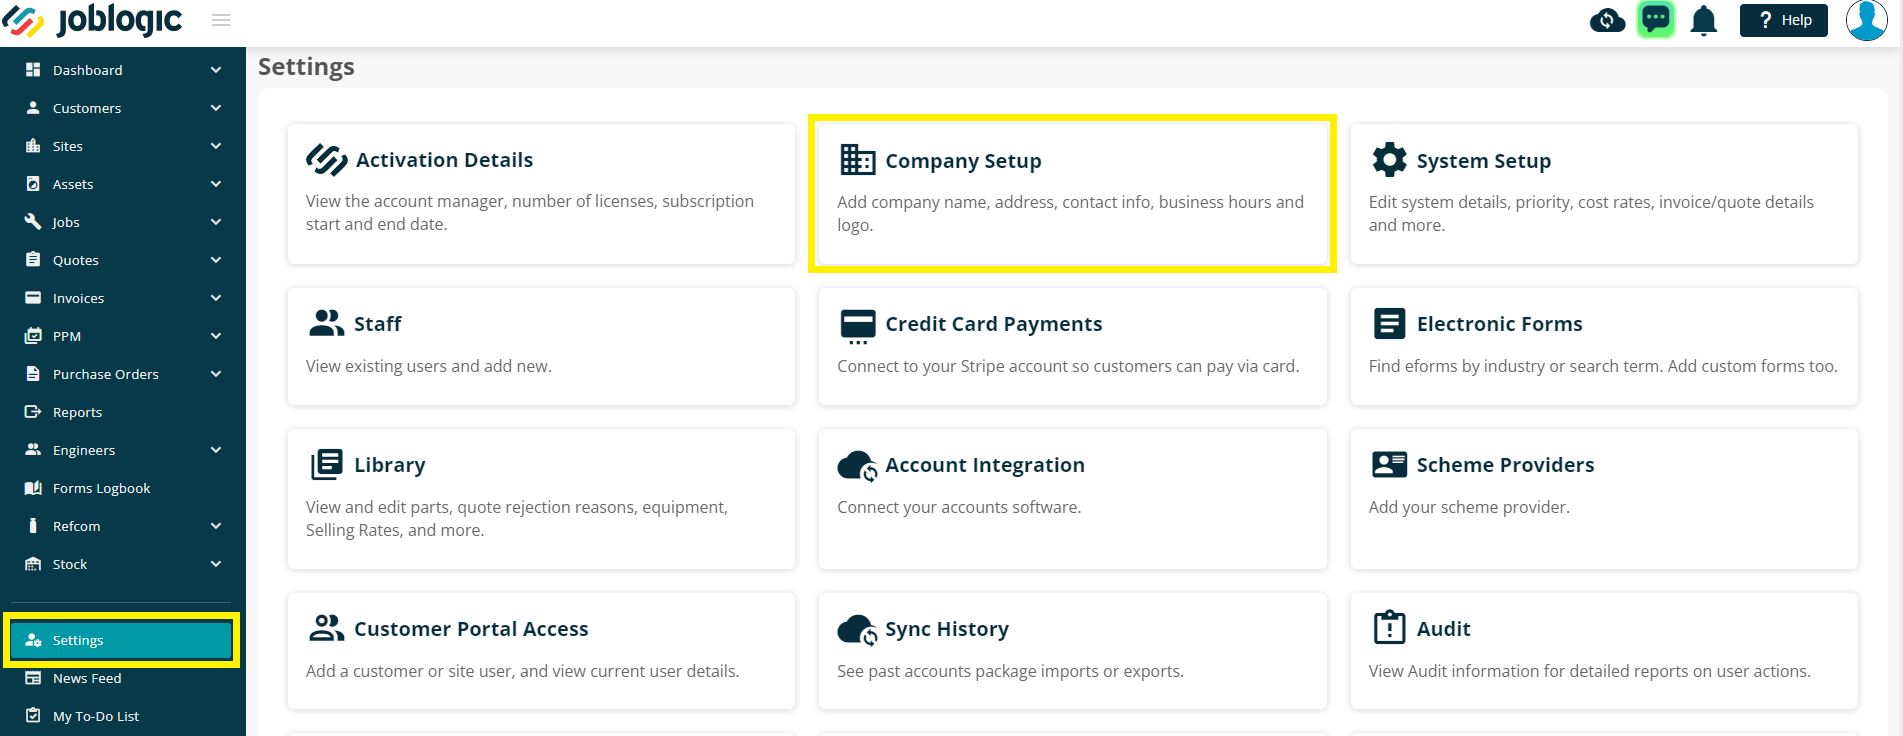
To do this, click the ‘Settings’ option on the left navigation page and select the ‘Scheme Providers’ option.
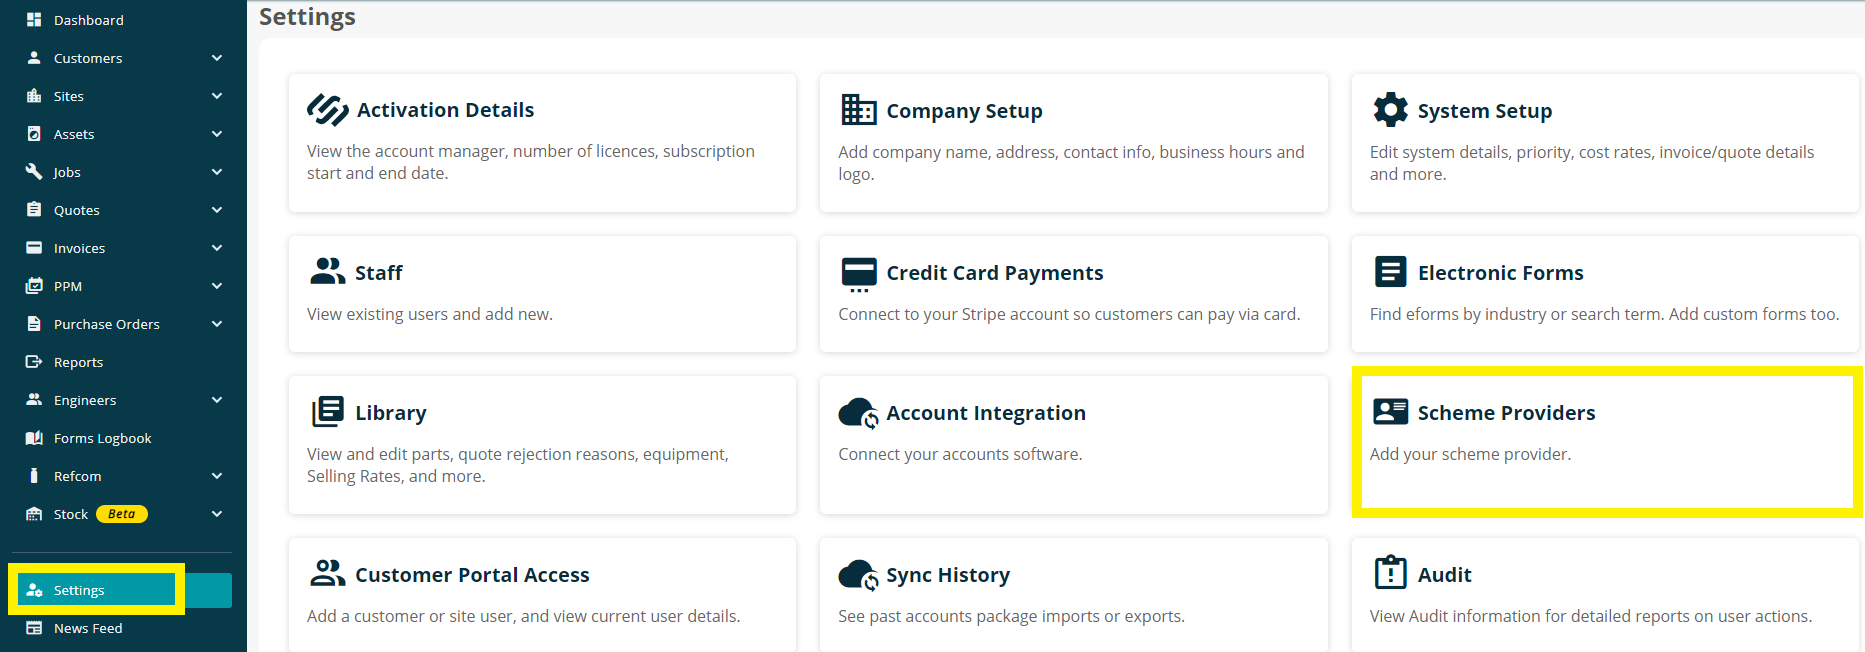
Once you’re directed to the Scheme Provider page, click the orange ‘Edit’ button to tick the Enable Refcom box and enter your Refcom Member and Waste Note Numbers. If you have a Registration number for Gas, Oil, Electrical or F-gas, you can enter these too.

Once the required details have been filled in, click the ‘Save’ button to confirm and your Refcom Module will become enabled (you may need to logout of your Joblogic account and log back in or refresh your browser page for the changes to take effect).
Adding/importing assets with their initial Refcom/Refrigerant details
Once the Refcom functionality has been enabled within your Joblogic account, every asset within your system will now provide a ‘Does this asset contain refrigerant?’ toggle button under the ‘Additional Information’ area of the individual asset page.
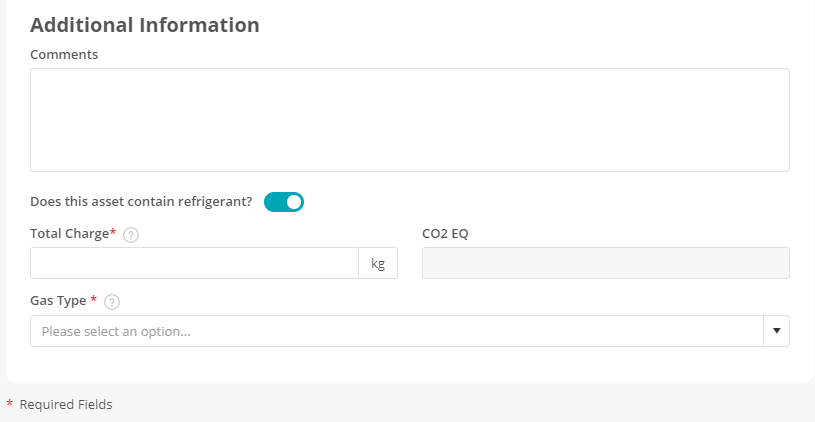
Switching this toggle ON, will provide you with a Total charge (the total amount of the refrigerant currently in the asset), Gas type (the type of refrigerant that the asset currently uses) and the CO2 EQ (CO2 Equivalent, automatically calculated and populated based on the total charge and gas type entered) for any assets already logged in the system. There is also the option to add a ‘Trim Charge’ when logging a new asset.
Fill in these details as per what they currently are within the actual asset and these values will then update automatically as per any Refcom transactions conducted against the asset going forwards.
Please bear in mind that once the first Refcom transaction is conducted against the asset you will not be able to manually edit these values from this page, as the Refcom regulations would need to be followed by recording a correction or the relevant transactions which actually took place, if this value appears incorrect.
These refrigerant values can also be filled in via an asset import template, if you choose to import a large quantity of assets.

Cylinders
How to Add a Cylinder-
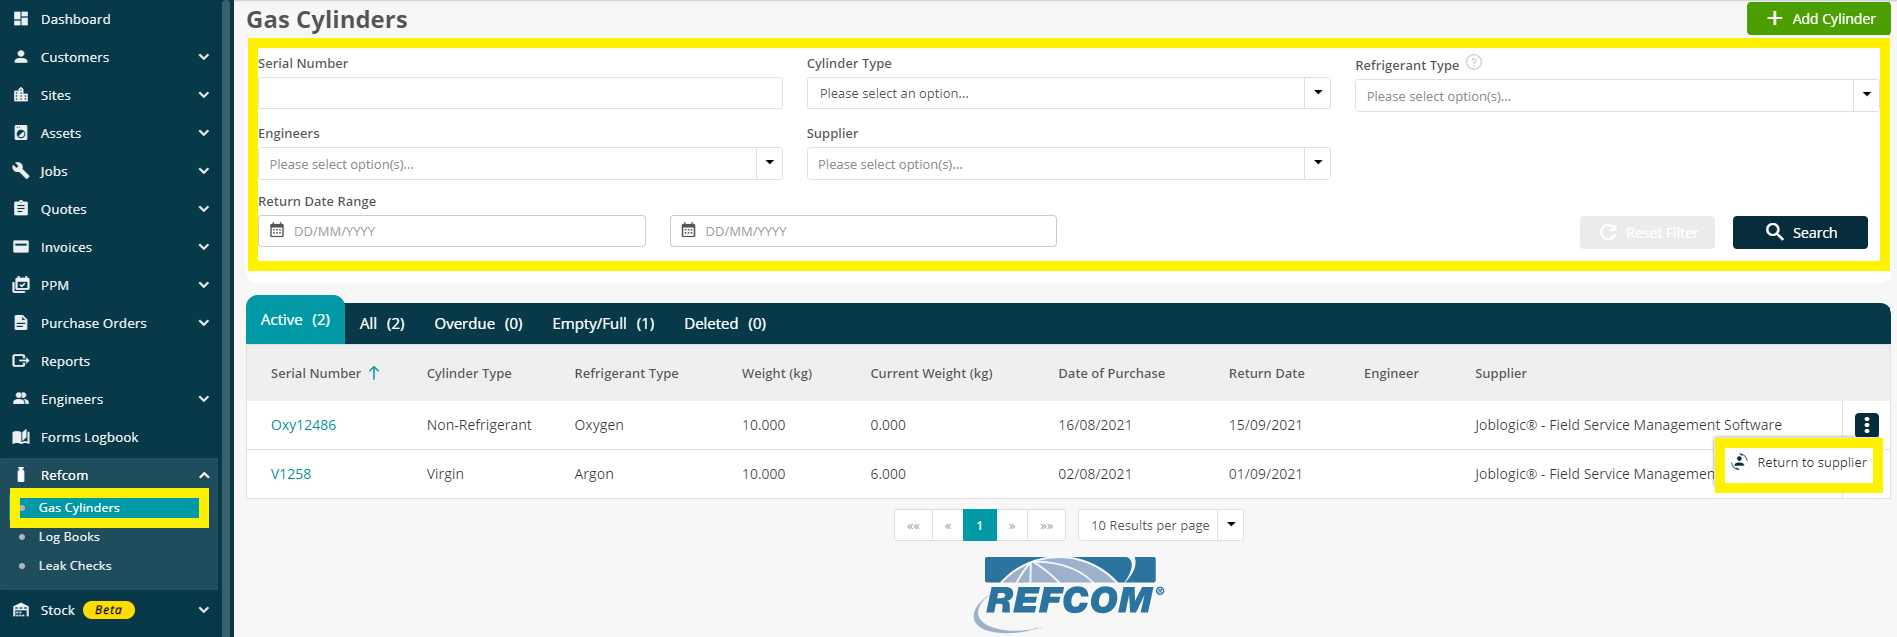
In order to add cylinders to your Joblogic account, select ‘Refcom’ > ‘Gas Cylinders’ from the left side dropdown menu and select ‘Add Cylinder’ from the top right corner.
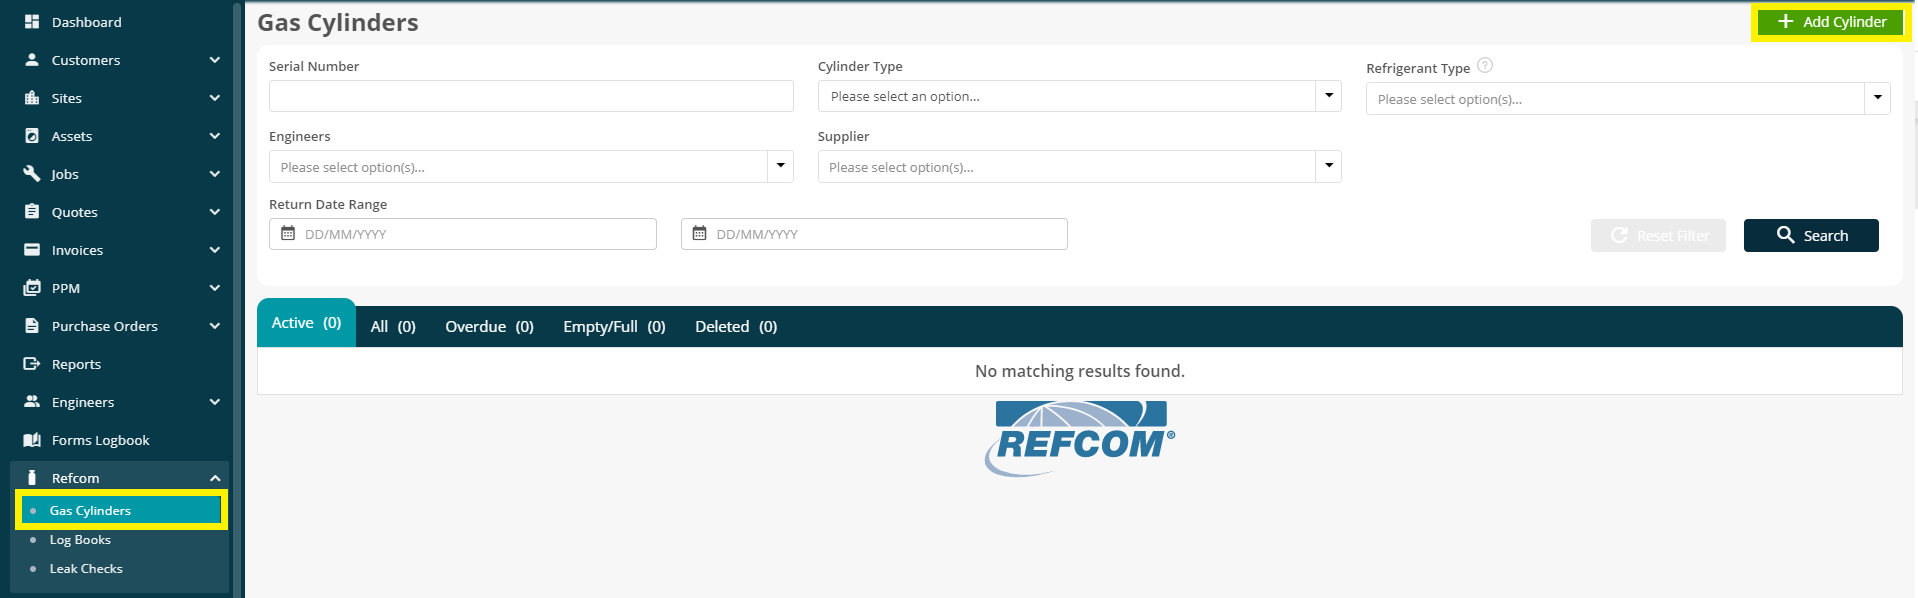
Select the cylinder type, fill in the cylinder’s details as applicable and mark whether the cylinder is currently being stored with the engineer, at the customer's site or at your storeroom. Click ‘Save’ and the cylinder will be recorded with the details entered.
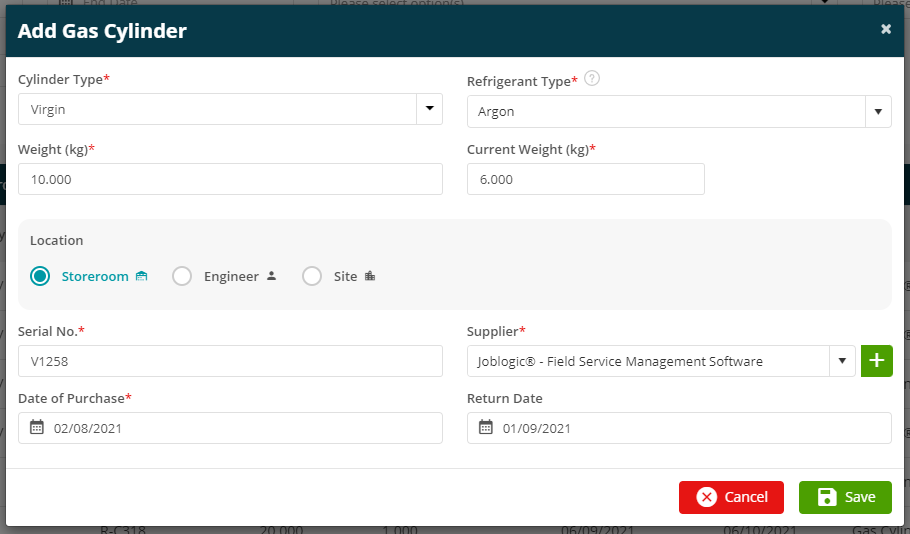
Be aware that the ‘Weight’ field refers to the cylinder's maximum capacity and the ‘Current Weight’ refers to how much refrigerant is currently within the cylinder.
Amending Cylinder details and Changing Location
In order to change cylinder details such as purchase and return dates, the recorded supplier or it’s current location, select ‘Refcom’ > ‘Gas Cylinders’ from the left side dropdown menu.
Select the cylinder that you wish to amend the details of by selecting it’s blue serial number button.
Within the ‘Edit Gas Cylinder’ page, amend the details as applicable. For example, to mark the cylinder as now being stored at the customer’s site, select the site icon and choose the site from the dropdown list.
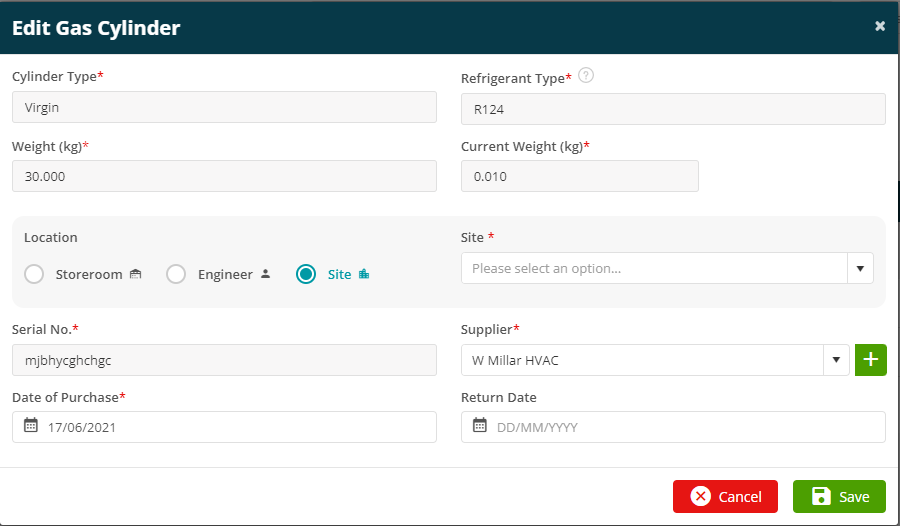
Select ‘Save’ and the cylinder will be amended as per the updated details.
How to ‘Decant’ a Cylinder
In order to decant a cylinder, open the ‘Gas Cylinders’ page by clicking the Refcom dropdown menu from the left side navigation pane and navigate to the cylinder that you wish to decant using the search and filter tool at the top of the page.
‘Click the ‘More Options’ (⠇) icon next to the cylinder that you wish to decant and select the ‘Decant’ option.
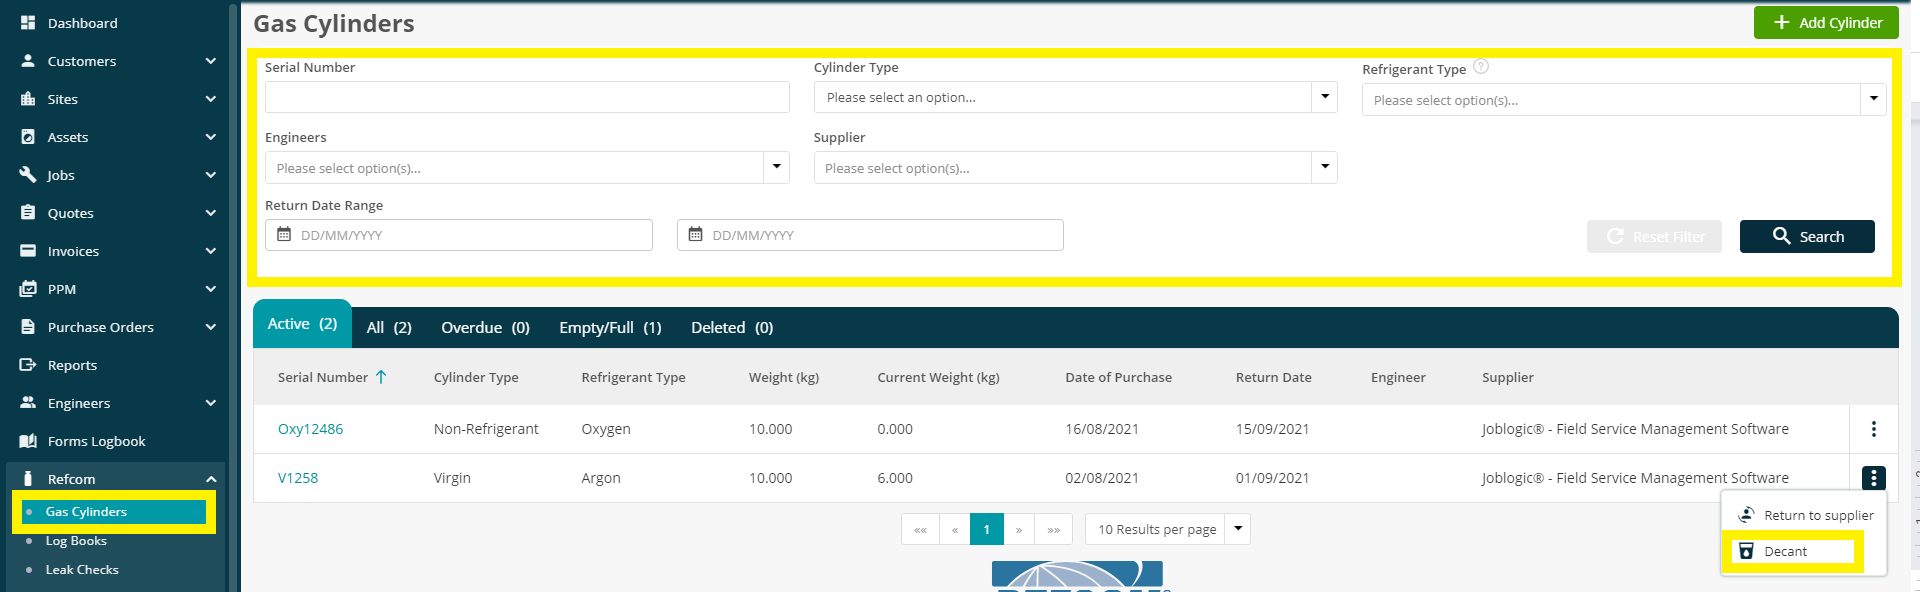
Select the destination cylinder (the cylinder of which you are decanting the refrigerant into) and fill in the destination cylinder's capacity details. Enter the amount you are decanting (the Quantity field) and select ‘Save’.
How to Return a Cylinder to the Supplier
In order to record a cylinder as having been returned to the supplier, open the ‘Gas Cylinders’ page by clicking the ‘Refcom’ dropdown menu from the left navigation menu and navigate to the cylinder that you wish to return.
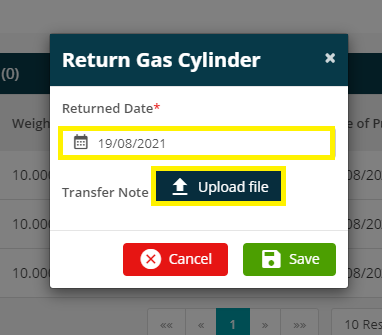
Click the ‘More Options’ (⠇) icon next to the cylinder that you wish to return and select the ‘Return to Supplier’ option.
Enter the ‘Return Date’ and upload the ‘Transfer note’ (this is not generated by the system and will need to be created manually). > select ‘Save’.
Swapping a Cylinder if Used in Error
If a user accidentally records the wrong cylinder against a transaction, a back office user can swap the incorrect cylinder with the correct one.
To do this, navigate to the ‘Refcom Audit’ within Refcom dropdown menu on the left navigation pane and select ‘Swap Cylinder’.
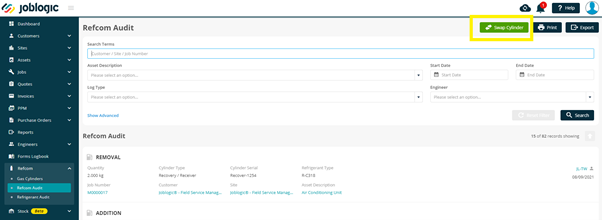
Within the Swap Cylinder section, the search filter at the top of the page can be used to locate a particular transaction or refine the list of transactions to swap any cylinders for. For example, to find the transactions concerning a particular cylinder.
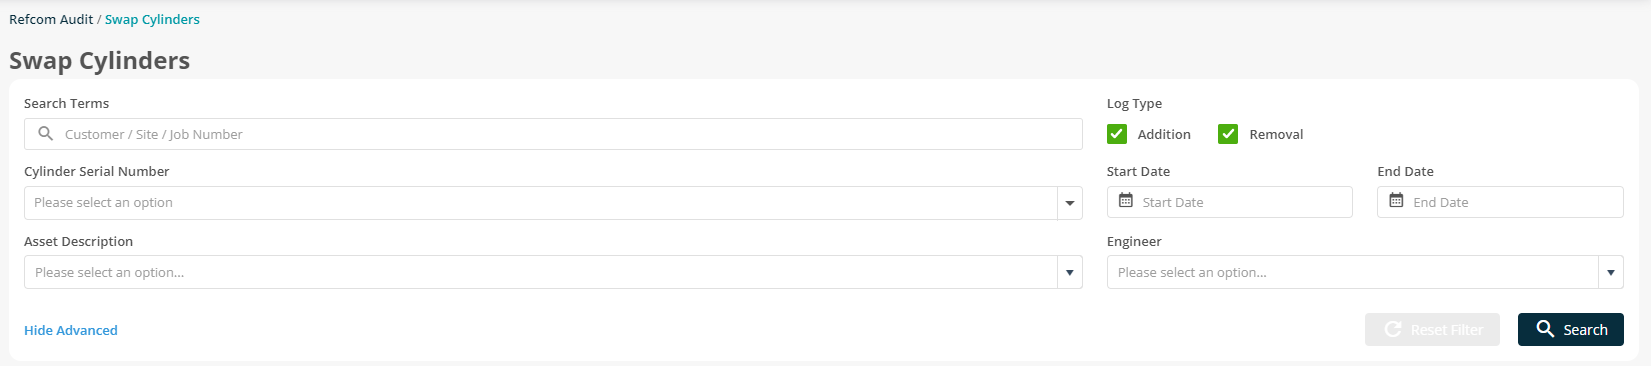
The Cylinders can be swapped individually for each transaction or can be swapped in bulk by using the tick boxes to mark those that you wish to swap (must concern the same original cylinder).
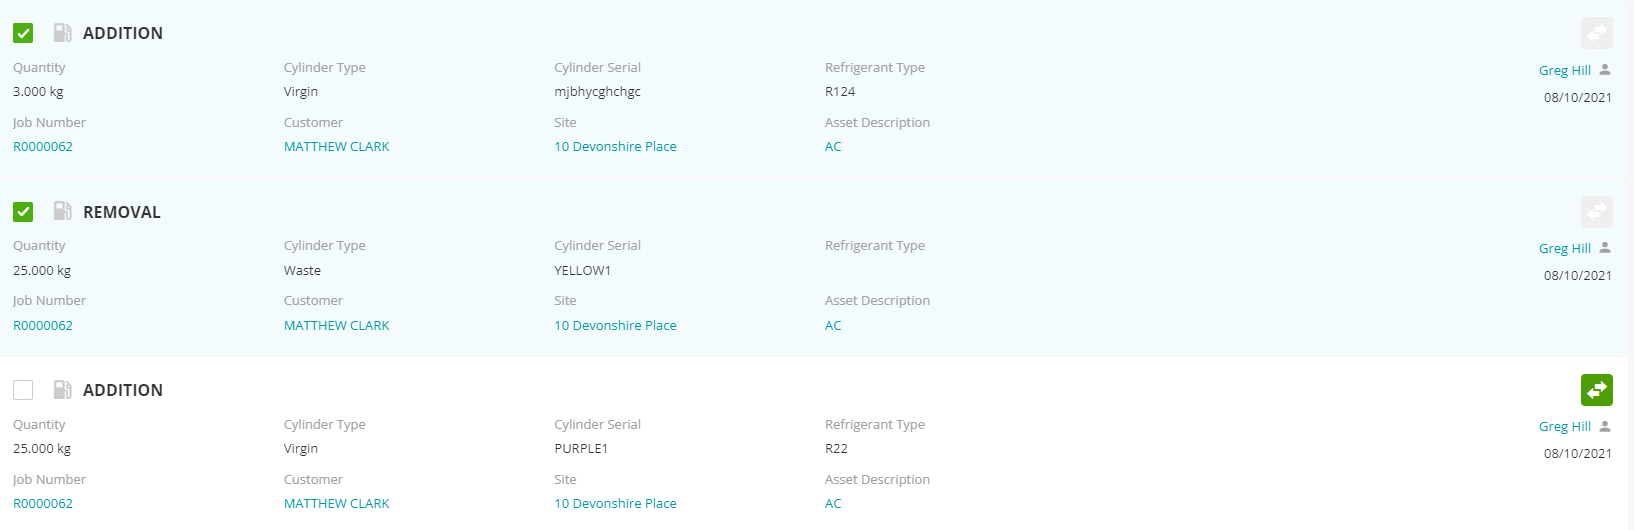
All the options shown under your search can be selected in one instance by ticking the select all tick box.
Once the required transactions have been selected, click the green ‘Swap Cylinder’ button in order to swap the selected cylinders in bulk. Alternatively, select the swap icon next to a single transaction in order to conduct a swap for that individual transaction.
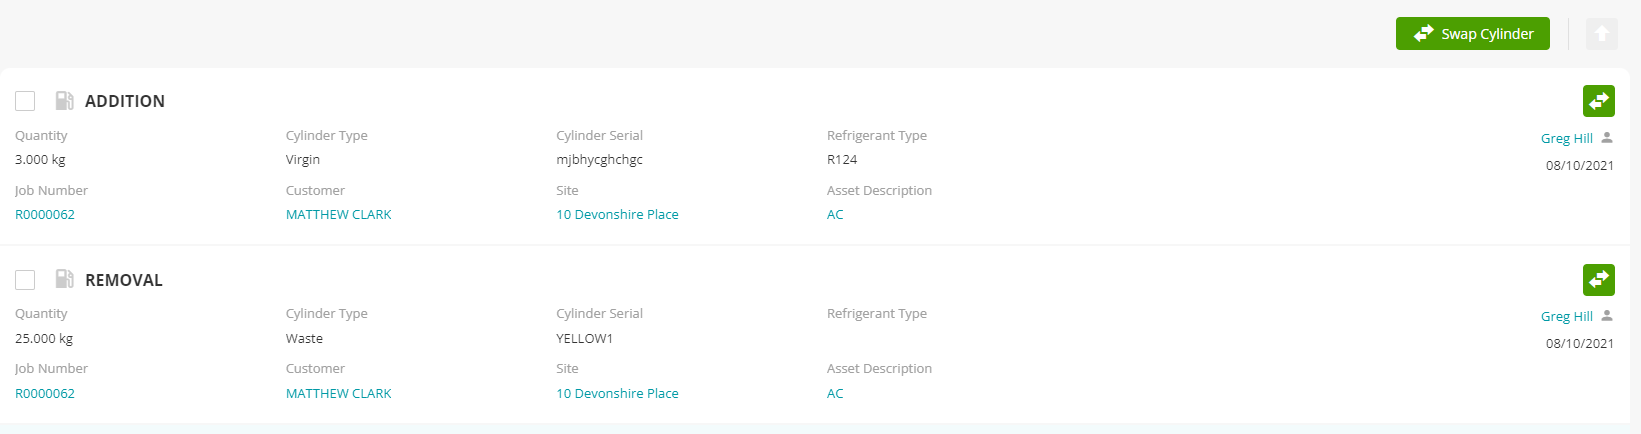
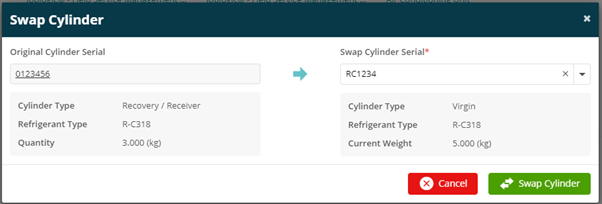
Within the swap cylinder pop-up window, select the correct cylinder that you wish to swap the original cylinder with from the ‘Swap Cylinder Serial’ dropdown list and select ‘Swap Cylinder’.
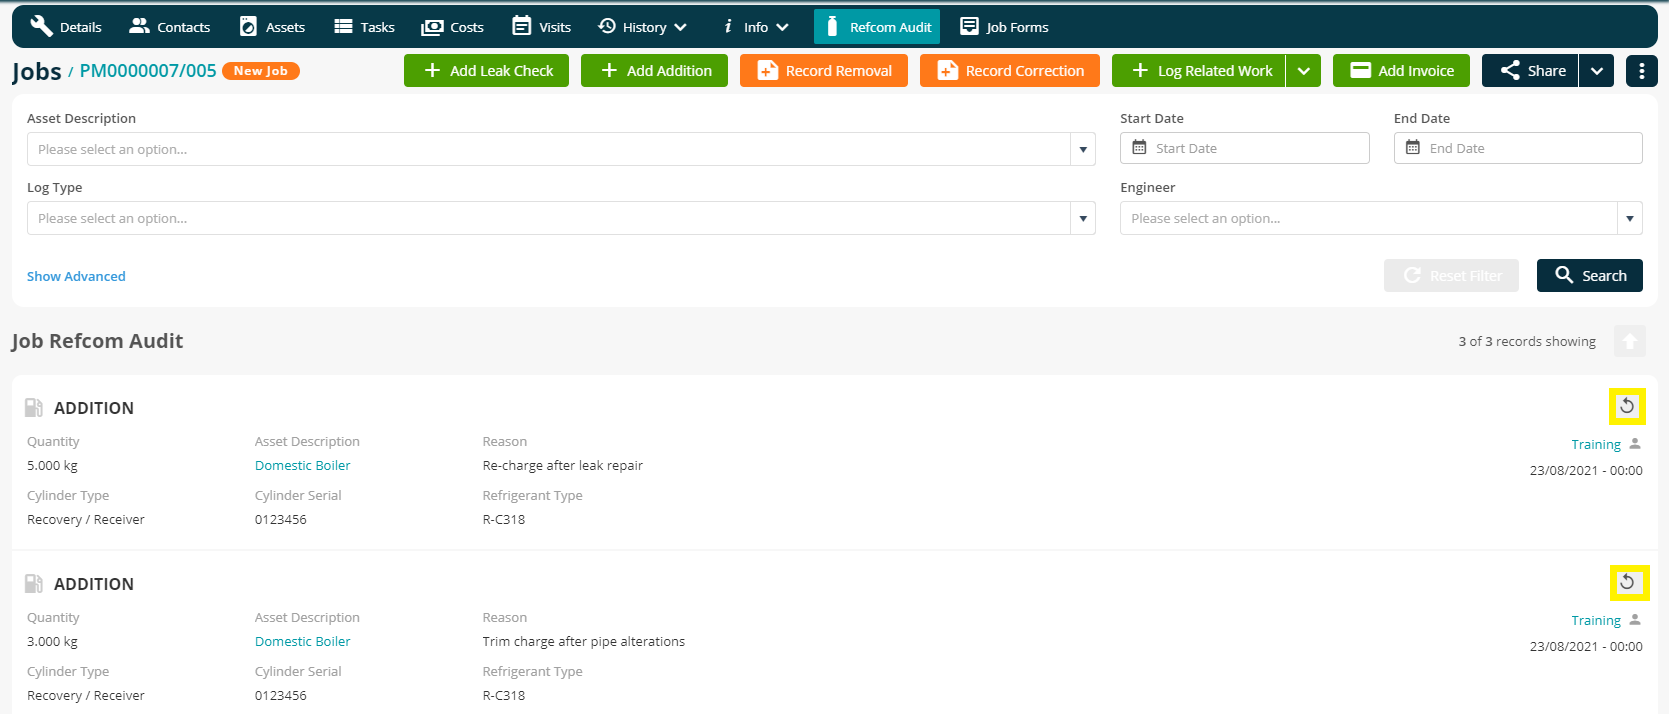
Once the swap is completed, the ‘Refcom Audit’ page will display a new, corrected transaction(s) with a ‘View Error’ icon against it.
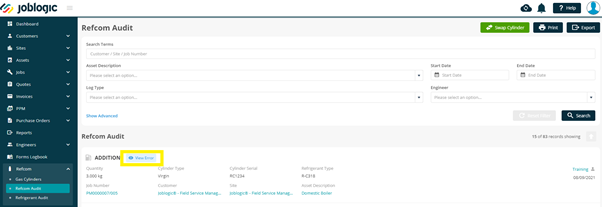
Selecting this will enable you to preview the original, incorrect cylinder.
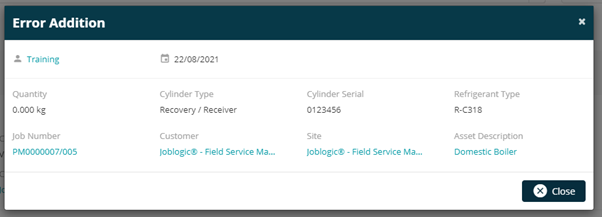
Additionally, an ‘Error’ label and ‘View Swap’ icon will be displayed against the original, incorrect transaction.
Selecting the ‘View Swap’ icon will enable you to preview the new/swapped cylinder.
Actions and Transactions
How to conduct a Leak Check
In order to conduct a leak check, navigate to the ‘Refcom Audit’ section within the main ‘Details’ page of the job against which the Leak Check needs to be conducted.
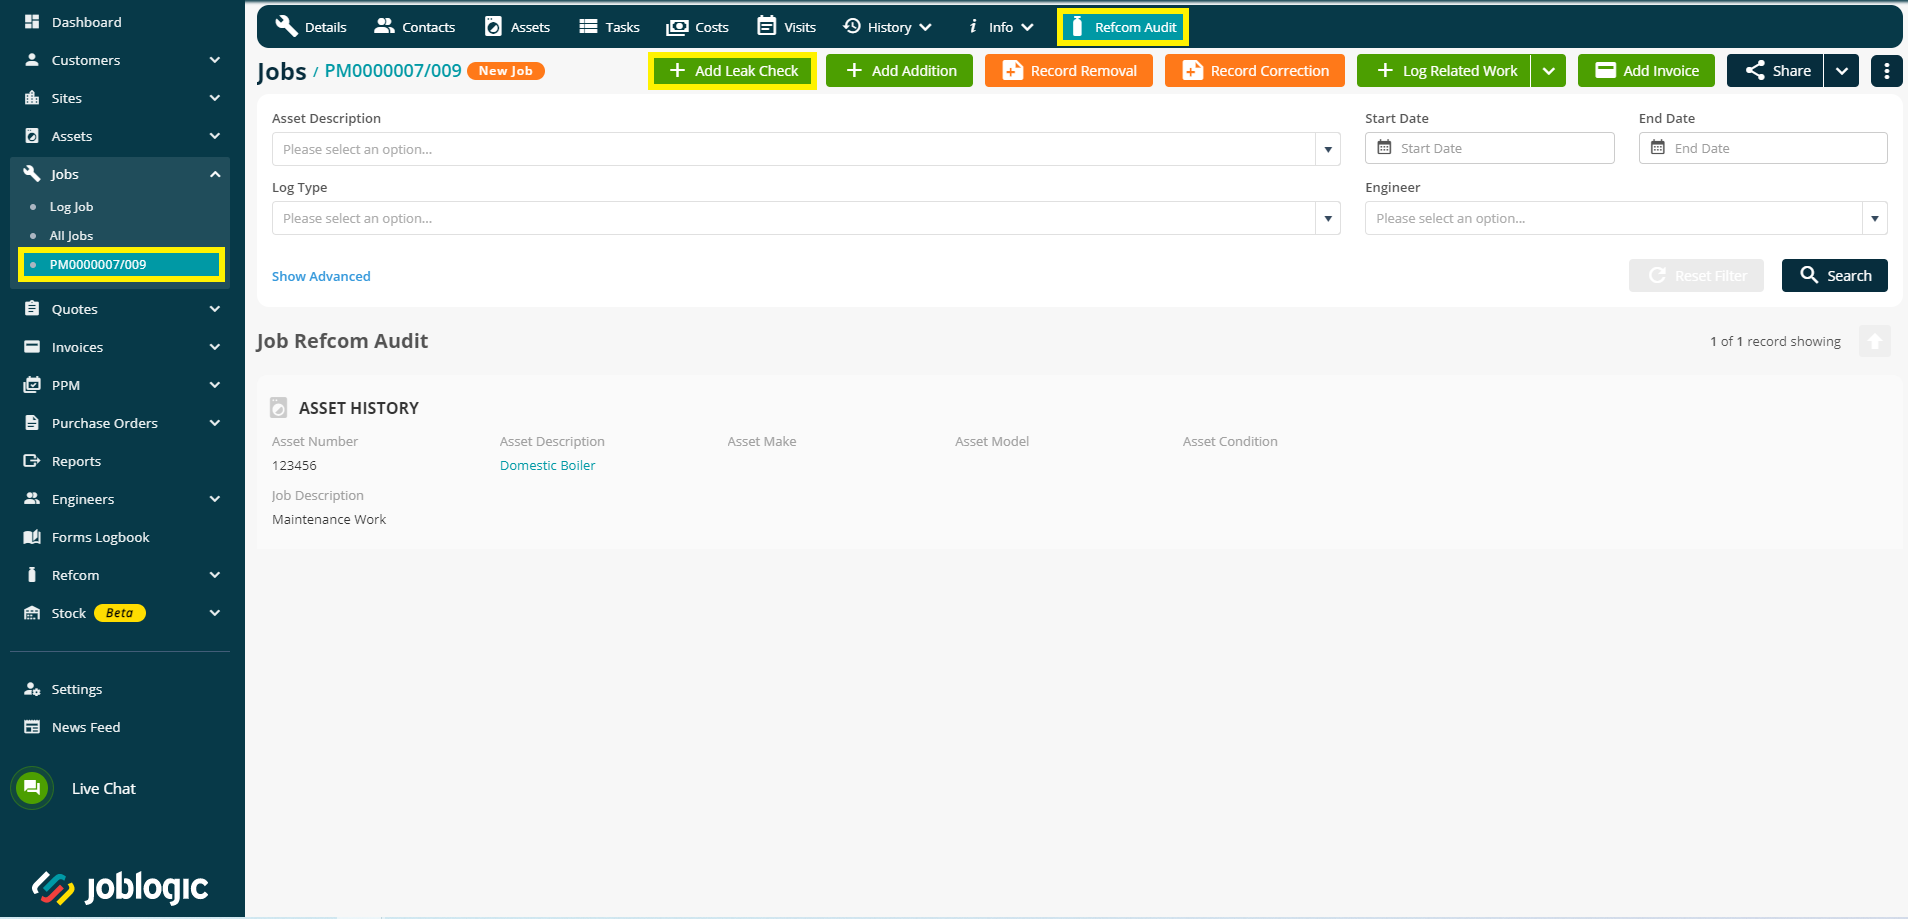
Within the Refcom Audit page of the job, select the ‘Add Leak Check’ and fill in the details of the leak check, such as the asset against which the leak check is conducted, the Engineer conducting the transaction, the transaction date and the check result (Pass or Fail) using the relevant icon. You may also enter a note regarding any follow-up actions, if required.
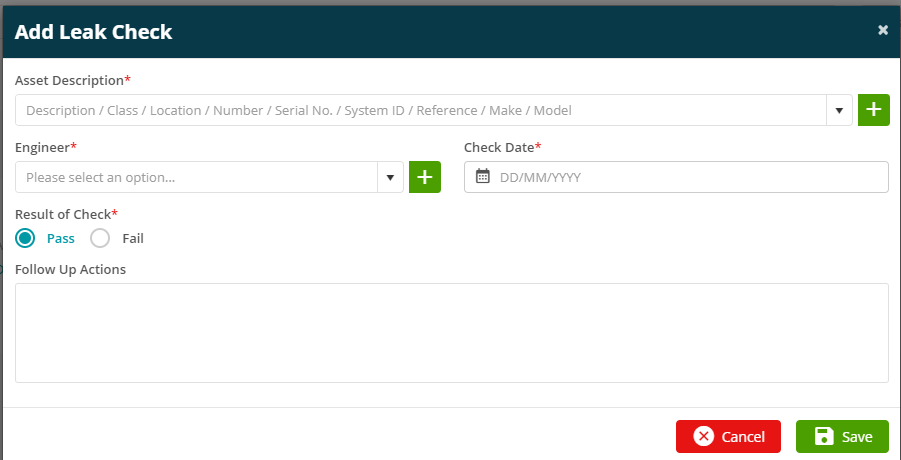
Once the required details have been filled in, select the ‘Save’ button and the leak check will be recorded within the Refcom Audit section.

How to conduct an addition
In order to conduct an addition, navigate to the main ‘Details’ page of the Job against which the ‘Addition’ transaction is to be recorded and click ‘Refcom Audit’.

Now click the ‘Add Addition’ button and fill in the details such as, selecting the asset that the addition is being made to, the ‘Gas Cylinder’ that the refrigerant is added from and enter the ‘Quantity’ of gas that’s being added.
You will also need to enter the ‘Transaction Date’, the ‘Engineer’ who made the addition and provide a transaction reason.


How to conduct a removal
In order to conduct a removal, navigate to the main ‘Details’ page of the job against which the ‘Removal’ transaction is to be recorded and click 'Refcom Audit'.
Now click the ‘Record Removal’ button and fill in the details such as, the asset which the gas is being removed from, the ‘Gas Cylinder’ which the gas is being transferred into and enter the ‘Quantity’ of gas that has been removed.
You will also need to enter the ‘transaction date’, the engineer who made the removal and provide the transaction reason. Additionally, you will need to upload your manually created transfer note here.

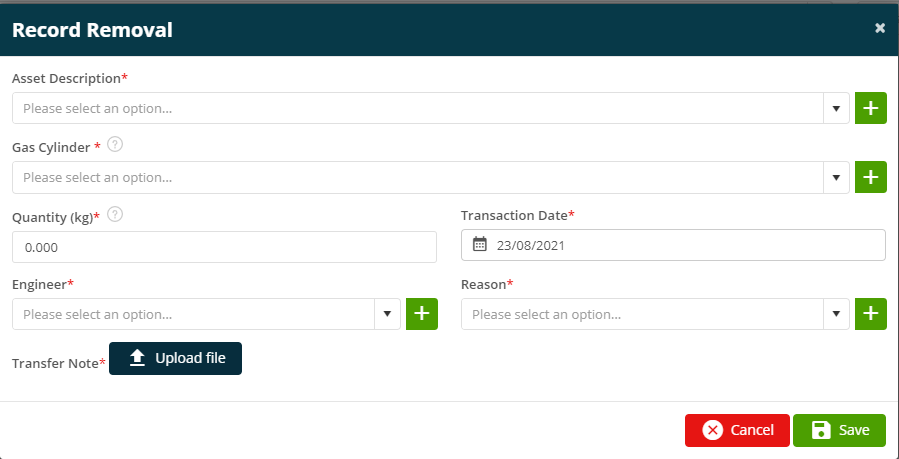
Once the required details are filled in, click the ‘Save’ button to record the removal transaction.
How to conduct a correction
In order to conduct a correction, navigate to the job that the correction needs to be conducted against and click ‘Refcom Audit’.
Select the ‘Record Correction’ button and fill in the details of the correction such as, the Asset that the correction needs to be made against, the correction date, the engineer concerned and the reason for this correction.
In the ‘Quantity’ field, enter a positive or negative value as applicable.
For example, in order to reduce the total charge by 5kg, enter ‘-5.000kg’. To increase the total charge by 5 kg, enter ‘5.000kg’.
The expected ‘New Charge’ of the asset will display based on the quantity entered and the current charge of the asset.
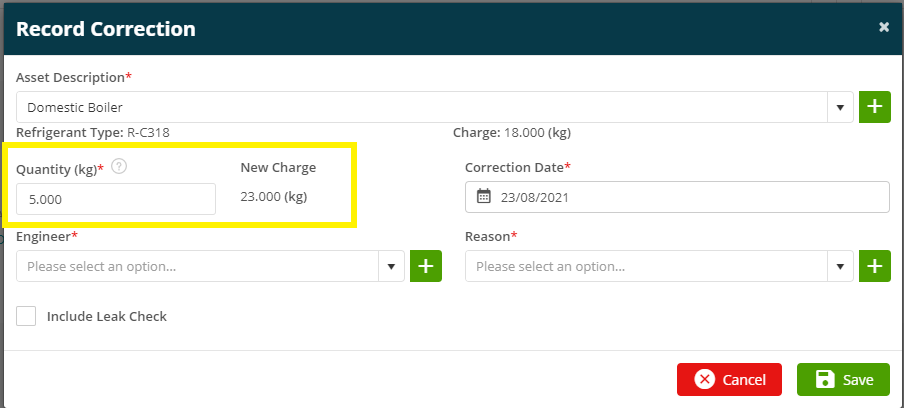
There is also an option to associate a leak check failure to the correction. In order to do this, select the ‘Include Leak Check’ tick box and a leak check failure entry will be created. Enter the follow-up action, select ‘Save’ and the correction and associated leak check will be recorded based on the ‘Correction Date’ entered.
How to conduct a Revert
In order to revert any transactions/actions recorded, select the revert icon against the action that you wish to revert. The asset and cylinder quantities will then revert back to values prior to that action having been recorded.
Further Support
For further information or assistance with the above, contact our Support Team on 0800 326 5561 or email support@joblogic.com. Alternatively, our Customer Success Management team can be reached by emailing customersuccess@joblogic.com
Publishing Details
This document was written and produced by Joblogic’s Technical Writing team and was last updated on the date specified above. Be aware that the information provided may be subject to change following further updates on the matter becoming available. Additionally, details within the guide may vary depending on your Joblogic account’s user permissions.