Introduction
The service jobs feature focuses on residential customers, allowing you to establish services according to asset compliance.
You will be able to select service frequencies (Weekly, Monthly, Quarterly, Annually) and customize reminder letter templates.
Once configured, services can be applied to customers and sites, generating service jobs and reminders based on set frequencies and target dates.
This guide will walk you through all of this and help you to set up services, while making sure you remain compliant along the way.
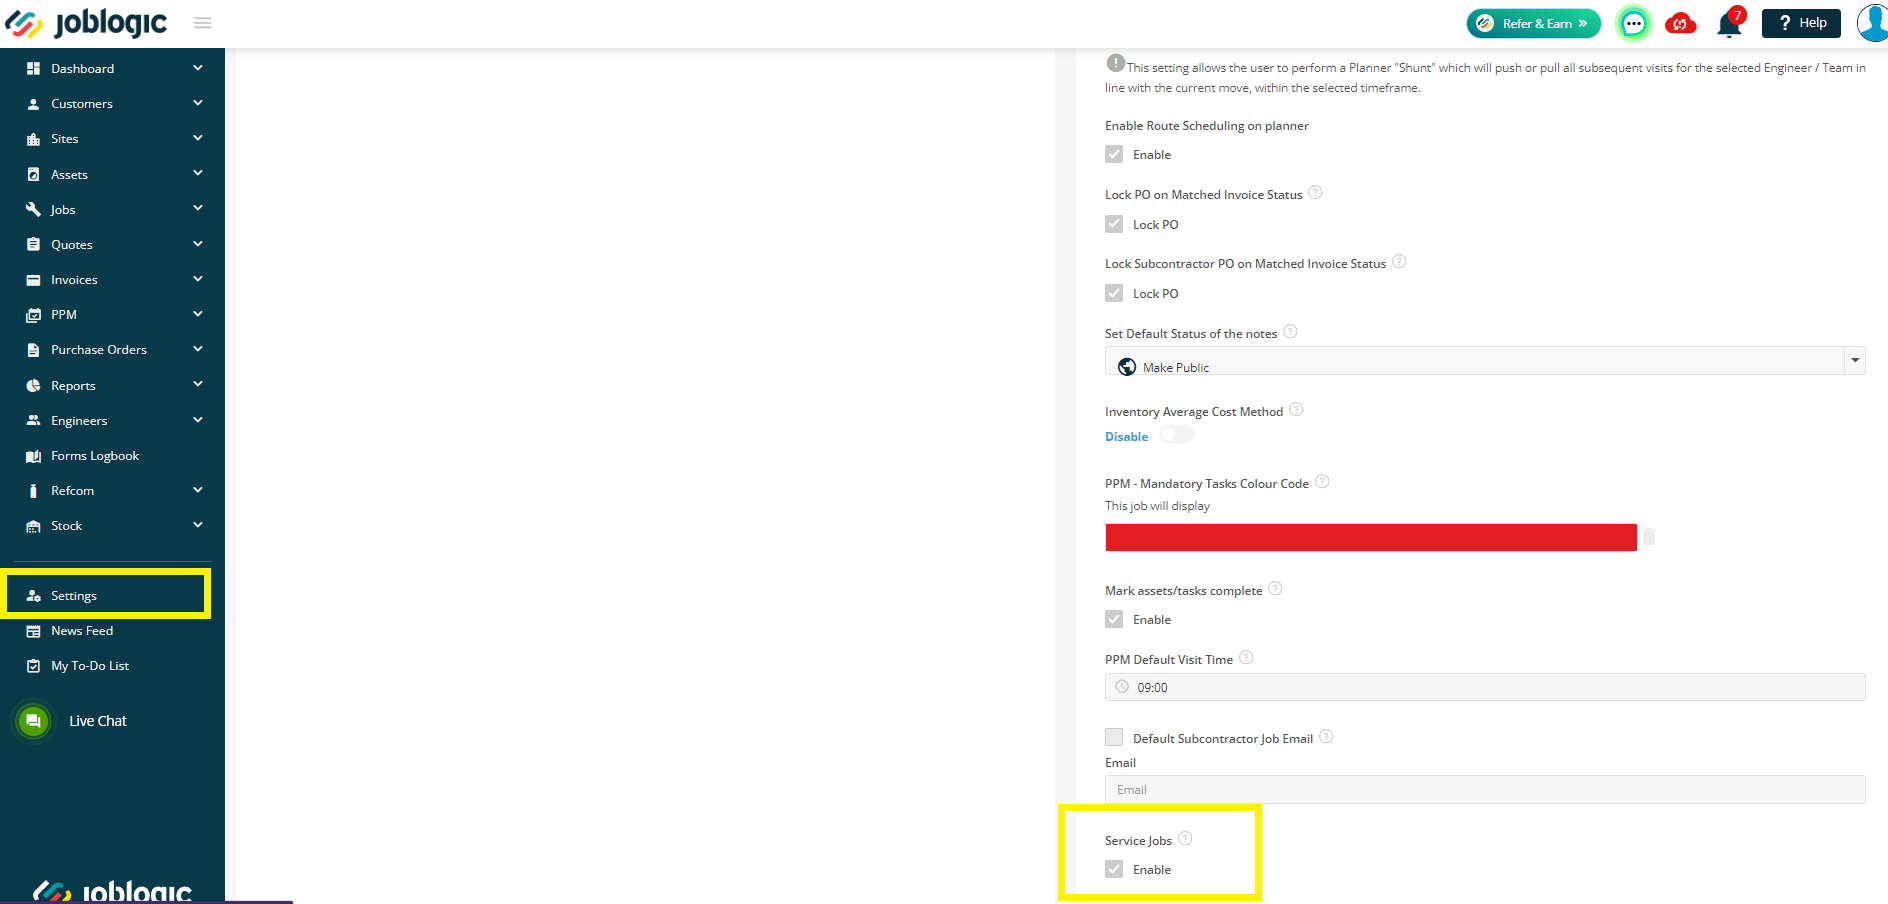
Enable / Disable Service Job Setting
You will firstly need to Enable the Service Jobs feature by going to Settings > System Setup. You will then need to click edit and scroll to the bottom of the page to tick Enable Service Jobs.
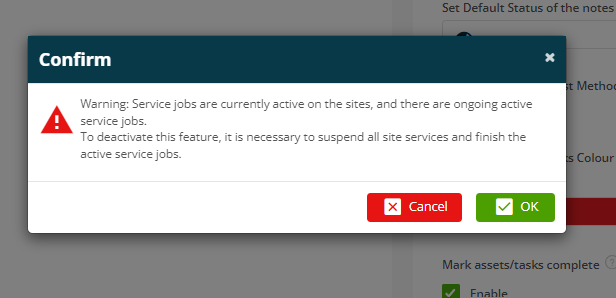
If you choose to untick and disable this with some active services ongoing, you will receive the following warning message:
Warning: Service Jobs are currently active on the sites, and there are ongoing active service jobs.
To deactivate this feature, it is necessary to suspend all site services and finish the active service jobs.
If you do decide to disable this setting after using it, the following will be hidden:
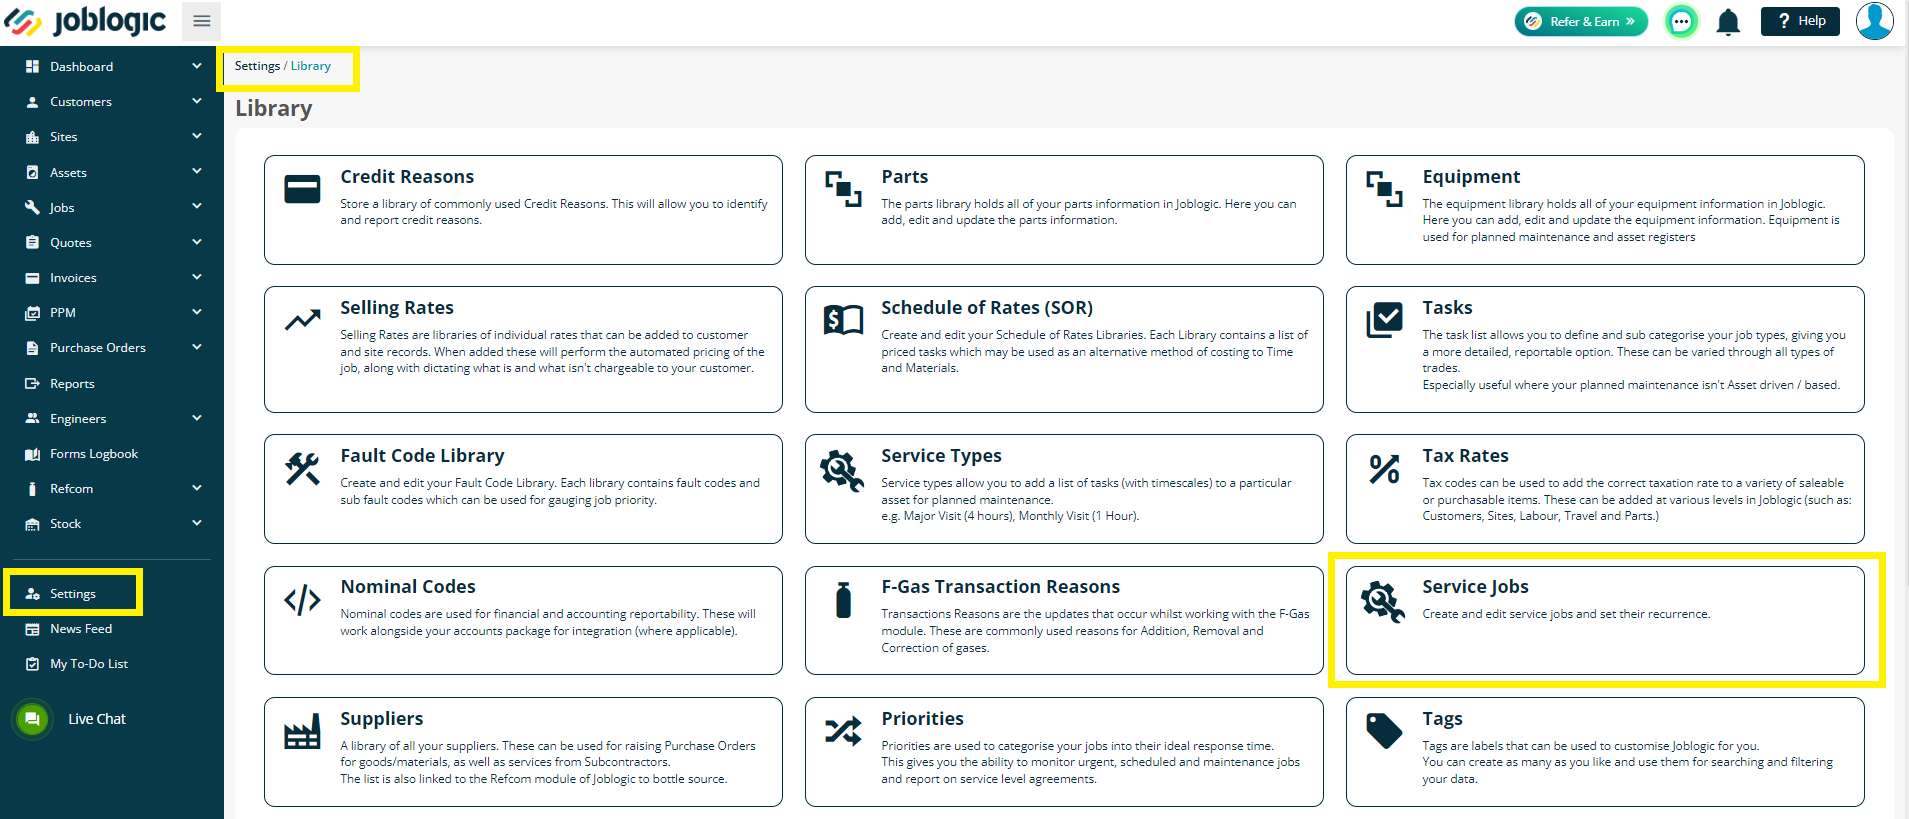
- Service Job in Settings > Library
- Service Job Library in Customer > Configuration
- Service Job tab in Site details
- Service Job Letter menu item under Jobs
- Service Job Letter option in Jobs > Info tab
- Service Letter tab in Settings > Document Templates
- Service Letter tab in Settings > Email
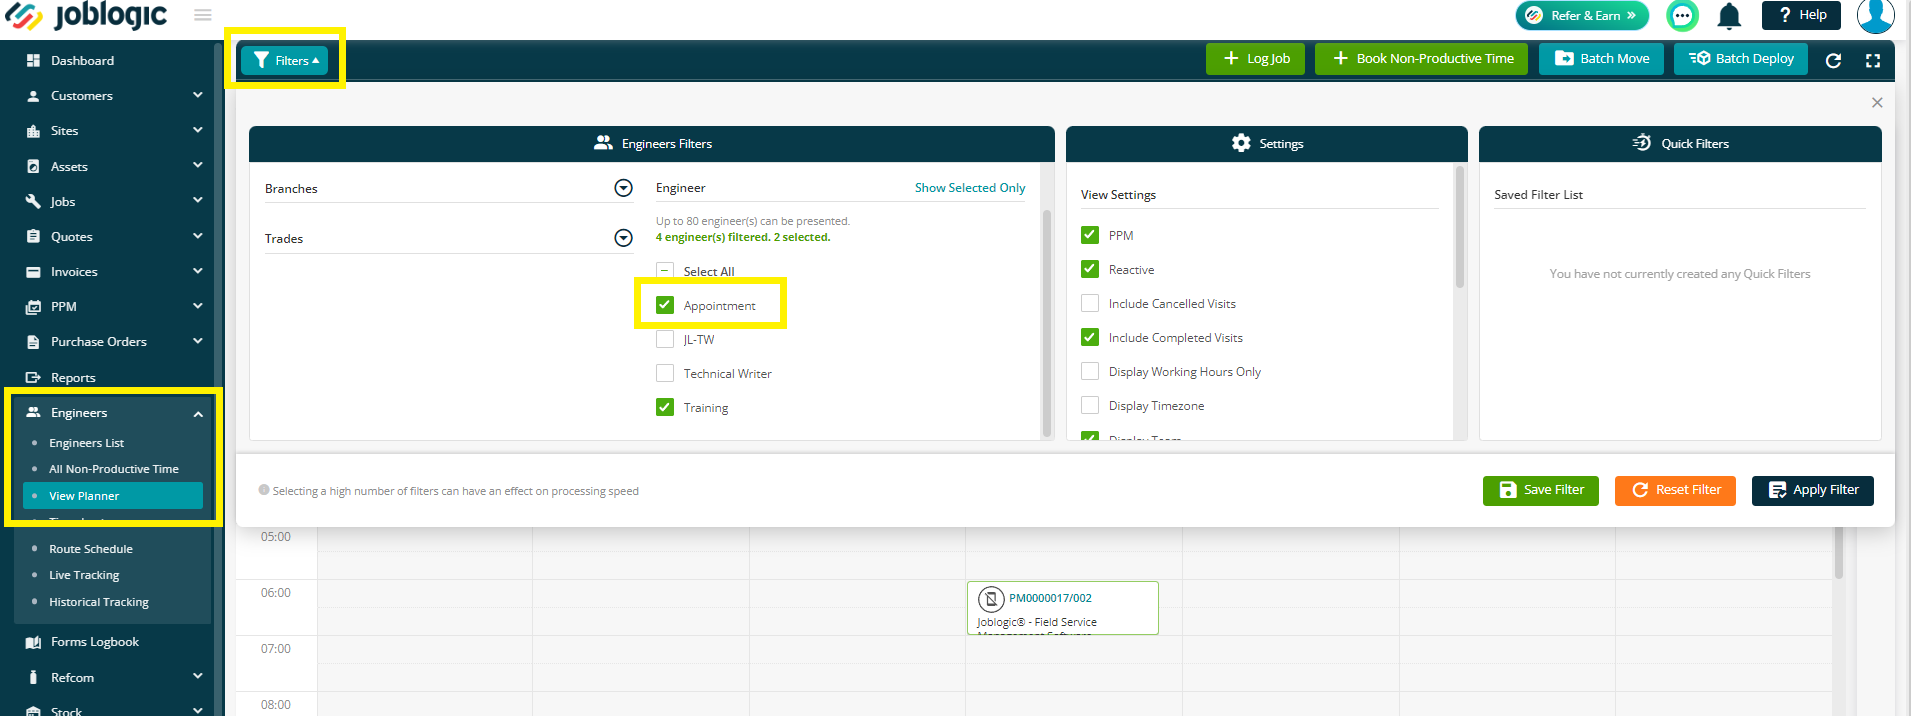
- Appointment option in Engineers > Planner > filters
However the following will remain for your reference:
- Service Job data already completed
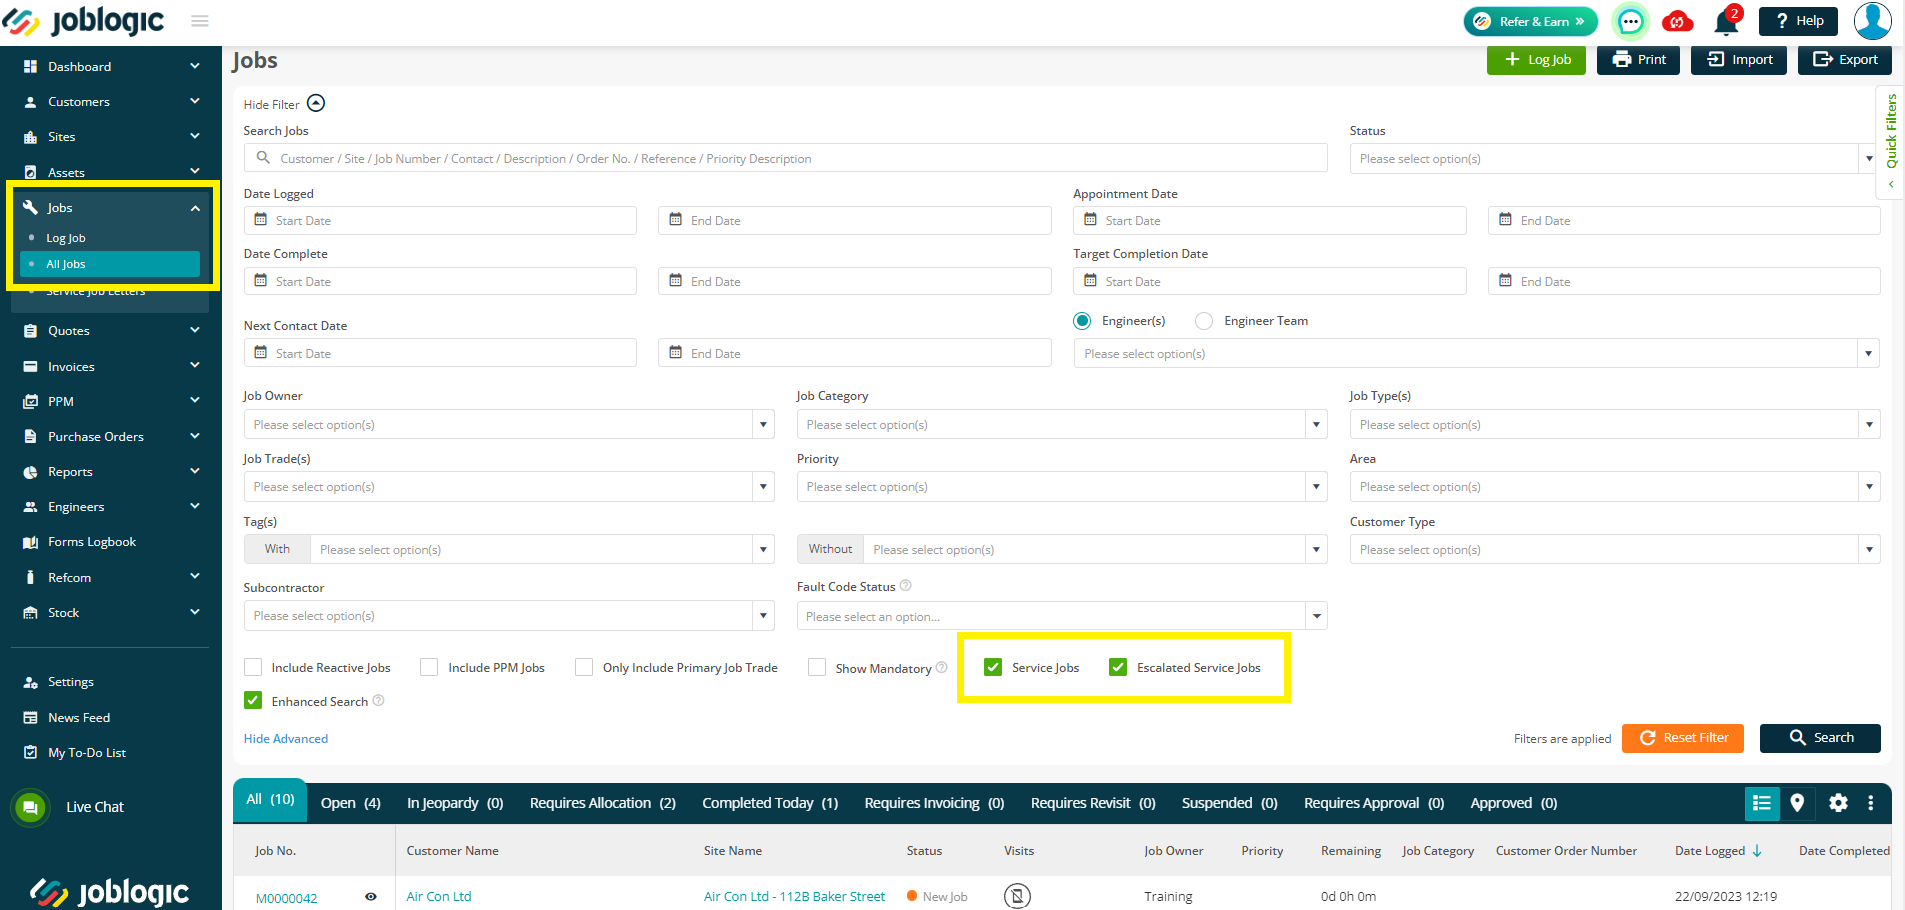
- The Service Job and Escalated Service Job filter on the All Jobs page
Setting up a Service
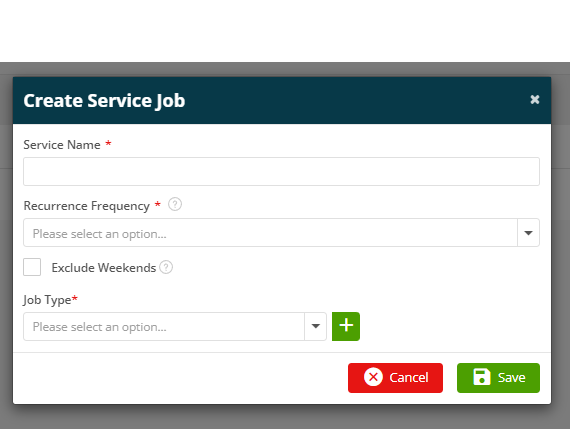
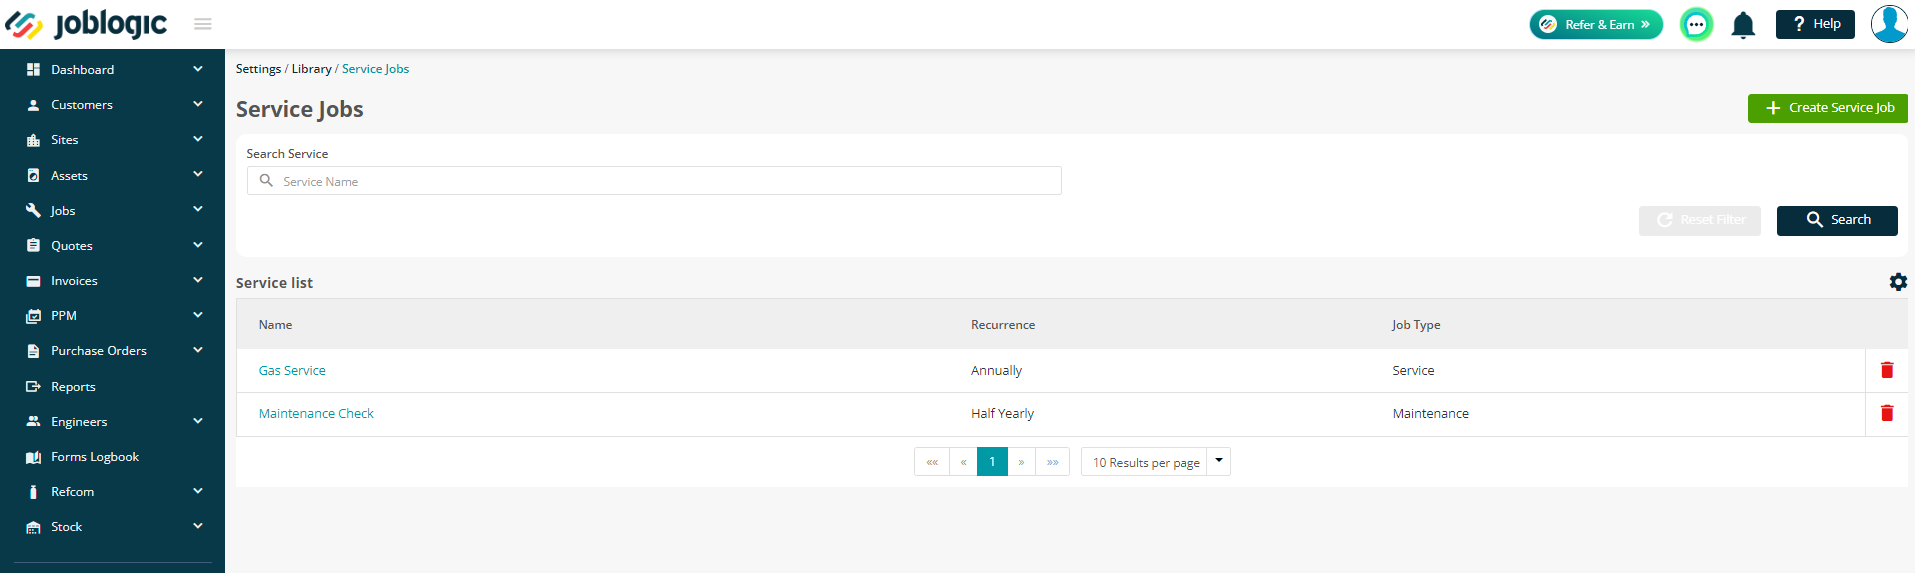
To set up your services, navigate to Settings > Library > Service Jobs.
From here, you can click on Create Service Job.
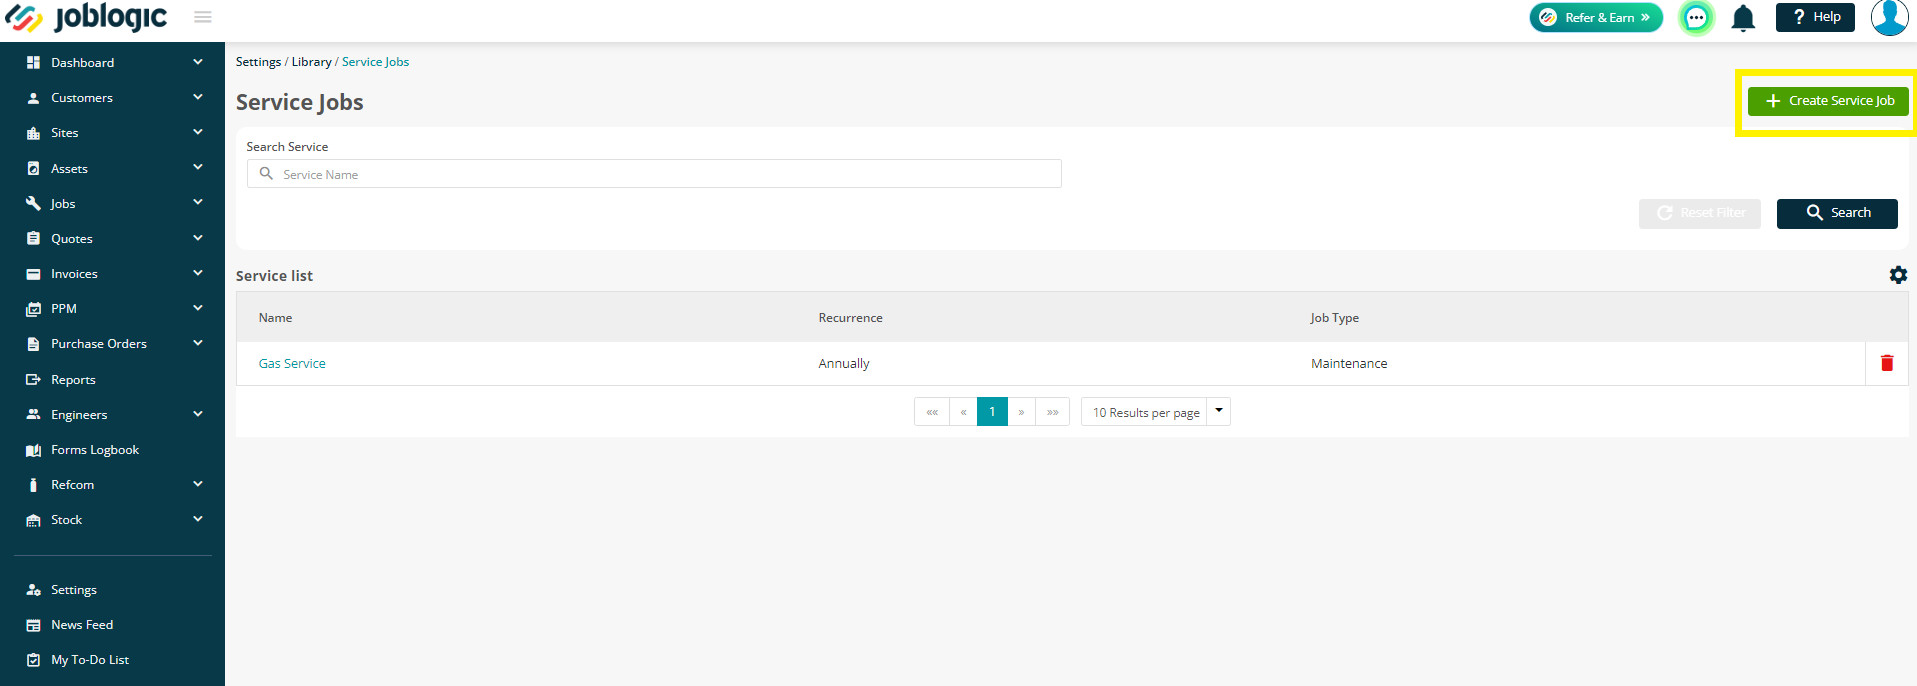
Enter your Service Name, Recurrence Frequency and Job Type.
You can also choose to tick the ‘Exclude Weekends’ if you wish for the service jobs to only include weekdays.
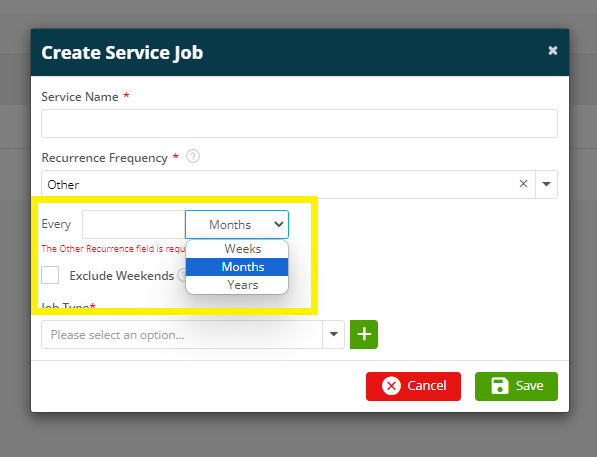
If you choose ‘Other’ under the Recurrence Frequency, you’ll get the option to choose your own frequency, in weeks, months or years.
Click Save - Now your new service will show in the list and is ready to set up against your customer.
Allocating a service to a Customer
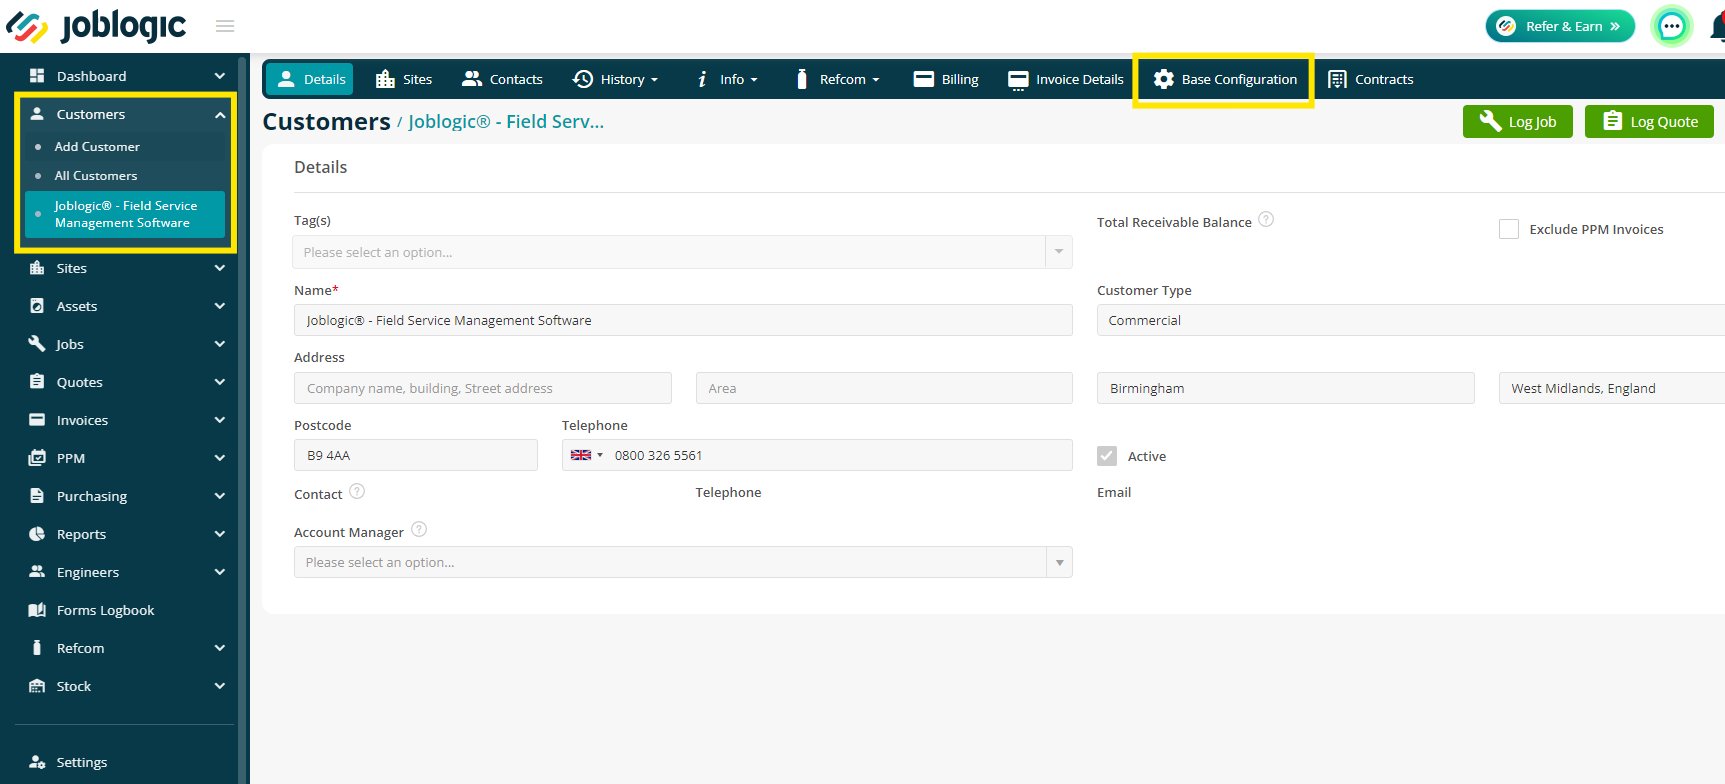
To allocate a service to your customer, navigate to Customers > All Customers > choose your customer > Base Configuration tab.
Next, scroll down to the Service Job Library section and click Add Service.
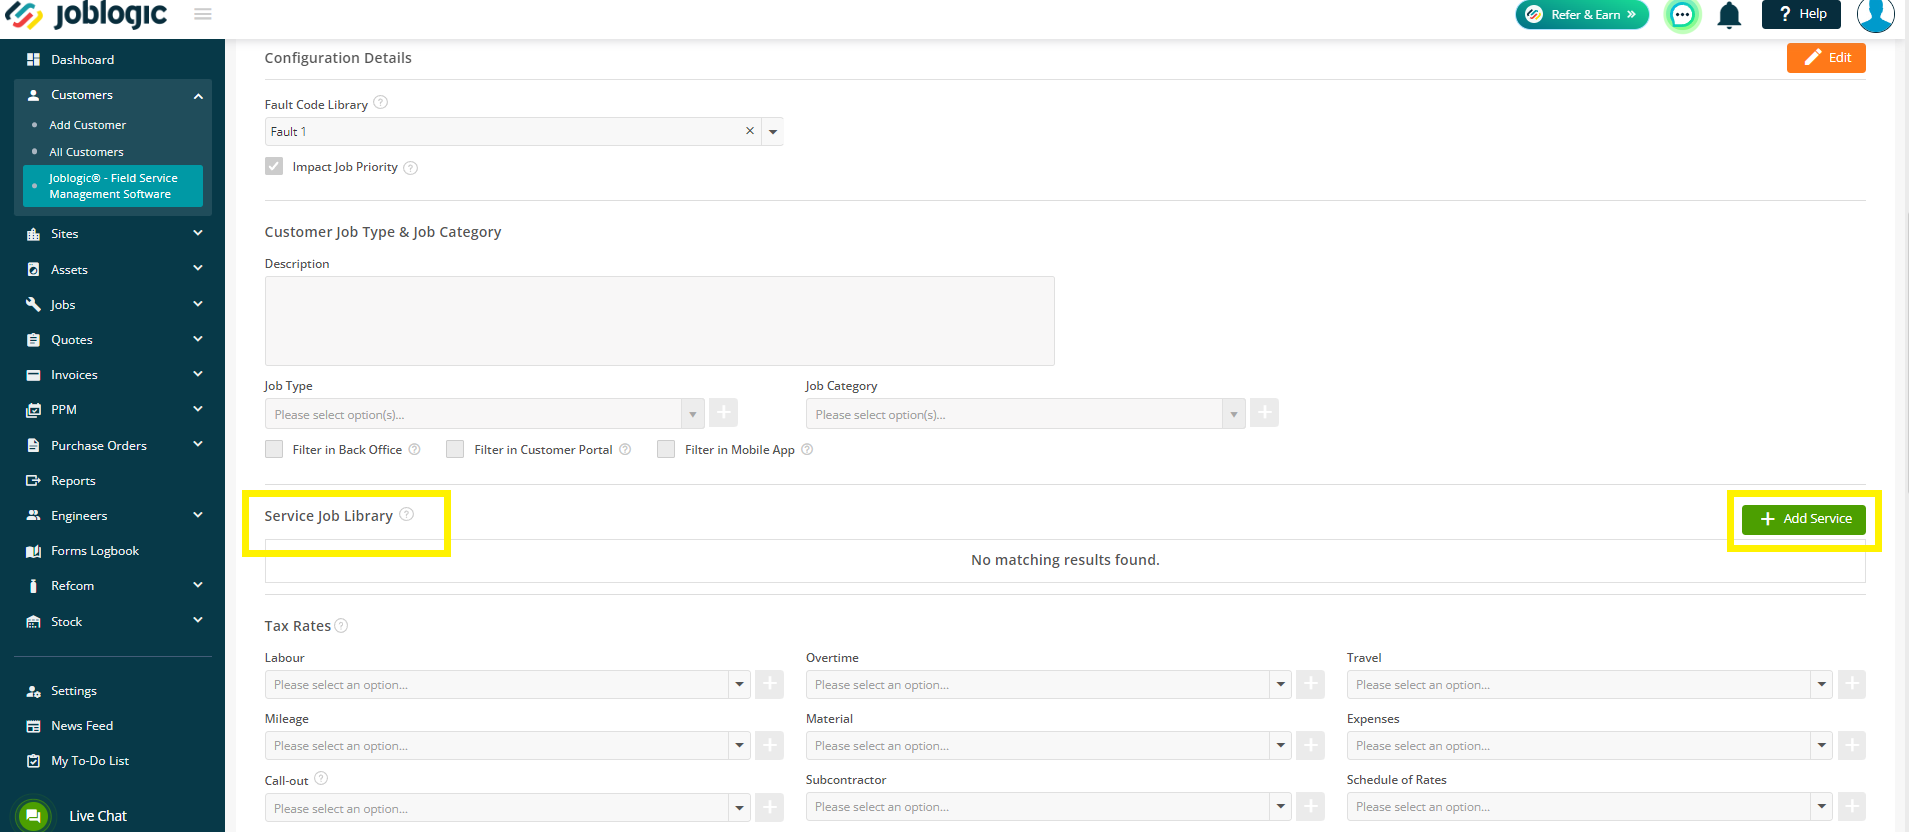
You will only be able to select services that already exist in your library.
Then you can setup the Visit Reminder Letter, by entering the First Reminder and Appointment Gap, in weeks or days as required.
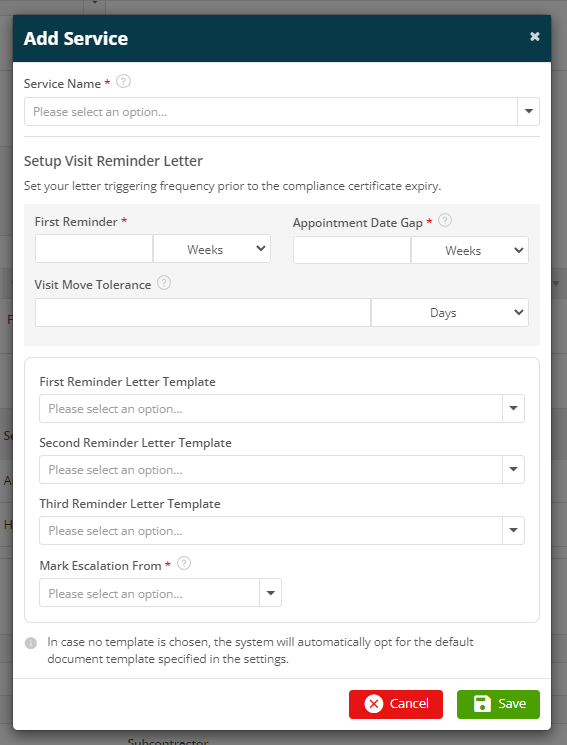
First Reminder: When you would like to send the first reminder letter, in preparation for a visit, before the compliance expiry date.
Appointment Gap: How long after the initial letter do you want the visit to take place.
Keep in mind to leave enough time in case of No Access visits / further reminder letters too.
Visit Move Tolerance: This allows you to set a limit for moving Service Job visits. If you do need to move a visit, this setting will only allow you to move the visit up to the number of days/weeks you have selected.
Reminder Letter Email Templates: You may choose service letters if you have set up custom templates, however you can leave these blank and the system will automatically use the system default found in Settings > Document Templates > Service Letter
Escalation:
Mark Escalation From - This is where you can set a point of escalation based on your reminder letters. Once a visit is marked as an escalation, it moves to the Escalations tab within the Jobs > Service Job Letters page. All corresponding documents (an escalation letter, job sheet, reminder letters and no access forms) are available to download or email as a zipped folder, as evidence to your customer, for contractual completion. Your job will then be marked as Completed, automatically.
Escalation Letter Template - Select your default template here if you wish. Again, if it's left blank, the system will automatically use the system default found in Settings > Document Templates > Escalated Service Letter
Time Display Format: Choose how appointment times are shown on service job letters. Instead of displaying exact times, you can present visits as broader time windows (e.g. Morning, Afternoon). For example, a 09:15 appointment can be shown as 08:00–13:00 (Morning), helping provide customers with clearer, more flexible scheduling expectations.
.jpg)
You can add more than one service against a customer if required.
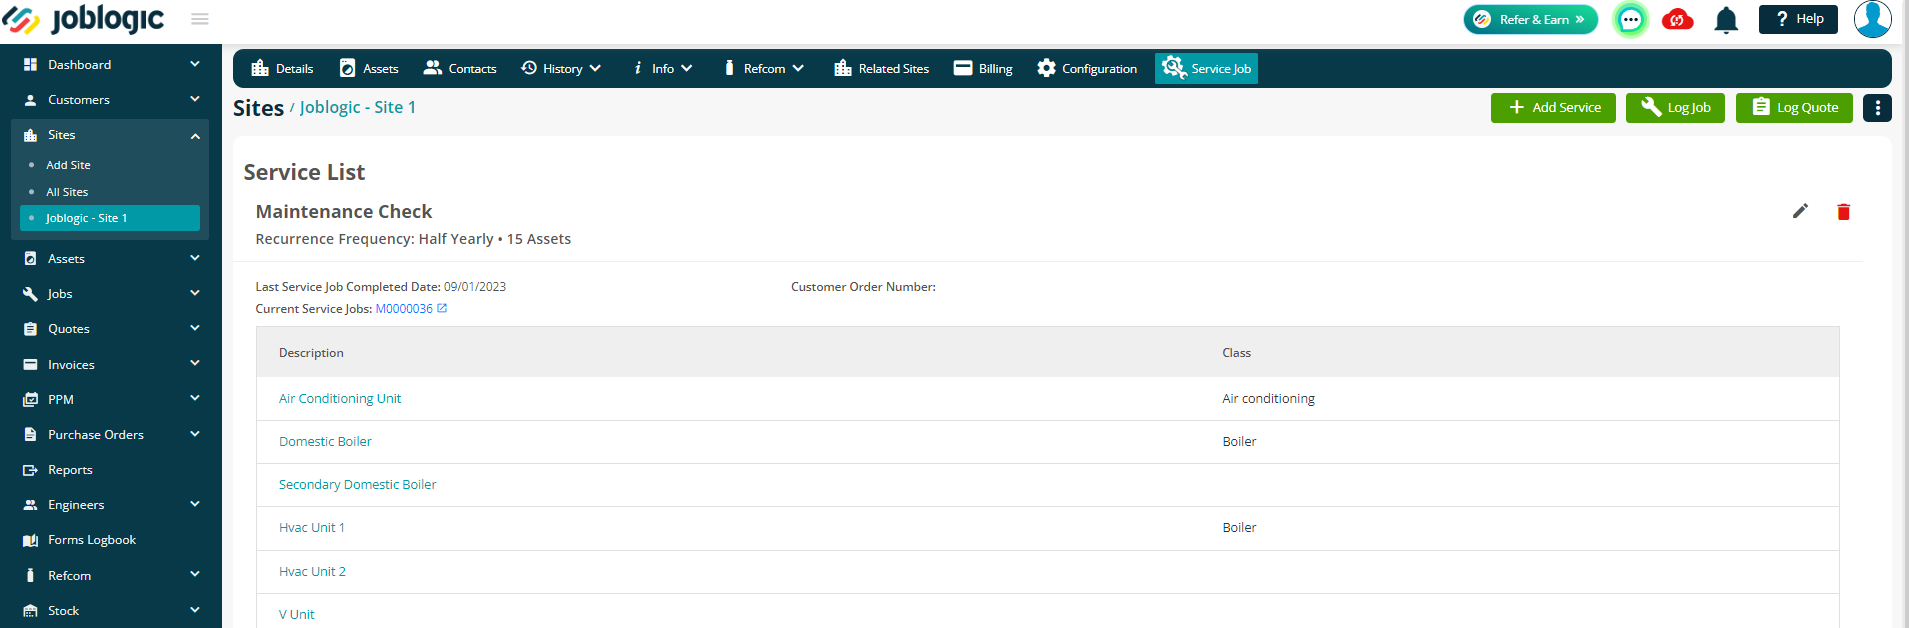
Allocating a service to a Site
The next step is to set up the Service jobs against your site.
So, to do this, go to Sites > All Sites > choose your site > Service Job > Add Service.
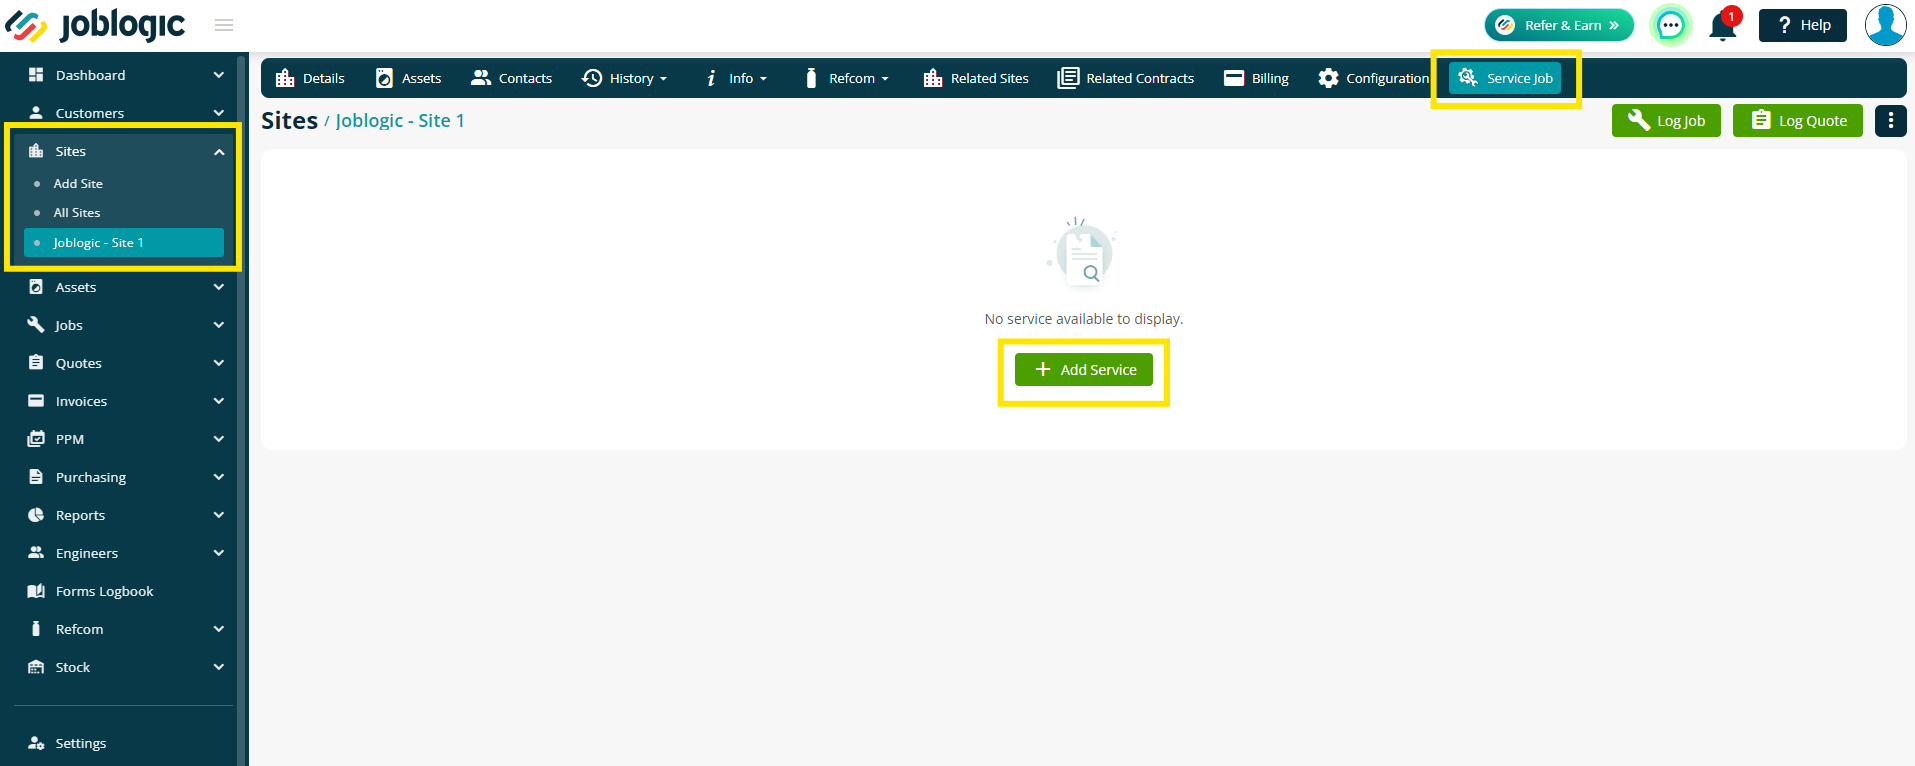
You will only be able to select services that have already been set up against the customer.
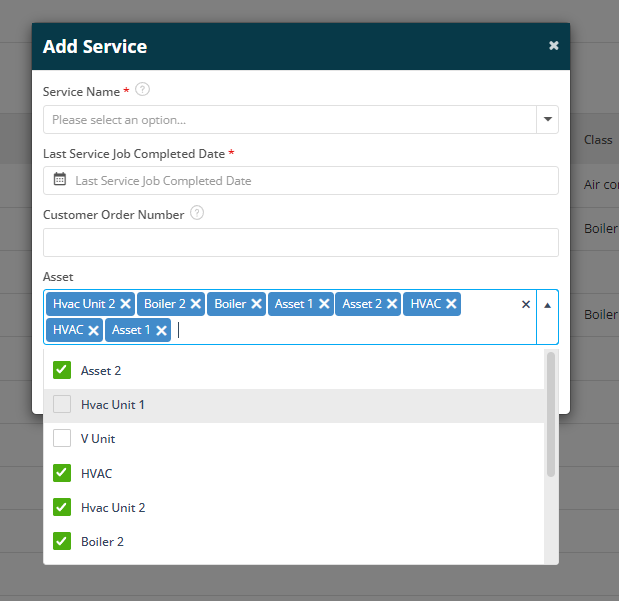
Choose the Service and then enter the Last Service Job Completed Date and a Customer Order Number if you wish.
You can then select your assets, for this service, from your site asset list.
All assets assigned to this site will be ticked by default.
Click Save and now you can see your site service job details.
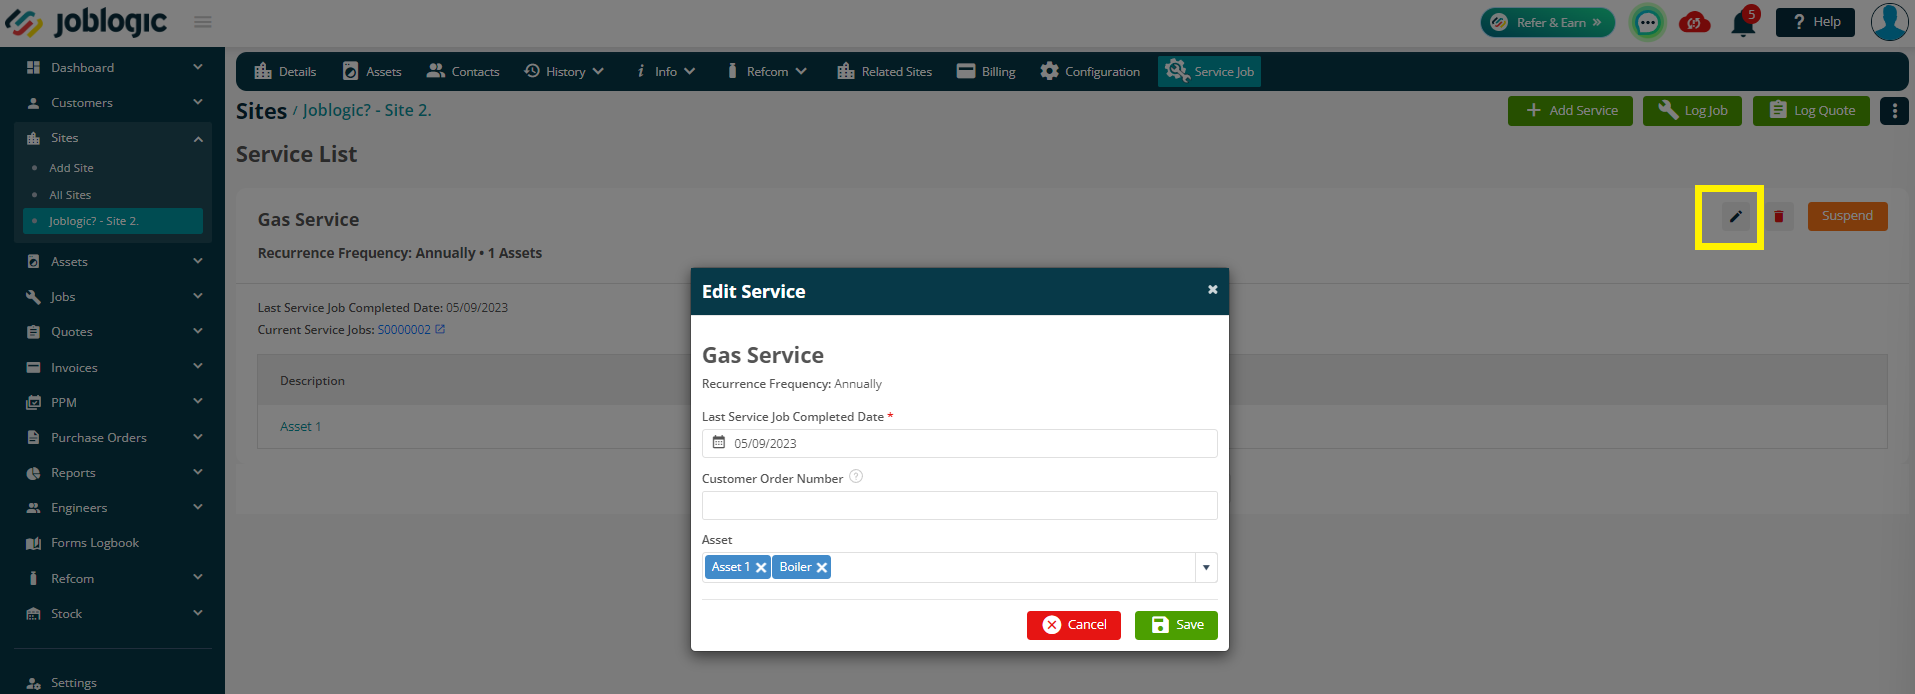
If you wish to edit the service, click the pencil icon on the right – you can make changes to the Last Service Job Completed Date and the Order Number.
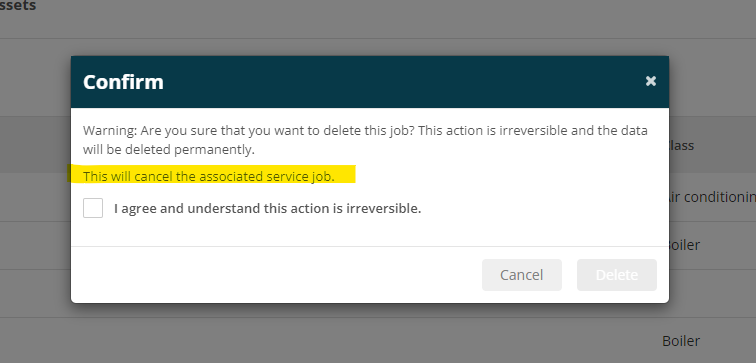
If you want to delete a service, click the icon and then confirm you are happy with the action.
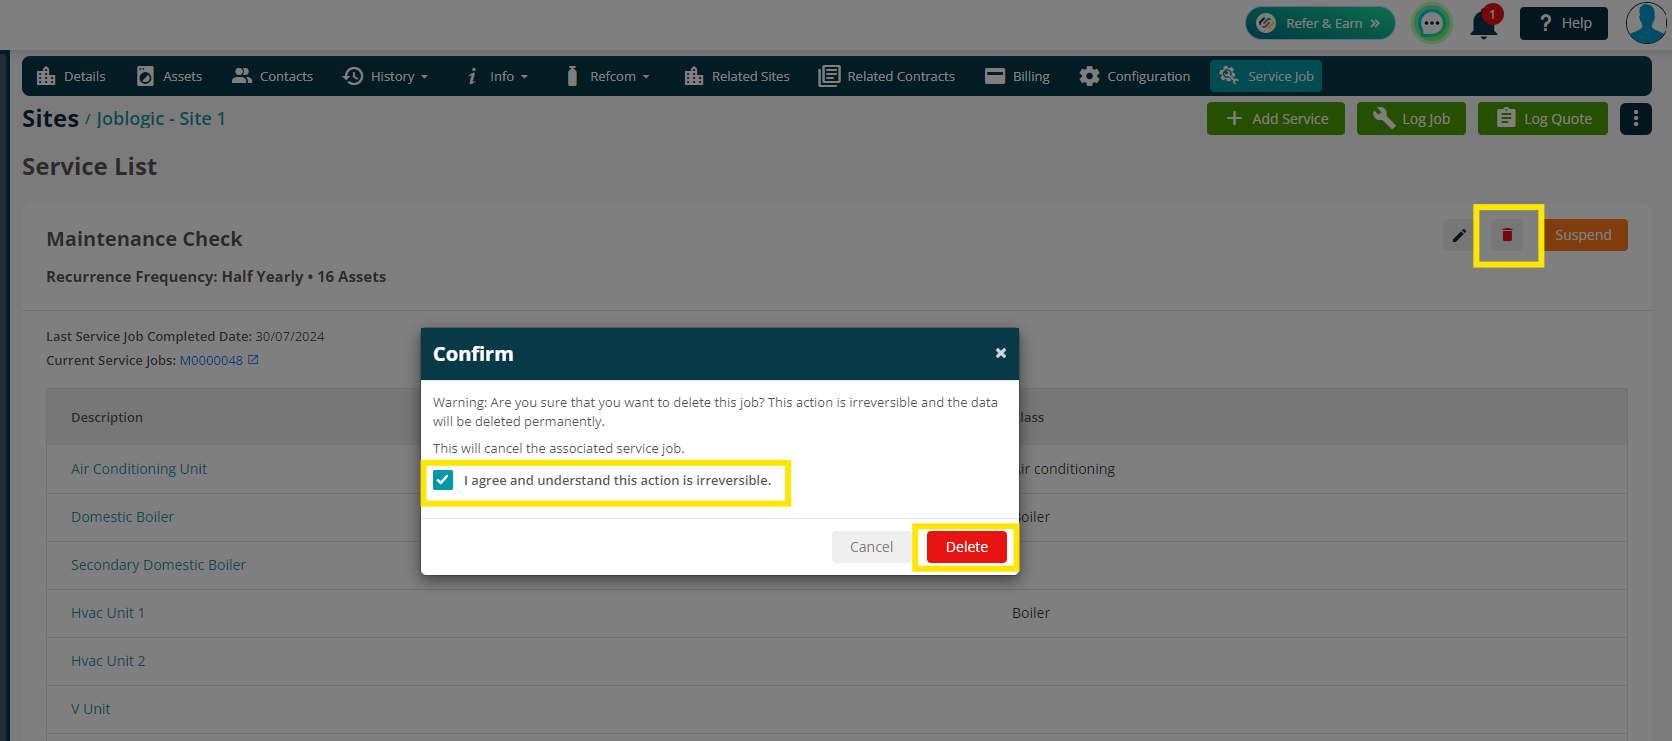
If you choose to delete the Site Service, the job will remain on the system, but will be marked as Cancelled for your reference.
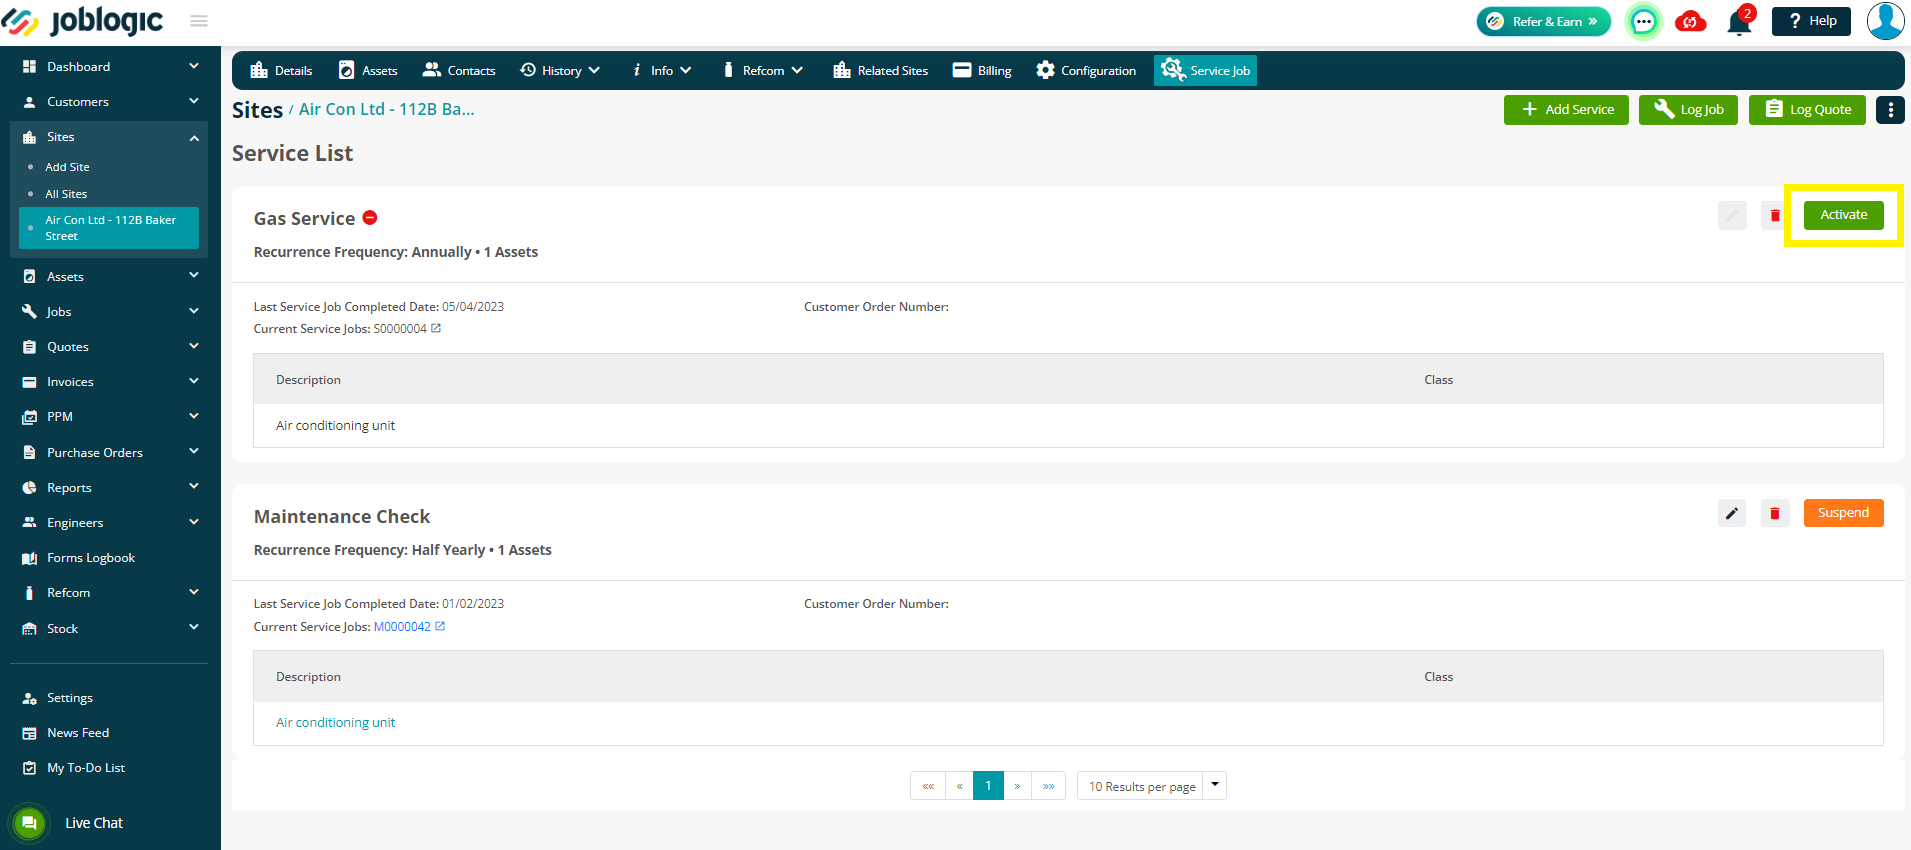
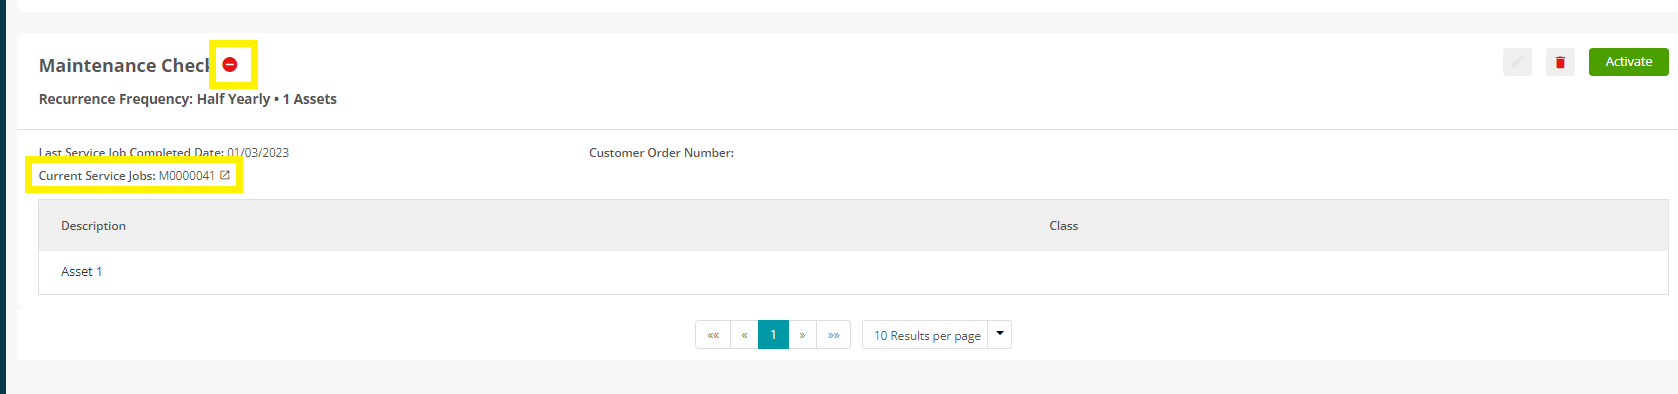
Suspending A Service
To suspend a service, go to Sites > All Sites > choose your site > Service Job tab
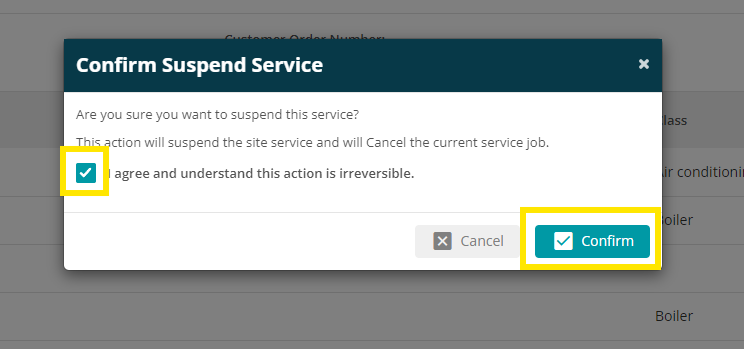
Any service that you have set up can be suspended by clicking the Suspend button

You will then need to confirm the suspension, and that you are happy for the current service job to be cancelled
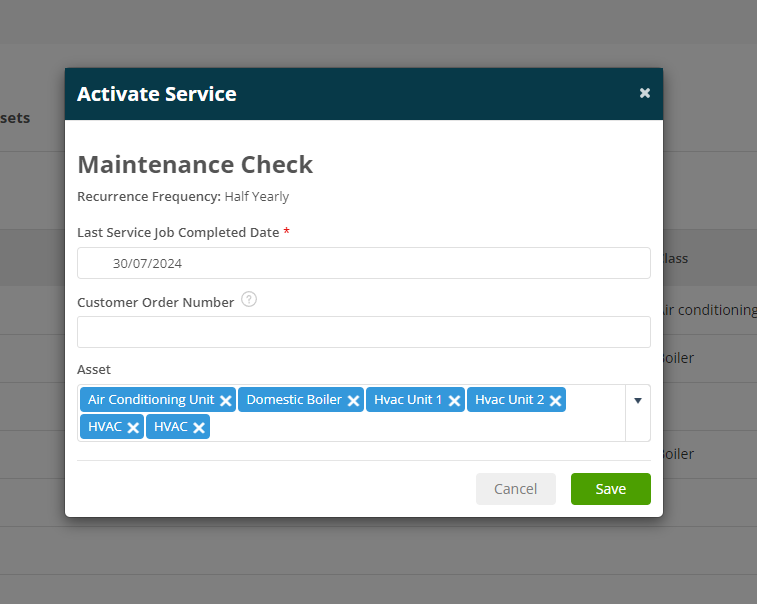
If you wish to reactivate the service, click the Activate button.
You will be asked to confirm the Last Service Job Completed Date and enter your Customer Order Number and Assets as required.
Service Job Visits
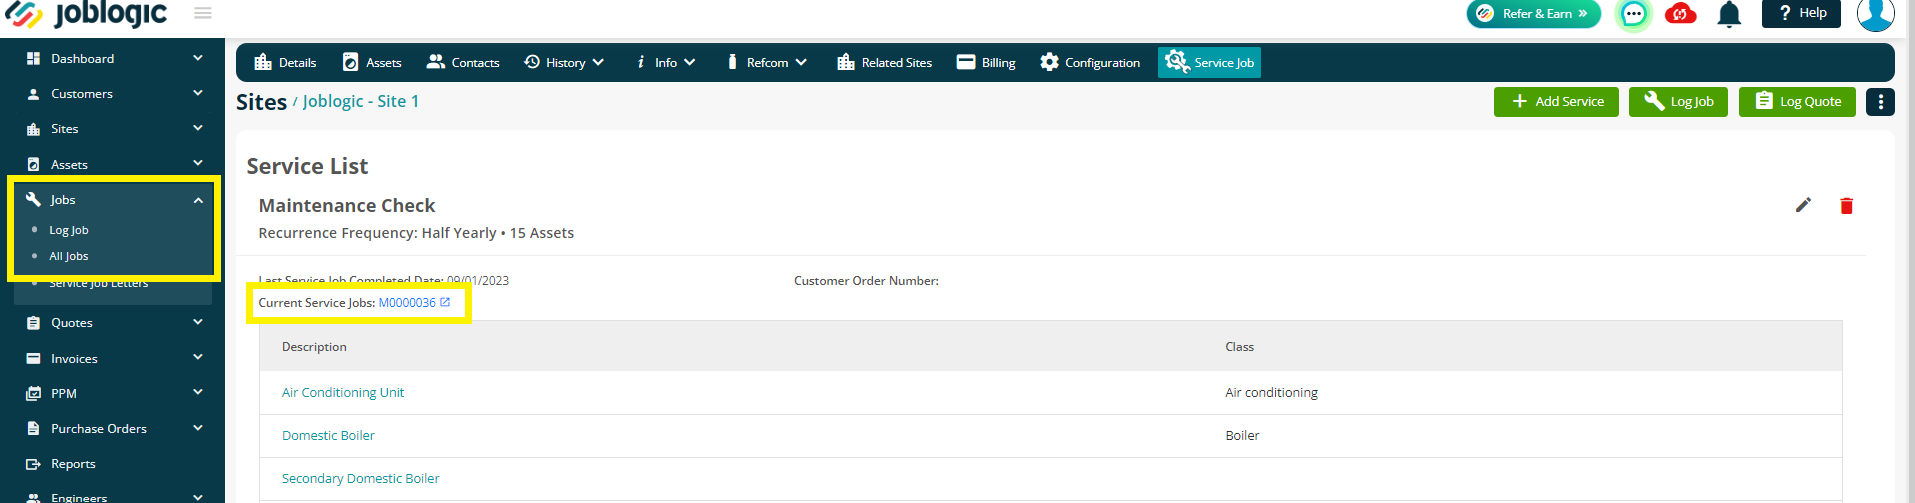
When you create a Service Job under your site, the system will automatically generate a visit under ‘’Appointment’’, which is yet to be allocated.
See the bottom of this guide for a full example.
You can view this, by either clicking the job number from the Site > Service Job.
Or you can click into Jobs > All Jobs to search for jobs manually, as normal.
Once you are in the Job Details screen, click the Visits tab to view the Visit with the unallocated appointment booked in.

This will also show under the ‘’Appointment’’ column via the Planner.
If you click Engineers > View Planner, you can then click the Filters option to choose ‘’appointment’’ to display, as you would with any other engineer. This will then show all visits that are yet to be allocated to an engineer.
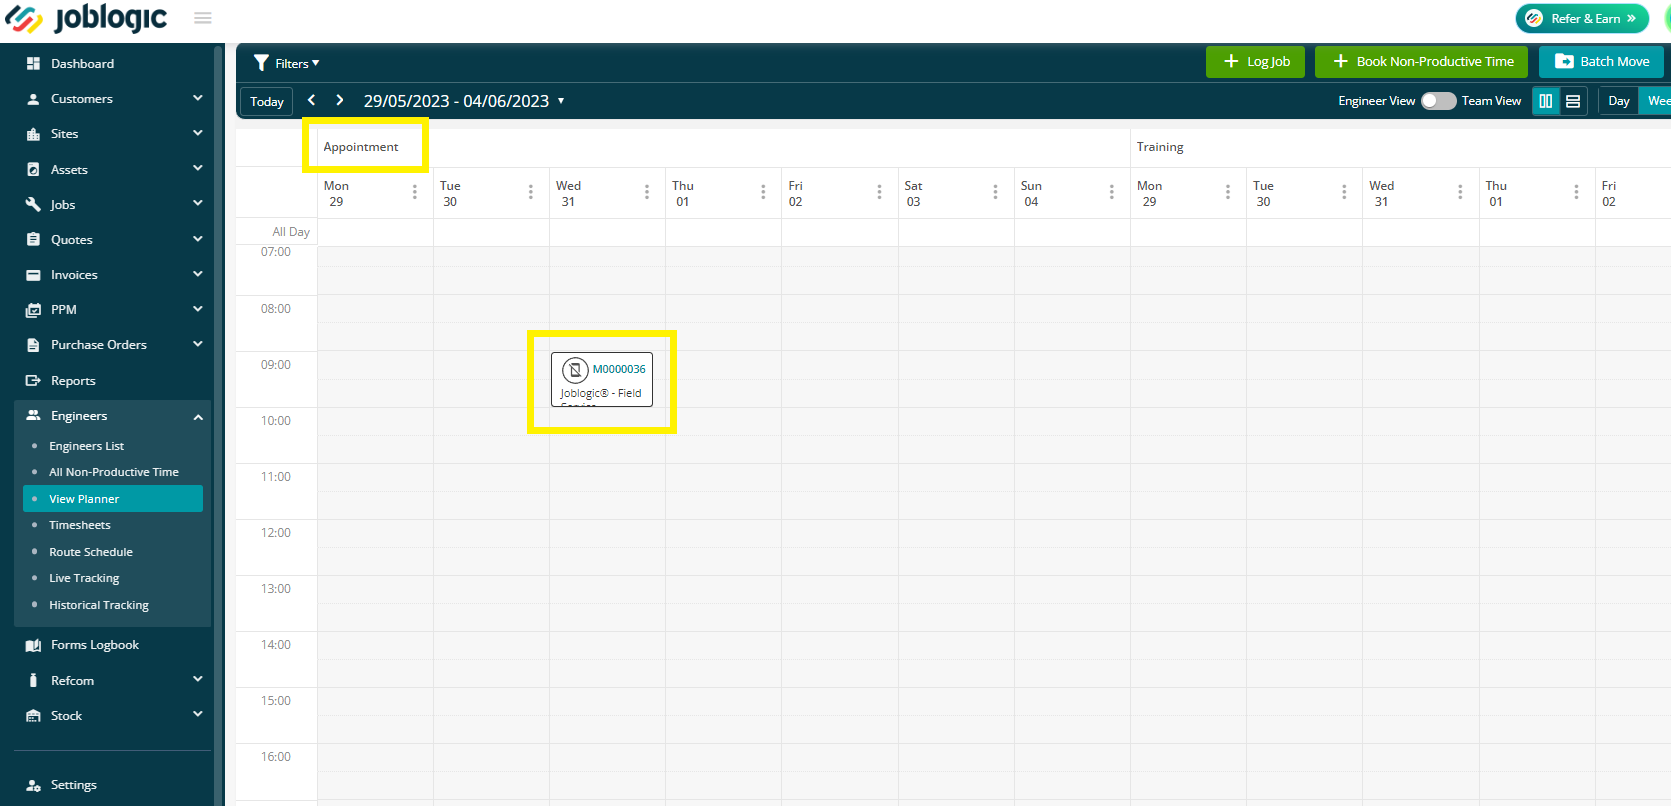
These visits are provisional and cannot be deployed at this stage as they are not yet assigned to an engineer.
When you are ready or when the appointment has been confirmed, you can assign and deploy to an engineer as normal. Click here to read more.
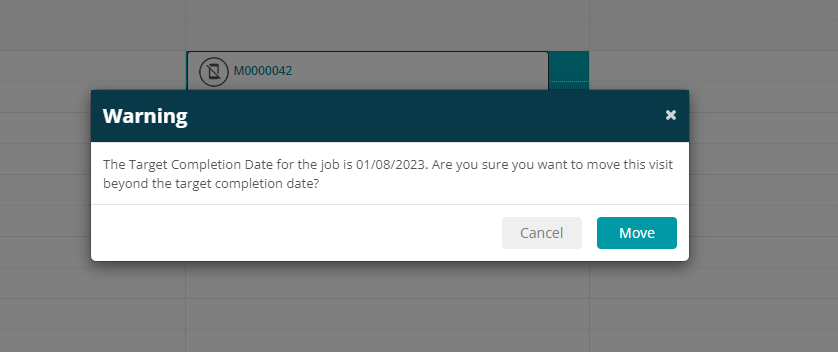
If you do try to assign or move a job past it's Target Completion Date, a prompt will pop up to warn you
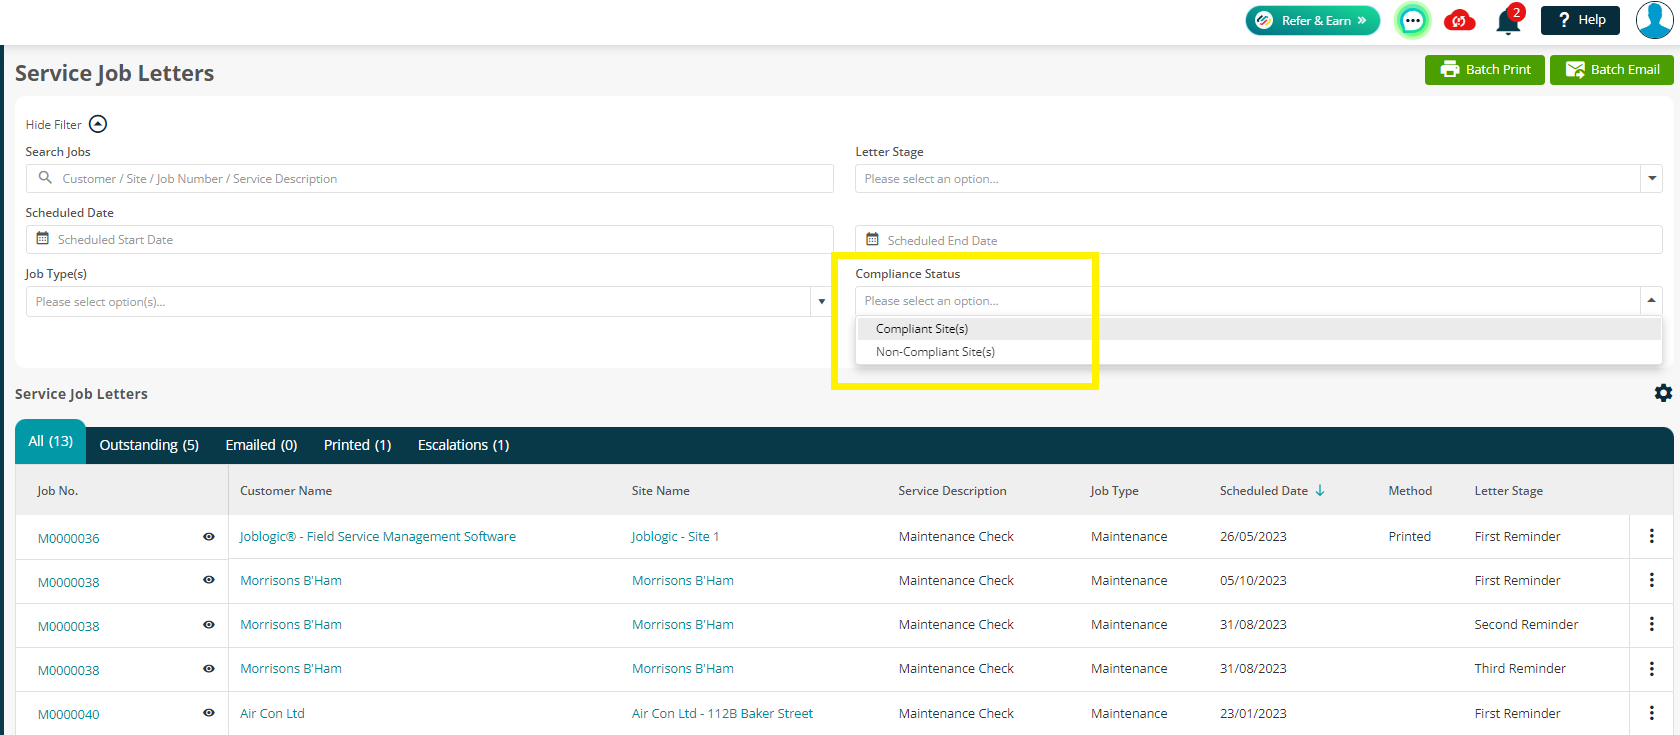
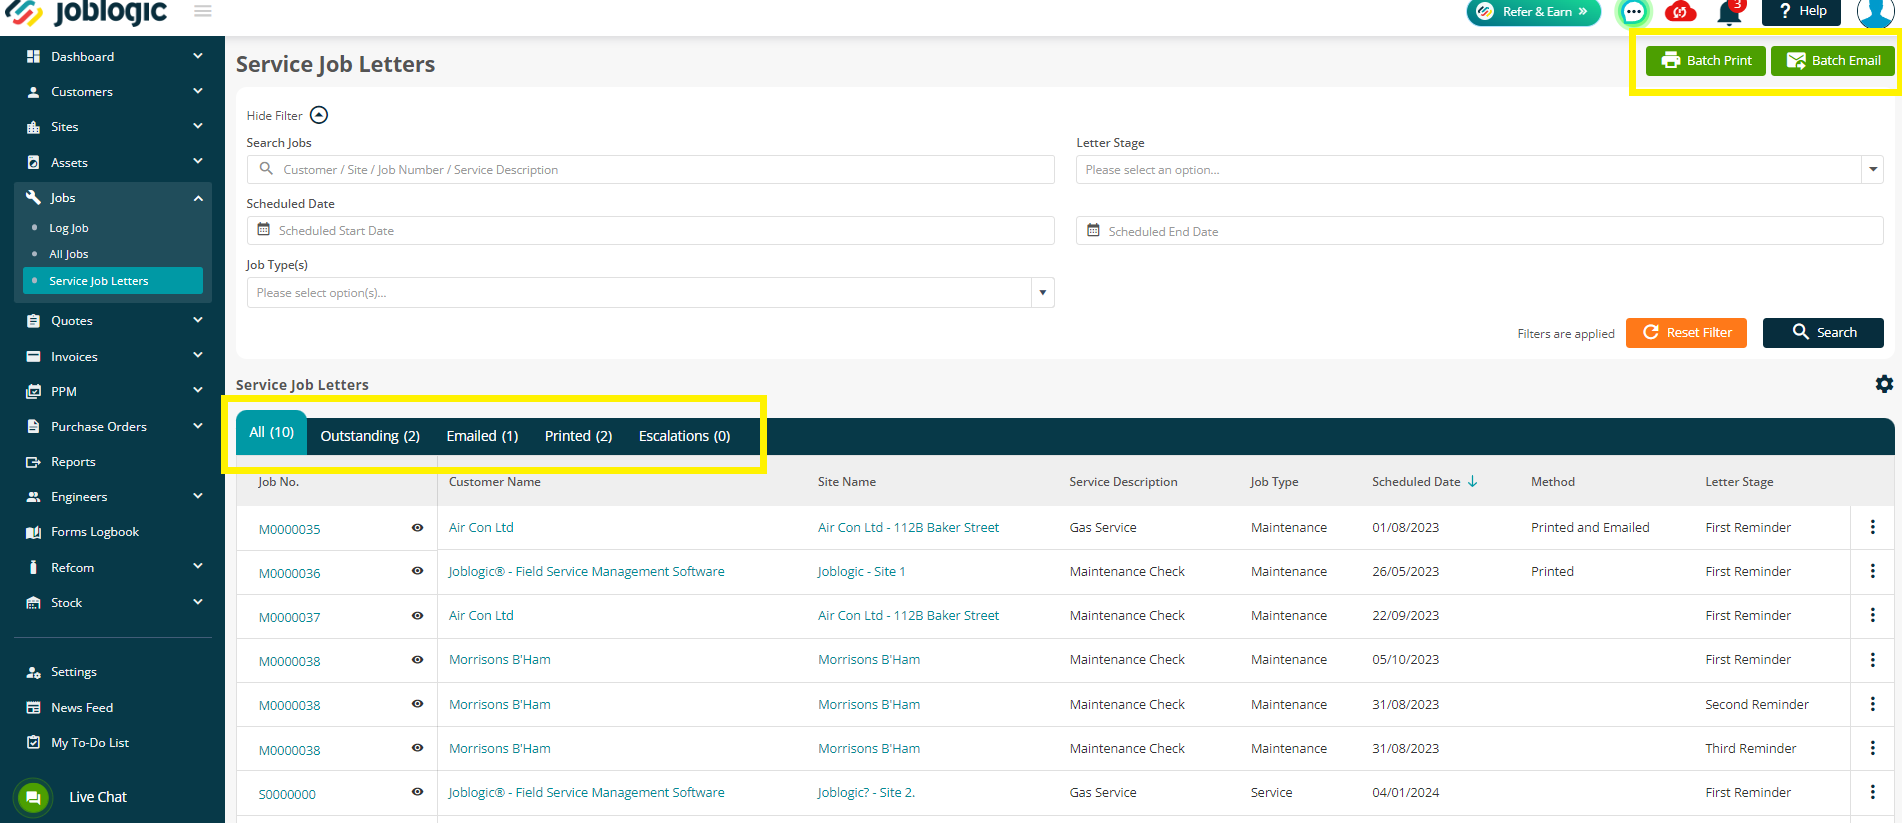
Service Job Letters
To send out your letters, firstly navigate to Jobs > Service Job Letters.
This screen will display all services you have set up, with tabs for outstanding letters, Emailed letters, Printed Letters and Escalations.
The outstanding tab will show letters that have reached or passed their scheduled date and have not been emailed or printed yet.
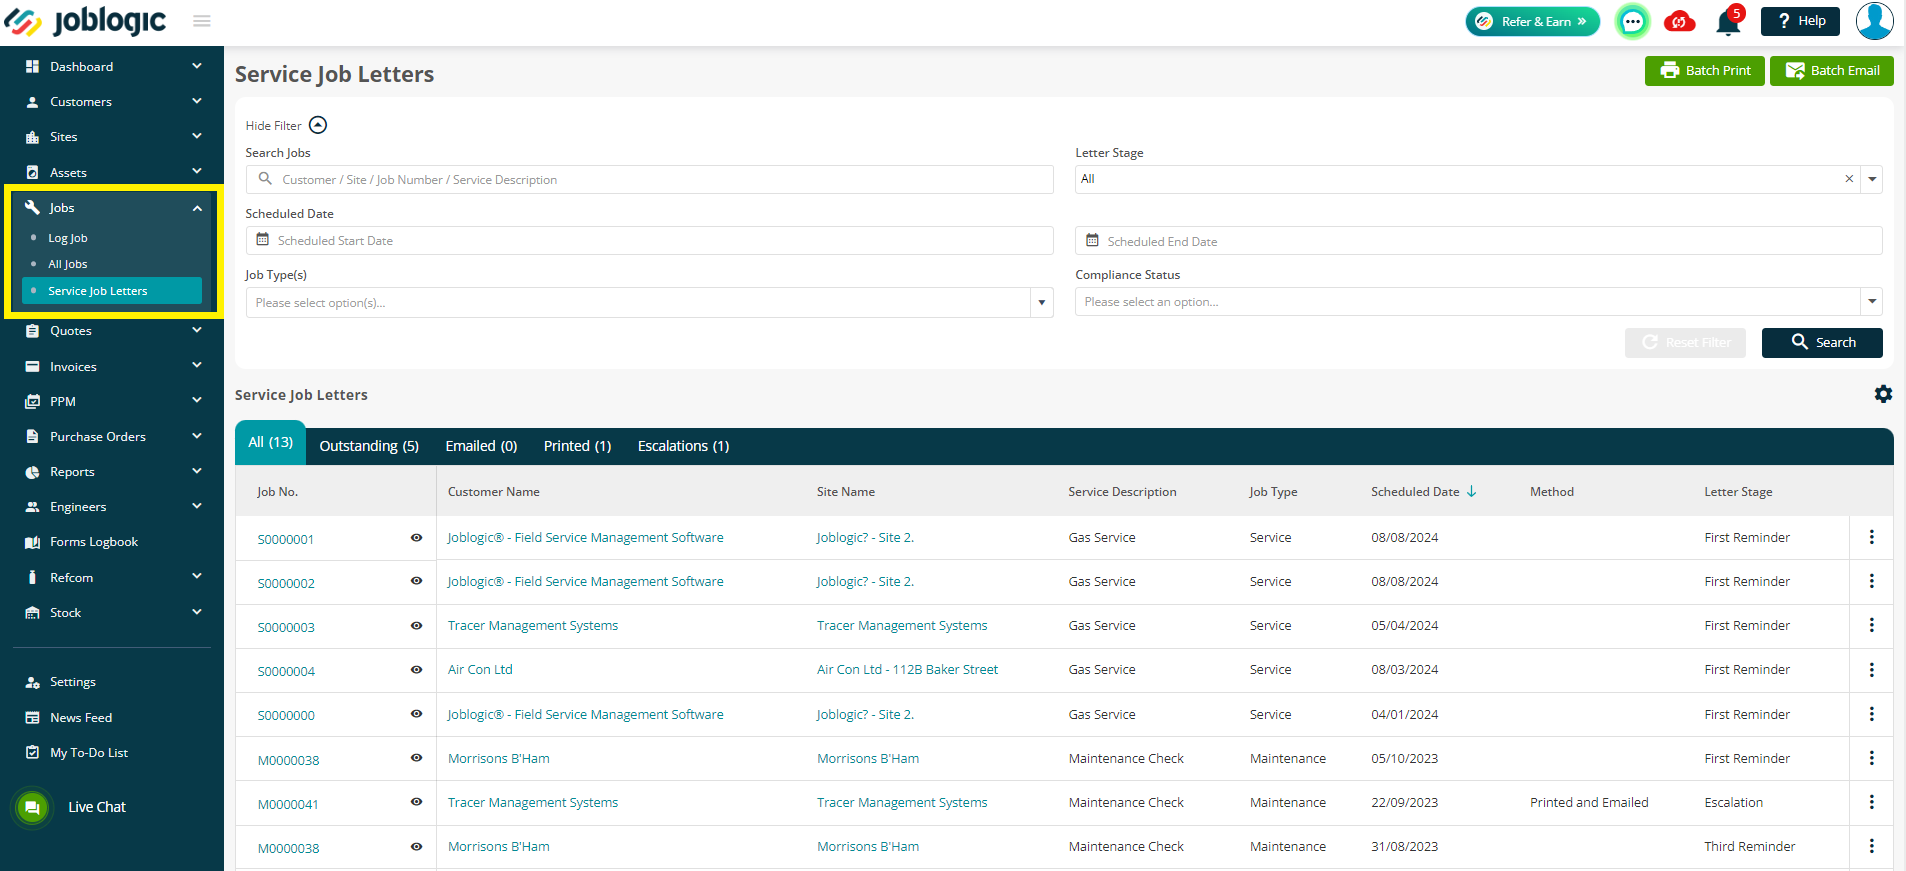
You can also use the options at the top of the page to filter your results as needed, i.e. by Letter Stage, Scheduled Date or Compliance Status.
The Compliance status has two options - ‘’Compliant Site(s)’’ and ‘’Non-Compliant Site(s)’’
Compliant Sites will list all sites with a completed service job and an active site service
The Non-Compliant Sites option will list all sites with a suspended site service job.
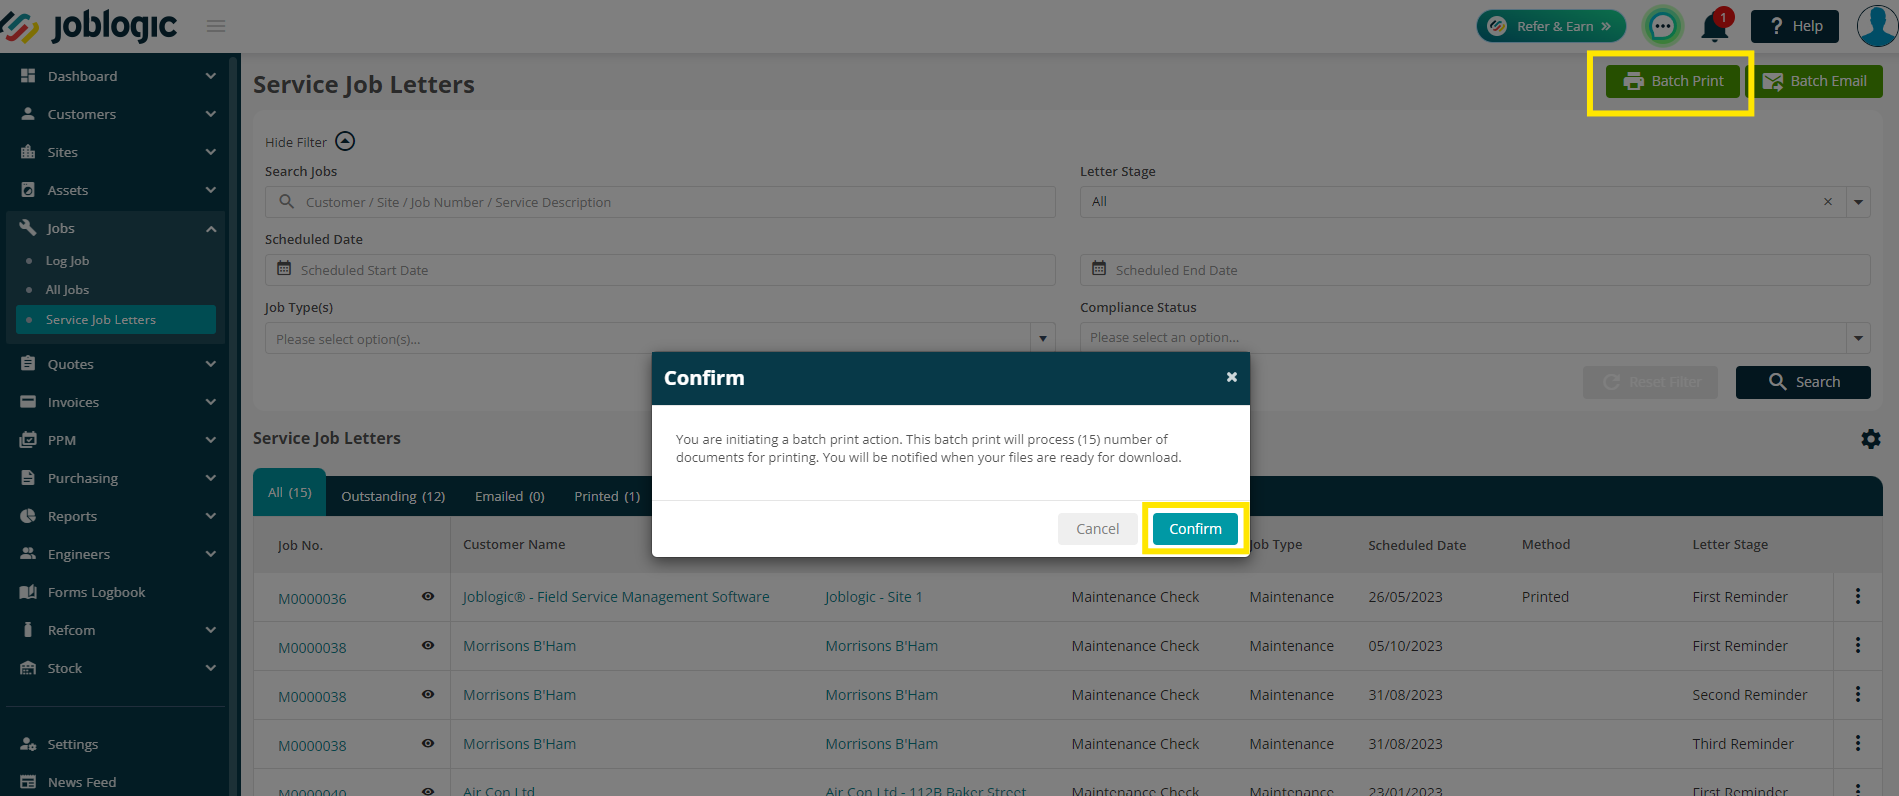
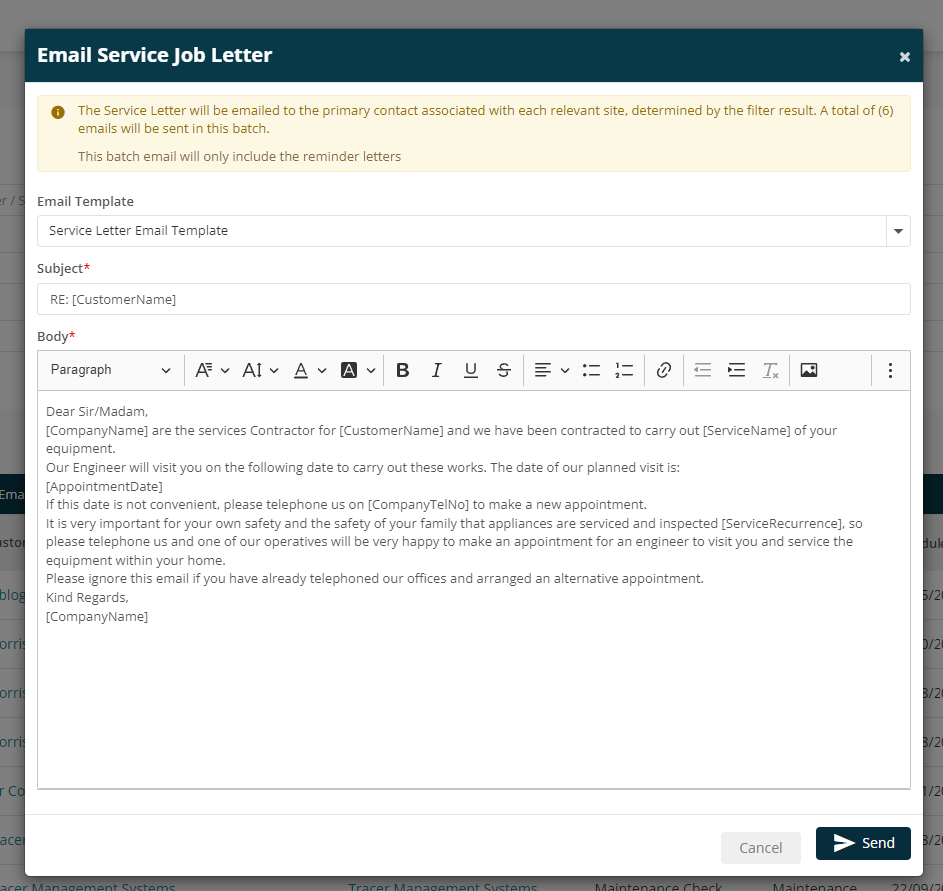
Batch Email & Print
You can Batch Email or Batch Print by clicking the relevant option in the top right.
Filter your letters as required, or choose the outstanding tab, and then click the preferred batch option.
Batch Print:
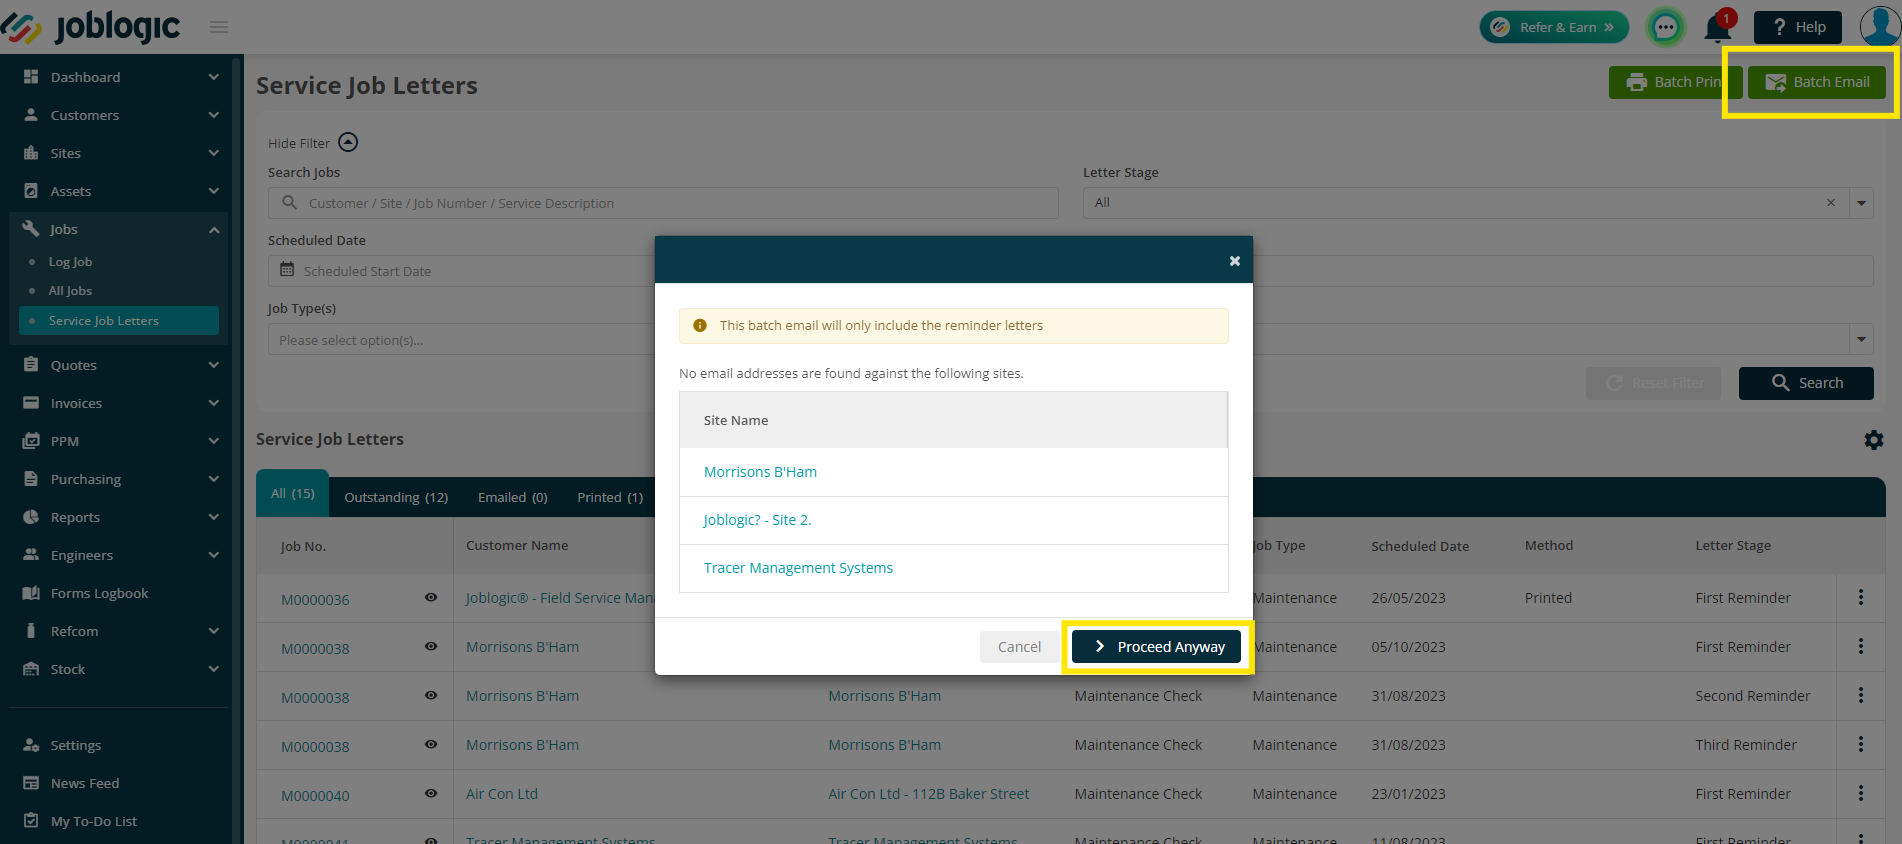
Batch Email:
In order to batch email, the site associated with the service will need to have a valid primary contact with an email address.
You will be prompted if any sites do not have a valid email address. You can either click into the site to add the contact email, or Proceed Anyway to continue with the rest of the letters in the meantime.
You may edit the email contents here if required, and then click Next.
The system will default to the Service Letter Template you have set up against your customer (Customer > Base Configuration > Service section)
If nothing has been specified against the customer, Joblogic will default to the System Settings (Settings > Document Templates > Service Letters)
The system will send the letters and notify you once complete.
You can also view / send the service letters per job via Jobs > All Jobs > click job number > Info > Service Job Letters.
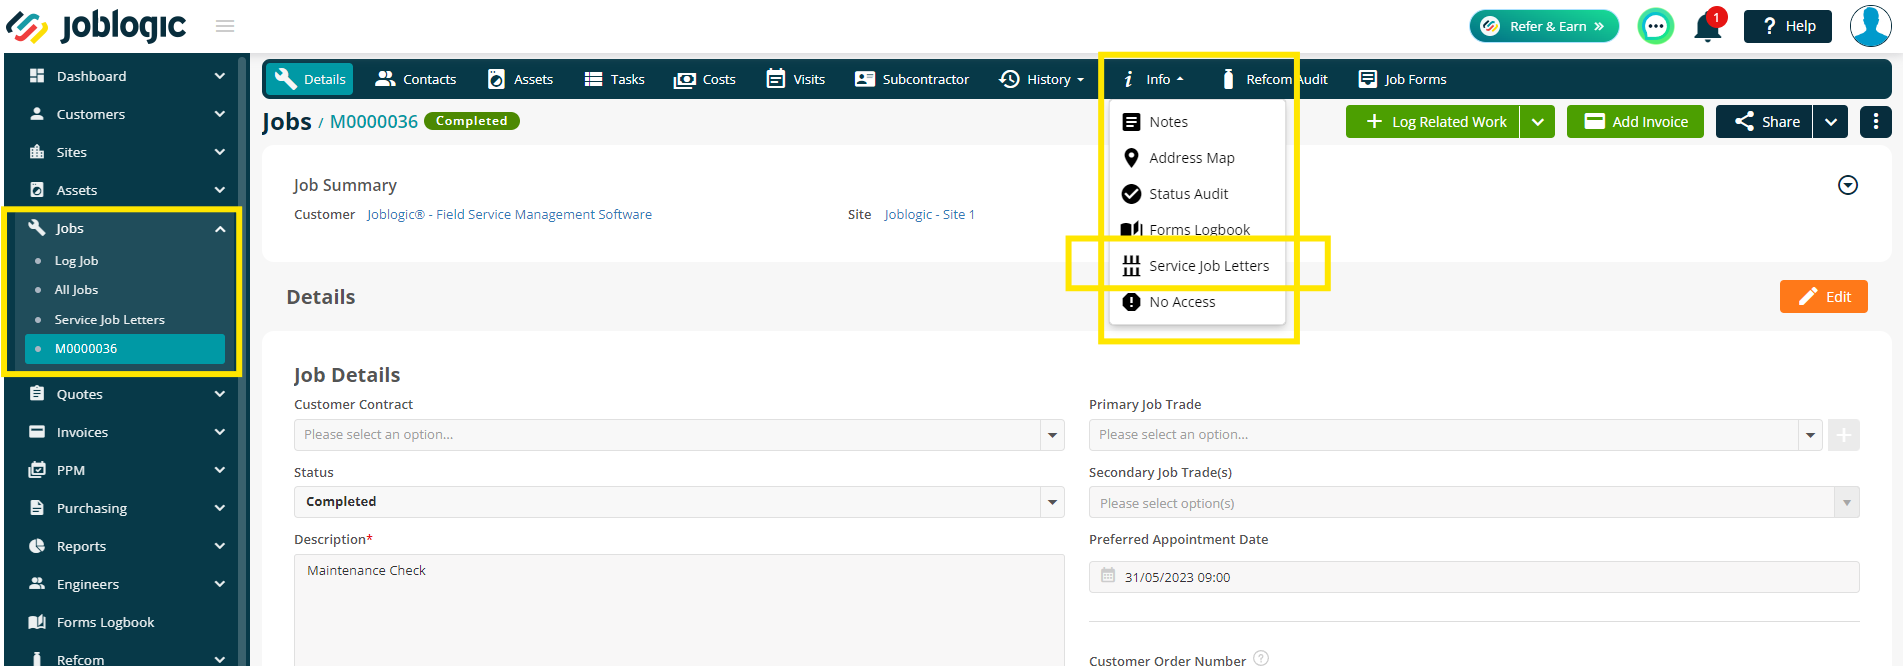
This screen provides all of the details of the service and letters, but also allows you to Print / Email the letter again / individually if needed.
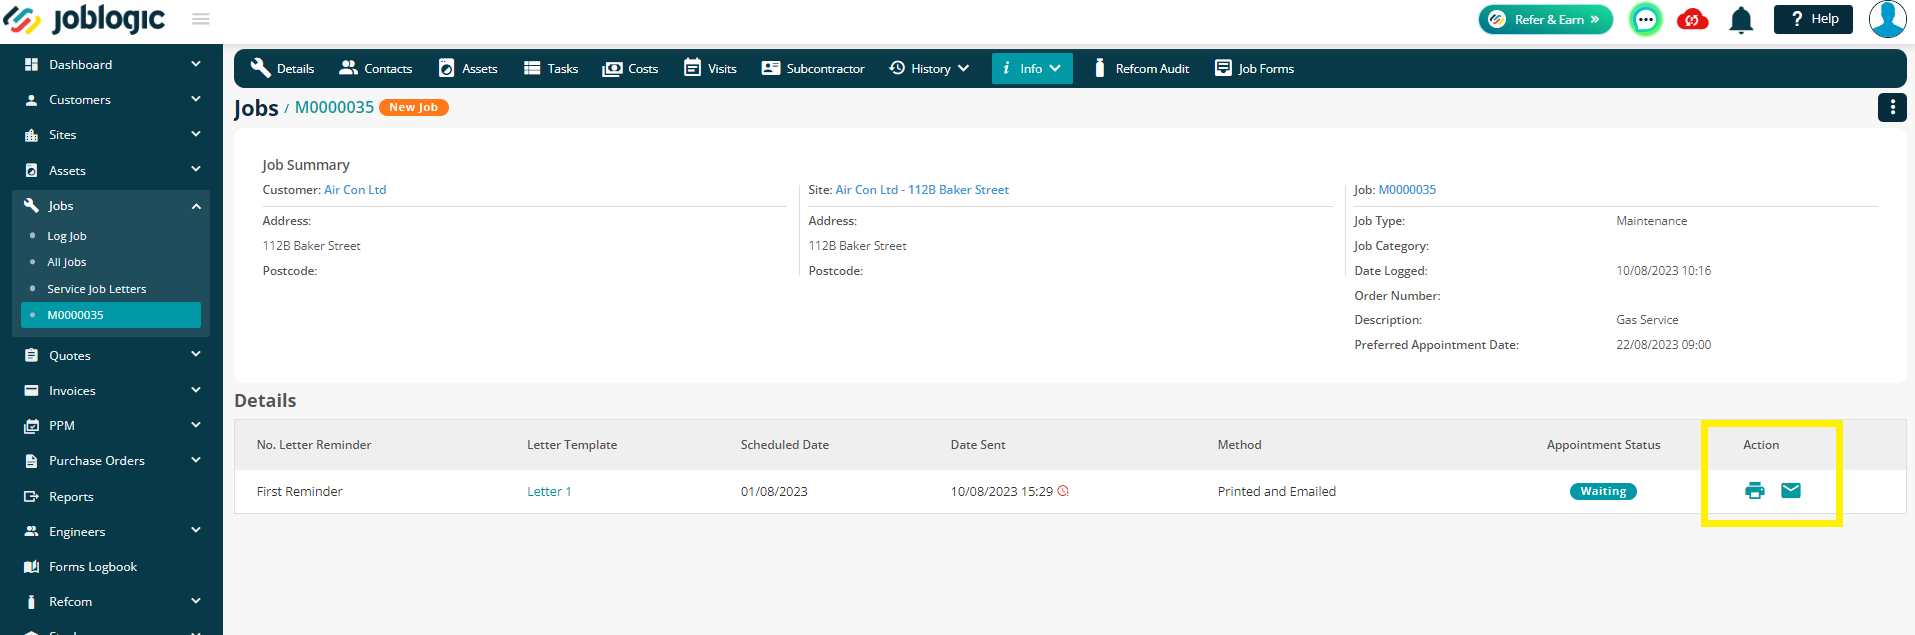
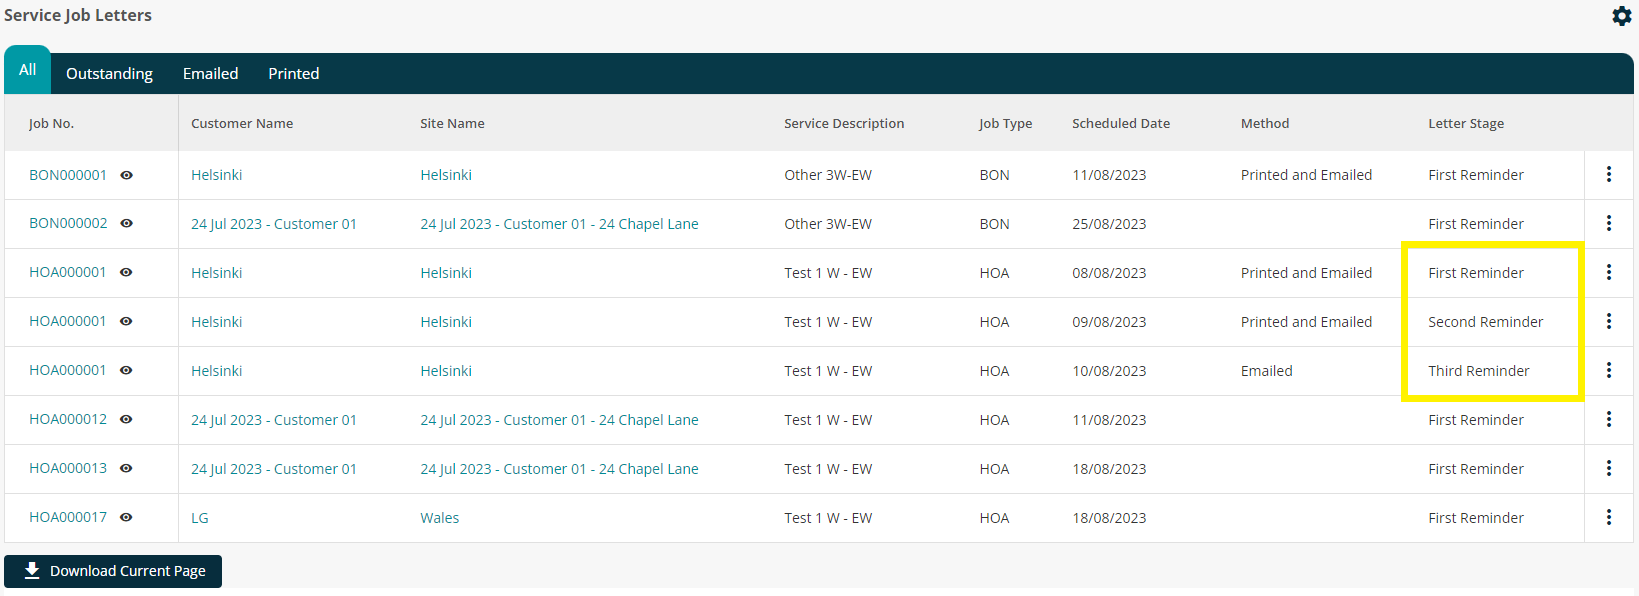
If you send the letter after the Scheduled Date, you will see a red icon next to the Sent Date to indicate the letter was later than scheduled.
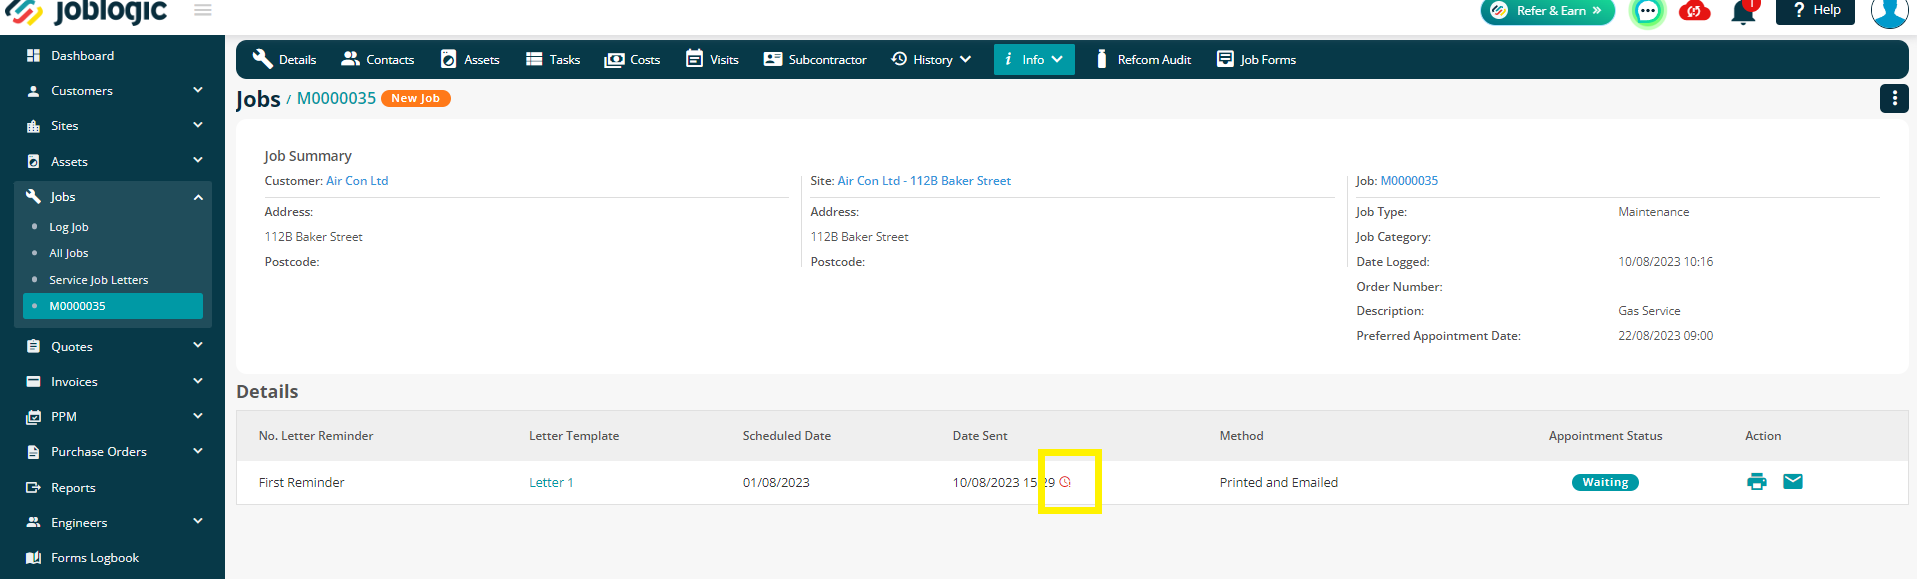
The Sent Date will indicate the first action only. For example, if the letter is emailed on the 1st August, and then printed on the 3rd August, the Sent Date will always state 1st August.
No Access
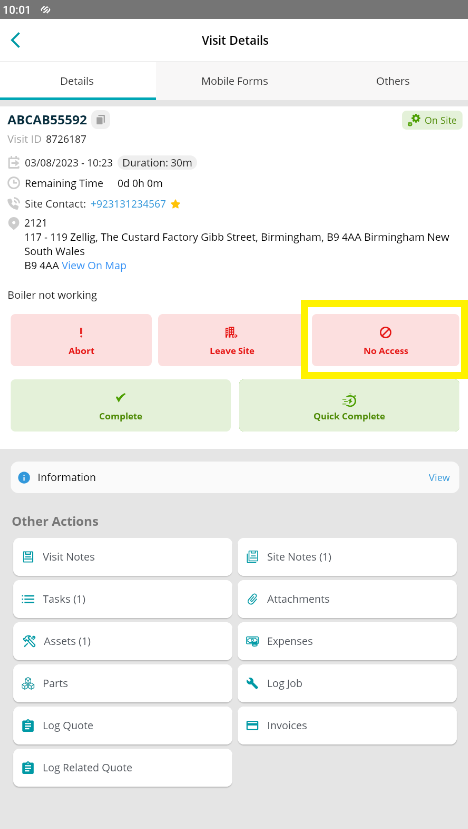
If your engineer goes out to site and is unable to access the property, they can mark the visit as ‘’No Access’’ on the mobile app.
Individual visit screen - No Access button:
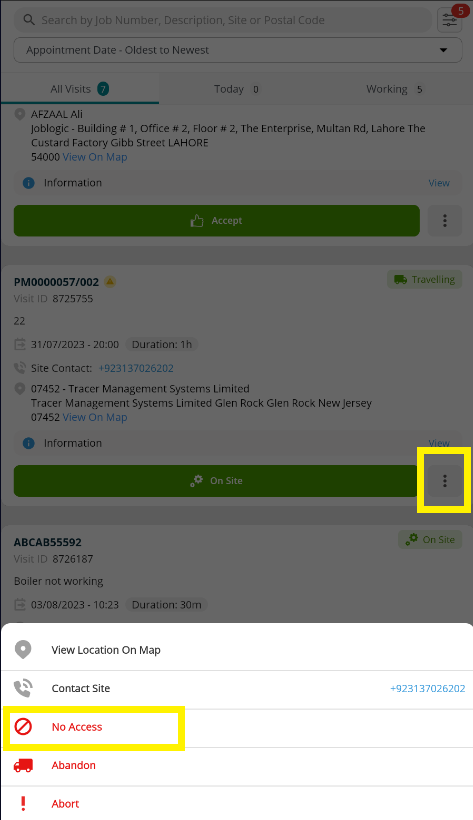
All Visits list - three dots:
This will then trigger a 2nd reminder letter to be scheduled with the current date, ready to be emailed/printed again
The system will then auto generate a second service job visit on the basis of no access, which you can again allocate and deploy to an engineer when required.
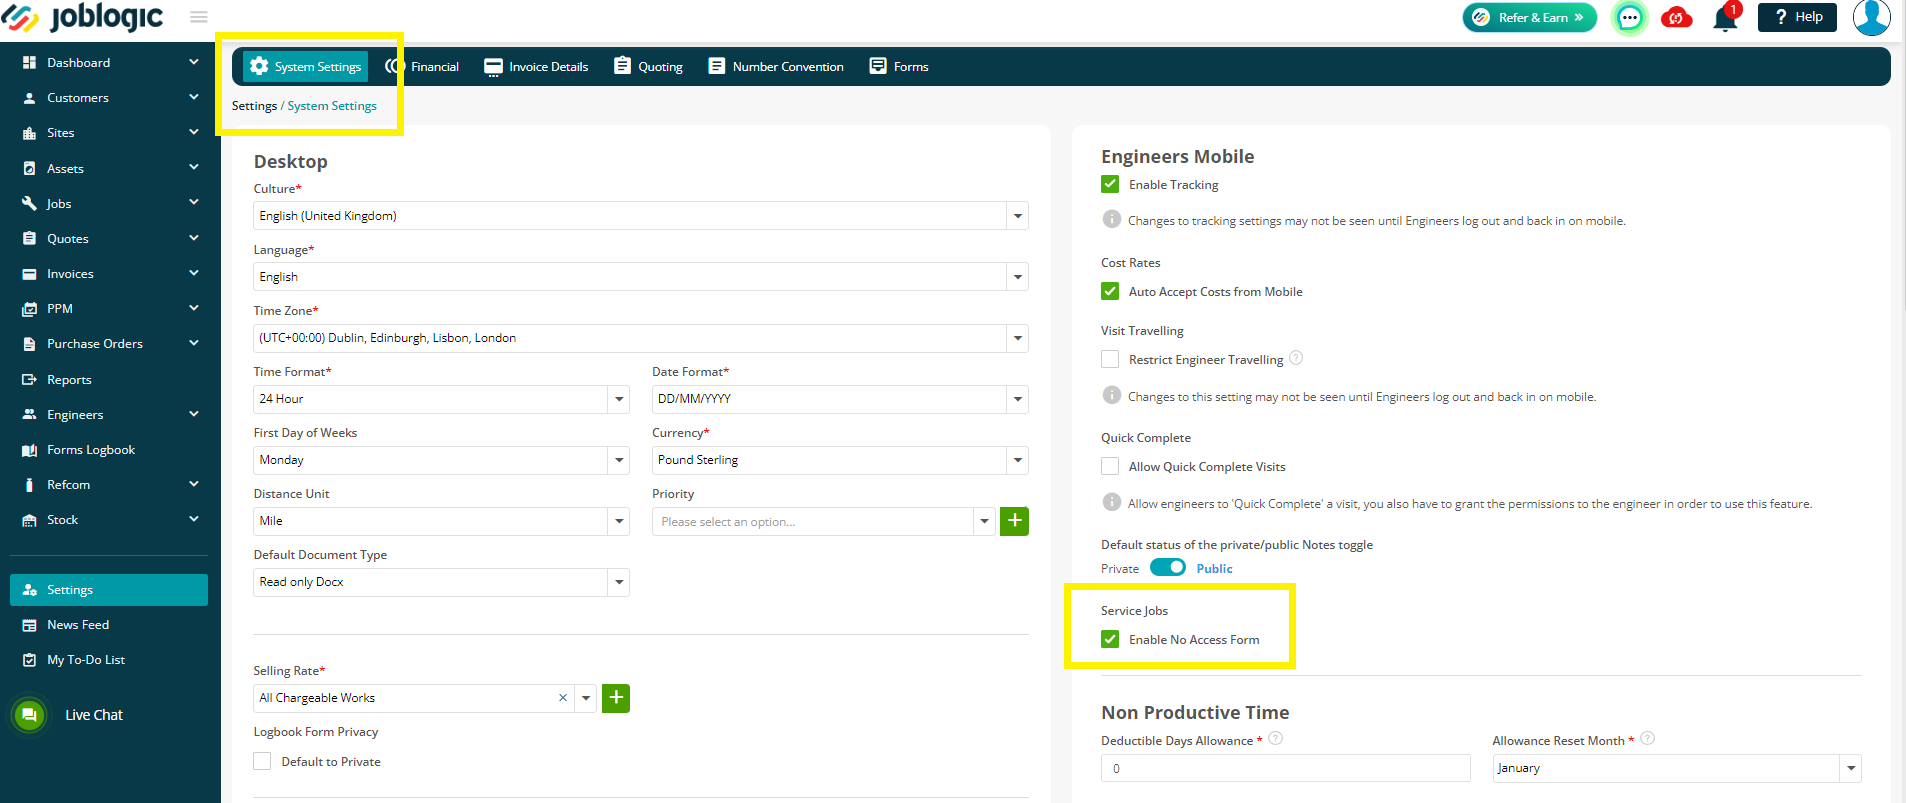
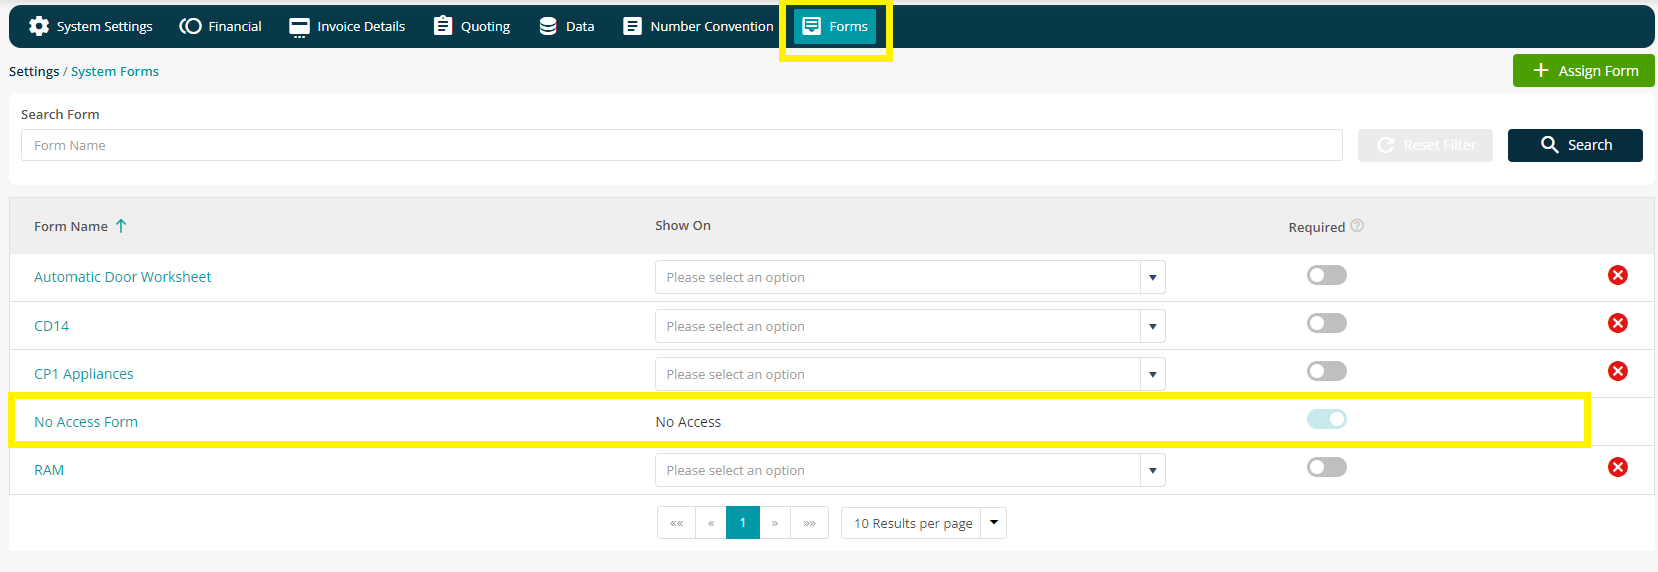
You can also enable a ‘No Access’ form to be completed, if you require.
This can be set up via Settings > System Set up > tick ‘Enable No Access Form’
Once this has been enabled, you’ll be able to see a No Access form section within the Settings > System Set up > Forms tab and via Job > Job Forms
Now, if you were to click No Access on the mobile app, the form will pop up, pulling your reason through automatically.
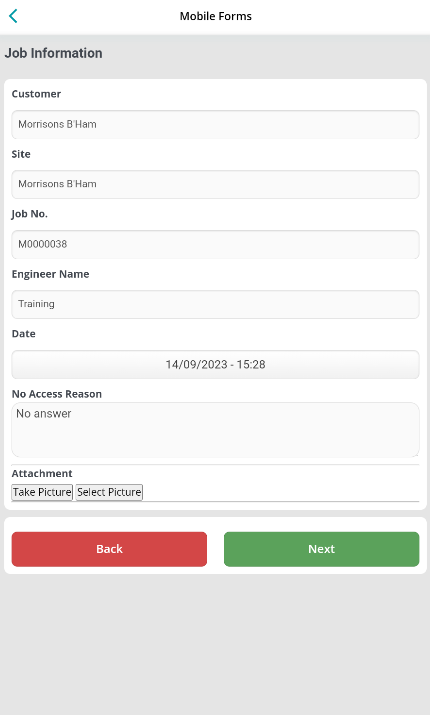
The form will be available in the back office via Forms Logbook on the menu, or via Info > Forms Logbook within the job, as normal.
Each job can have up to 3 letters against it. If there is still no access after this process, you can hand this back to your client as your side of the compliance is fulfilled.
Escalations
Depending on when you have set your escalation point (letter stage), jobs will automatically move into the Escalation tab on the Jobs > Service Job Letters page
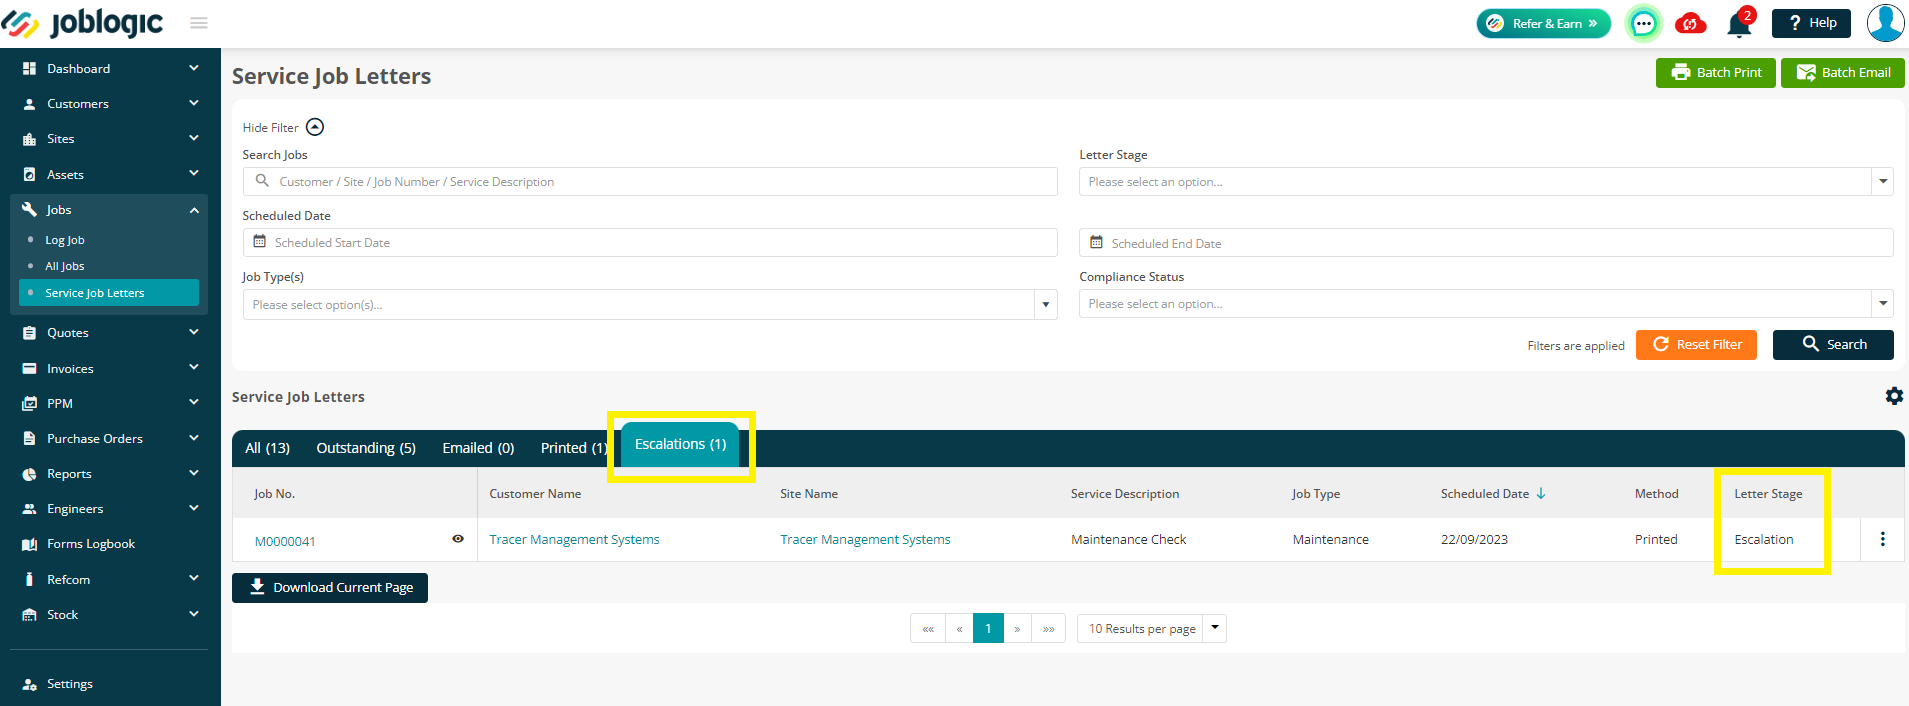
You can then send your evidence of attempts to your client for contractual completion on your side. To do this, click the three dots against the job to Print or Email the folder containing the following documentation: The Escalation Letter, all Reminder Letters, the Jobsheet and all No Access forms.

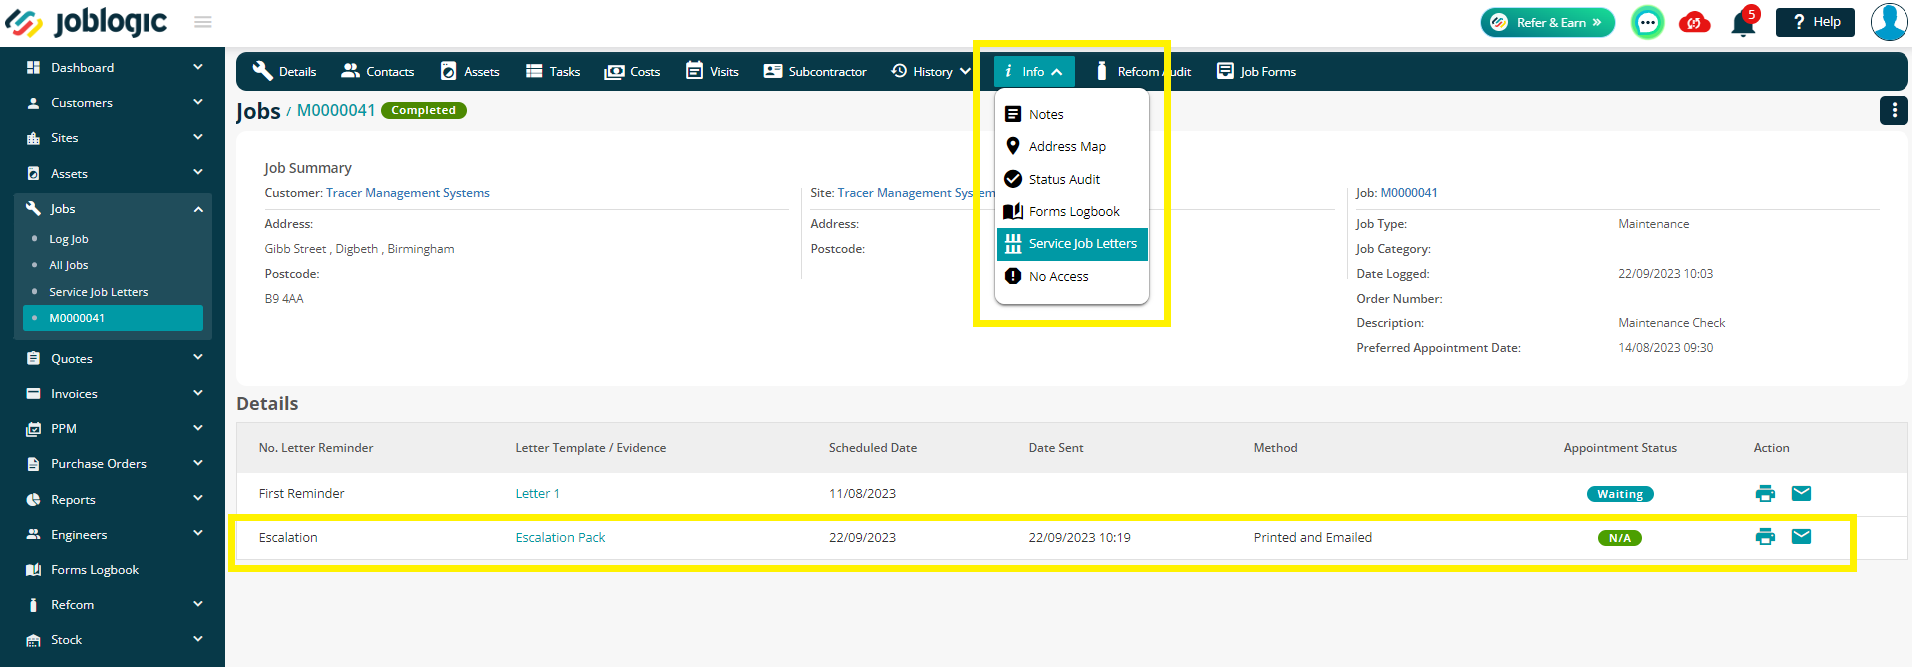
You can also view and send your escalation packs from within the job itself via Jobs > All Jobs > select job > Info tab > Service Job Letters
Here you can either click the ‘Escalation Pack’ link to download the files, or Print/Email the full list of documents as per the above.
As soon as a job moves to the Escalation point, the site service will be marked as suspended automatically.
You can search for Escalated Service Jobs via the Jobs > All Jobs page too, using the tick box under the Show Advanced filter list
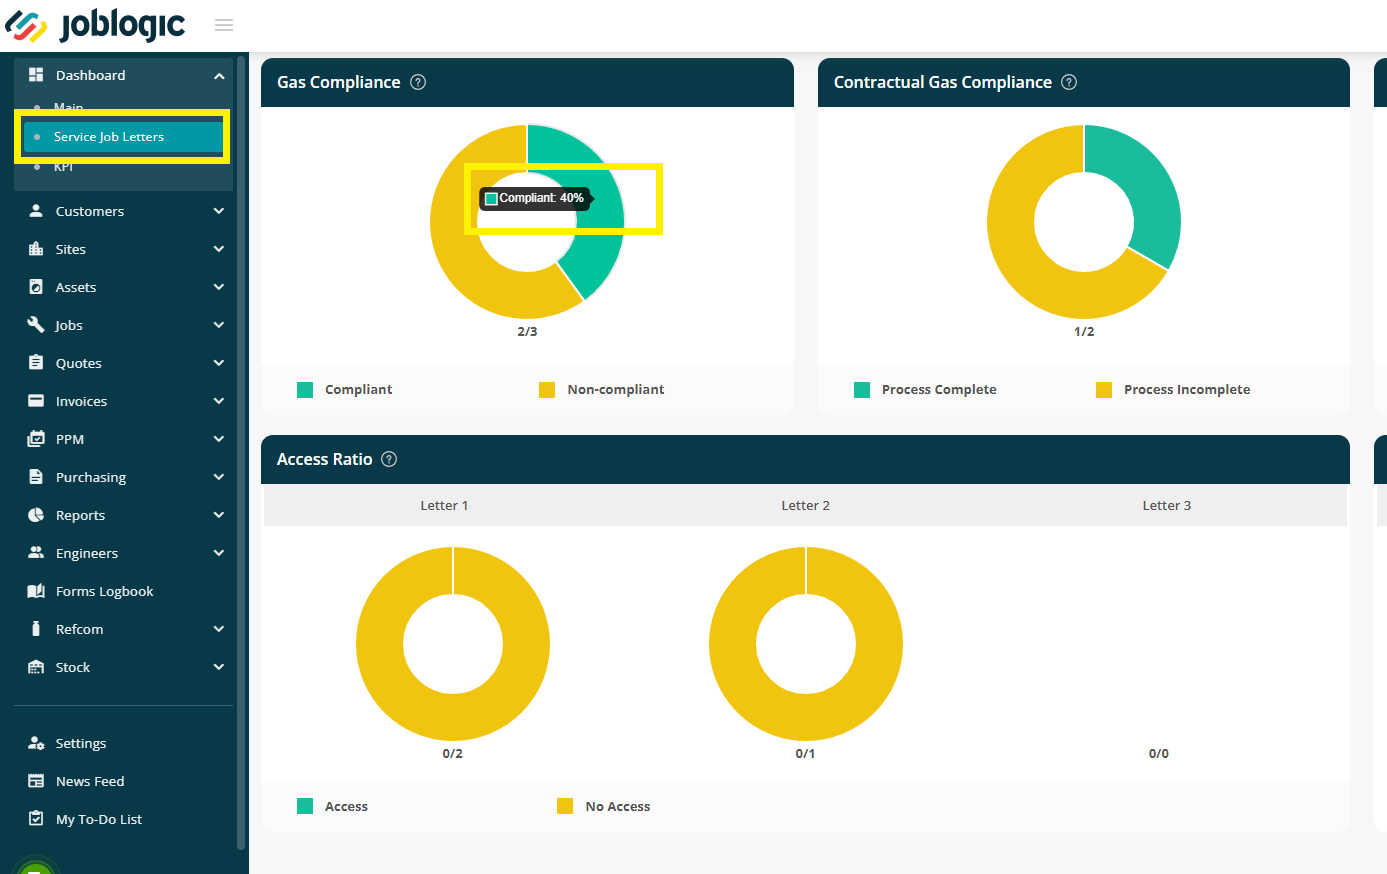
Service Job Letters Dashboard
There is a dashboard to view important Service Letter information via Dashboards > Service Job Letters
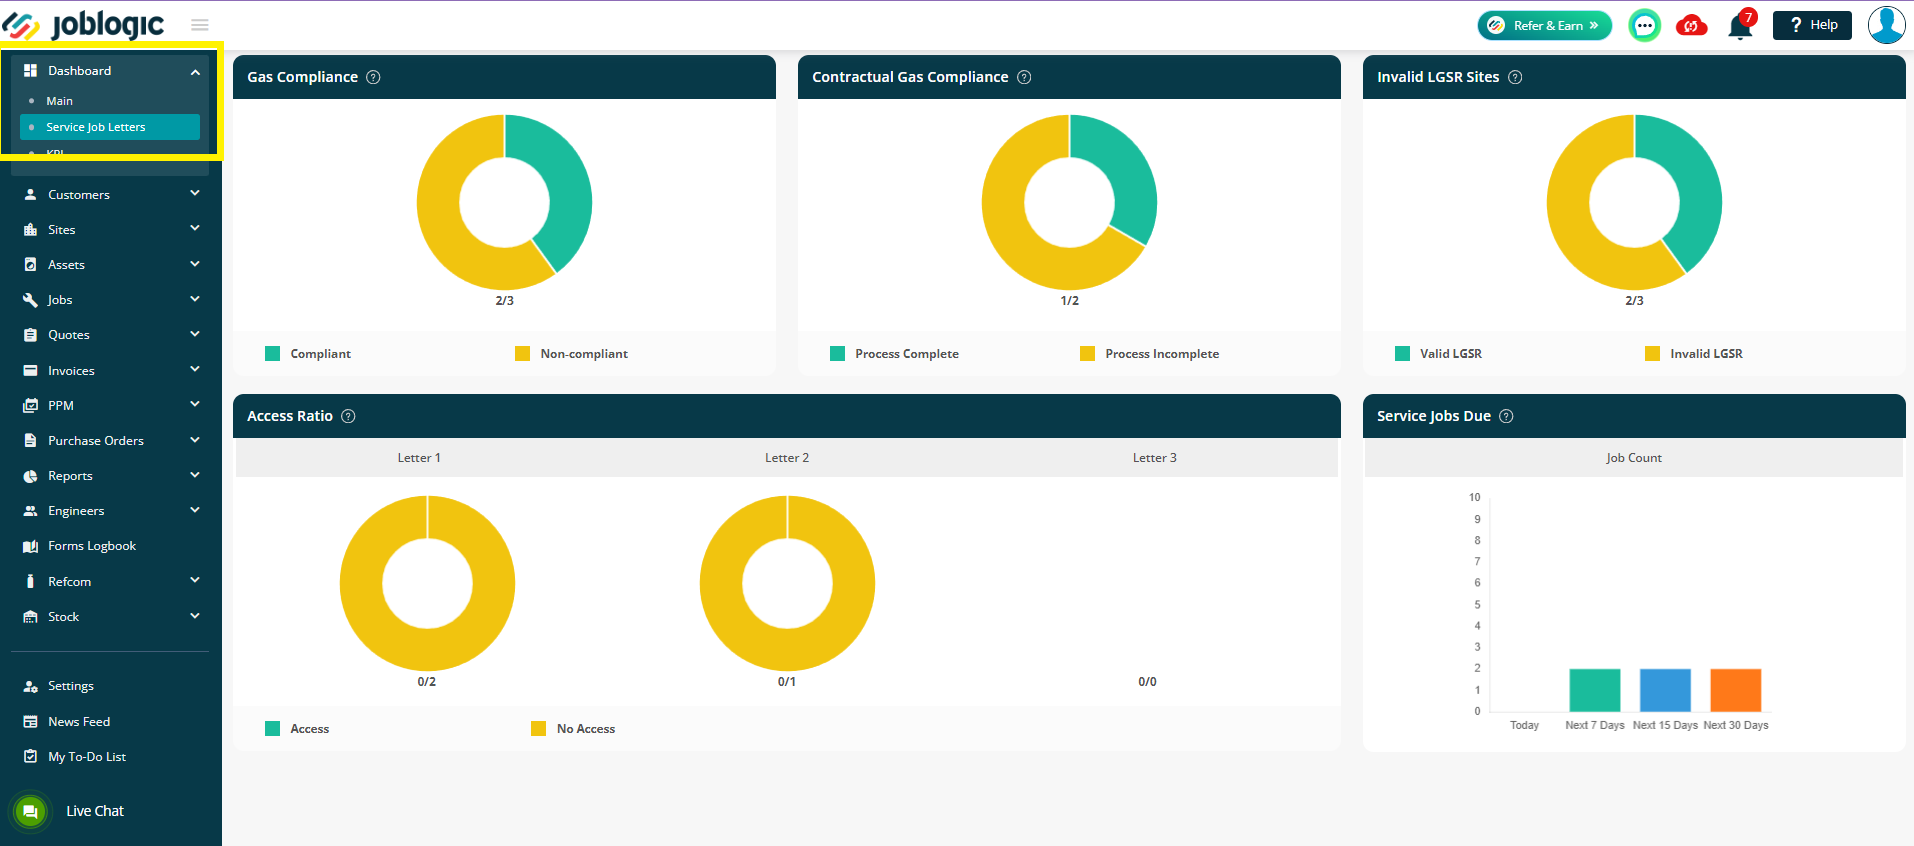
The following charts have been set up:
- Gas Compliance
- Contractual Gas Compliance
- Invalid LGSR Sites
- Access Ratio
- Service Jobs Due
Clicking the ? Icon next to each title will provide you with a short summary of what each section is portraying:
- Gas Compliance – List of LGSR compliant sites against the clients’ full list of gas service properties
- Contractual Gas Compliance – List of LGSR non-compliant sites against which the letter process was completed through client return
- Invalid LGSR Sites – Shows the number of properties with invalid LGSR in the service program
- Access Ratio – Shows the success ration of the access process for all three letters
- Service Jobs Due – Shows the number of service jobs due in next days (Today, 7, 15 or 30), based off the Visit Start Date.
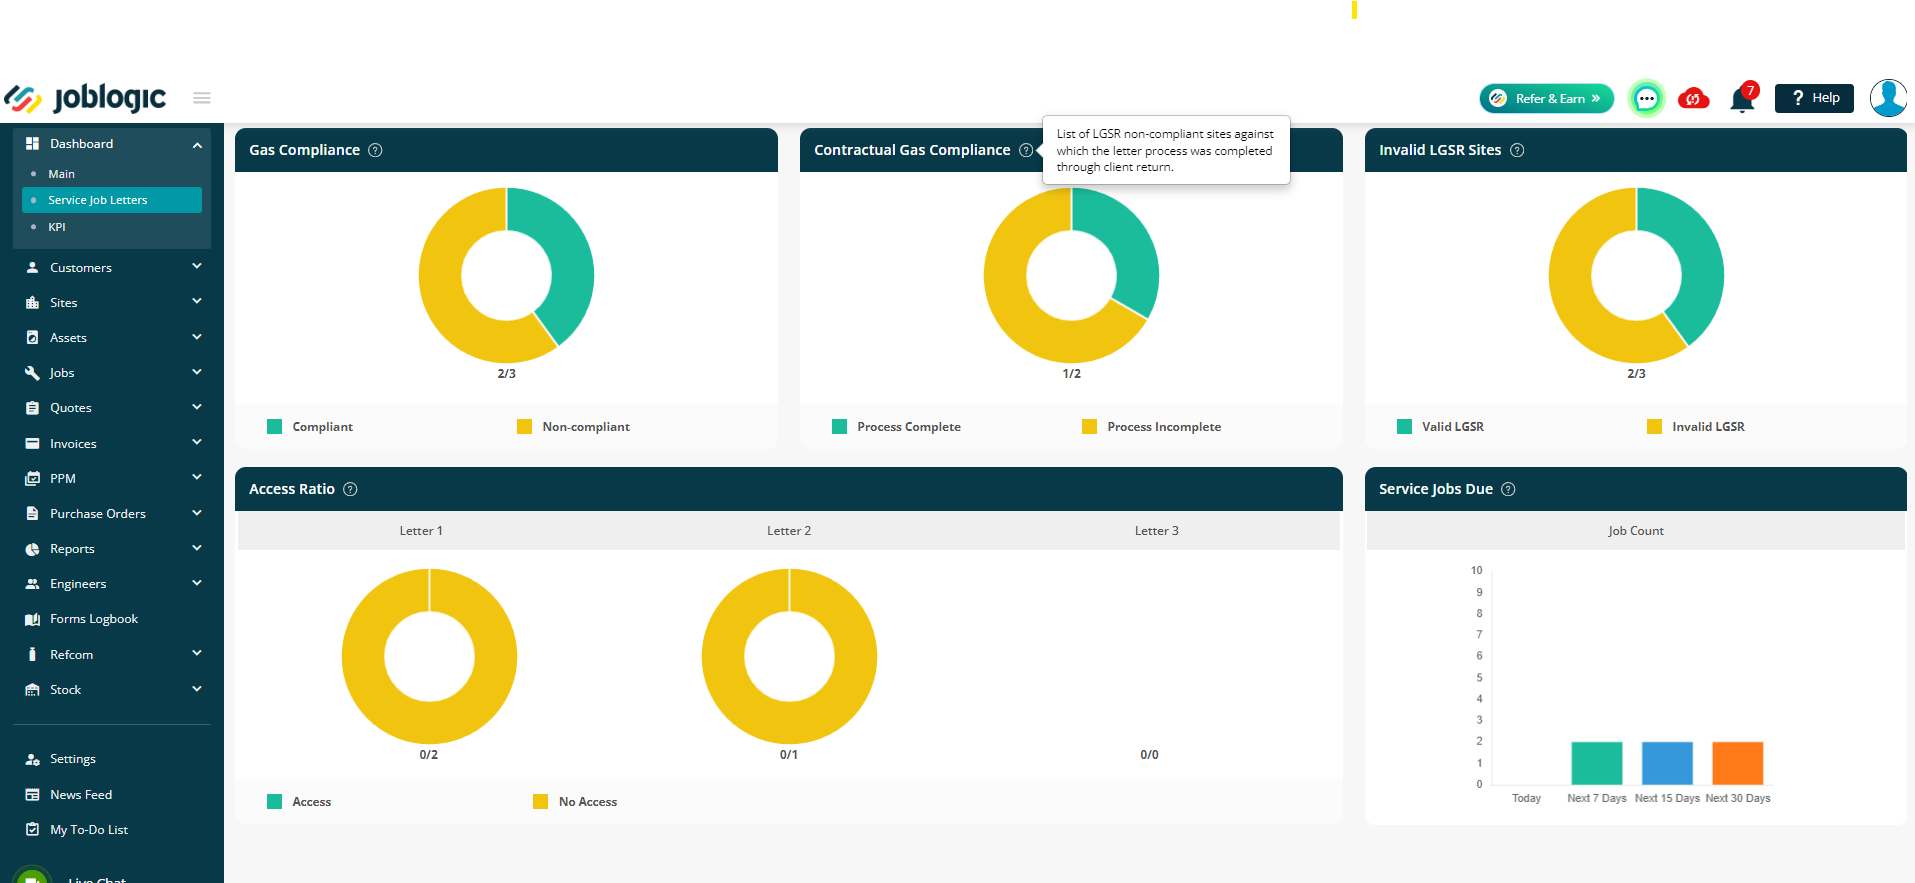
Hover over any section to see percentages totals.
Setting up letters and email templates
There are system defaults in place for the reminder and escalation letters as well as the email templates, however if you do wish to edit or create your own feel free to do so.
To edit or create your own letters, click Settings > Document Templates
You can then click on the ‘Service Letters’ tab to choose either Service Letter or Escalated Service Letter.
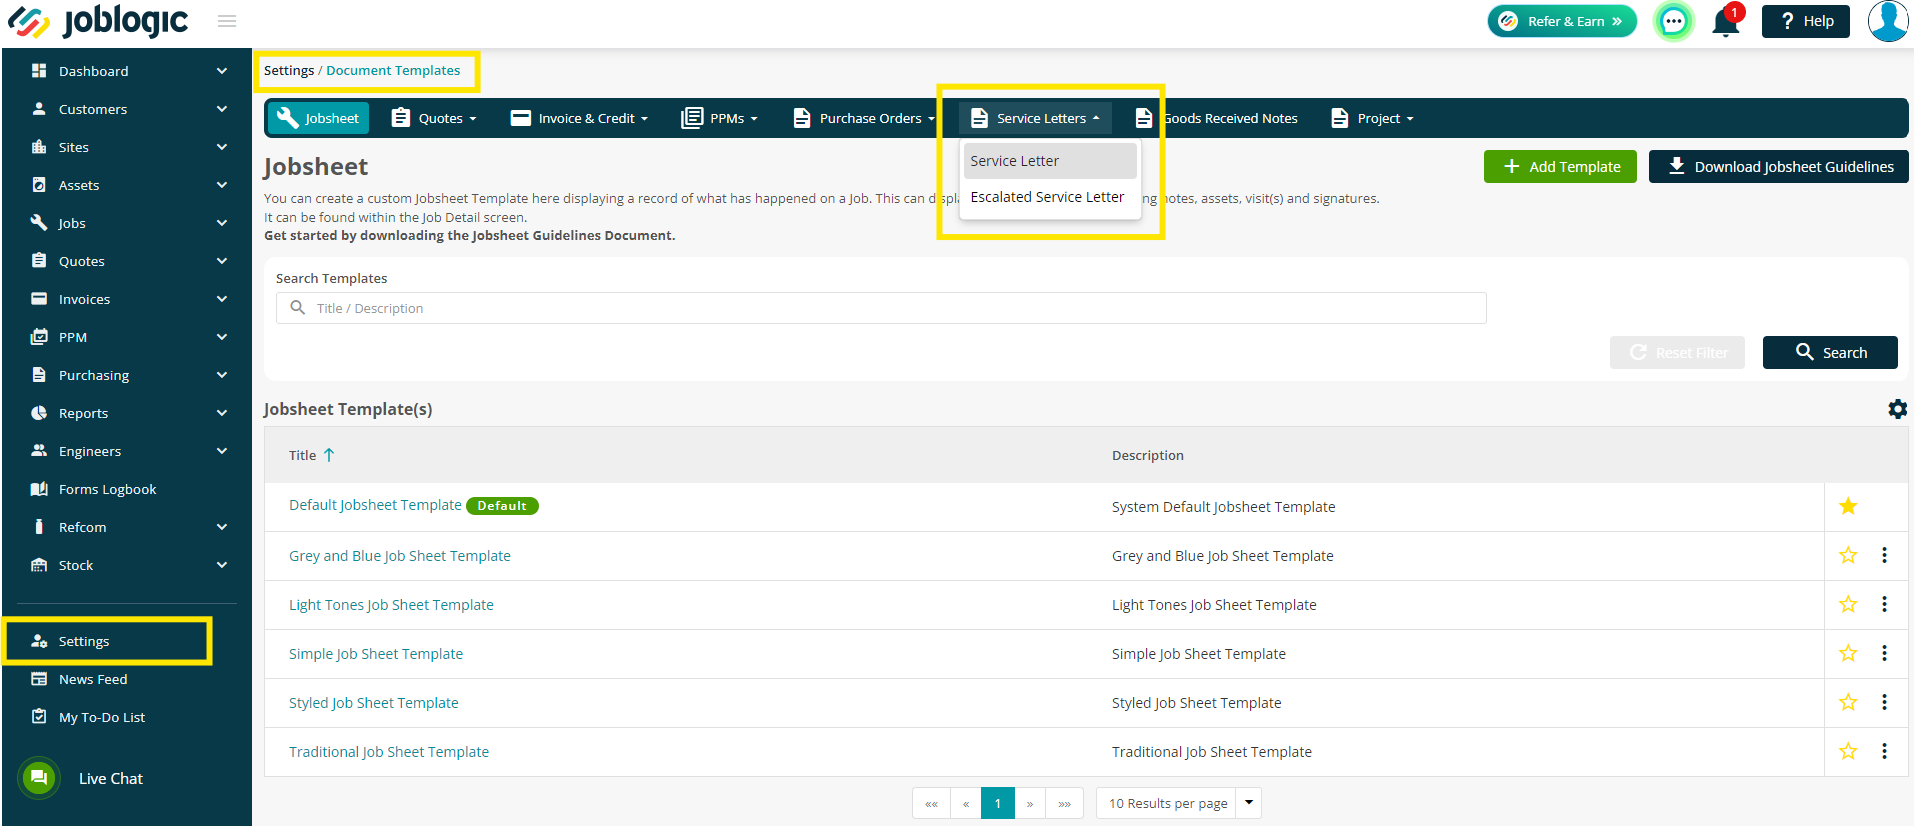
If for any reason a new template is created, assigned to a service, and then deleted, the system will automatically revert to the default template. This means your services will always have a template against them and your customers will not miss out on vital reminders.
If you require further assistance with document templates, click here to read our guide.
To set up or amend the email template, click through to Settings > Email, here you can edit your Service Letter or Service Letter Escalations templates as needed.

Example:
I have set up my Service – Recurrence frequency – Annually
I have set up my Customer – First Reminder – 6 weeks
I have set up my Customer – Appointment Date Gap – 1 weeks
I have set up my Site - Last Service Job Completed Date – 03/10/2022
So:
My letter is scheduled for – 22/08/2023 (6 weeks before expiry on 03/10/2023)
My provisional appointment – 29/08/2023 (1 week after letter as per appointment gap)
Keep in mind to leave enough time in case of No Access visits / further reminder letters too.
Further Support
For further information or assistance with the above, contact our Support Team on 0800 326 5561 or email support@joblogic.com. Alternatively, our Customer Success Management team can be reached by emailing customersuccess@joblogic.com
Publishing Details
This document was written and produced by Joblogic’s Technical Writing team and was last updated on the date specified above. Be aware that the information provided may be subject to change following further updates on the matter becoming available. Additionally, details within the guide may vary depending on your Joblogic account’s user permissions.