Introduction
The stock requests module is a powerful feature designed to simplify and optimise the process of managing stock for jobs and visits, ensuring your team has the right resources at the right time. Whether you are allocating materials for a scheduled visit or handling surplus stock after a job, this module offers a seamless way to streamline inventory management.
This guide will walk you through the key features, benefits, and workflows of the Stock Requests module, helping you maximise its potential to improve efficiency, reduce errors, and maintain optimal inventory levels.
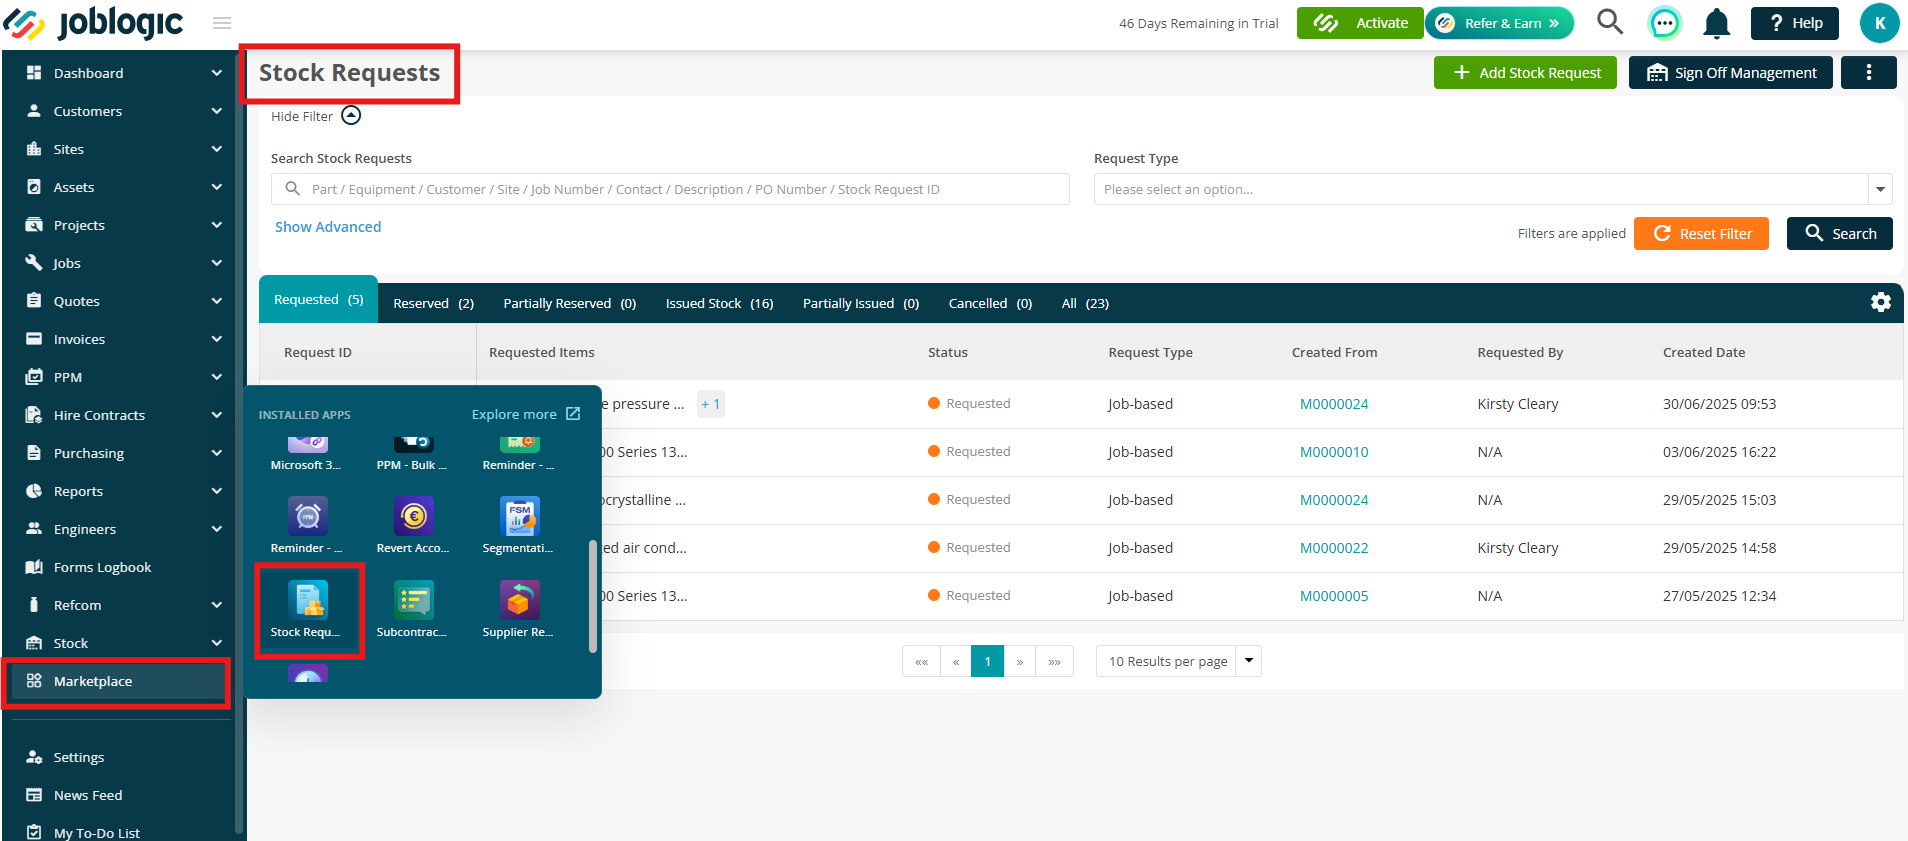
How to access the Stock Requests module
Click the Marketplace option on the main menu and then click Stock Requests
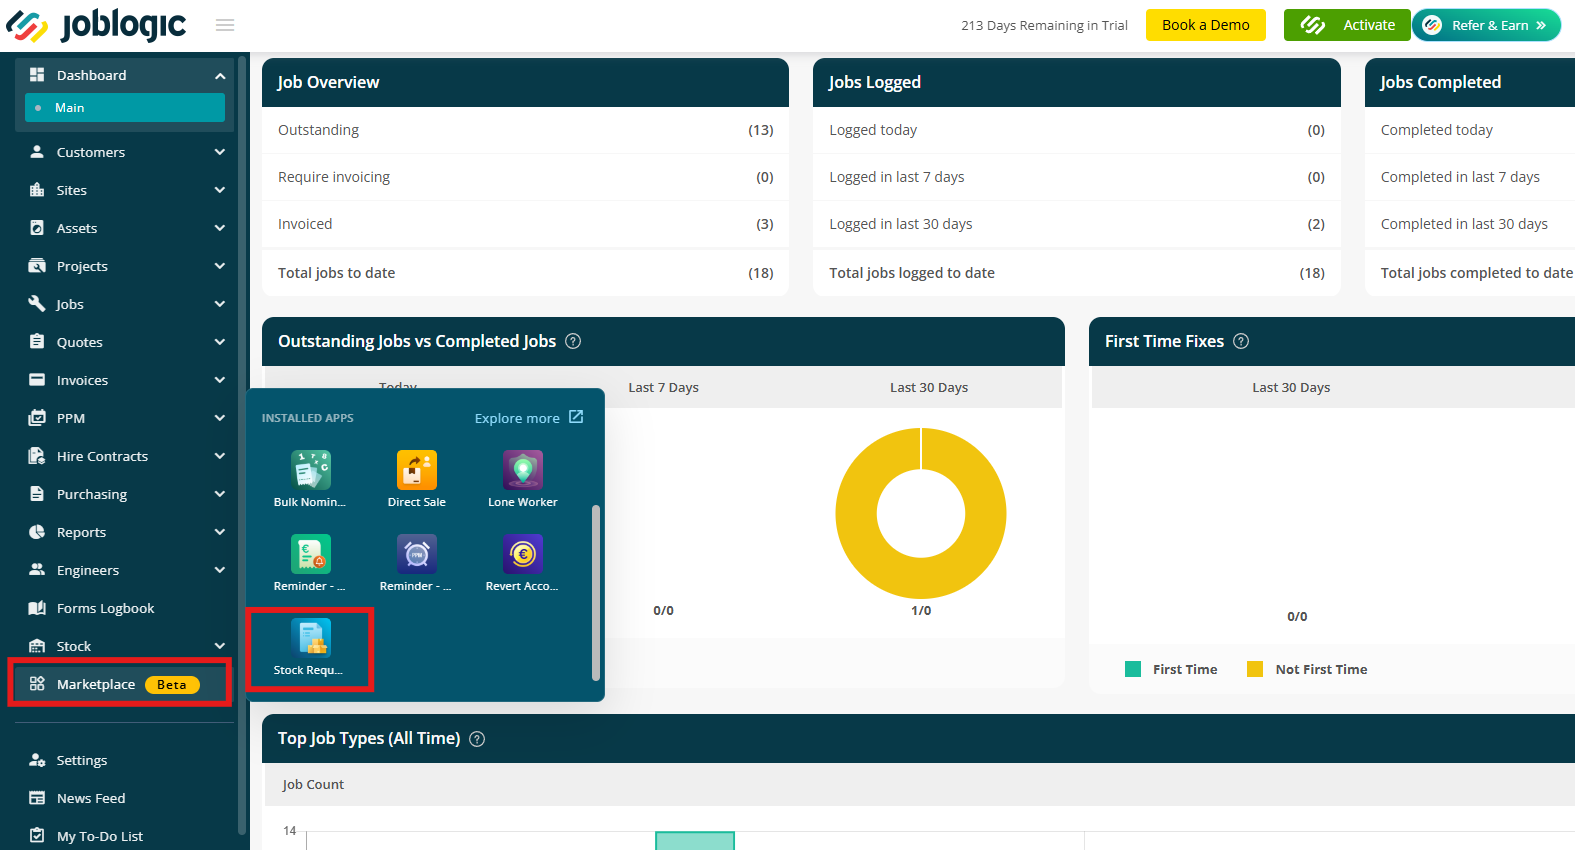
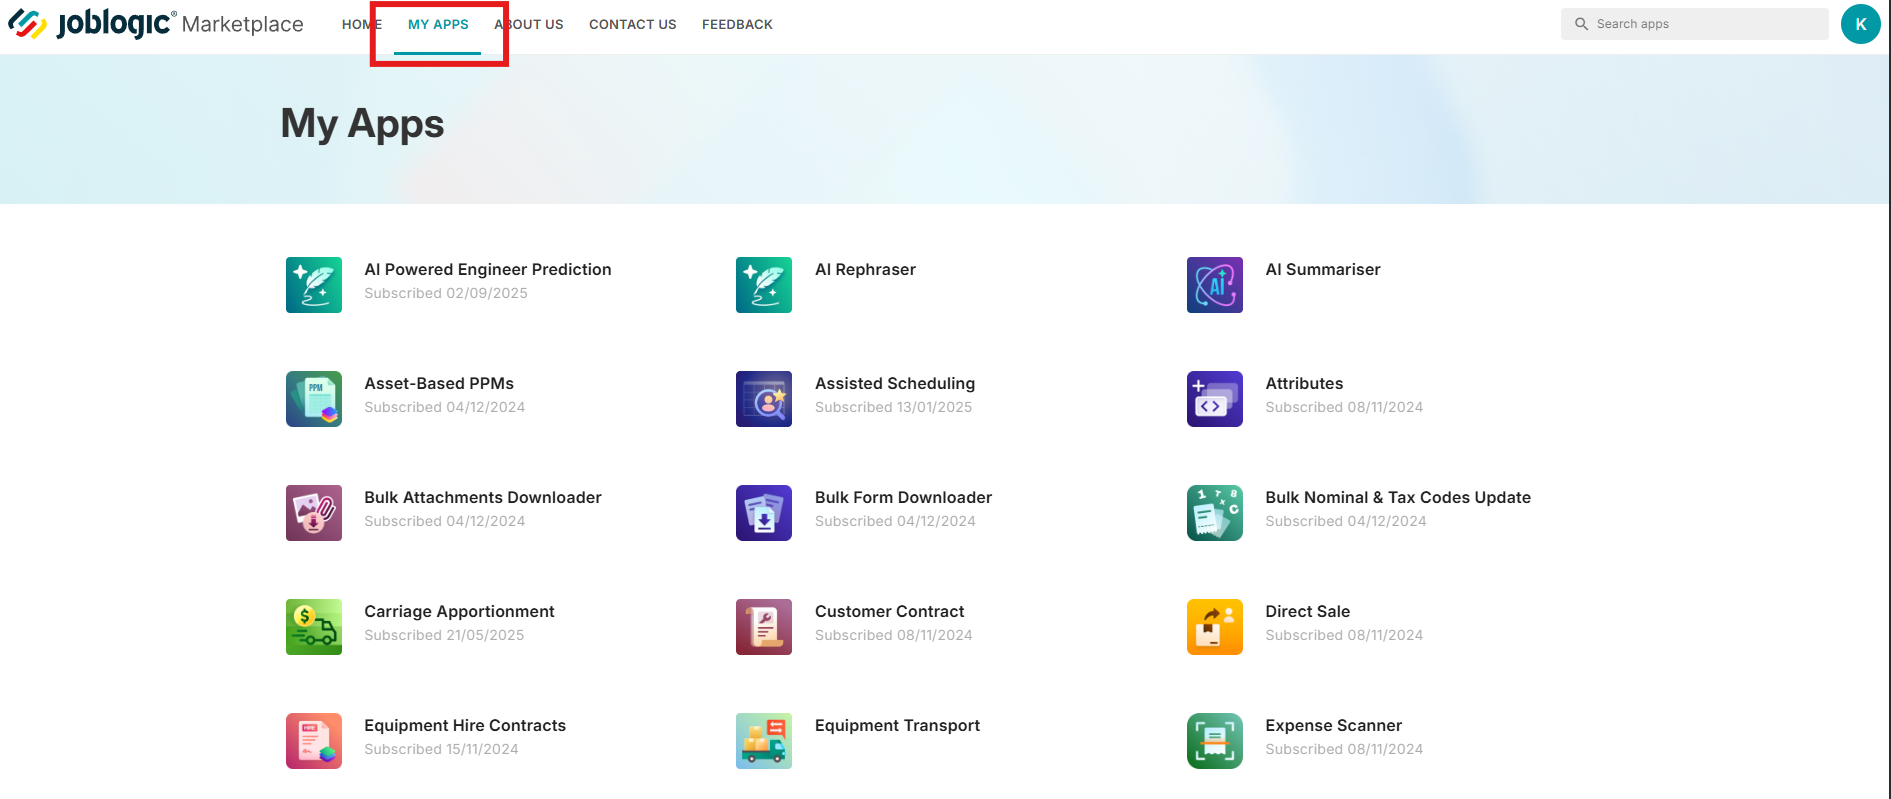
Alternatively, click Explore More and find it under the My Apps section.
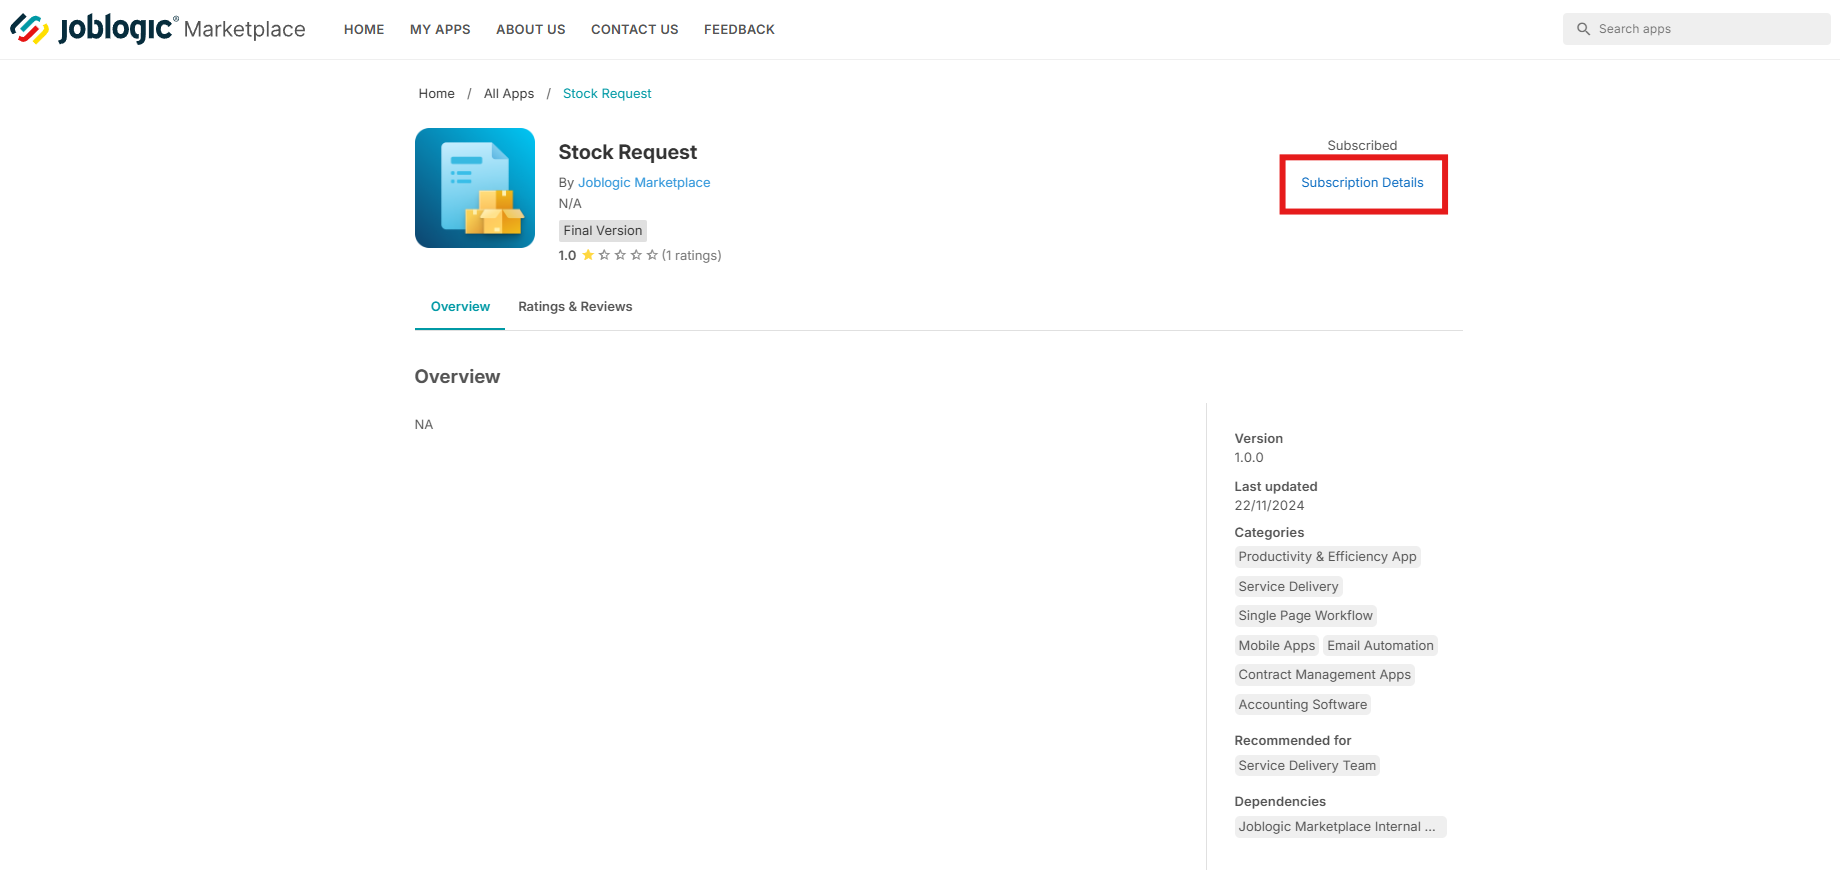
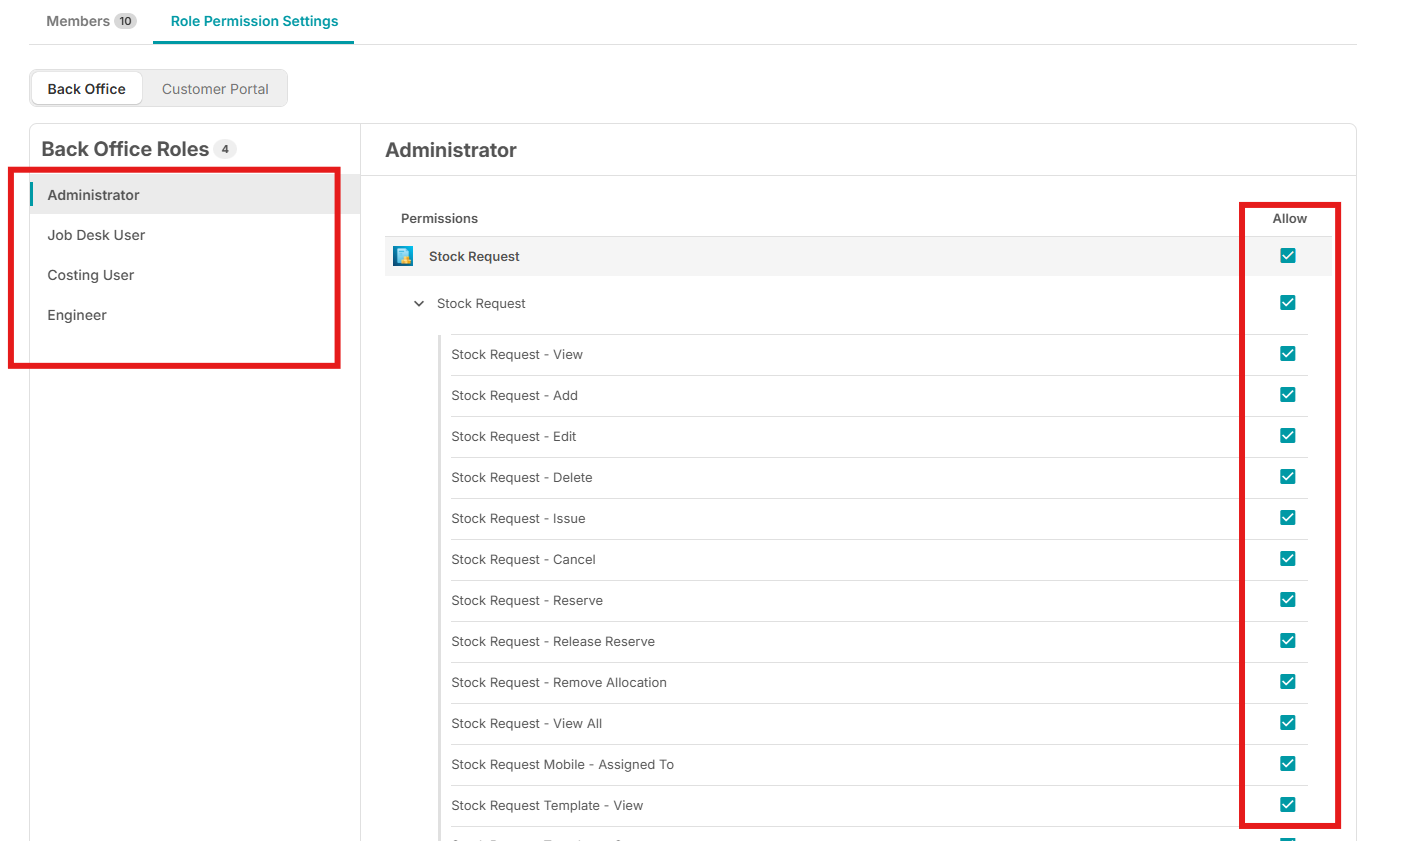
Permissions
To manage permissions for the Stock Requests app, click Subscription Details under the App settings.
Then click Role Permission Settings.
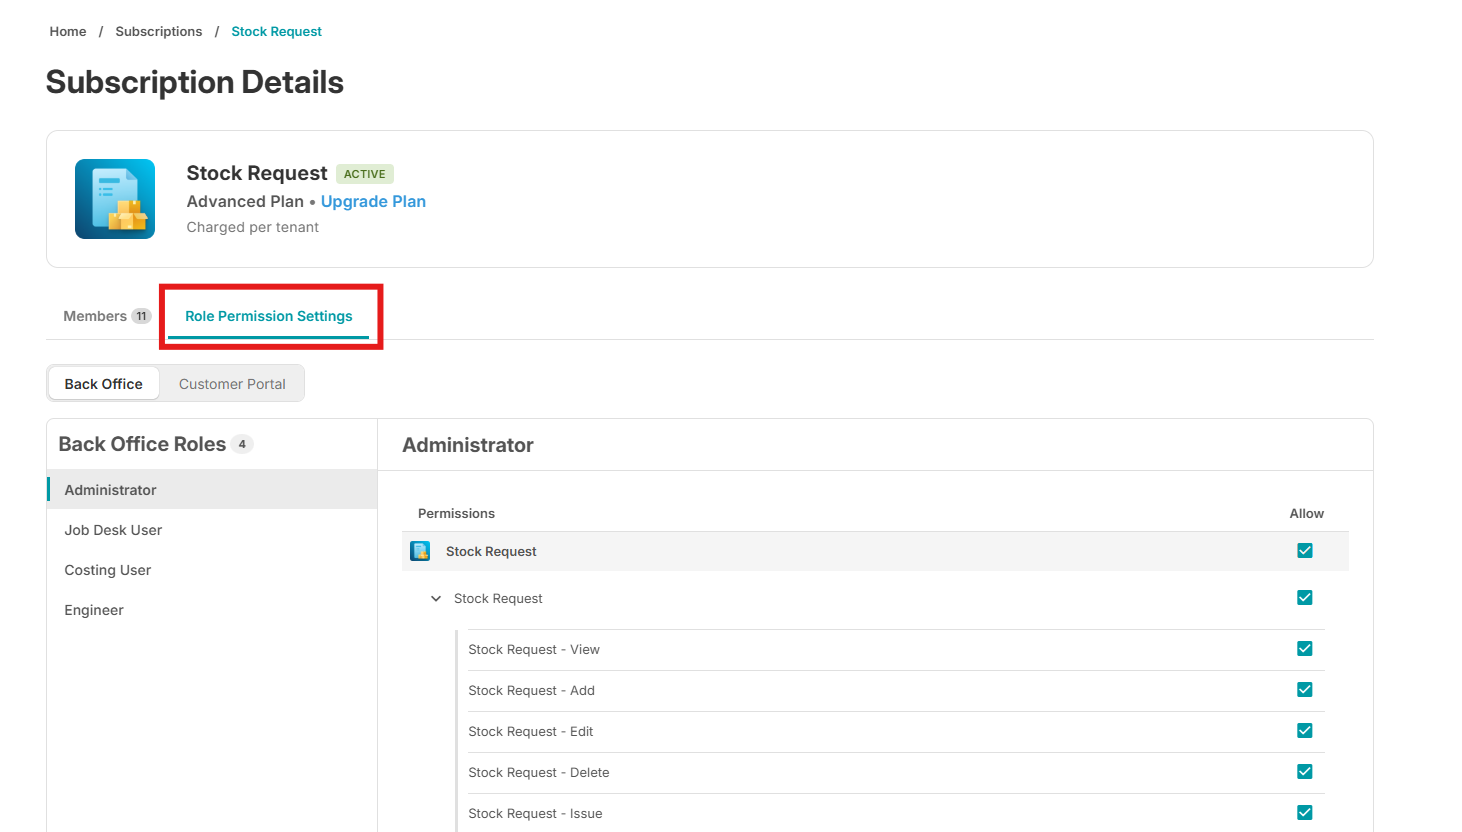
Tick/untick the relevant settings for each role.
- Stock Request - View
- Stock Request - Add
- Stock Request - Edit
- Stock Request – Delete
- Stock request – Issue
- Stock Request – Cancel
- Stock Request – Reserve
- Stock Request – Release Reserve
- Stock Request – Remove Allocation
- Stock Request - View All
- Stock Request Mobile - Assigned To
- Stock Request Template - View
- Stock Request Template - Create
- Stock Request Template - Edit
- Stock Request Template - Delete
- Stock Request Template Back Office - Use Template
- Stock Request Template Mobile - Use Template
User roles
- Administrator Role – permissions inherited as Granted
- Job Desk User Role – permissions inherited as Granted
- Costing User Role – permissions inherited as Denied
- Engineer Role – permissions inherited as Denied
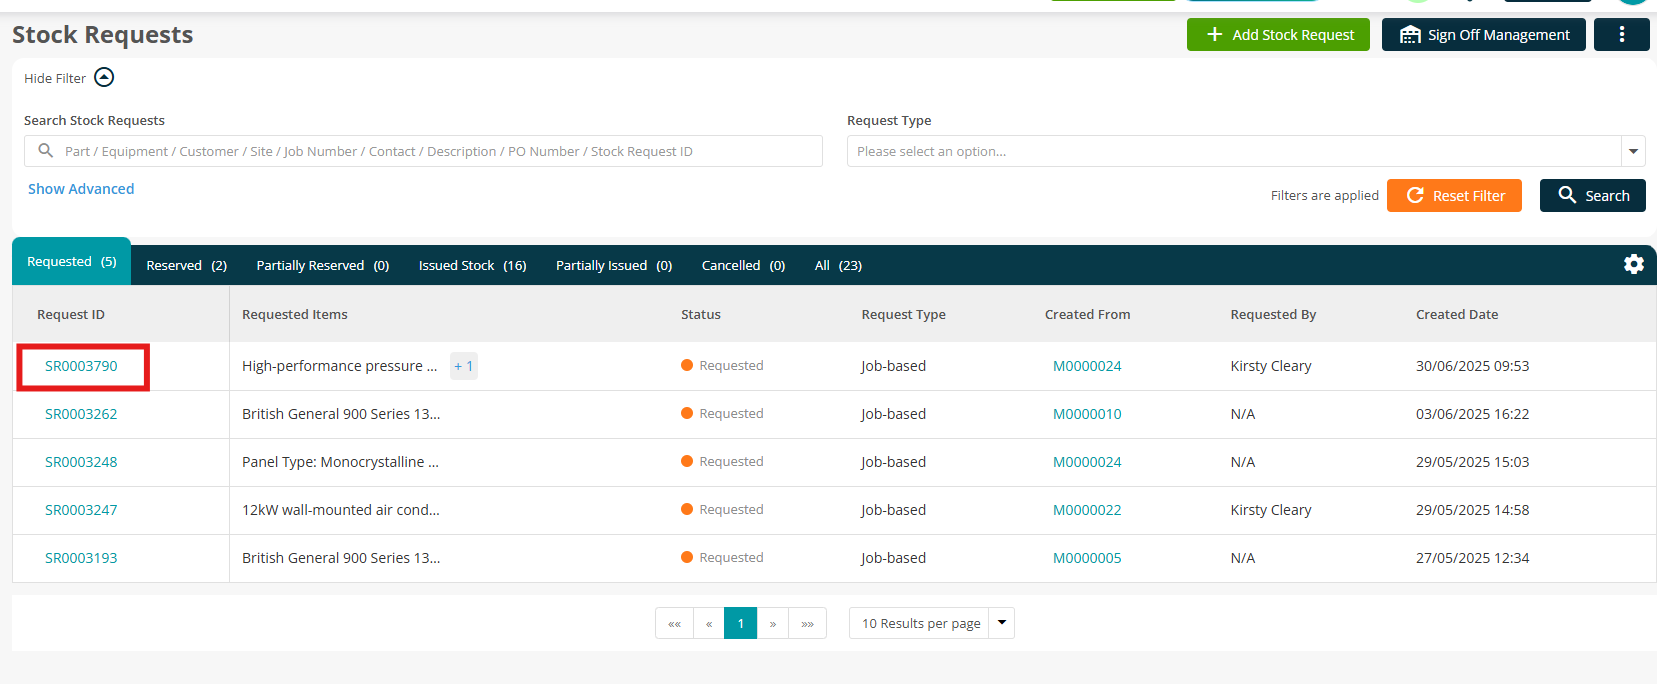
Stock Requests page
The Stock Requests landing page is your one-stop shop for managing all your stock requests.
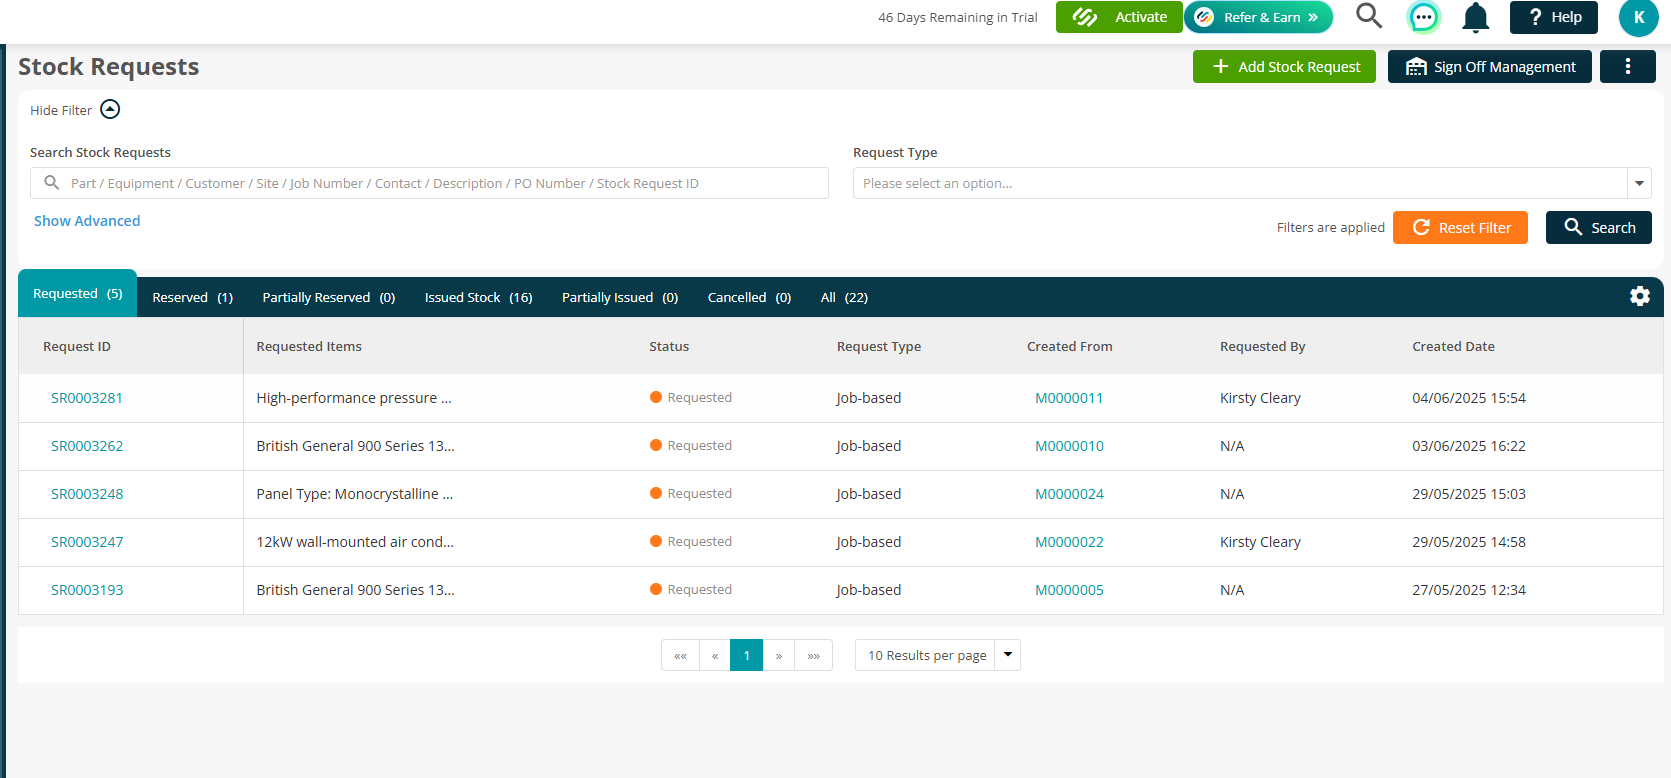
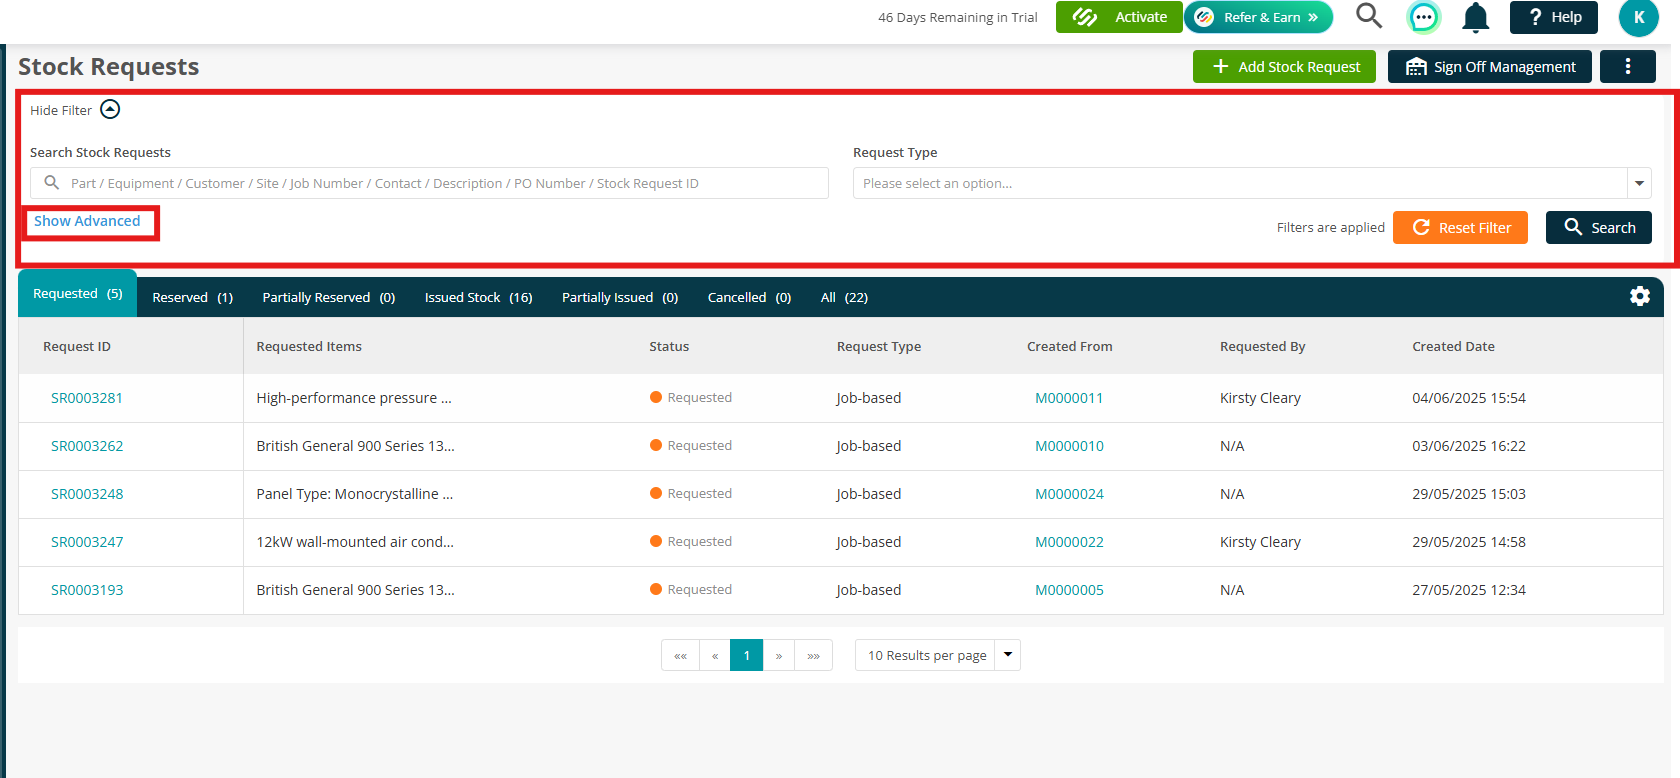
Quickly find specific jobs, parts, dates and more using the handy search filters.
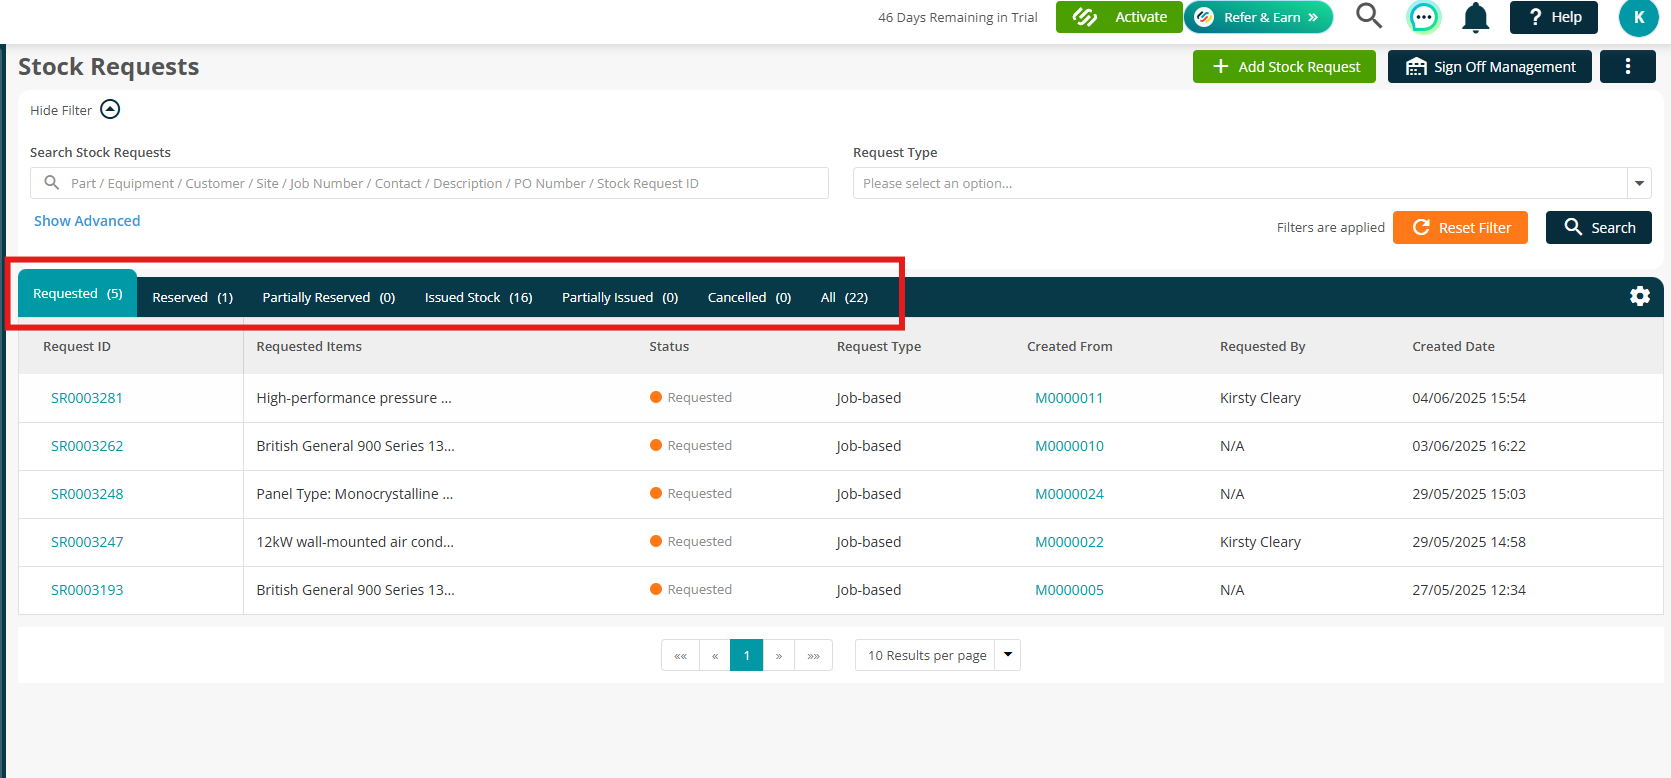
Switch between tabs to view items that are Requested, Reserved, or Issued at a glance.
We’ll return to this page later. First, let's take a look at setting up some Stock Templates to help you save time later on!
Stock Templates
Stock Request Templates allow you to create reusable lists of parts and equipment that can be quickly applied to Stock Requests.
This is particularly useful for repeat jobs where the same materials are required each time, such as planned maintenance, standard installations, or project-based work.
Creating a Stock Template
From the Stock Requests page, click Stock Templates in the top right corner.
.png)
Next, click Create Template.
.png)
Here, you can enter your Template Name (mandatory).
You can also complete the following optional fields: Job Type, Job Category and Comments.
.png)
Adding Stock Items
Once saved, you can begin adding stock items to your template.
.png)
To add items to your template, select your part or equipment from the dropdown and click Add.
.png)
Editing a Template
You can edit a template at any time.
- Any changes made will only apply to future Stock Requests
- Existing Stock Requests created using the template will remain unchanged
.png)
Adding a Stock Request
There are a couple of ways you can add a stock request.
Main page
The first option is on the Stock Requests main page. Click Add Stock Request in the top right
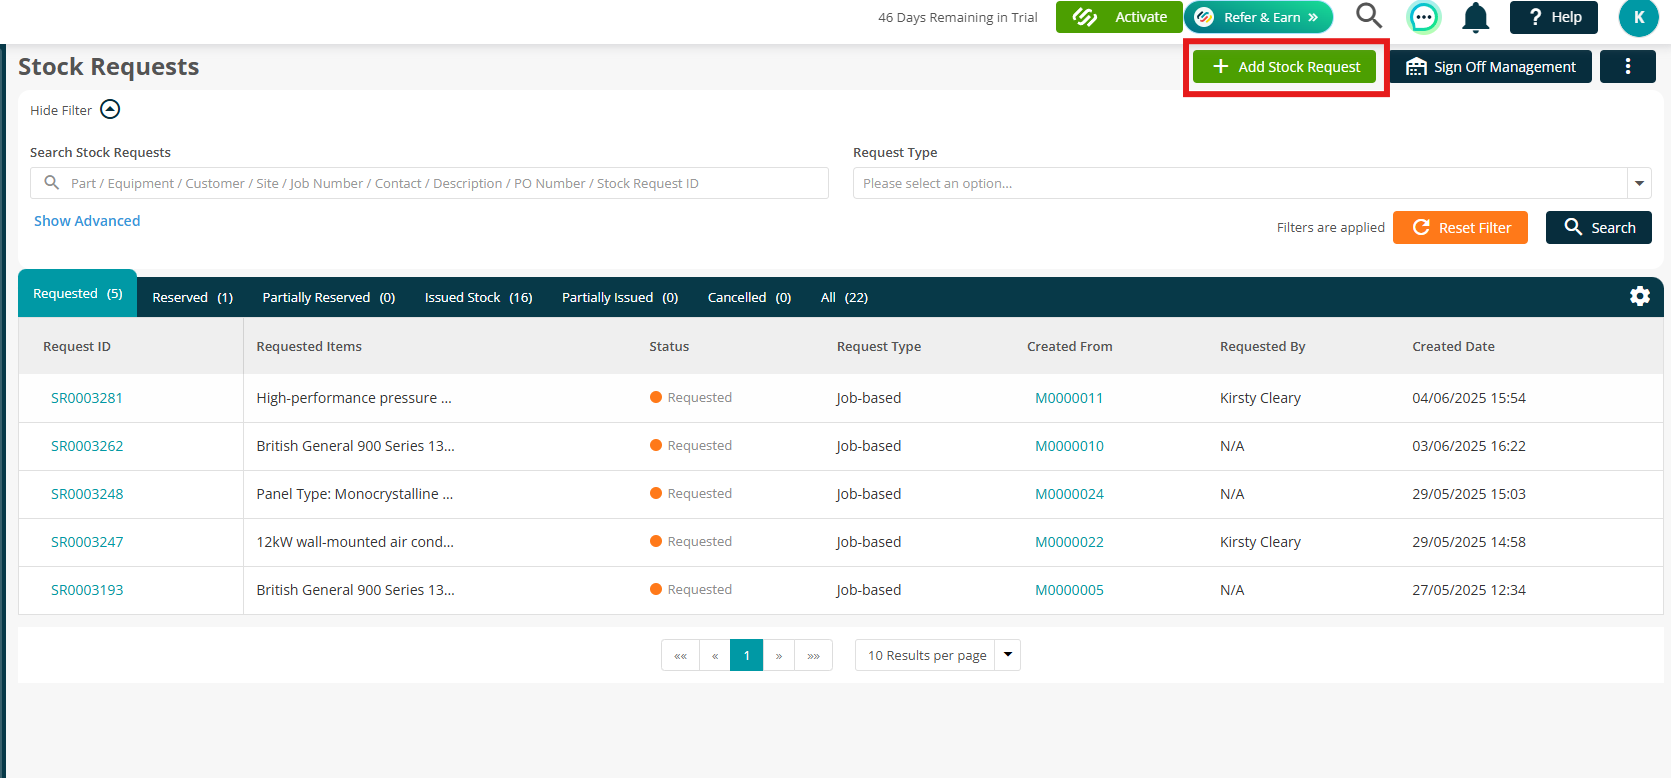
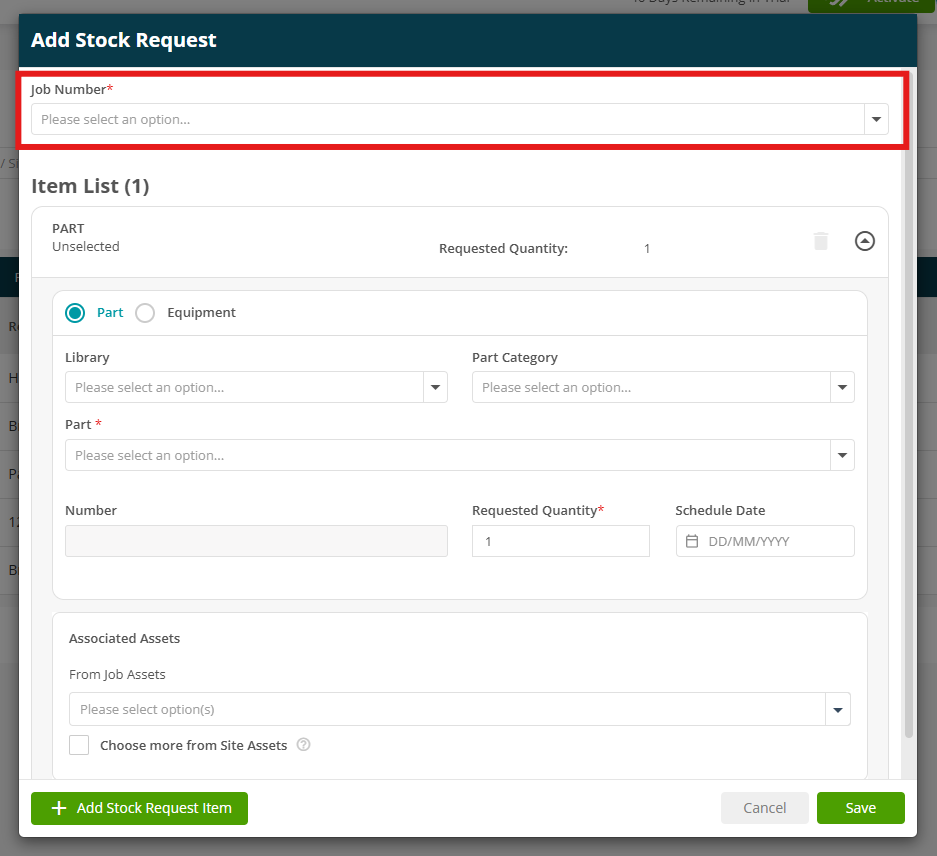
You’ll then need to select a Job Number from the dropdown
You can then select your Part/Equipment manually, or select a Stock Template to pull through your items automatically.
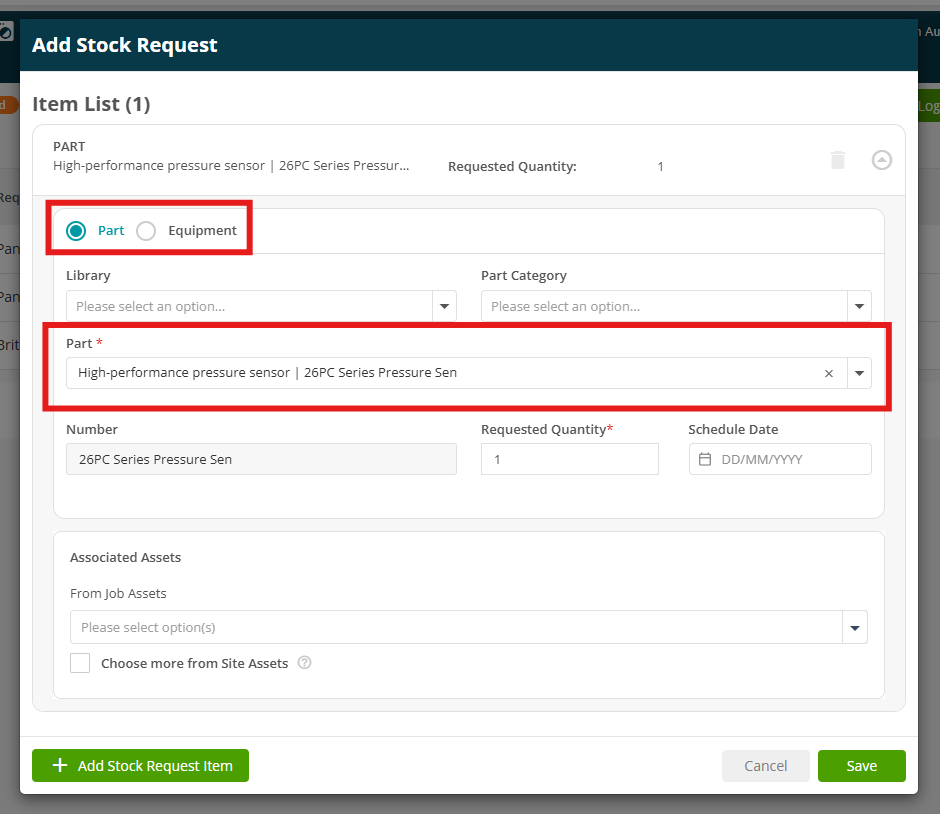
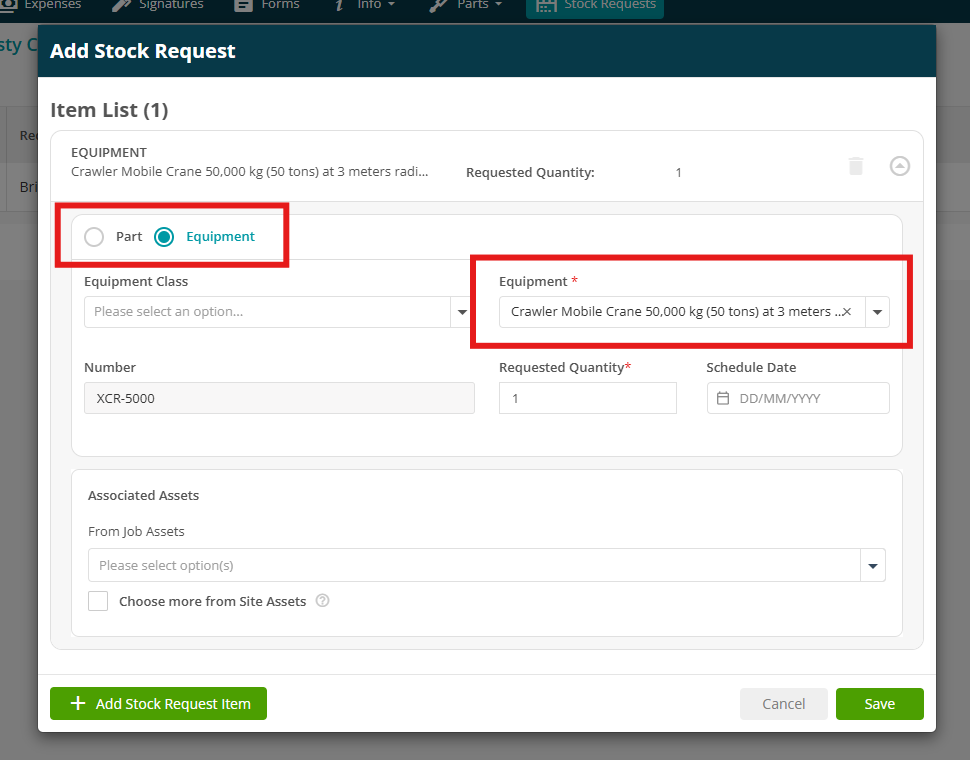
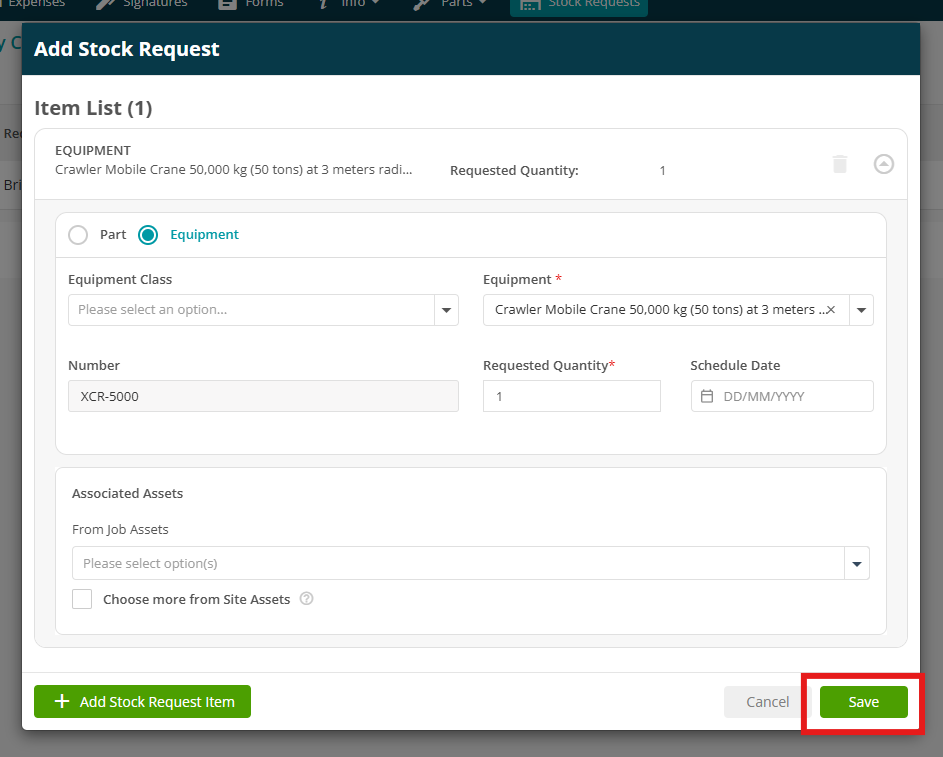
To do this manually, select your Part/Equipment from the dropdown:
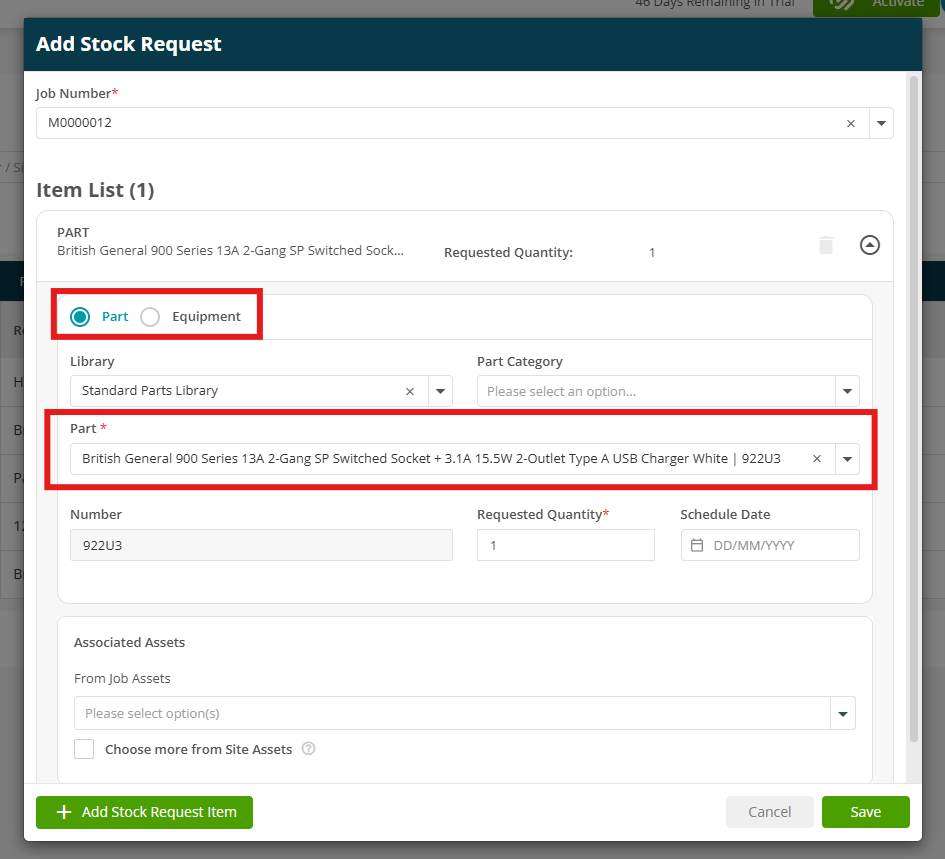
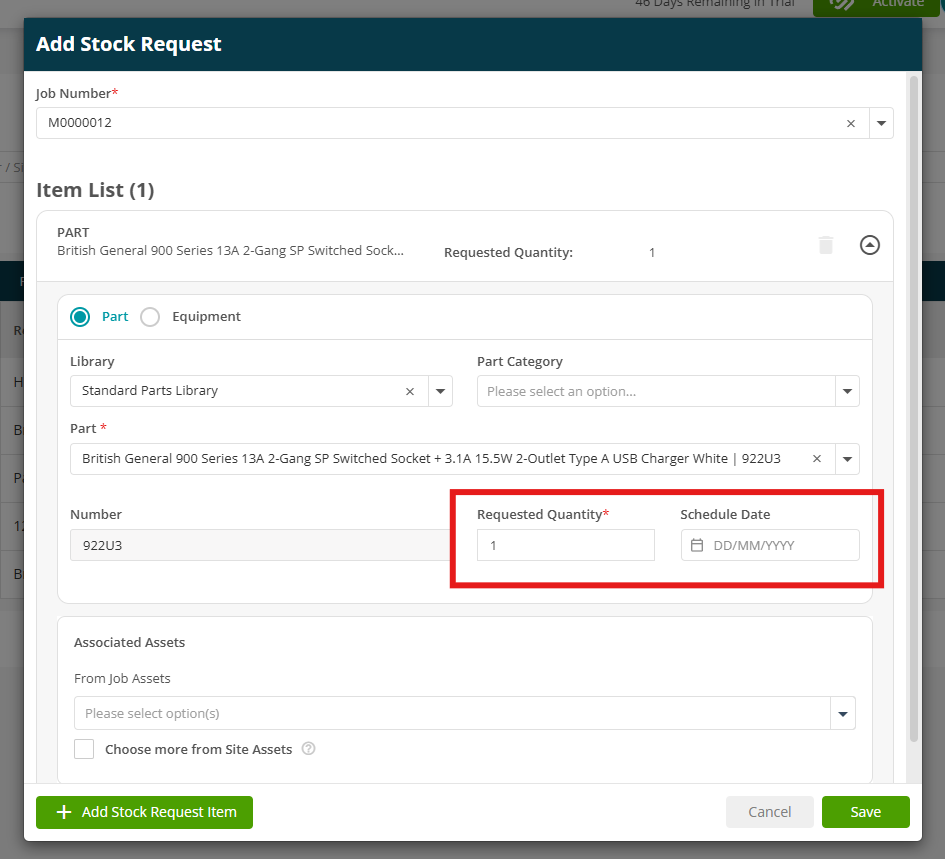
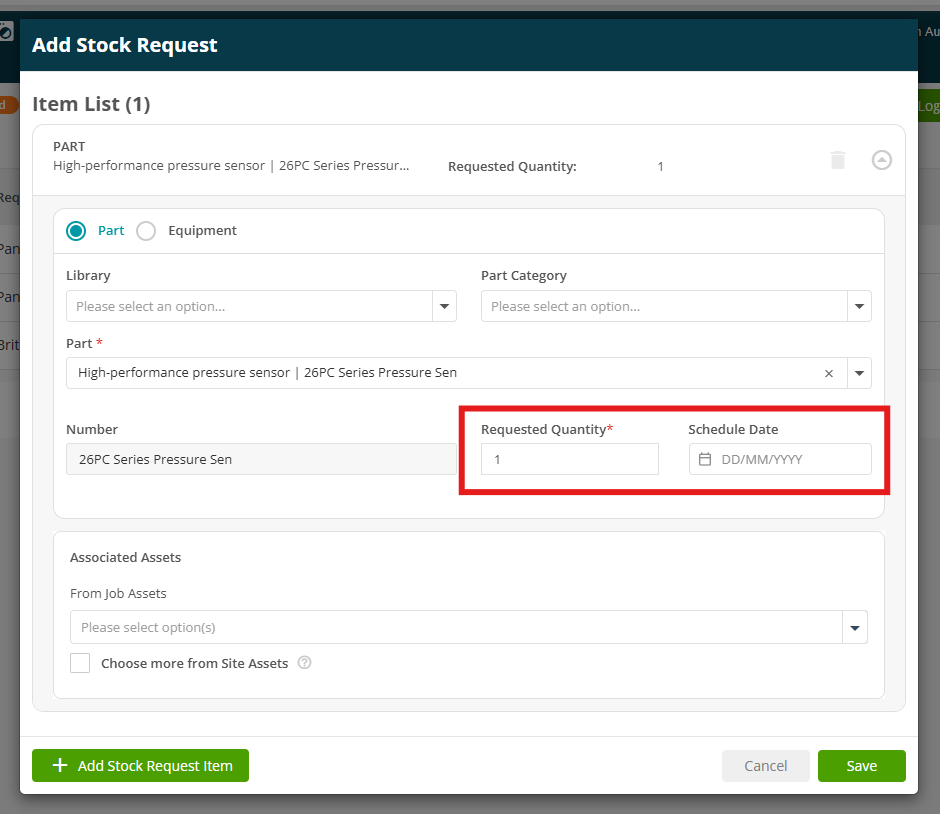
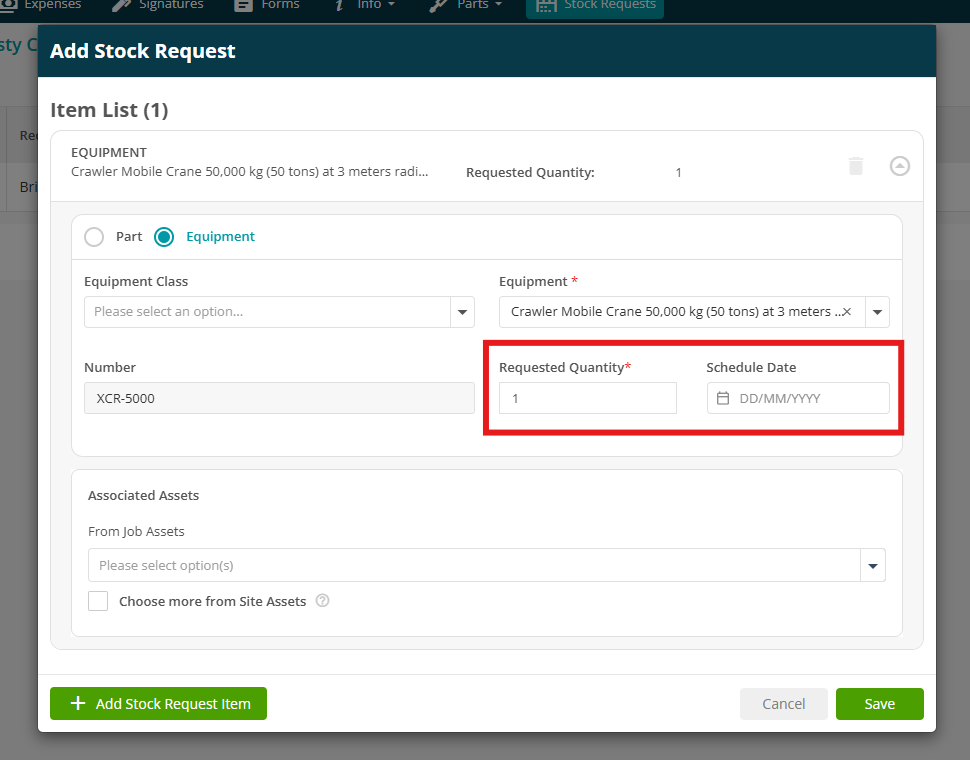
Once this has been chosen, you can enter the Requested Quantity (mandatory) and Schedule Date (not mandatory)
Alternatively, click Add Stock Request Item at the bottom of the screen.
.png)
This will allow you to select a Stock Request Template from your library.
Once selected, all stock items from the template will be automatically added to the request.
You can still:
- Add additional items
- Edit quantities
- Remove items as needed
This allows you to use templates as a starting point while still maintaining the flexibility to tailor each Stock Request to your specific job requirements.
.png)
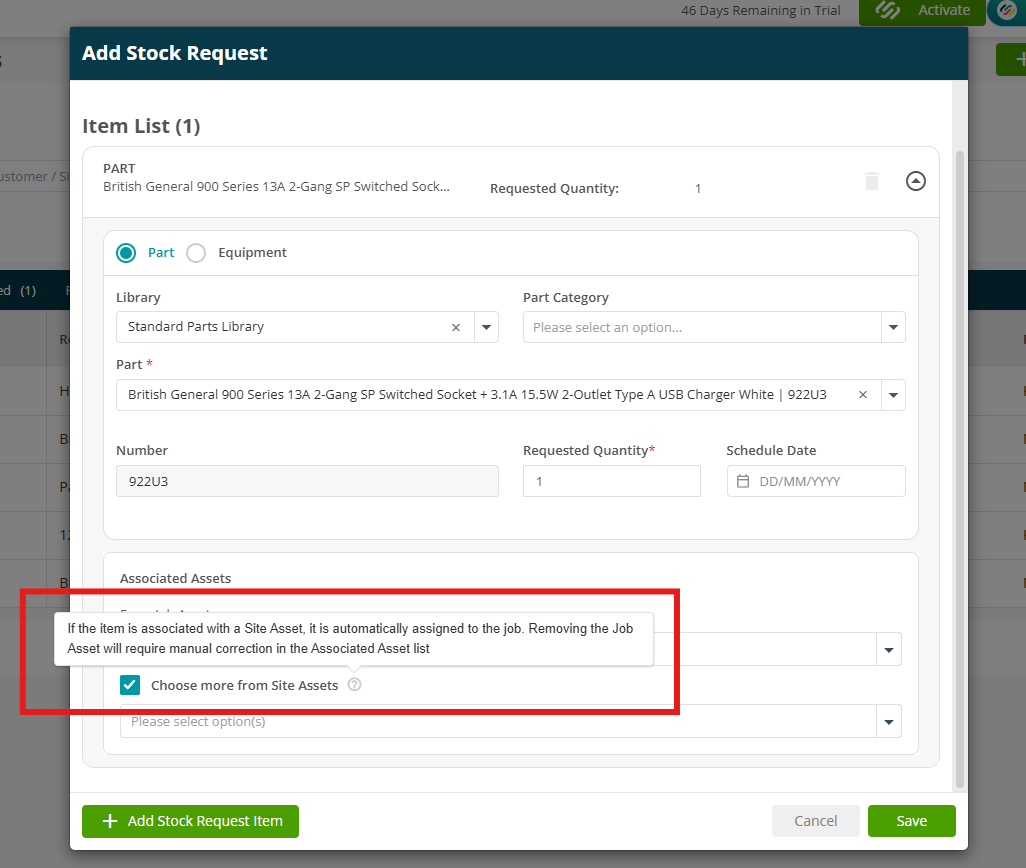
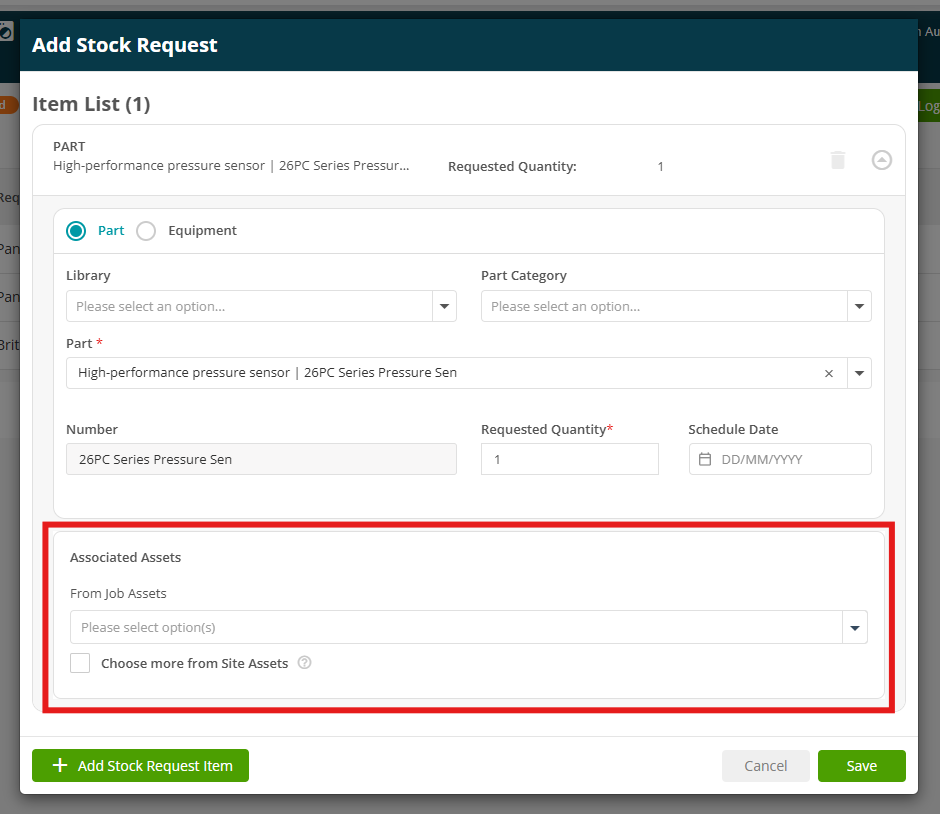
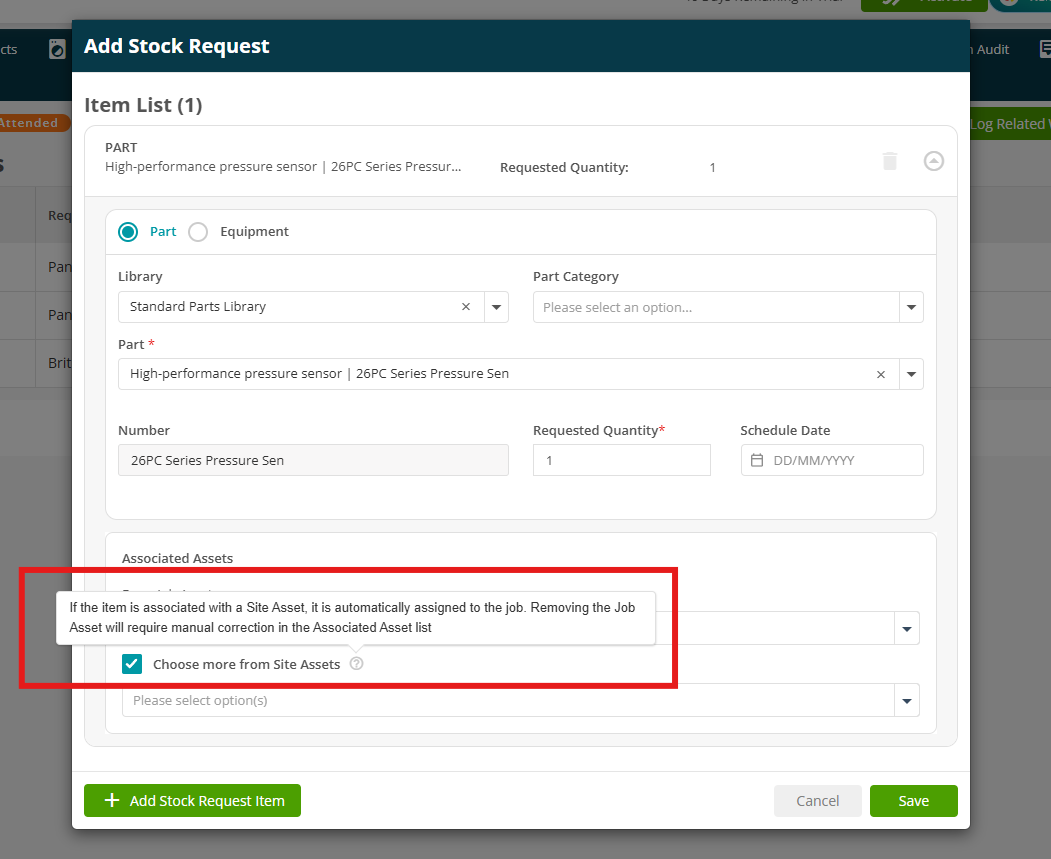
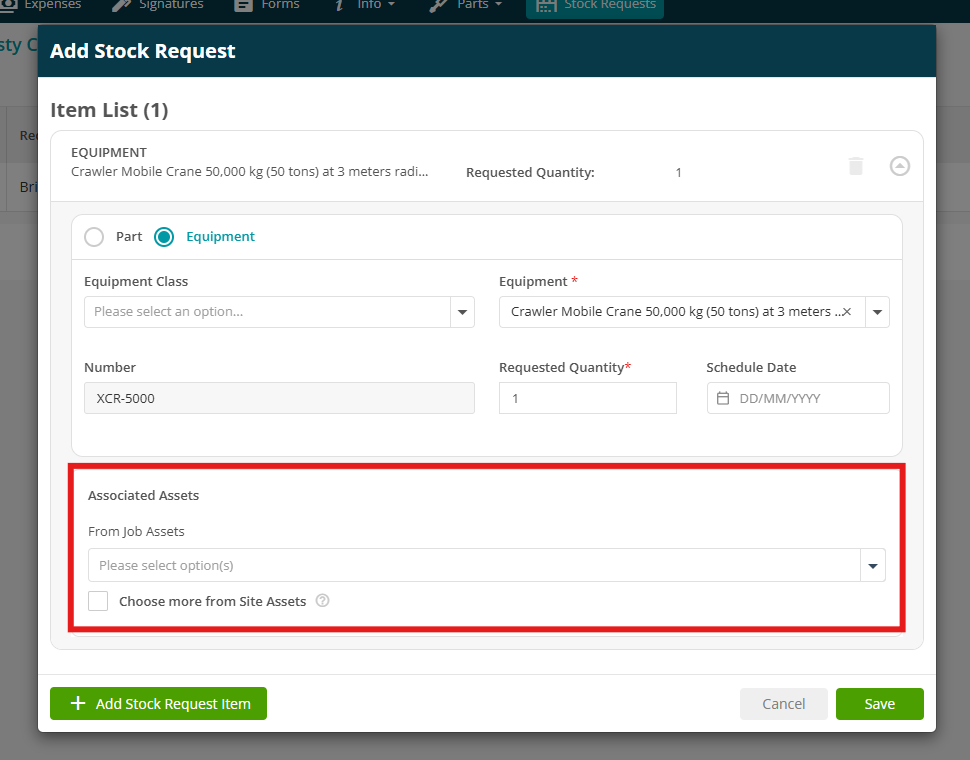
Associated Assets
When adding a Stock Request, it is possible to associate the part with a specific asset. This allows for clearer tracking and visibility of which assets each part is intended for—particularly useful when stock is linked to job-specific equipment.
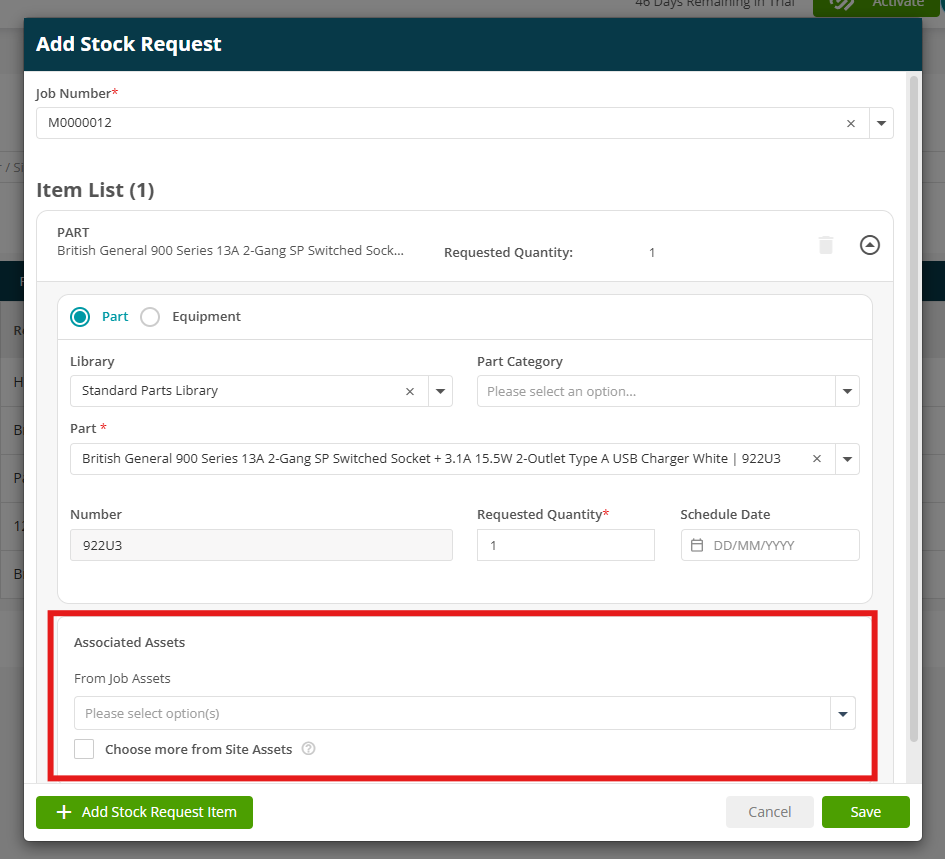
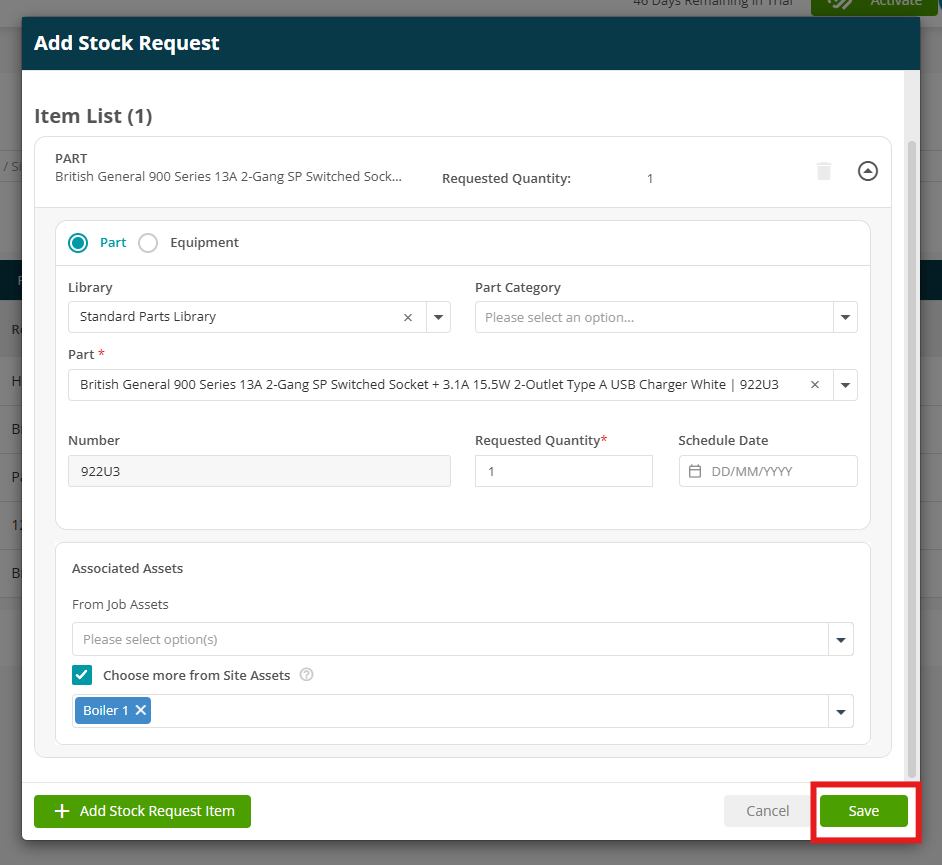
Tick the Choose more from Site Assets checkbox to expand the dropdown to include any assets registered to the site.
If a site asset is selected, it will automatically be added as a job asset.
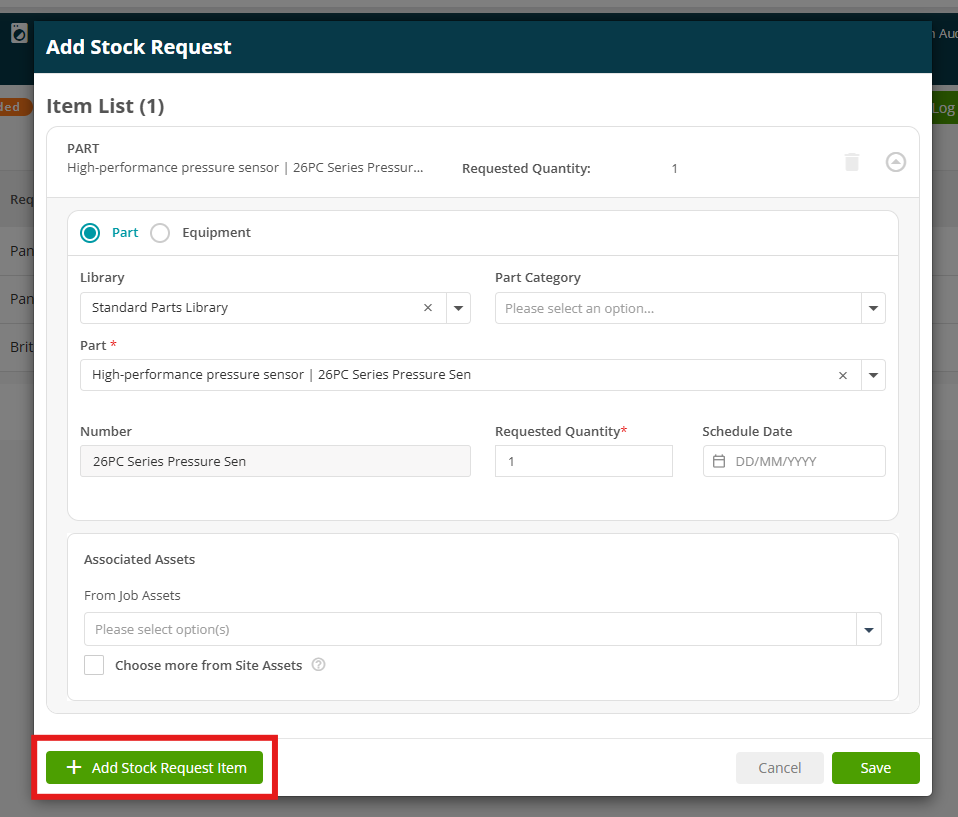
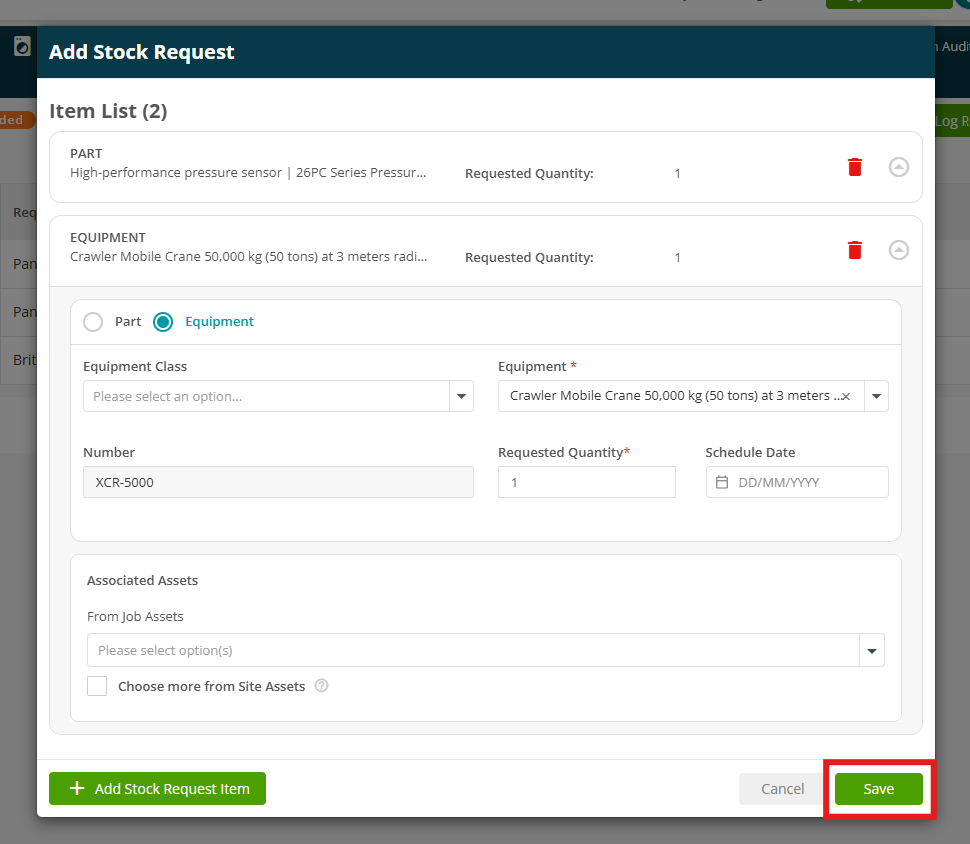
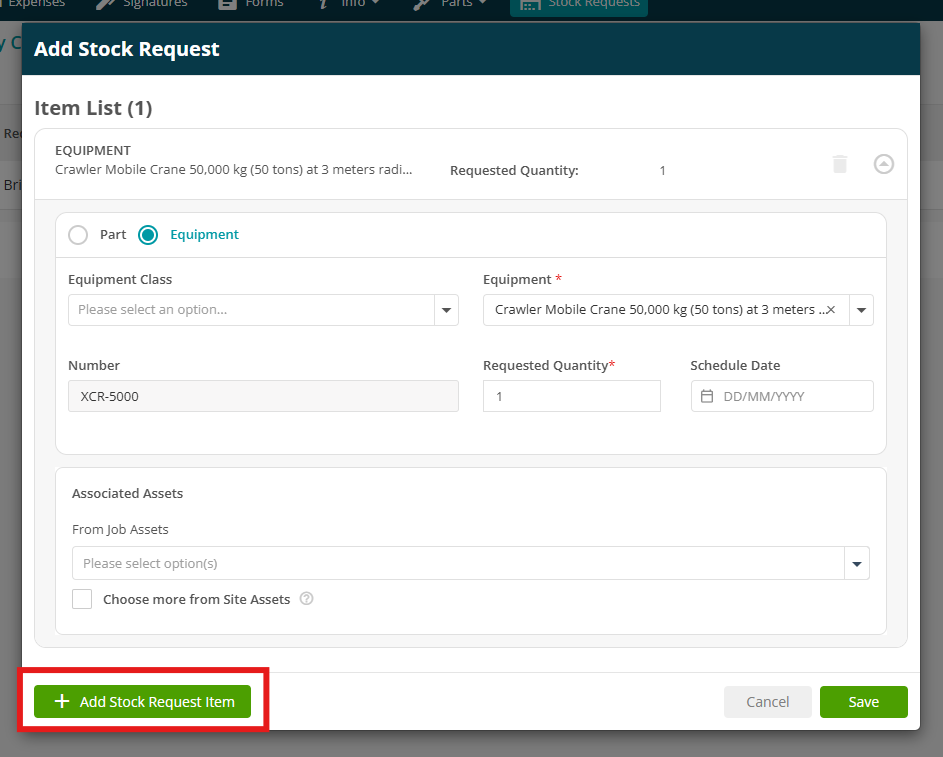
Multiple Stock items
You can request multiple parts or items within the same stock request form. All items will be grouped under a single Stock Request ID, helping you manage everything in one place with less admin.
Just click Add Stock Request Item to add more items to your request.
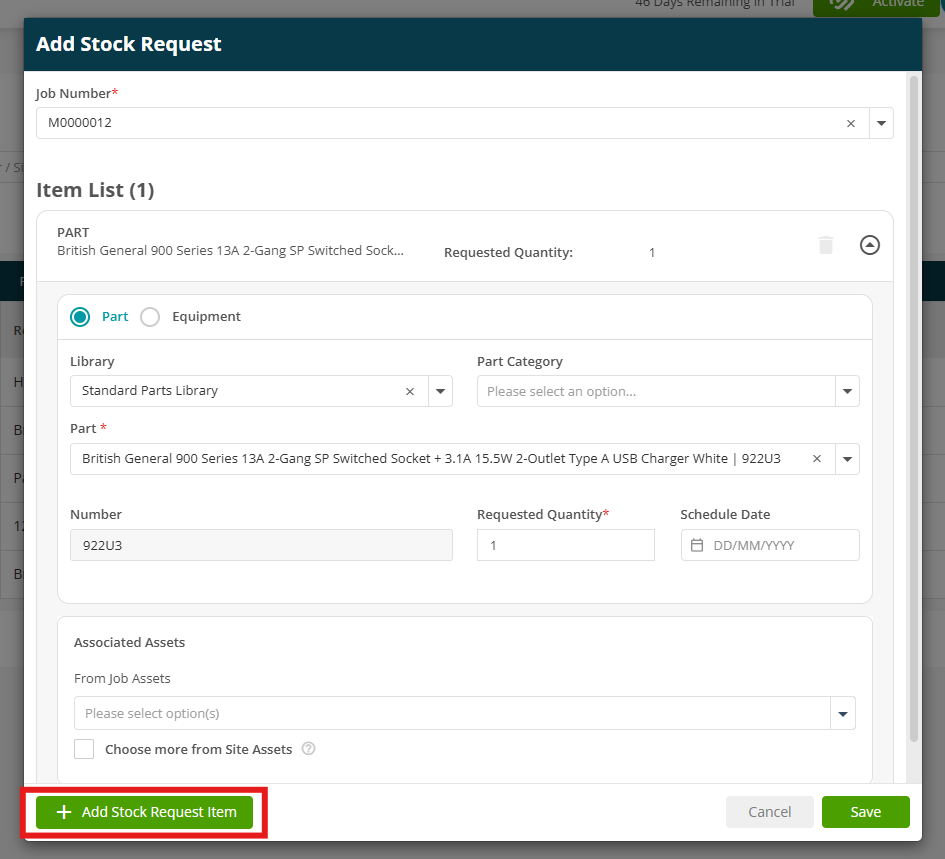
Click Save to finalise your choices
Job
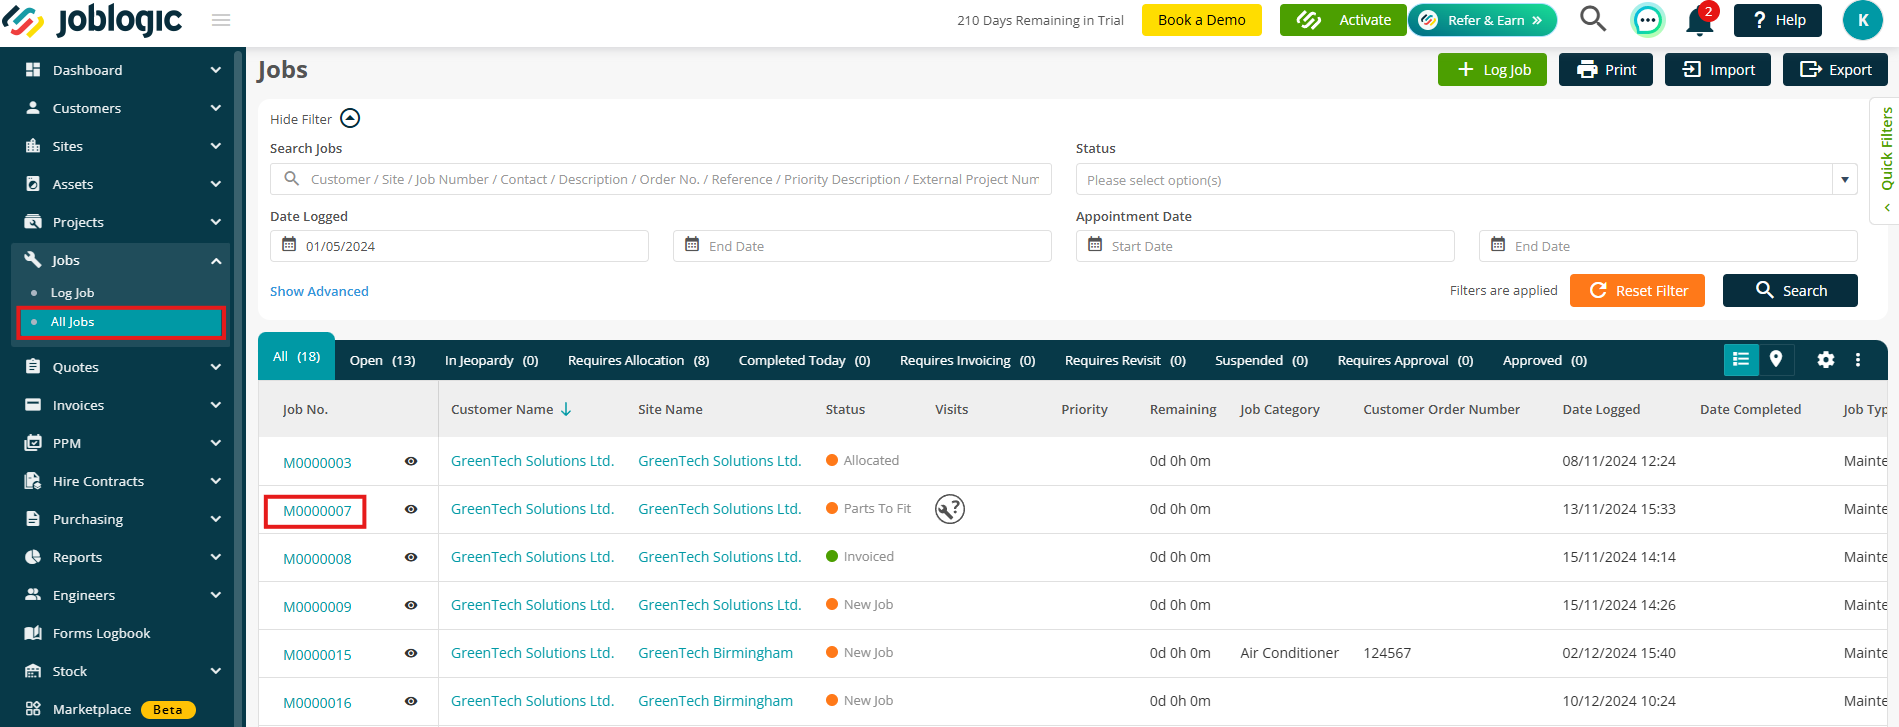
You can also add a stock request via a job. Click Jobs > All Jobs from your main menu
Next, select the job number you’d like to add stock to

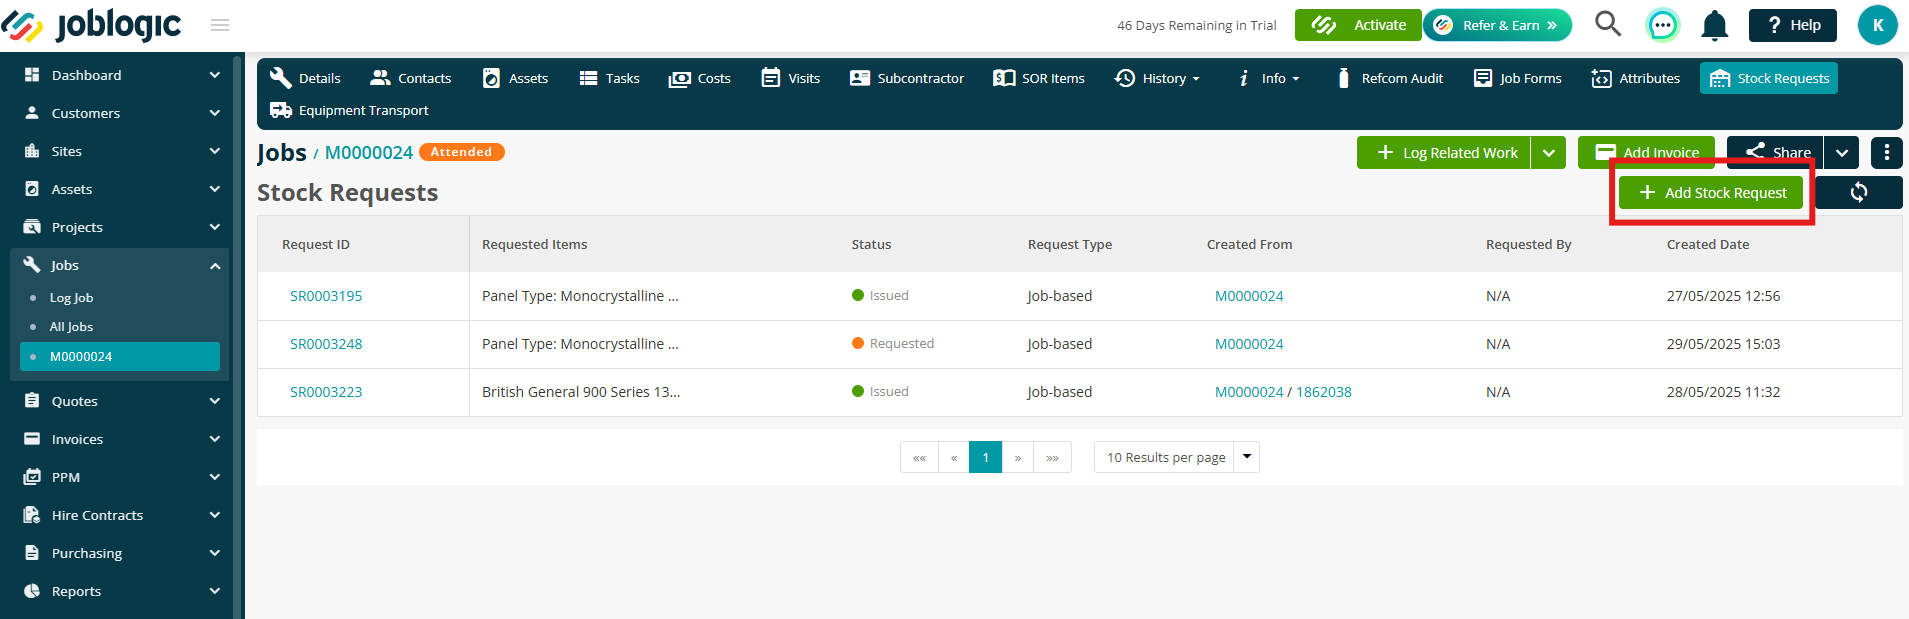
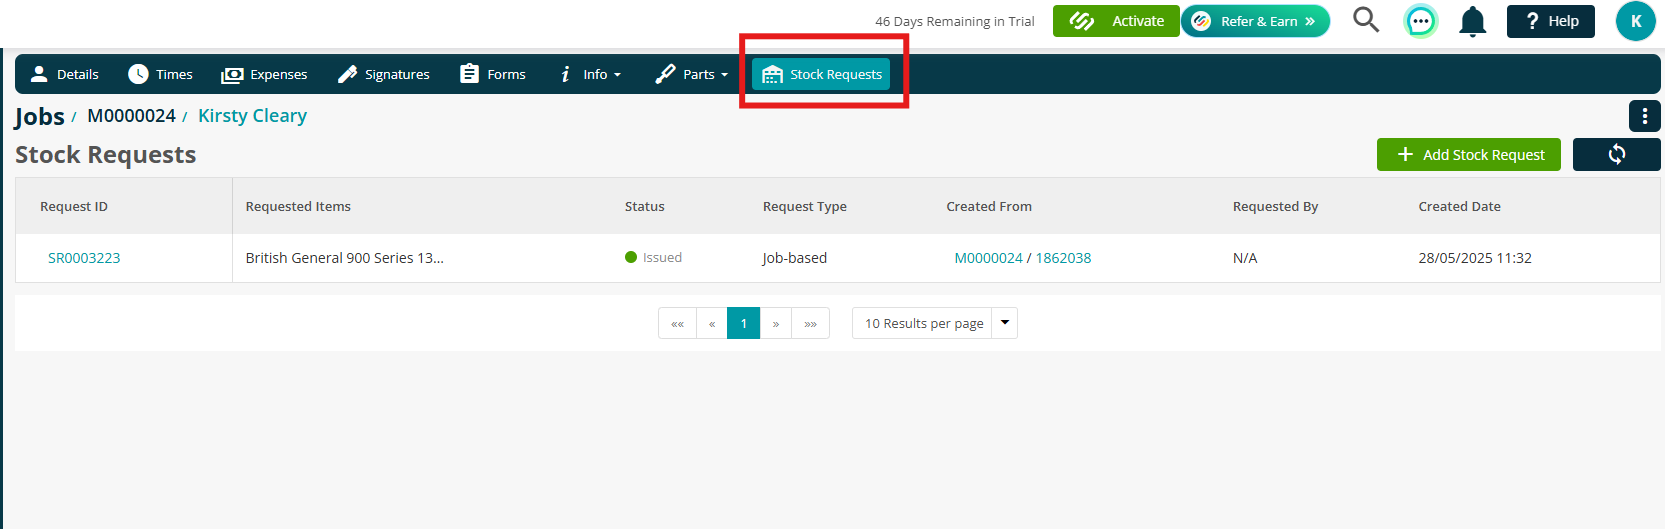
Click the Stock Request tab on the top right
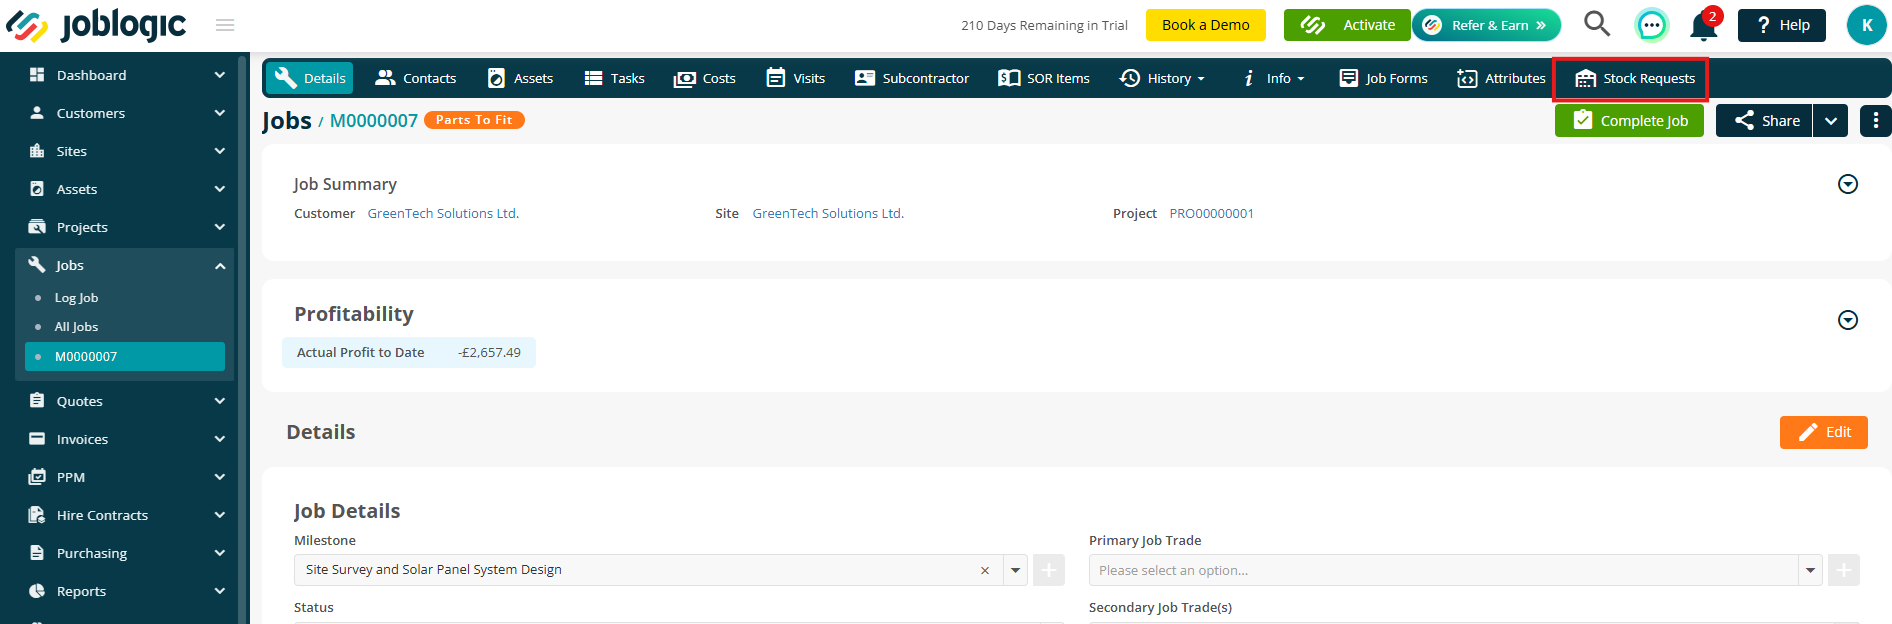
Here you can see any current stock that has been requested on this job
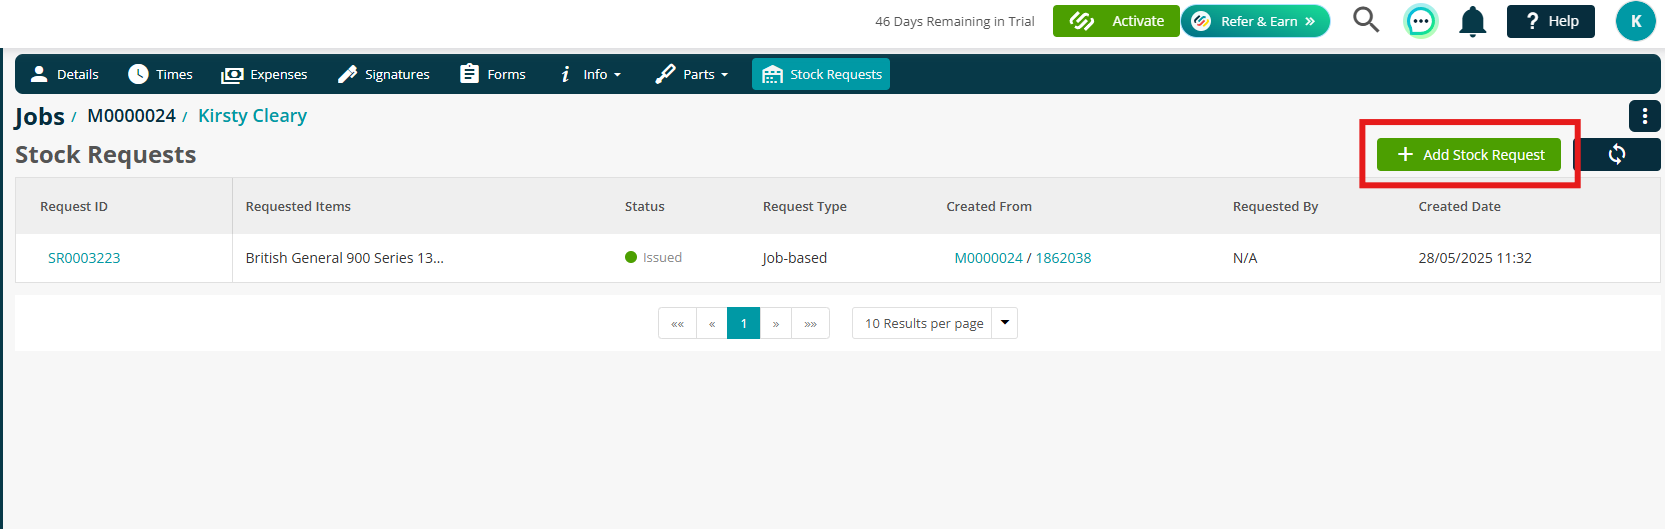
You can also click the Add Stock Request button to add new items
You can then select your Part/Equipment manually, or select a Stock Template to pull through your items automatically.
To do this manually, select your Part/Equipment from the dropdown:
Once this has been chosen, you can enter the Requested Quantity (mandatory) and Schedule Date (not mandatory)
Alternatively, click Add Stock Request Item at the bottom of the screen.
This will allow you to select a Stock Request Template from your library.
Once selected, all stock items from the template will be automatically added to the request.
You can still:
- Add additional items
- Edit quantities
- Remove items as needed
This allows you to use templates as a starting point while still maintaining the flexibility to tailor each Stock Request to your specific job requirements.
Associated Assets
When adding a Stock Request, it is possible to associate the part with a specific asset. This allows for clearer tracking and visibility of which assets each part is intended for—particularly useful when stock is linked to job-specific equipment.
Tick the Choose more from Site Assets checkbox to expand the dropdown to include any assets registered to the site.
If a site asset is selected, it will automatically be added as a job asset.
Multiple Stock items
You can request multiple parts or items within the same stock request form. All items will be grouped under a single Stock Request ID, helping you manage everything in one place with less admin.
Just click Add Stock Request Item to add more items to your request.
Click Save to finalise your choices
Visit
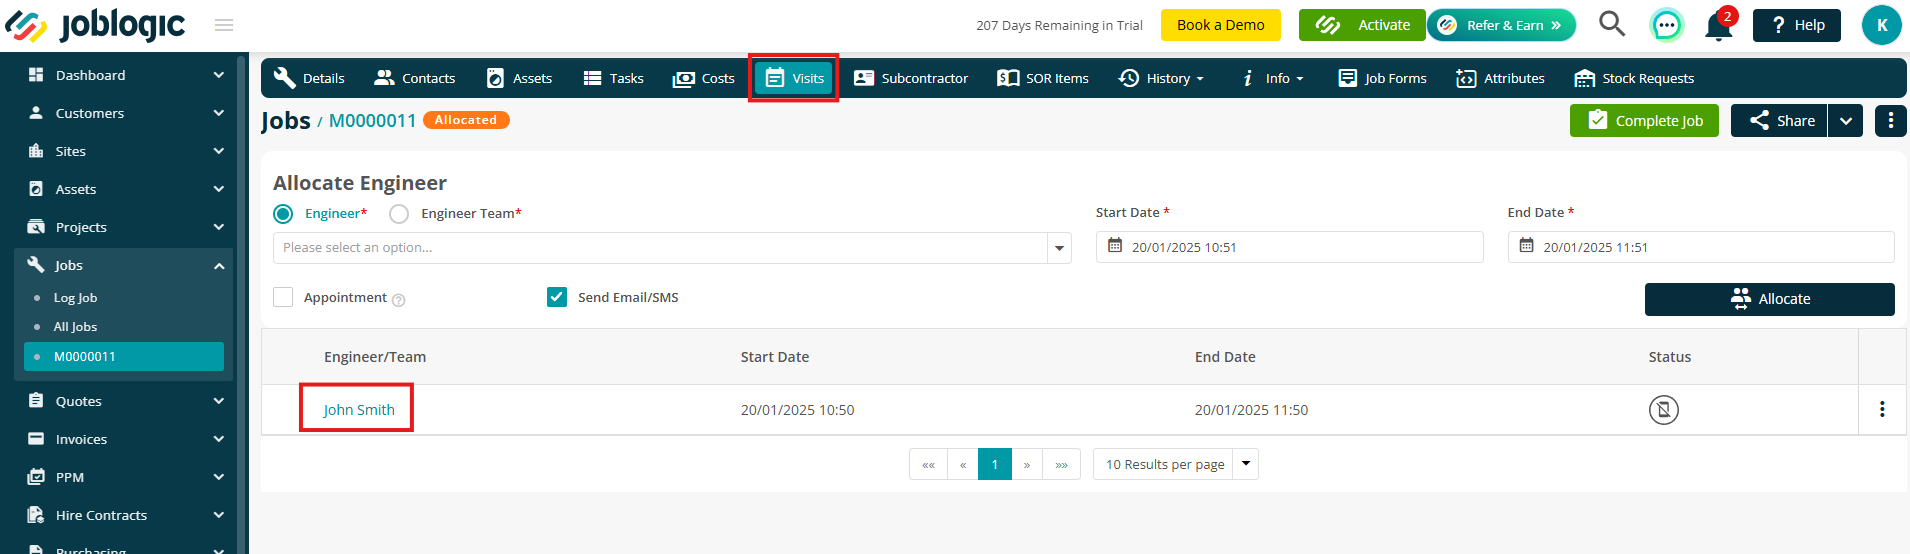
To add a Stock Request against a visit, click into your Jobs > All Jobs from your main menu
Next, select the job number
Click the Visit tab and then onto the Engineer Name
Click the Stock Request tab on the top right
Here you can see any current stock that has been requested on this job
You can also click the Add Stock Request button to add new items
You can then select your Part/Equipment manually, or select a Stock Template to pull through your items automatically.
To do this manually, select your Part/Equipment from the dropdown:
Once this has been chosen, you can enter the Requested Quantity (mandatory) and Schedule Date (not mandatory)
Alternatively, click Add Stock Request Item at the bottom of the screen.
This will allow you to select a Stock Request Template from your library.
Once selected, all stock items from the template will be automatically added to the request.
You can still:
- Add additional items
- Edit quantities
- Remove items as needed
This allows you to use templates as a starting point while still maintaining the flexibility to tailor each Stock Request to your specific job requirements.
Associated Assets
When adding a Stock Request, it is possible to associate the part with a specific asset. This allows for clearer tracking and visibility of which assets each part is intended for—particularly useful when stock is linked to job-specific equipment.
Tick the Choose more from Site Assets checkbox to expand the dropdown to include any assets registered to the site.
If a site asset is selected, it will automatically be added as a job asset.

Multiple Stock items
You can request multiple parts or items within the same stock request form. All items will be grouped under a single Stock Request ID, helping you manage everything in one place with less admin.
Just click Add Stock Request Item to add more items to your request.
Click Save to finalise your choices
Requesting Stock When Upgrading a Quote to a Job
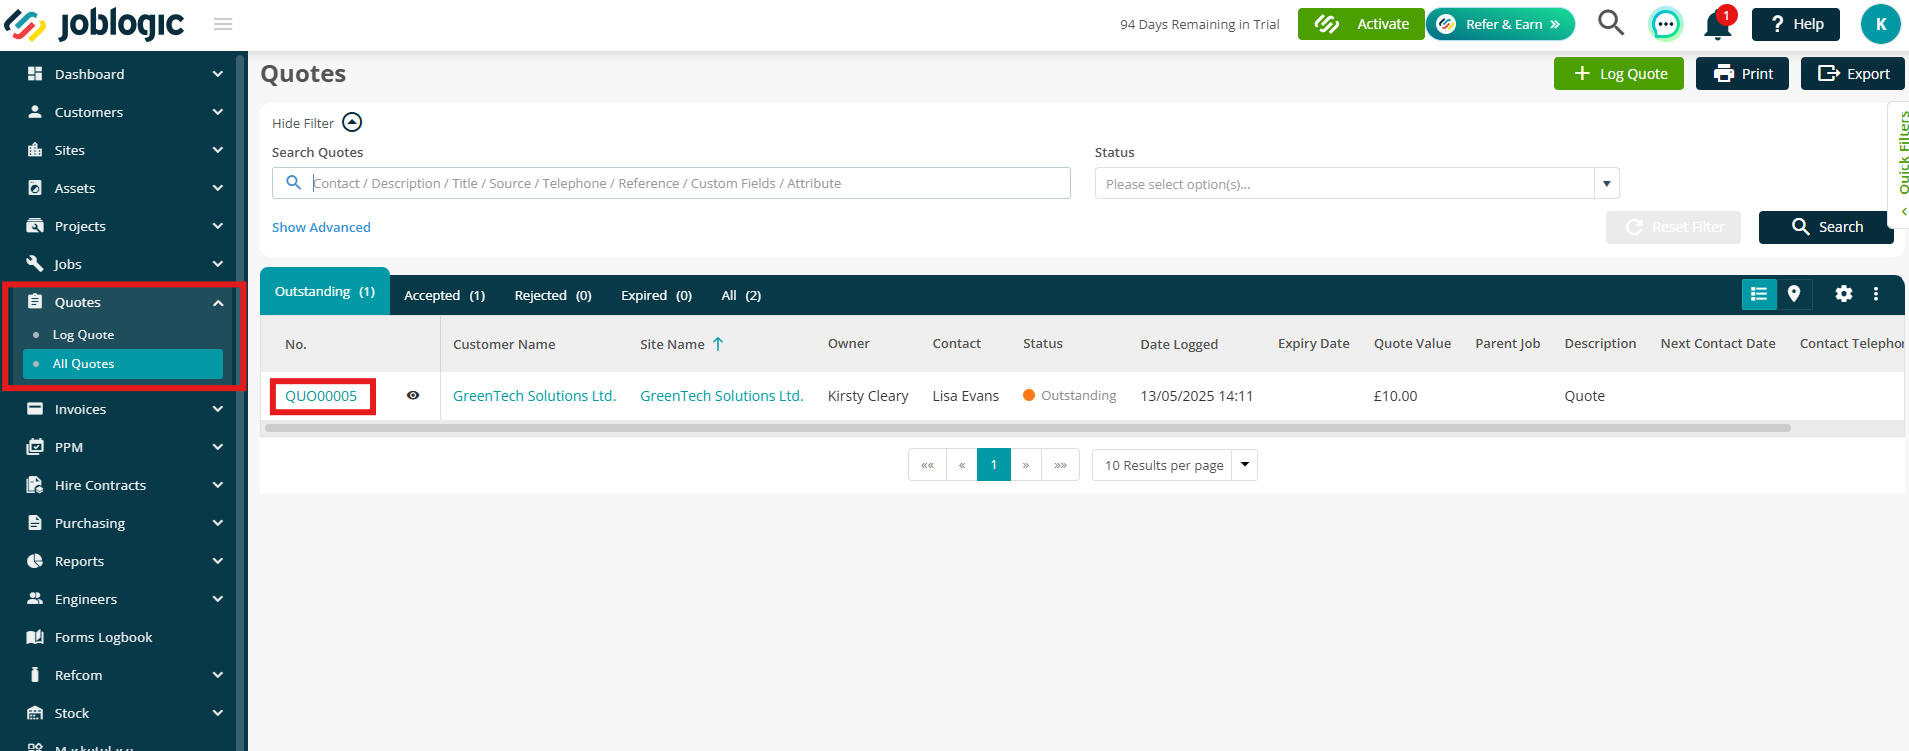
When upgrading a Quote to a Job, you can also Request Stock for any Materials against the quote.
Go to Quotes > All Quotes and select the relevant quote number.
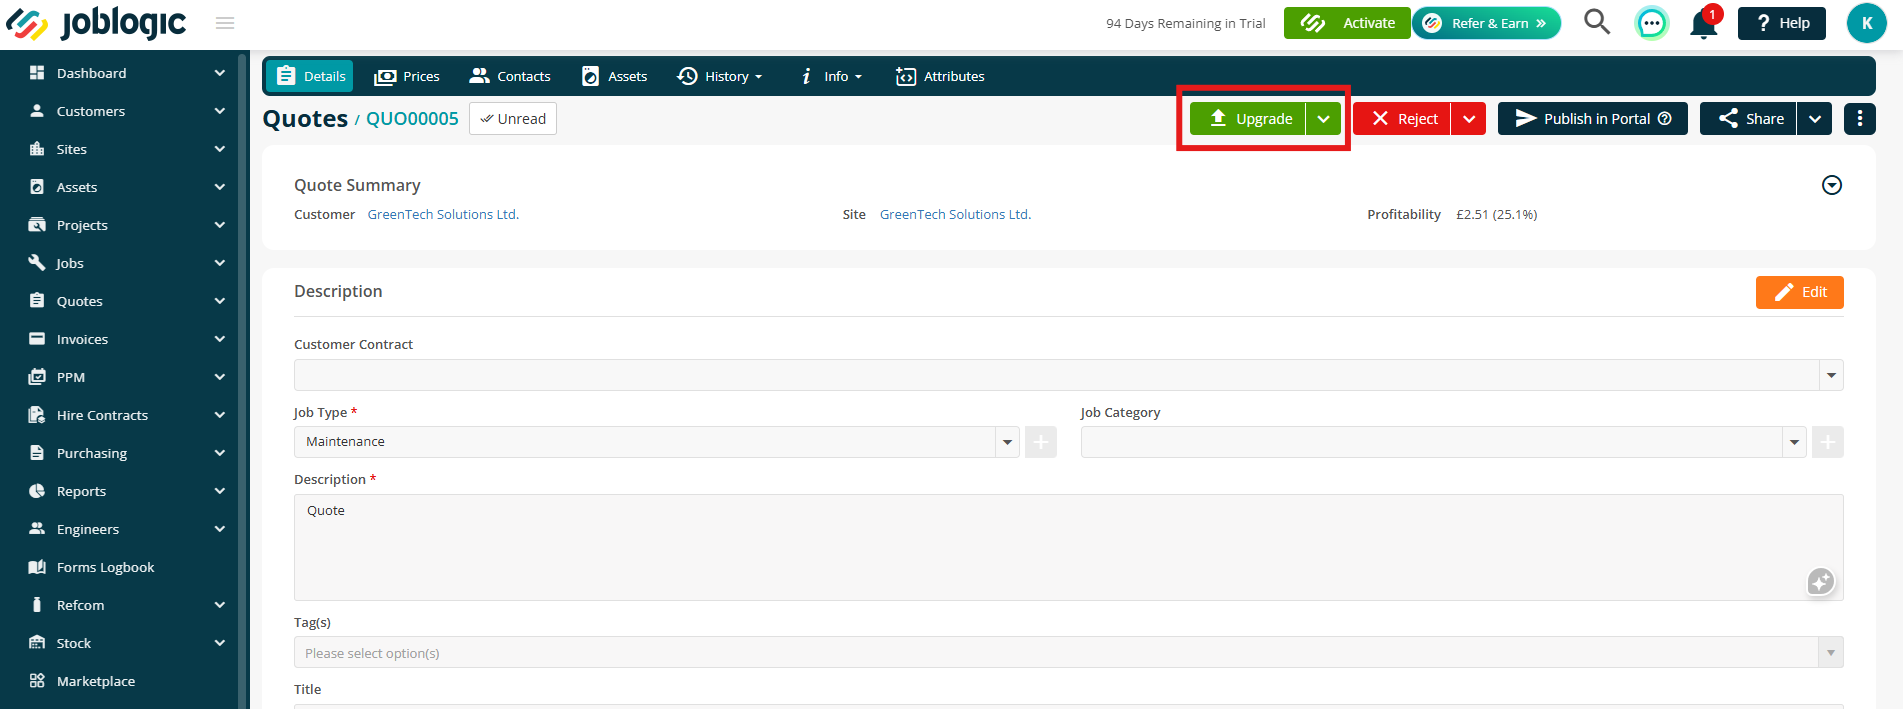
Click the Upgrade button in the top right.
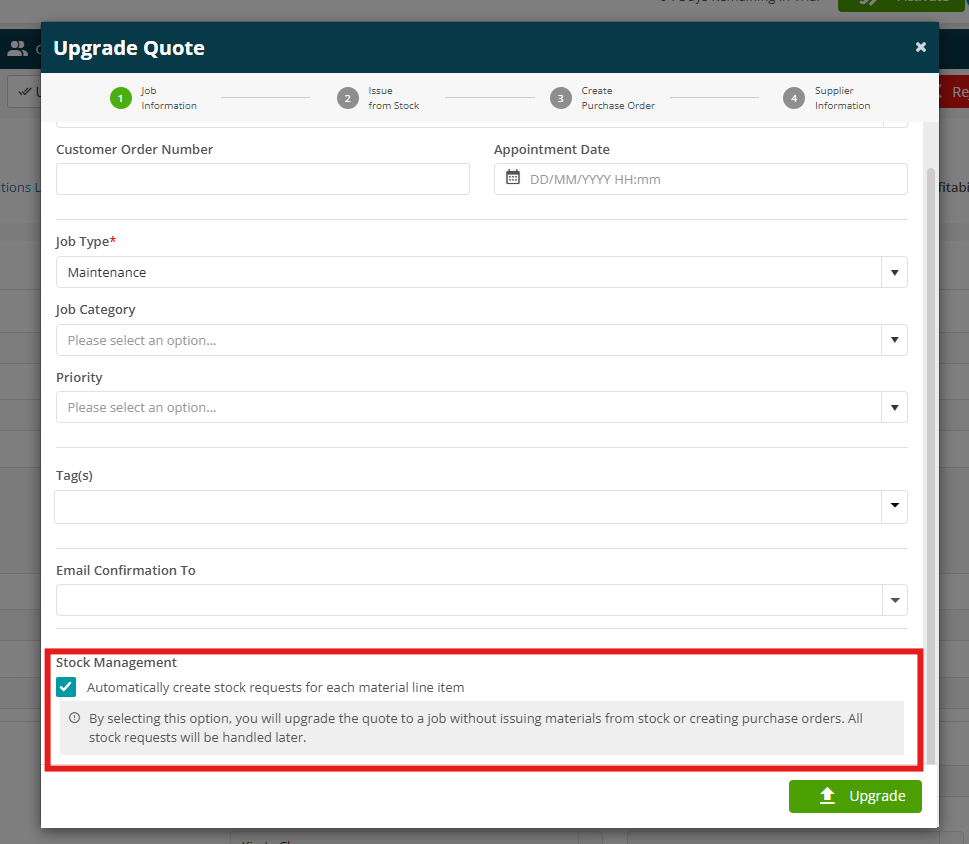
In the upgrade window, tick the option: ‘Automatically create stock requests for each material line item’
Taking action against Stock
You can take action on stock from anywhere it's set up—whether that’s the main Stock Requests page, the job stock section, or the visit stock view.
For this example, let’s head back to the main Stock Requests page within your Marketplace apps.
Click on a Request ID to open the Stock Request Details page.
From here, you can view all request information, including item lists, statuses, sign-off progress, and audit logs.
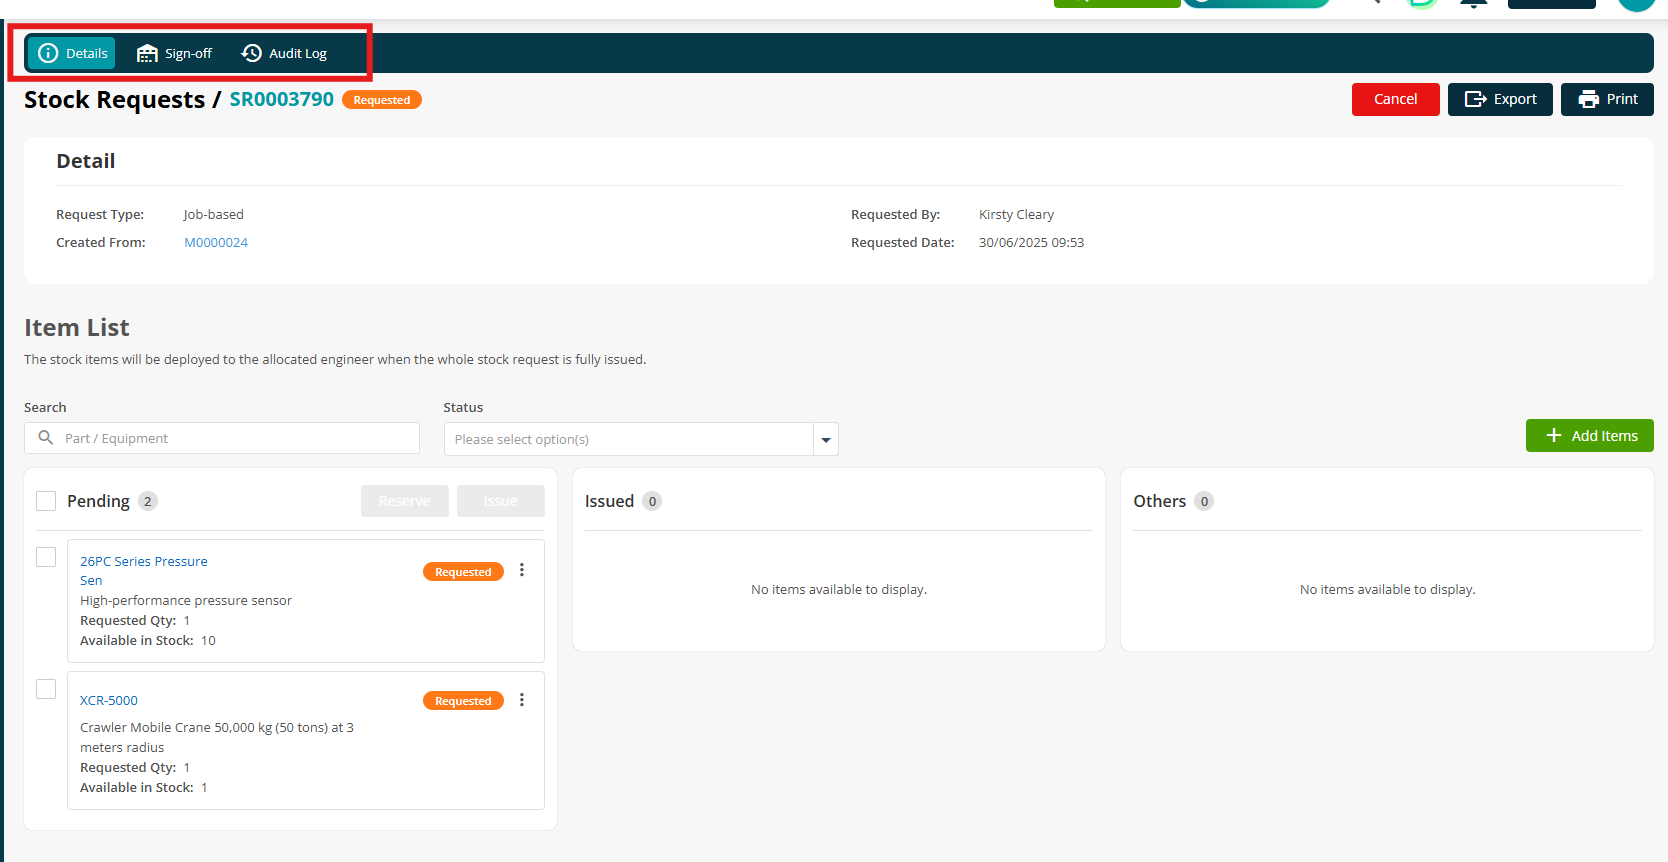
To take action on a stock item, simply tick the relevant box(es), or click the three dots next to a specific item to access more options.
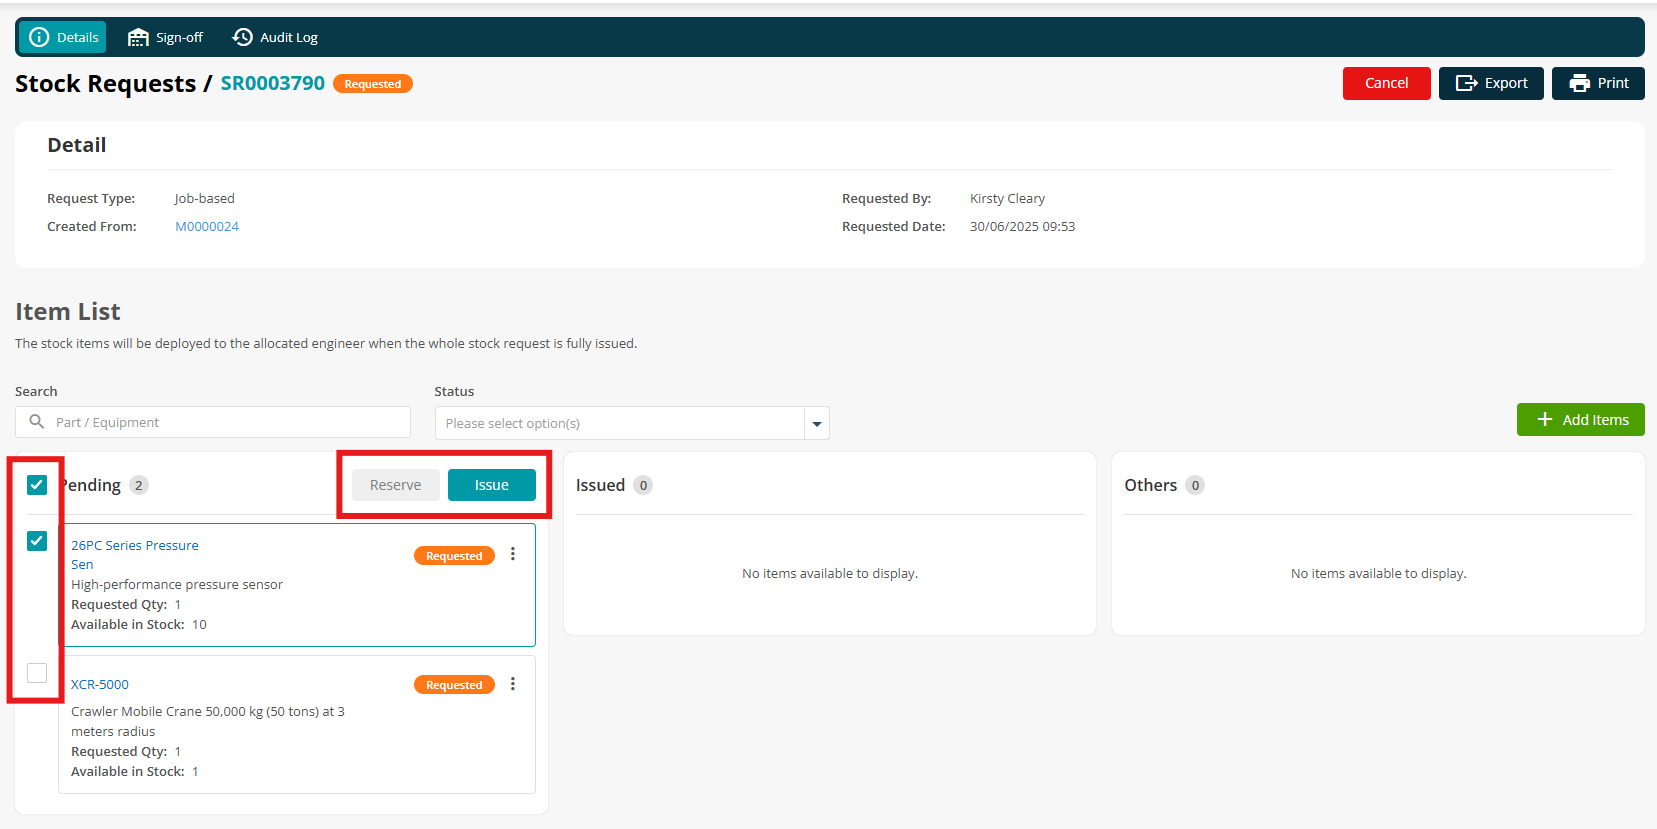
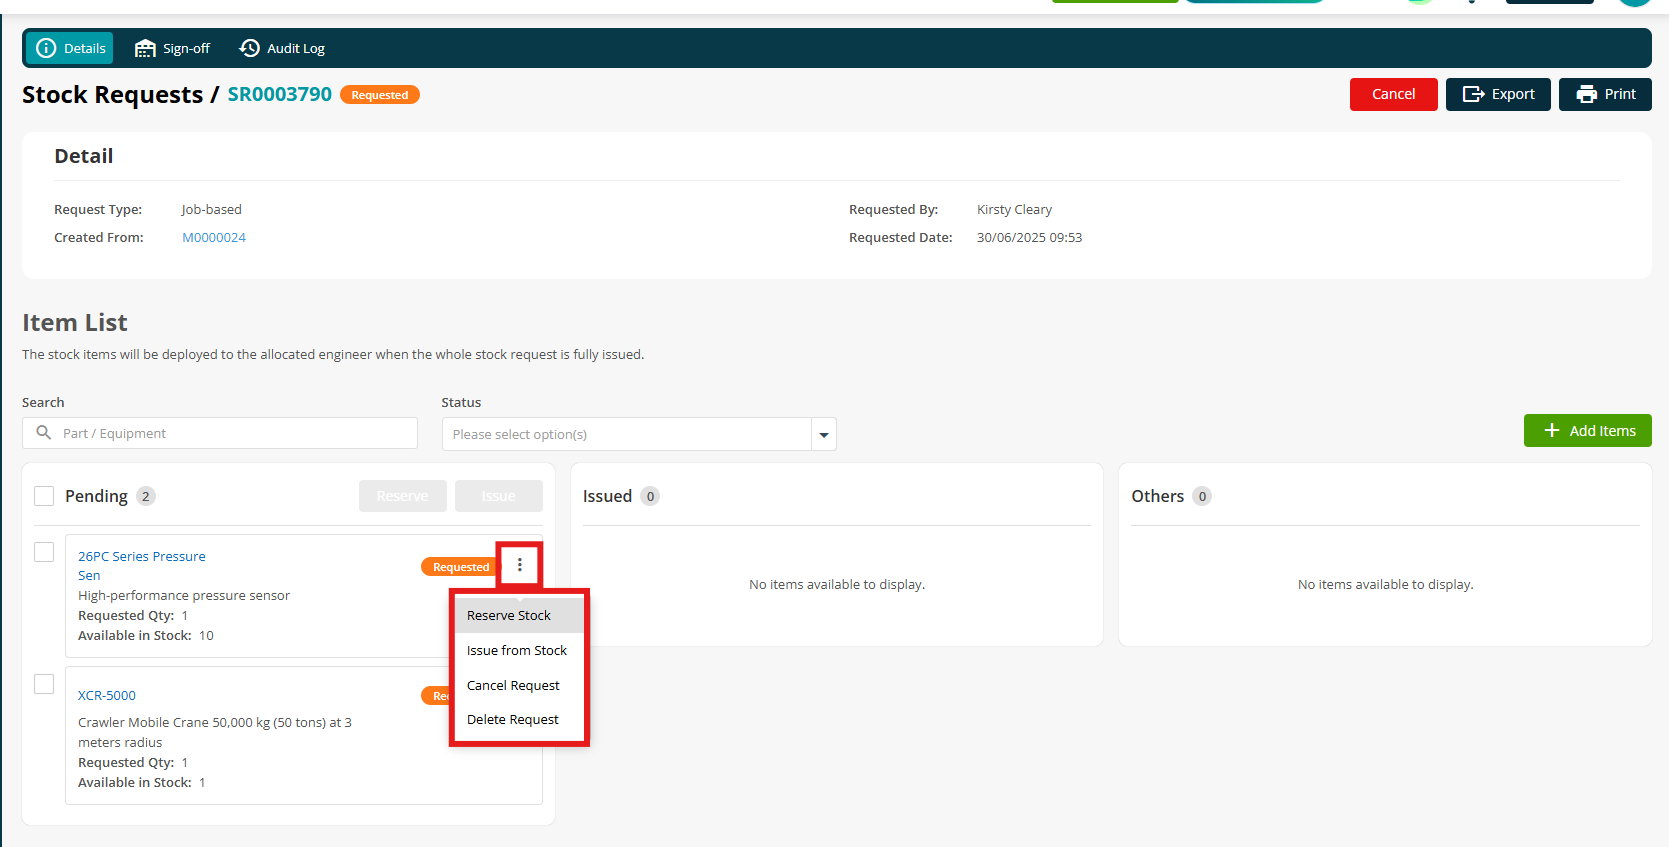
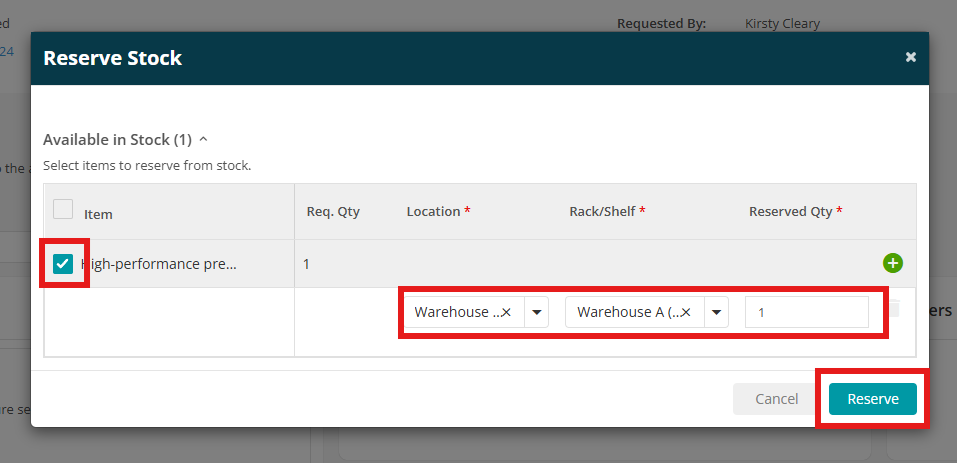
Reserve Stock
Once you've clicked Reserve on the main page, tick the stock items and then choose a Location, Rack/Shelf and quantity before clicking Reserve to confirm.
To release reserved stock, click the 3 dots and choose the relevant option.
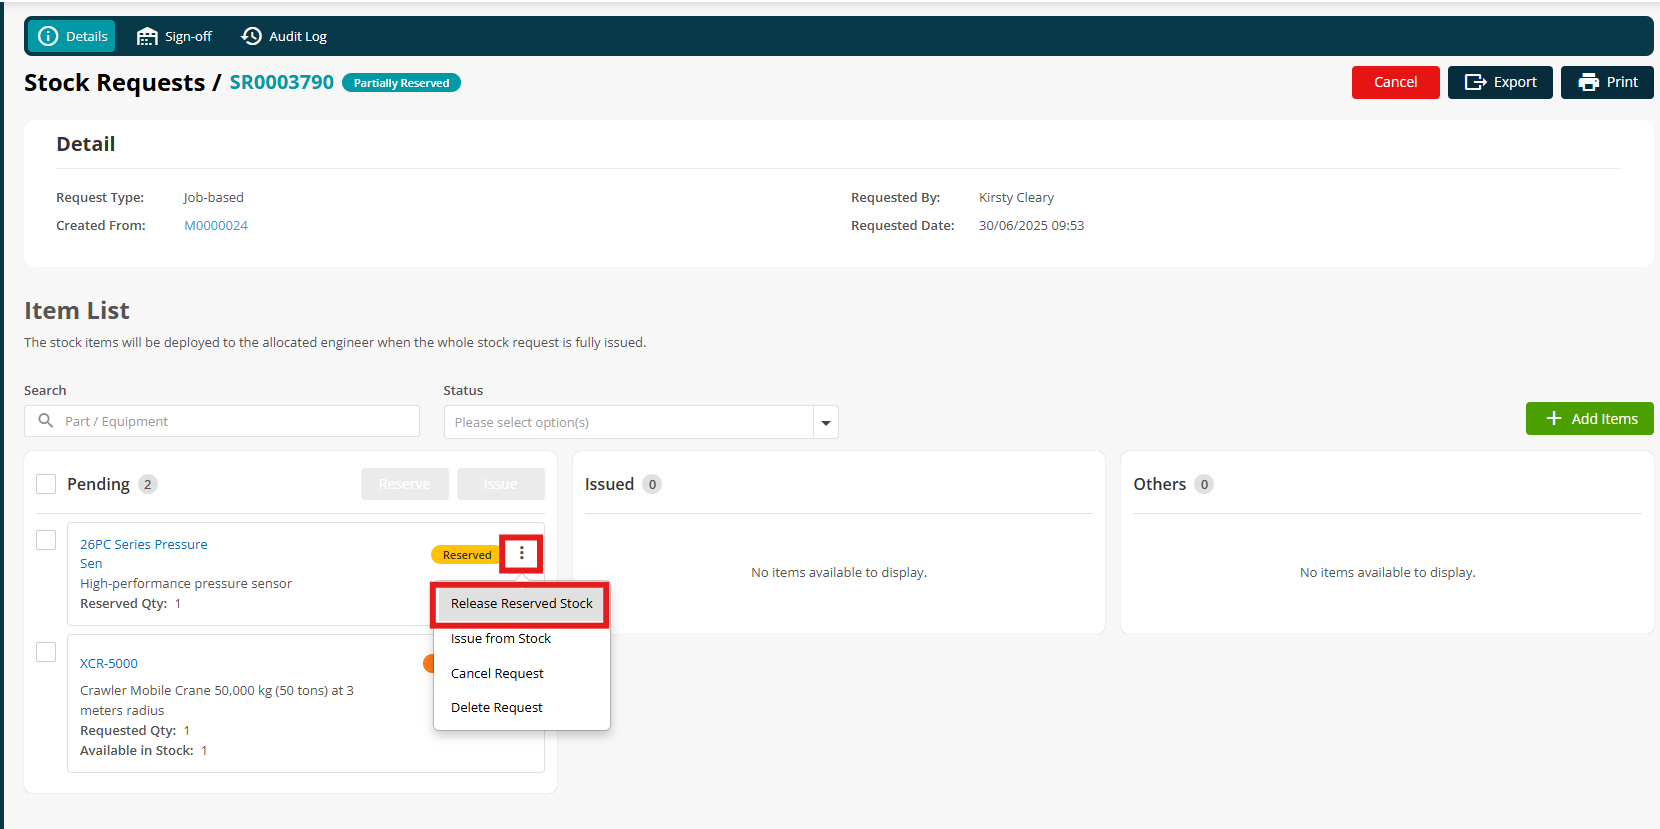
Click Confirm to finalise the release.

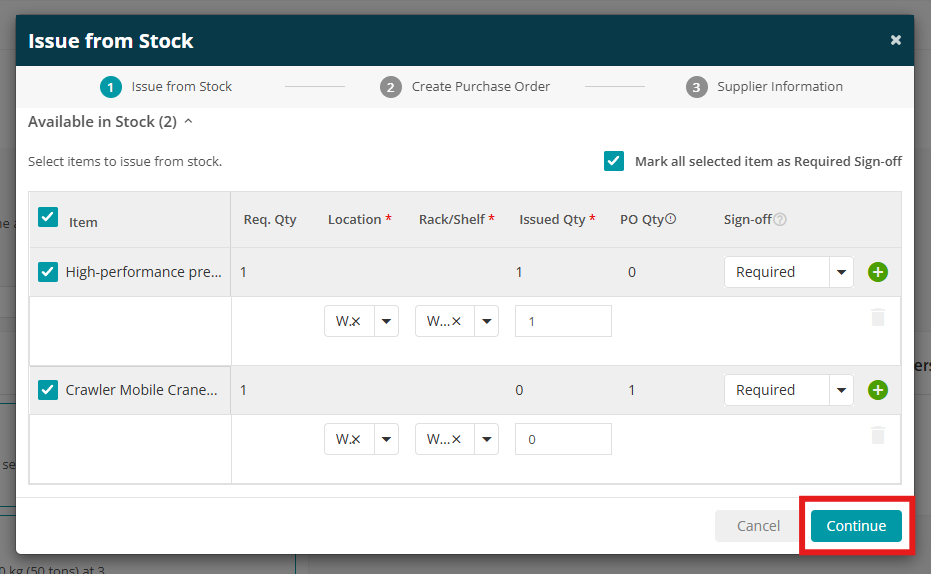
Issue from Stock
When choosing Issue on the main page, again tick the stock items and then choose a Location, Rack/Shelf and quantity.
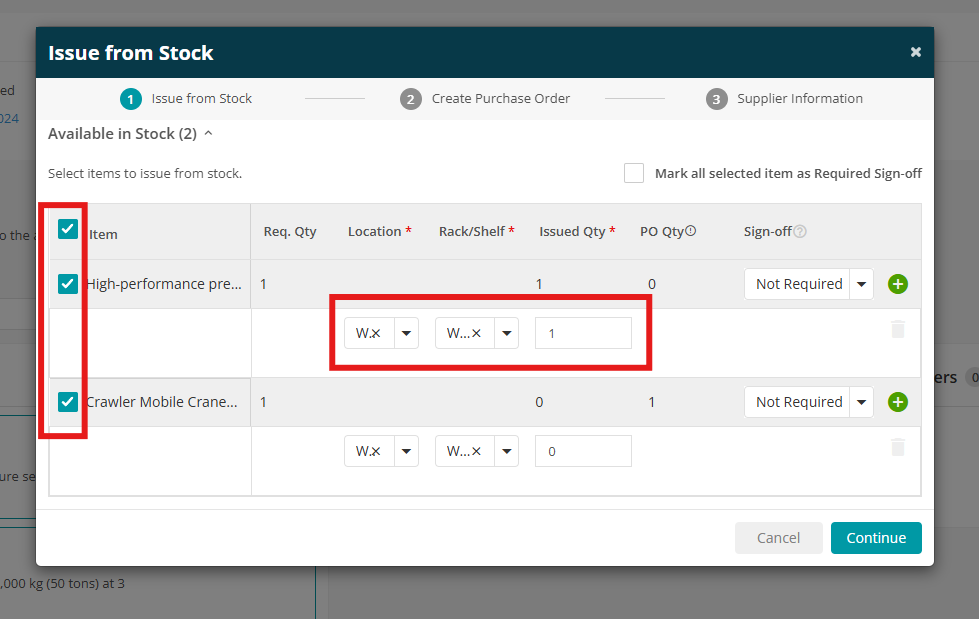
Next, choose whether each item requires Sign Off.
You can set this individually per stock item, or use the ‘Mark all selected items as Required Sign Off’ option at the top to apply it in bulk if you are issuing more than one item.

Click Continue when you are happy with your selections.
You’ll then have the option to create a Purchase Order if required, or to Skip and Issue
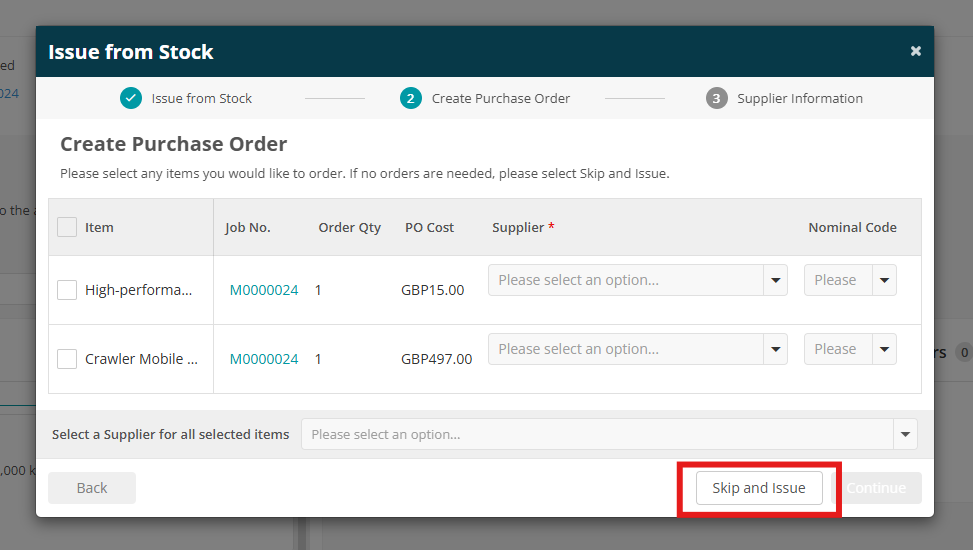
If you are creating a PO, you'll have a couple of options.
First, tick the items you want to include in the Purchase Order.
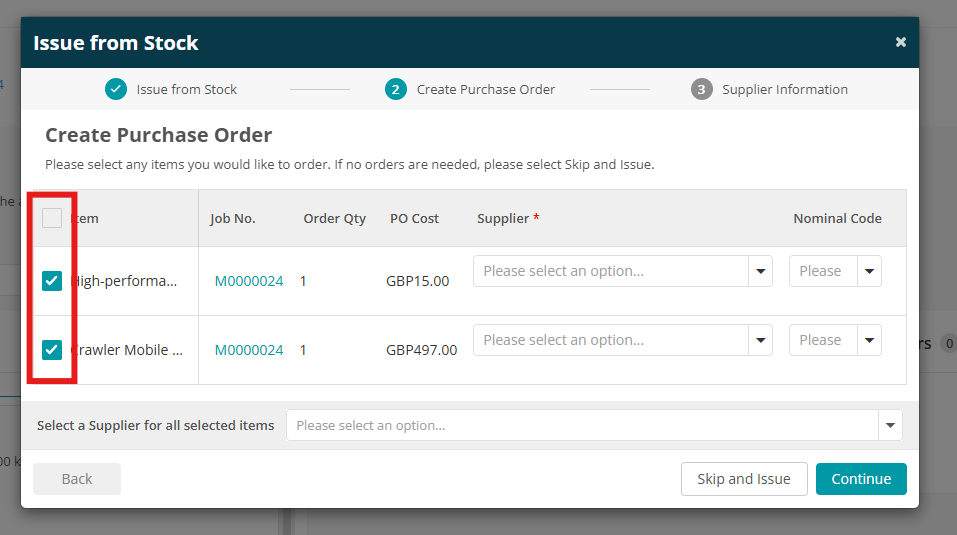
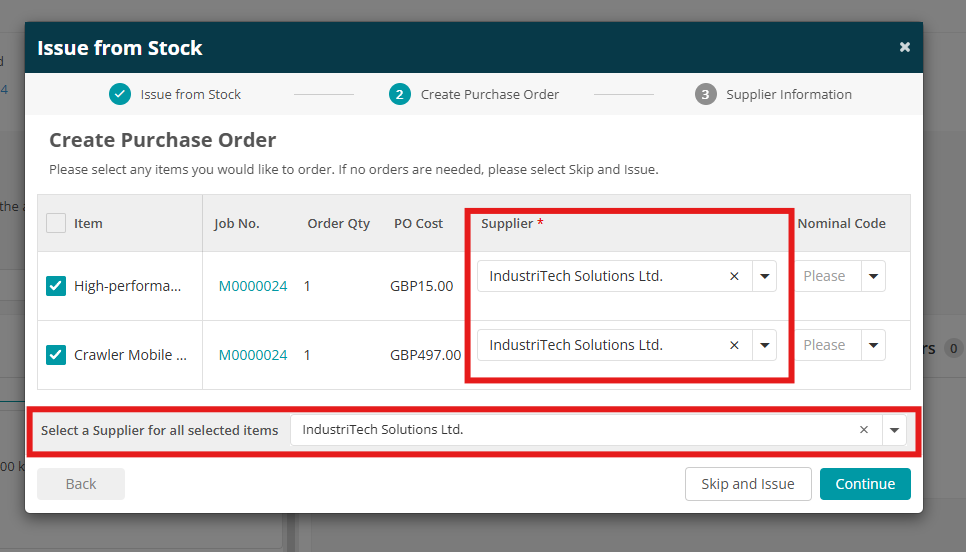
You can then assign a different supplier to each individual line item or choose a single supplier for all items using the dropdown at the bottom of the list.
Click Continue when you are ready.
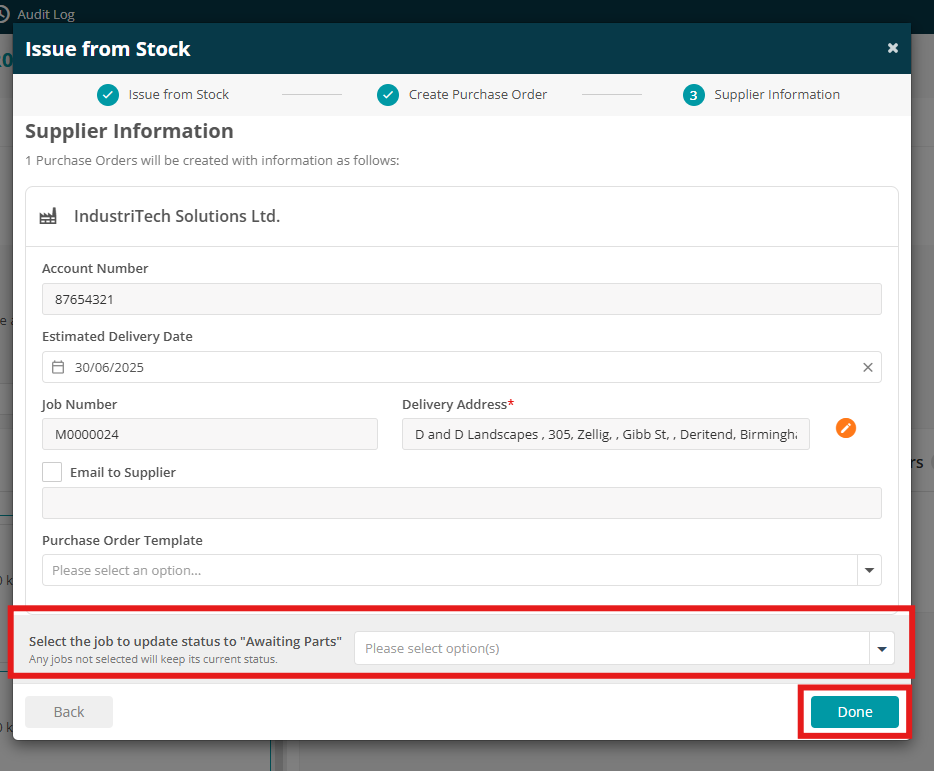
Edit details such as Estimated Delivery Date and Delivery Address as needed.
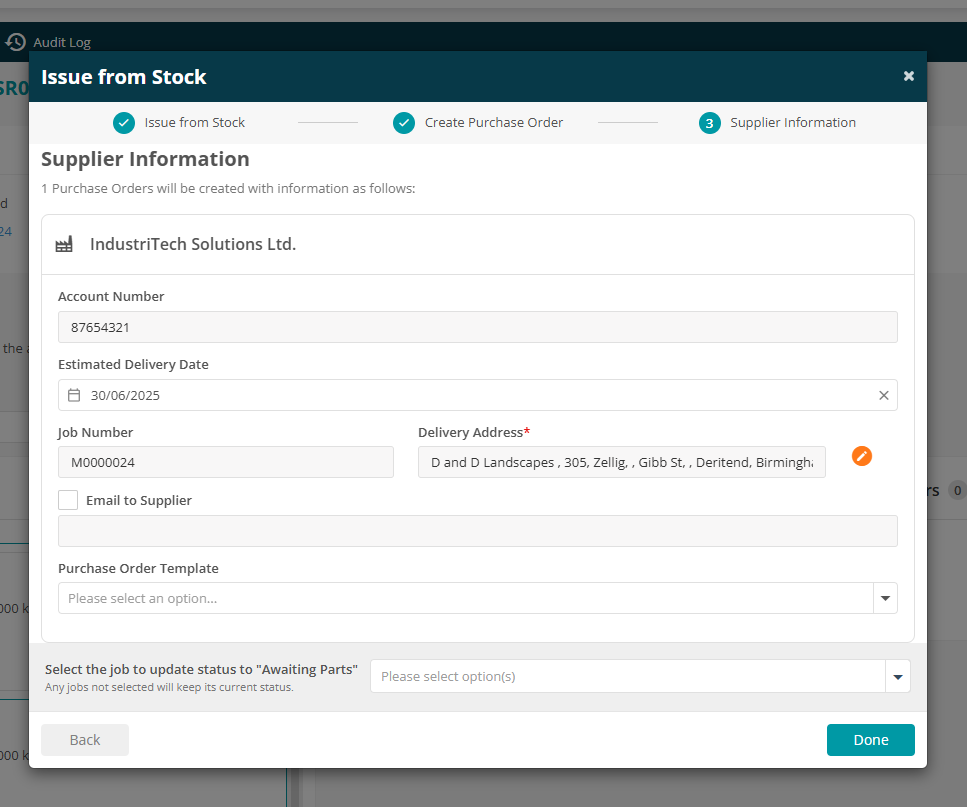
And finally, you can update the job to Awaiting Parts by ticking the job from the dropdown.
Click Done once you're happy with your selections.
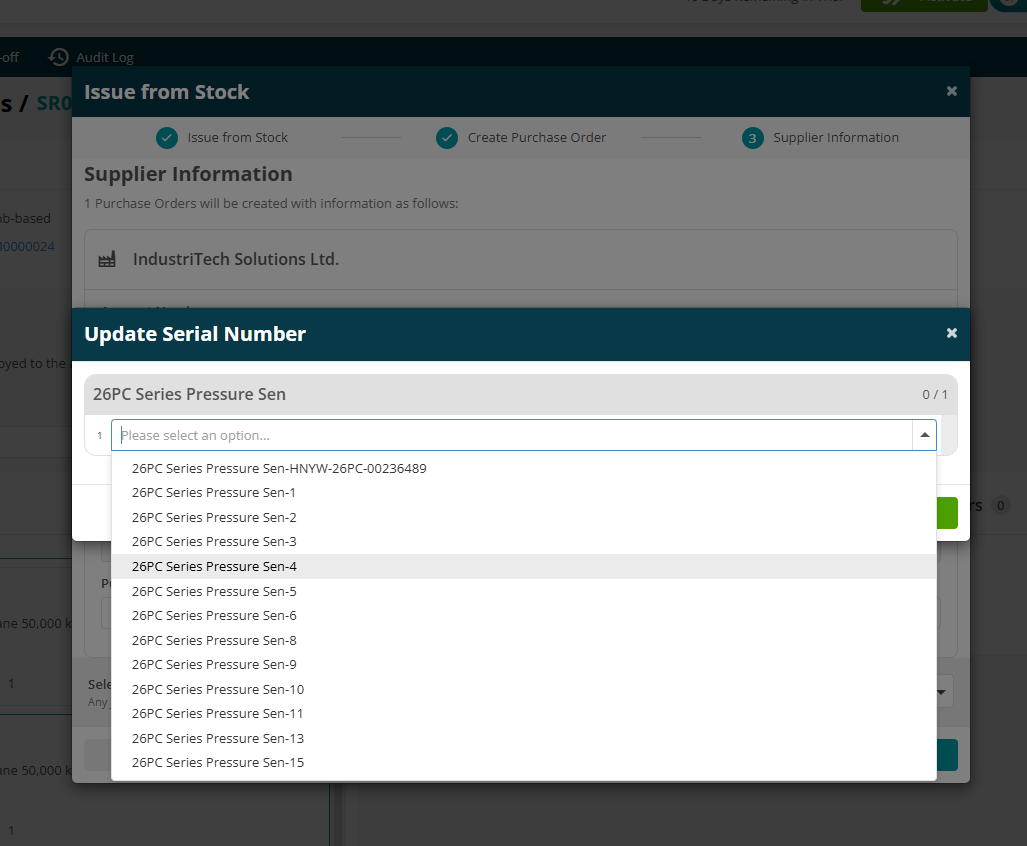
If you have the Serialised Stock option enabled, here you’ll be able to select the Serial Numbers for your chosen parts.
To read more about seralised stock, click here.
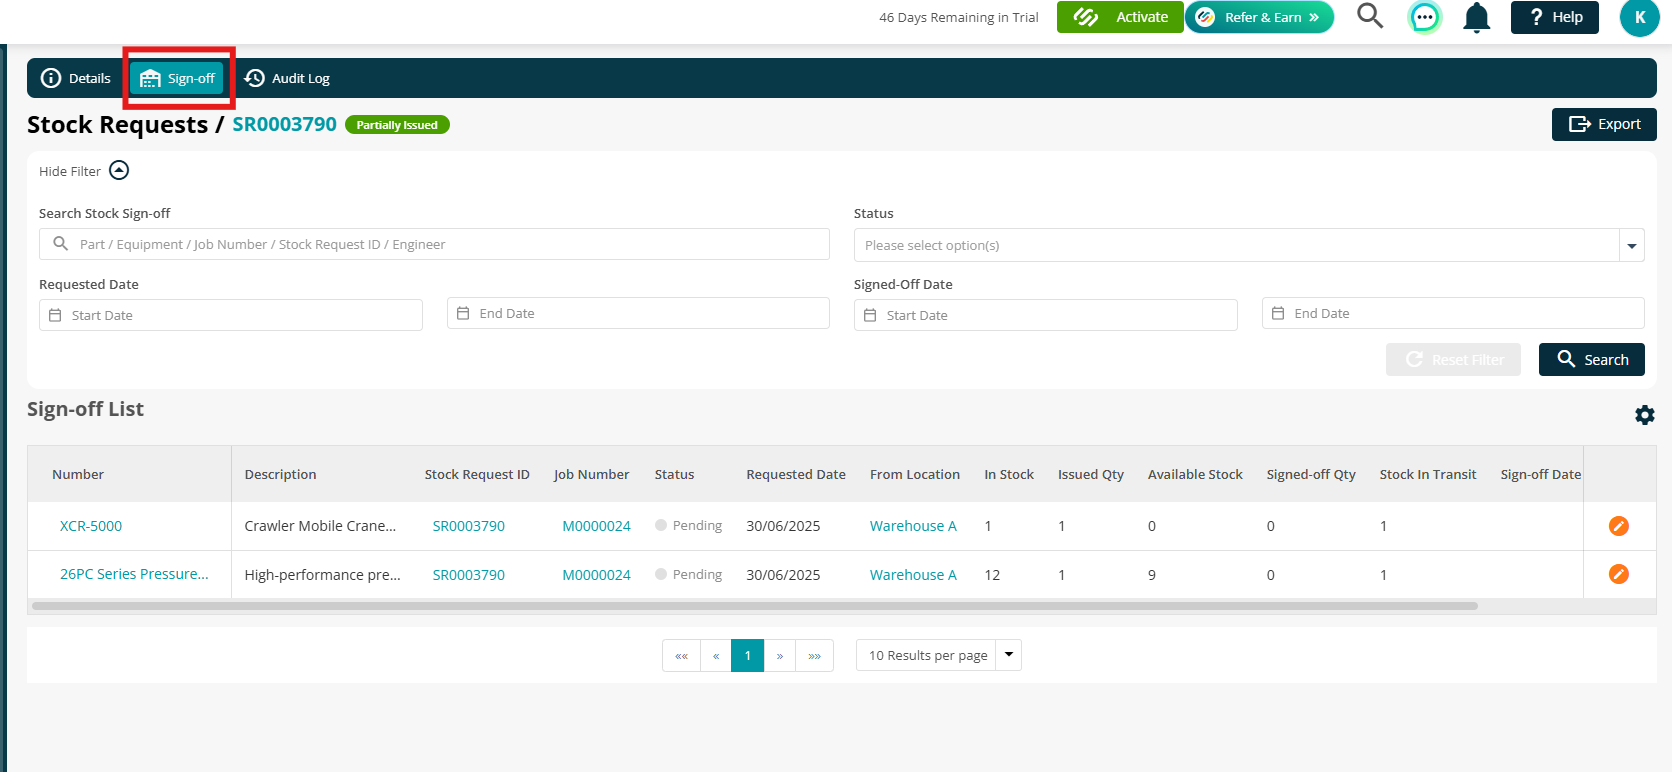
Sign-Off Management
If you've selected the tick box Require Sign Off when issuing stock at any stage, you can manage and track these items through the Stock Sign-off Management screen within the Stock Requests app.
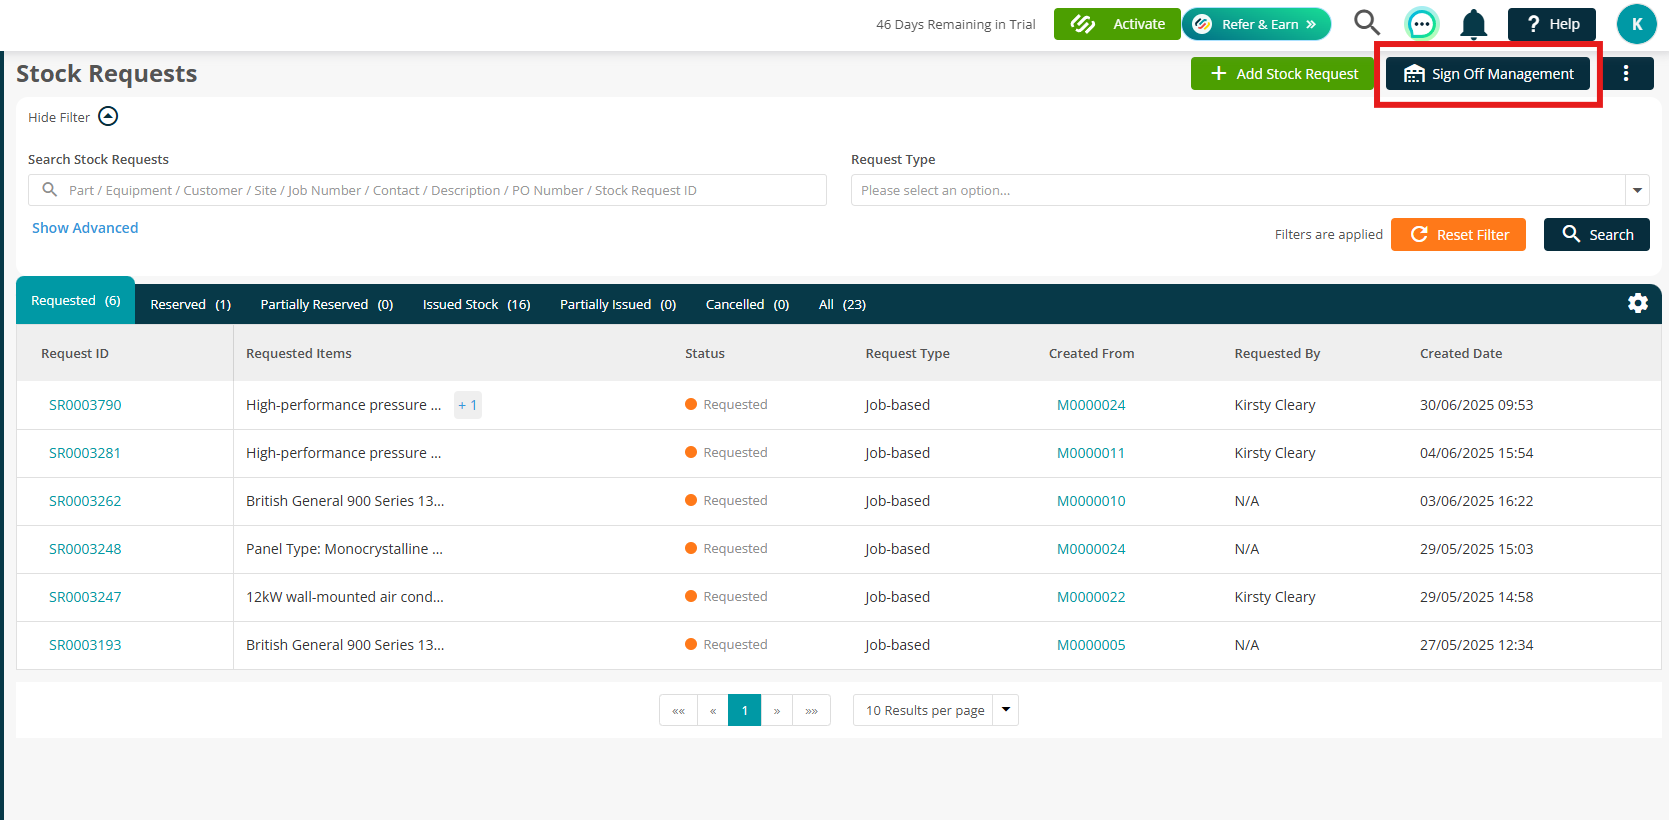
This screen gives you a clear overview of all stock items that require sign-off. You can easily filter, search, and track their status - helping you stay in control and ensure accountability for stock in transit.
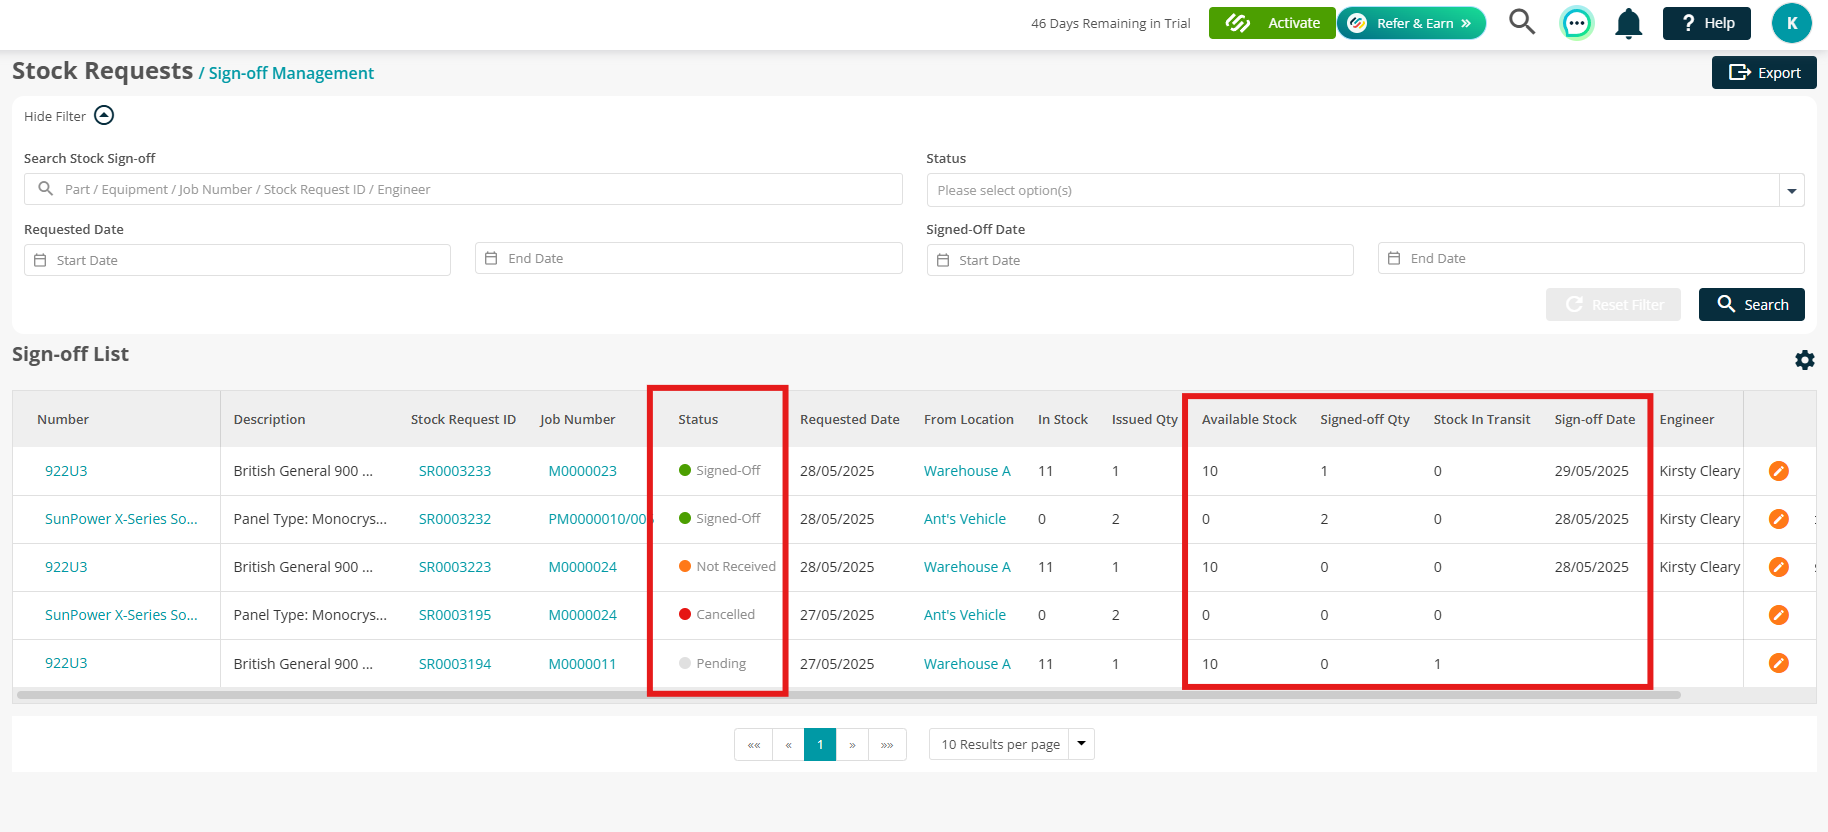
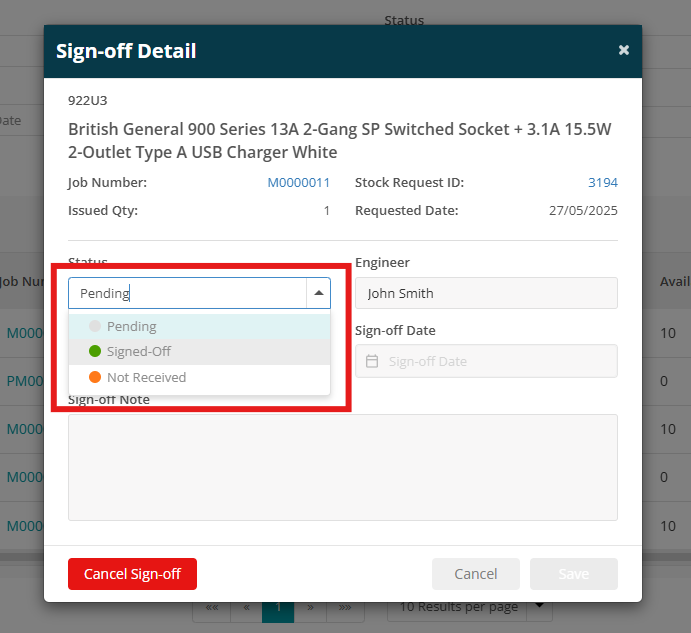
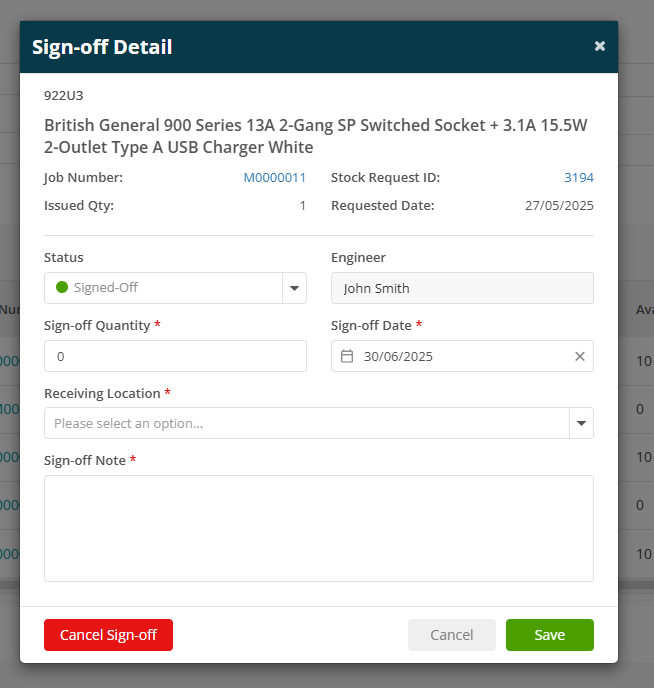
If an item is still pending, you can click the orange edit icon to cancel the sign off if needed.
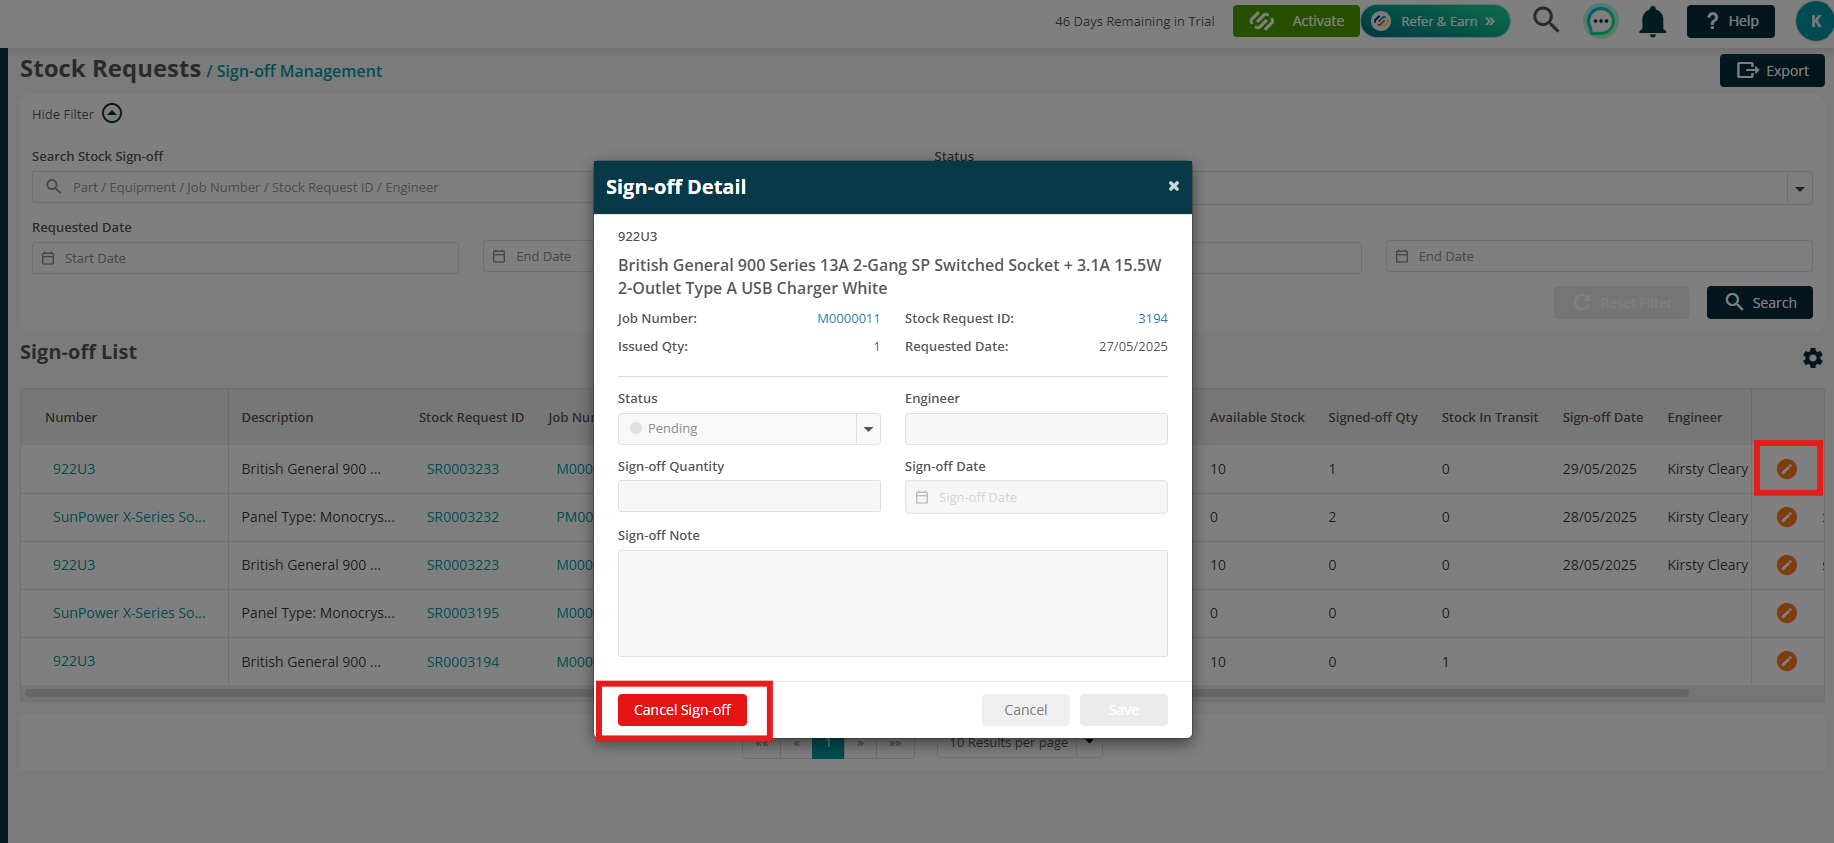
If the item has been sent to an engineer, additional updates can be made from the back office — such as changing the status or entering the relevant details.
You’ll also find a dedicated Sign Off tab within each stock request, making it easy to manage sign-offs directly from the request itself.
Stock Requests on the Mobile App
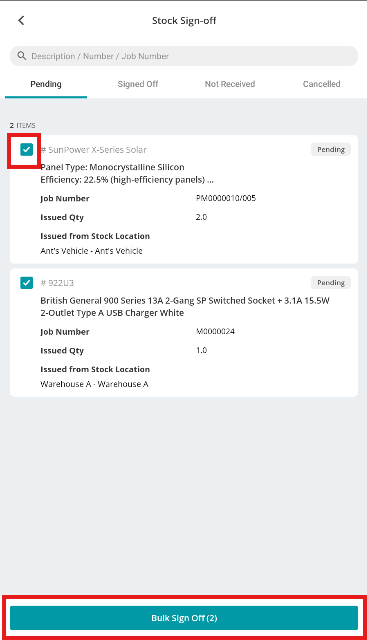
Stock Sign-off
Note: If a Stock item is marked as Required Sign Off, it won’t appear in your job’s Stock Requests until it’s been signed off, so be sure to check this area before moving forward.
To view and sign off relevant stock items, open the Menu on your app and tap Stock Sign-off.

From here, tick the boxes next to the items you want to update, then tap the Bulk Sign Off (x) button at the bottom of the screen.
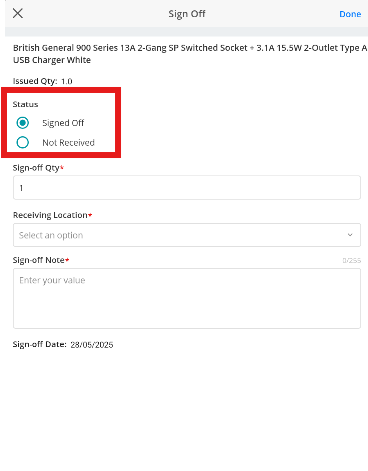
You’ll be prompted to choose either Signed Off or Not Received, depending on the outcome.
If you select Not Received, simply enter a Sign-off Note and click Done to save.
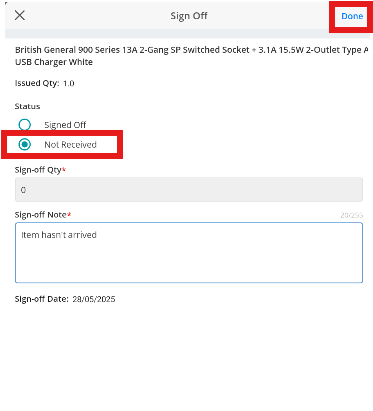
You’ll then see a confirmation box - click Yes to finalise.
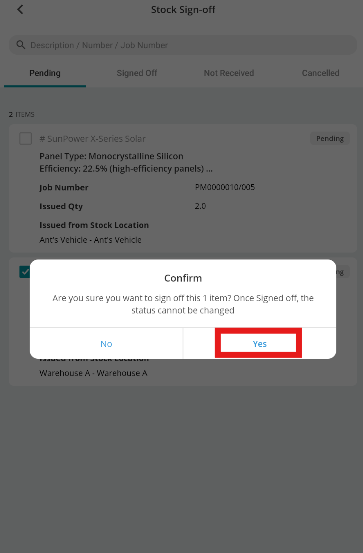
If you choose Signed Off, enter the Quantity, select the Location, and add a Note.
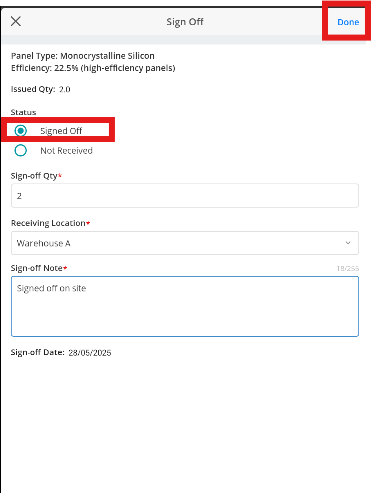
Click Done, and once again, confirm your selection by clicking Yes.

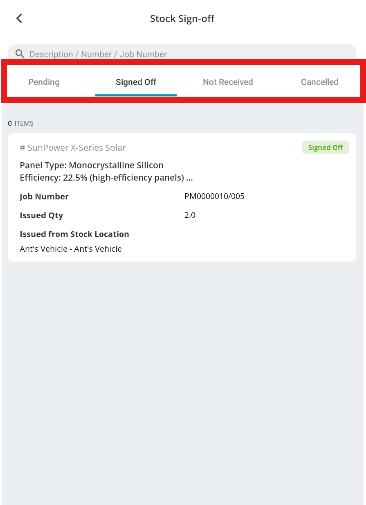
You can view your items at any stage by navigating through the status tabs at the top of the main Sign-off screen.
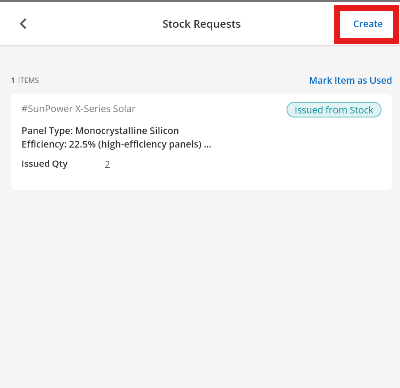
Marking items as Used
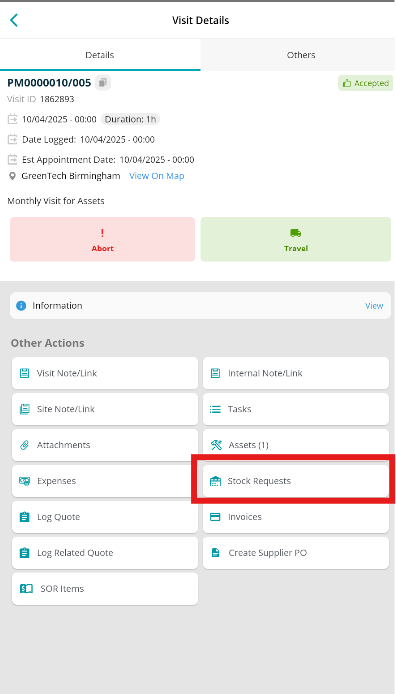
To view your Stock Requests for a job, go to the Visits tab and select the relevant job.
Tap the Stock Requests button.
To mark multiple items as Used, tap the Mark Item as Used button at the top of the screen.

Tick the relevant items, then tap Done.
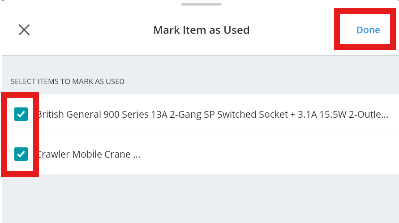
The selected items will now show a Used status tag.
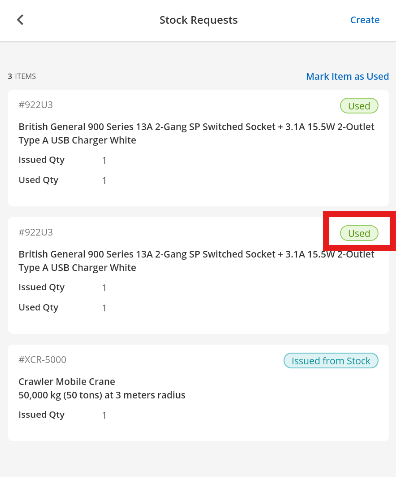
To update an item individually, tap anywhere on the item card to open it.
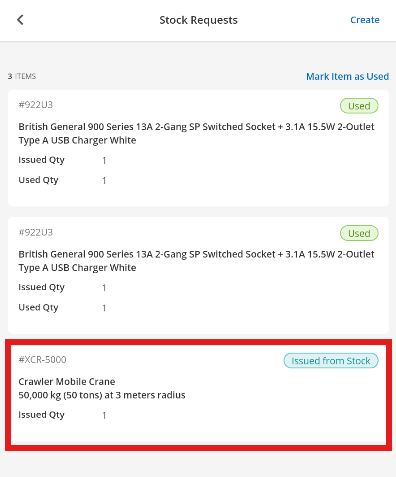
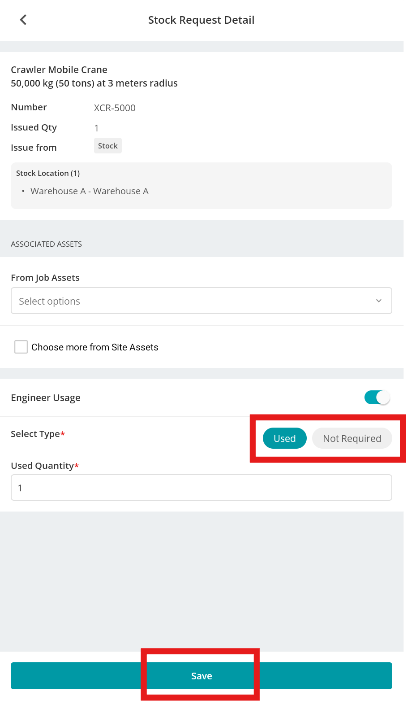
Toggle the Engineer Usage option.
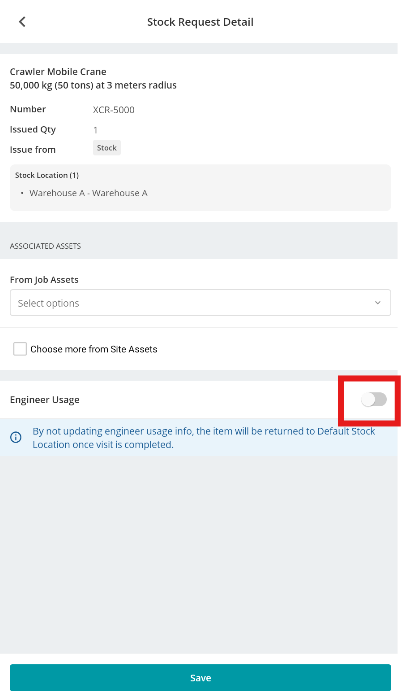
You’ll then have two choices:
Used – Enter the quantity used and tap Save.
Not Required – Select the return location for the item.
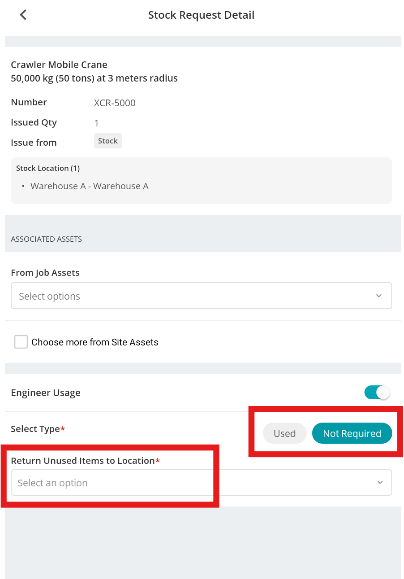
This helps ensure accurate stock tracking and keeps your usage records up to date.
Adding a Stock Request to a job
Note: You can only add Stock Requests once you’ve accepted the job.
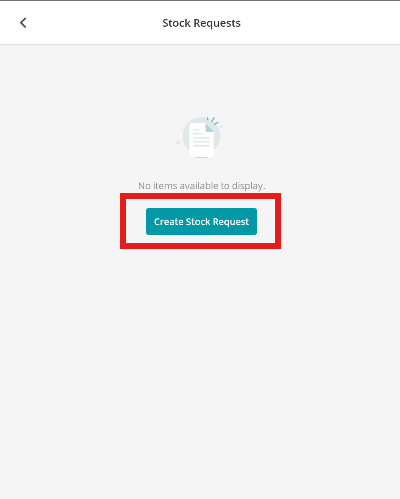
To create a Stock Request for a job, go to the Visits tab and select the relevant job.
Tap the Stock Requests button.
If there are no existing requests, tap Create Stock Request in the centre of the screen
If items have already been assigned to you, the Create button will appear in the top right instead.
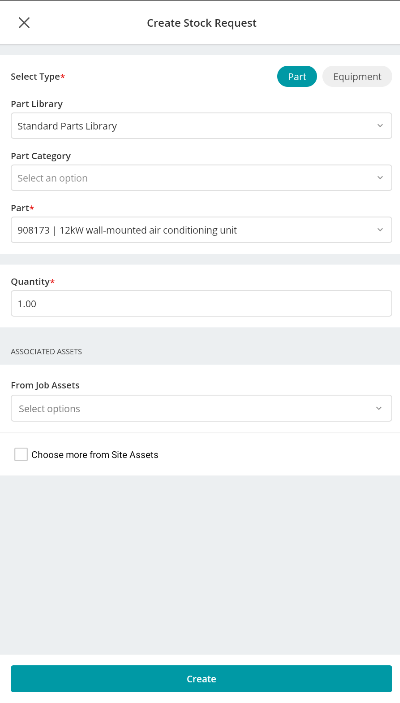
To create your request, select Add Part, Add Equipment or Add Items from Template.
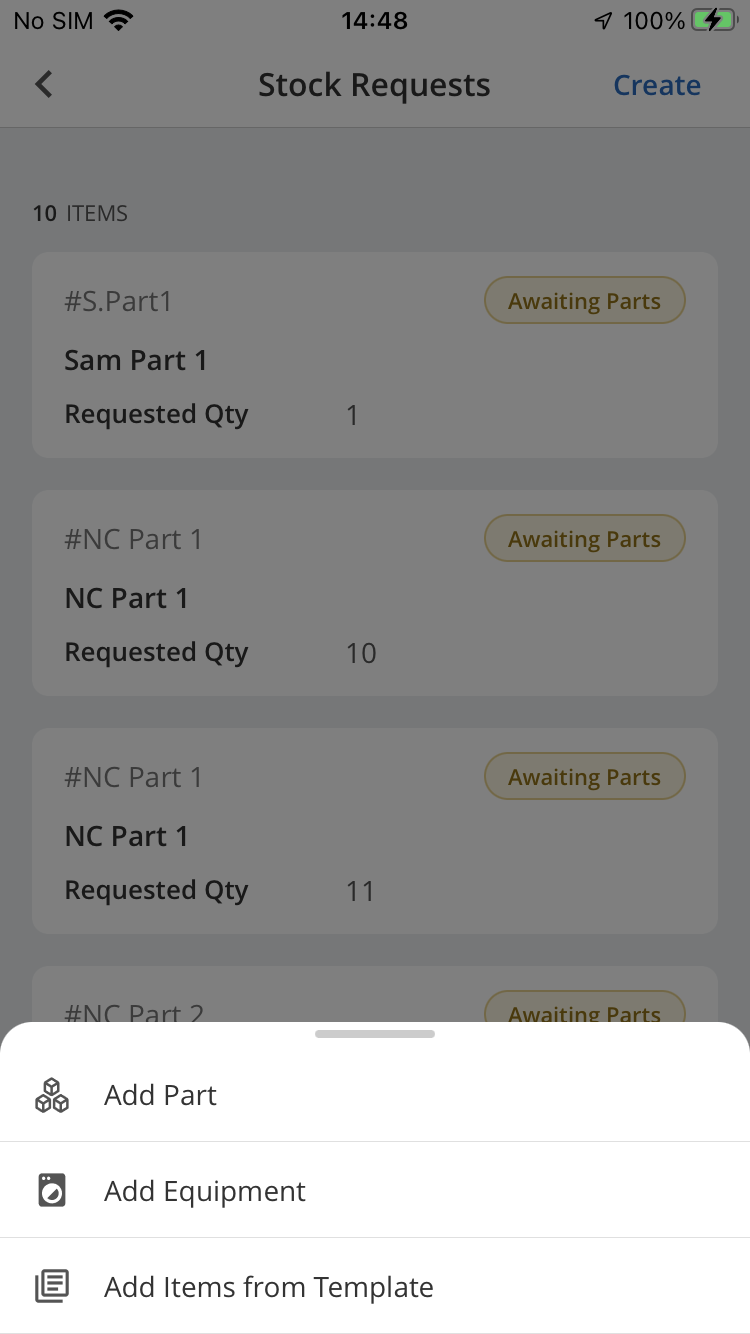
If you've chosen Add Part / Equipment, select your item from the dropdown.
When you're ready, tap Create to save your request.
Alternatively, click Add Items from Template.
Select a template from the list to automatically populate all items in the request.
You can then edit or remove items as needed before submitting.
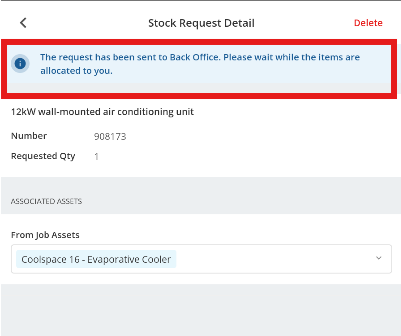
Once submitted, the request is sent to the back office for item allocation.
Further Support
For further information or assistance with the above, contact our Support Team on 0800 326 5561 or email support@joblogic.com. Alternatively, our Customer Success Management team can be reached by emailing customersuccess@joblogic.com
Publishing Details
This document was written and produced by Joblogic’s Technical Writing team and was last updated on the date specified above. Be aware that the information provided may be subject to change following further updates on the matter becoming available. Additionally, details within the guide may vary depending on your Joblogic account’s user permissions.