Introduction
The System Settings area consists of general default settings for the back office and mobile application (mobile app) including your Joblogic accounts culture, time zone and currency settings, enabling engineer tracking, non productive time defaults and two factor authentication logins. This user guide will detail the different settings on this page, what they mean and how to turn them on or off.
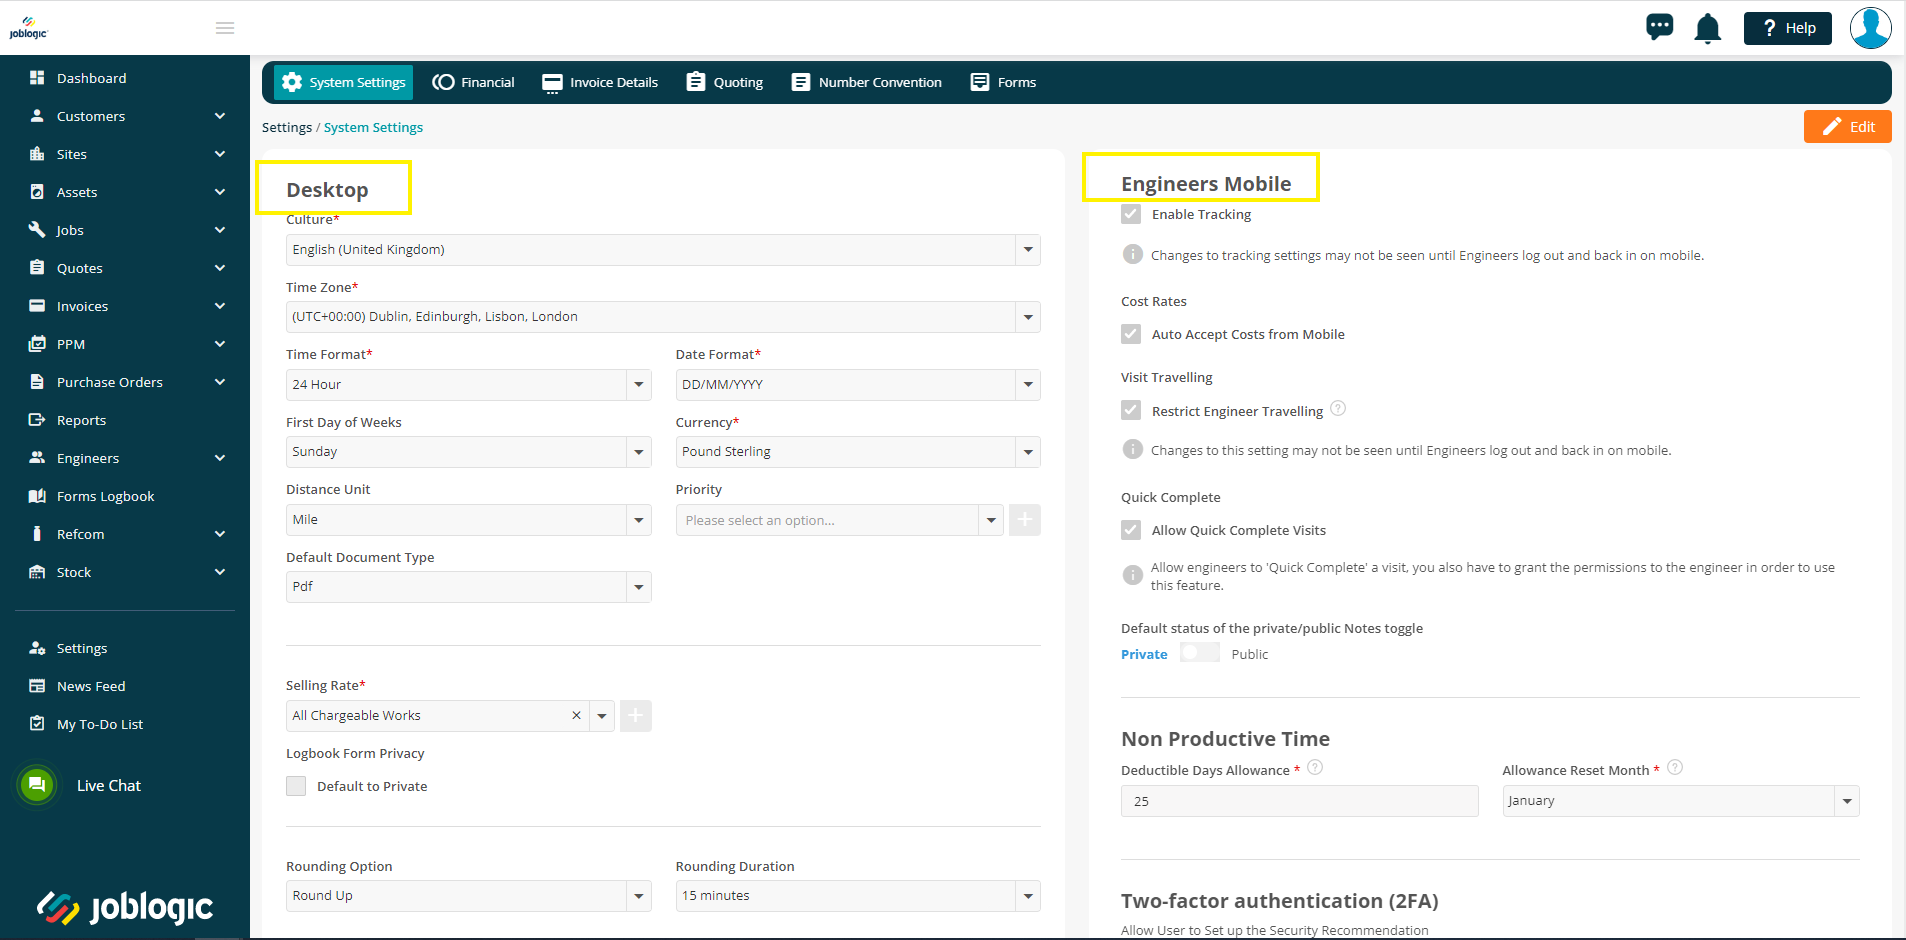
The System settings Area
The page is broken down into three main areas relating to general settings for the back office (Desktop), mobile application (Engineer’s Mobile) and an ‘Other’ area.
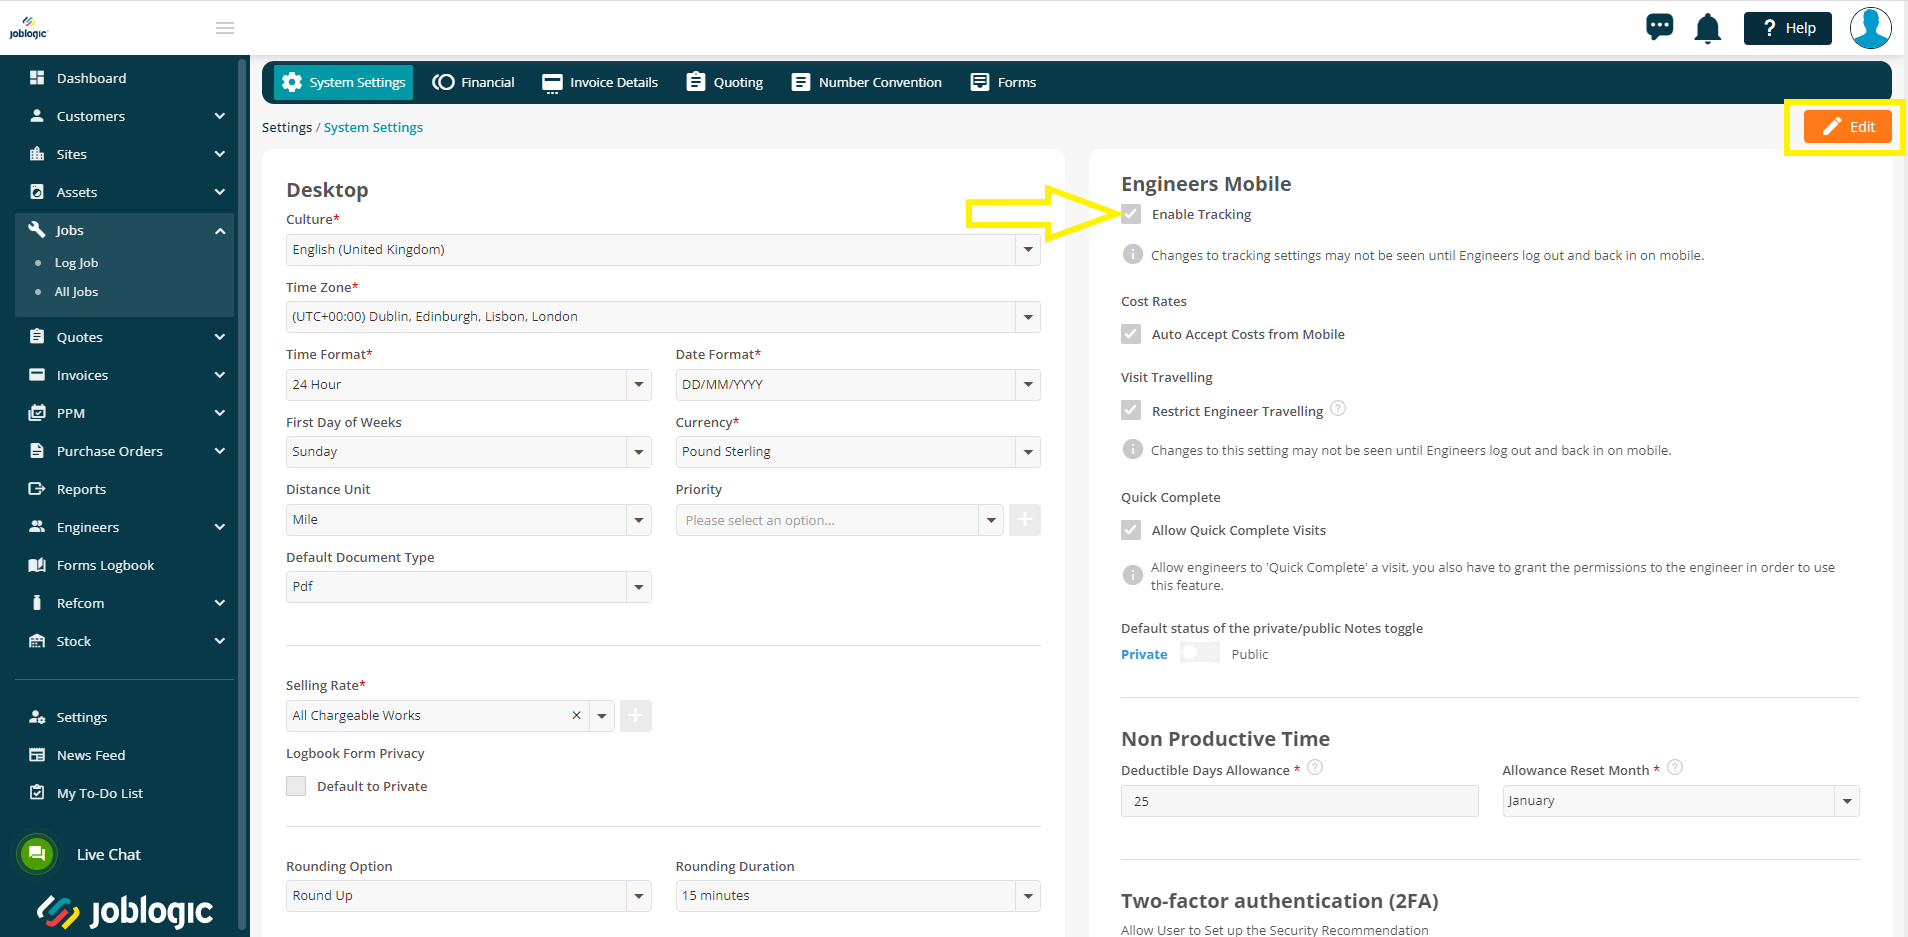
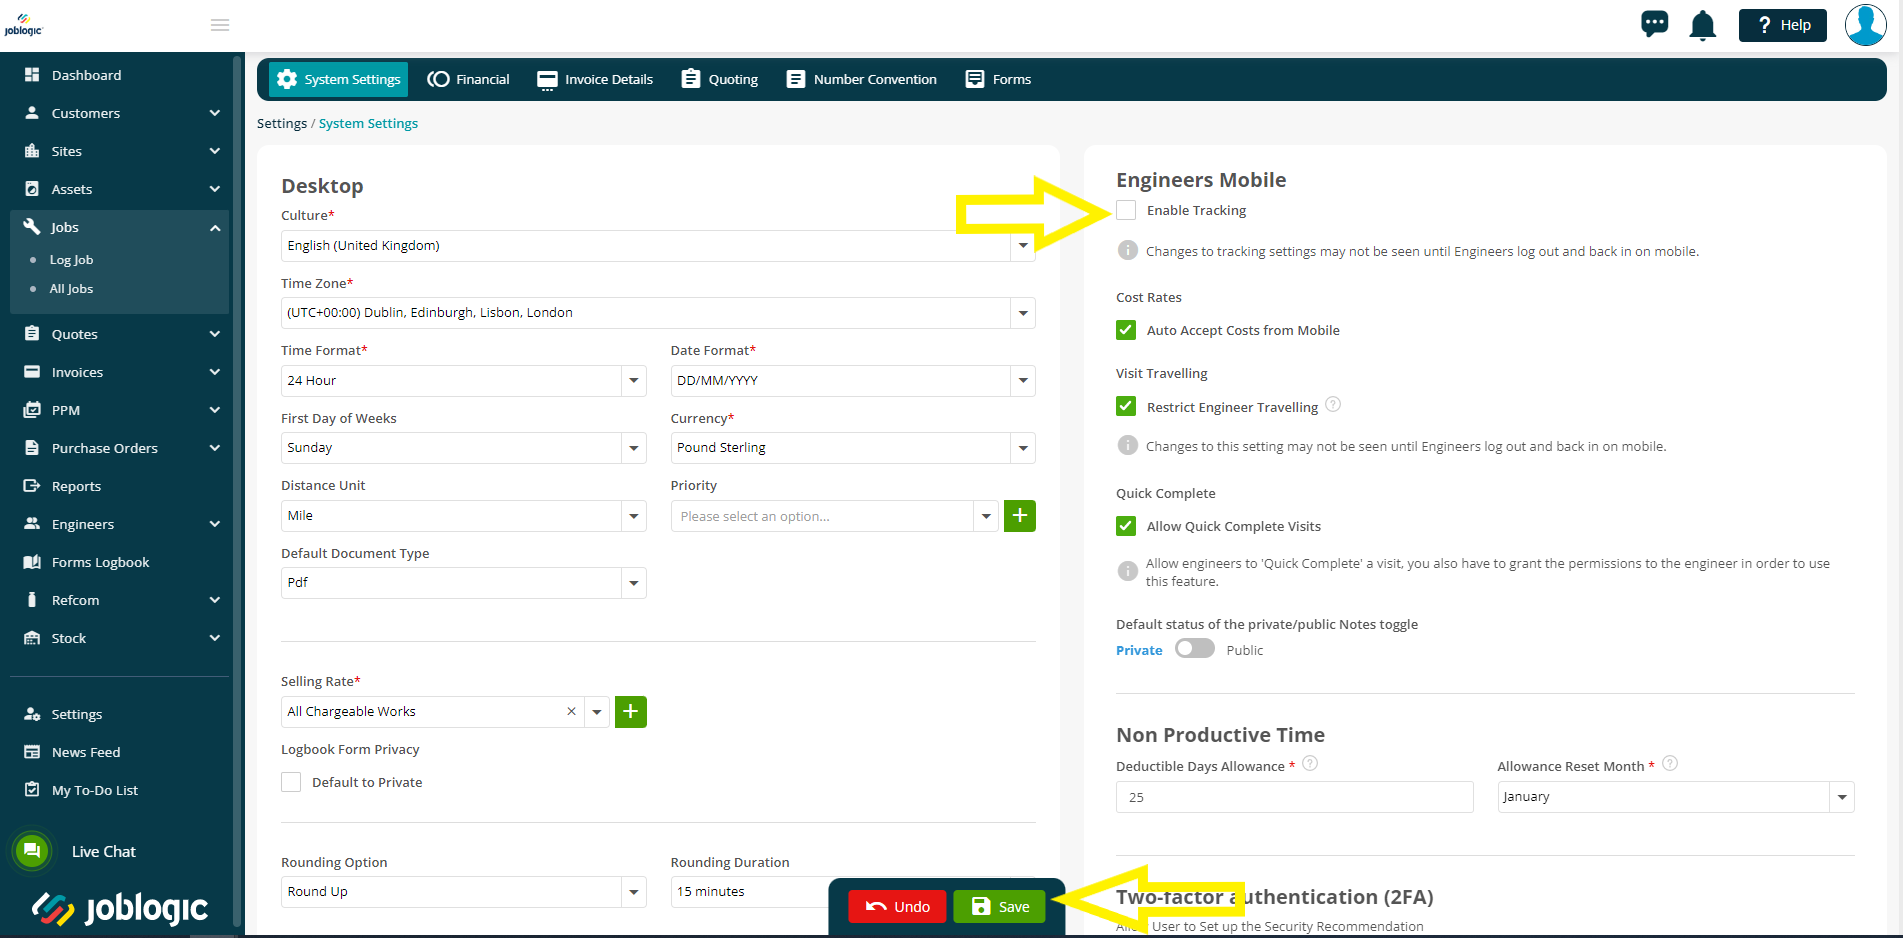
In order to edit any of the settings on this page, select the orange ‘Edit’ button in the top right corner of the screen, make changes to the settings as applicable and select ‘Save’ for changes to take effect.
Desktop
The Desktop area concerns default settings relating to different aspects of the back office.
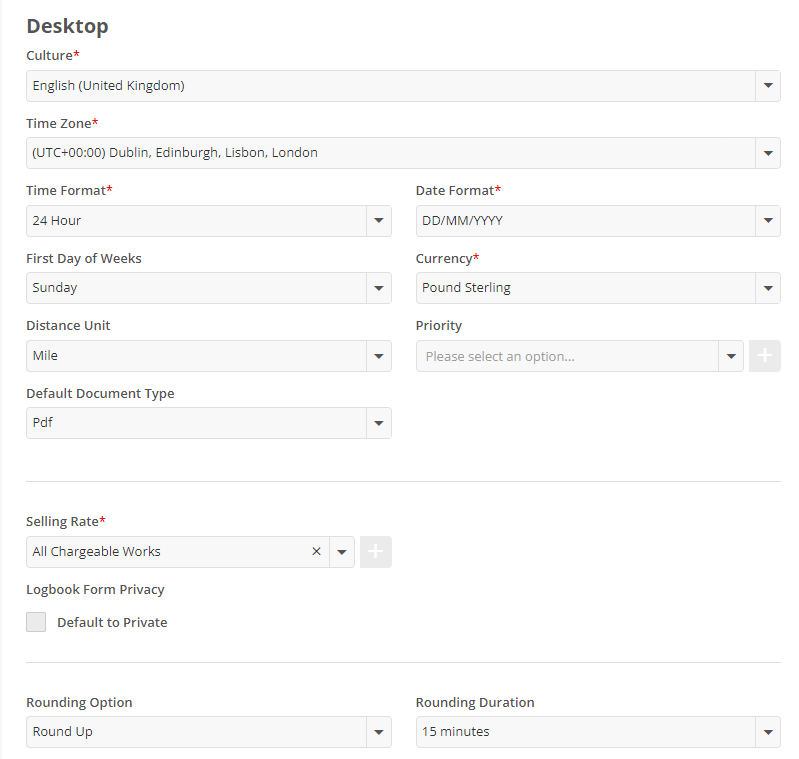
We will define each setting below to help you decide how you would like to set each one for your Joblogic account. These settings are universal across your dataset, so setting these defaults does so for all other users of your Joblogic system.
Culture - This refers to the country of which your Joblogic account and business is located. Changing the culture of your account will update general details within your Joblogic such as terminologies and date or telephone number formats presented.
Time Zone - This refers to the time zone of which Joblogic uses to base time recordings on.
Time Format - This can be set as either 12 or 24 hour meaning that times are either expressed via a 24 hour clock such as 16:00 or a 12 hour clock such as 4:00pm.
First Day of Weeks - This refers to the first day of your business week in a calendar week and updates related areas such as your planner via week view.
Currency - This refers to the money currency that your business deals in, likely correlating to your culture also set for your account.
Distance Unit - This can be set as either miles or kilometres meaning that distance records are expressed either per mi or km.
Priority - Joblogic contains a priority feature whereby target response times can be set against a job, such as a ‘24 hour’ or ‘Emergency response’. This field allows you to set the default priority for your Joblogic, meaning that unless a different priority is set at a more specific area (such as directly against the job), jobs and other items where priorities apply will automatically populate as this priority initially.
Default Document Type - This refers to the default format that documents downloaded from the system generate as. For example, setting this field as PDF means that when downloading a Jobsheet from the system, the jobsheet document will be downloaded as a PDF file which cannot be edited. Alternatively, this field could be set as editable docx meaning that documents downloaded from the system could then be edited via Microsoft Word or Google docs for example.
Selling Rate - Joblogic contains a selling rate feature whereby different rates at which you sell items to customers can be set against a job. This field allows you to set the default selling rate for your Joblogic meaning that unless a different selling rate is set at a more specific area (such as directly against the job), the job and other items where selling rates apply will automatically populate as the one set here.
Logbook Form Privacy - This setting determines if your customer can view the form within their portal account - If the ‘Default to Private’ tick box is set, then your customers will not be able to view the form(s).
Rounding Option - This refers to how the system rounds time within your Joblogic. You can set values to round up, down, to the nearest point or not at all.
Rounding Duration - In relation to the above setting, this setting determines how much you are rounding your time to, i.e. 5, 10, 15, 30 or 60 minutes.
Engineer’s Mobile
The Engineer’s Mobile area concerns default settings relating to different aspects of the mobile application.
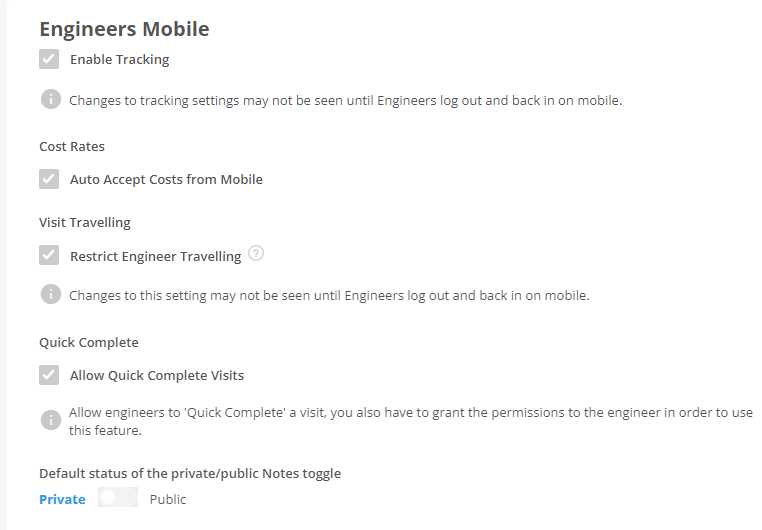
We will define each setting below to help you decide what you would like to set each value as for your Joblogic account. These settings are universal across your dataset and so setting these defaults does so for all other users of the mobile application within your Joblogic system.
Enable Tracking - This setting refers to whether or not you want to track your engineer’s via their mobile application/the device that the Joblogic app is installed on. Turning this setting on only turns the function on in general for your Joblogic account. There are then settings on the engineer’s mobile device which need to be enabled in order for the function to work, so it is possible to track some engineer’s and not others if required.
Cost Rates - If you have set up the cost rates against your engineers, their time stamps will automatically calculate costs as they complete their jobs. The ‘Auto Accept Costs from Mobile’ tick box refers to whether these costs are automatically applied to the costs area of the job in the back office, or whether costs from the mobile need to be manually approved before being recorded against the job.
Visit Travelling - Within the mobile application, an engineer is presented with time stamps for each visit to a job such as accept the job > record travel > mark themselves onsite and working. The ‘Restrict Engineer Travelling’ tick box means that when enabled, engineers will not be able to record travel to an alternative visit until the current visit that they are on is marked as a ‘closed’ status. These being: Completed, Left site, Rejected, Aborted, Cancelled, Abandoned, Job Revisit.
Quick Complete - This setting allows a quicker completion process on the app. It will allow a completion check on one page, rather than over serval, more detailed pages.
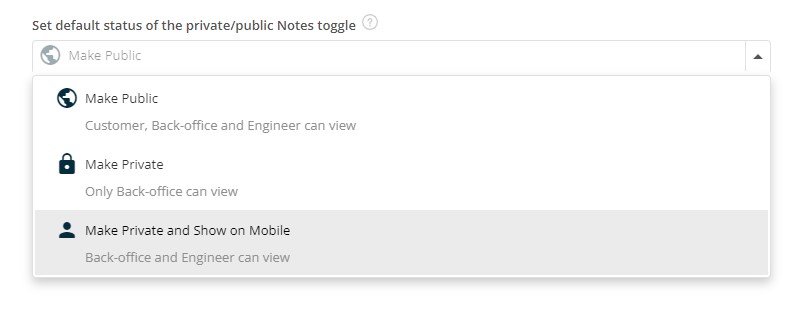
Default status of the private/public notes toggle - When recording a note via the mobile application, engineers are presented with a private/public toggle button used to mark the note as either a private (whereby only users with private note permissions can view) or public (where all users can view). Marking a note as private also means it will not show up on any customer facing documentation or portals.
This default setting refers to whether notes created by the engineer initially generate as public or private notes removing the need for them to manually select the toggle button to the required privacy status.
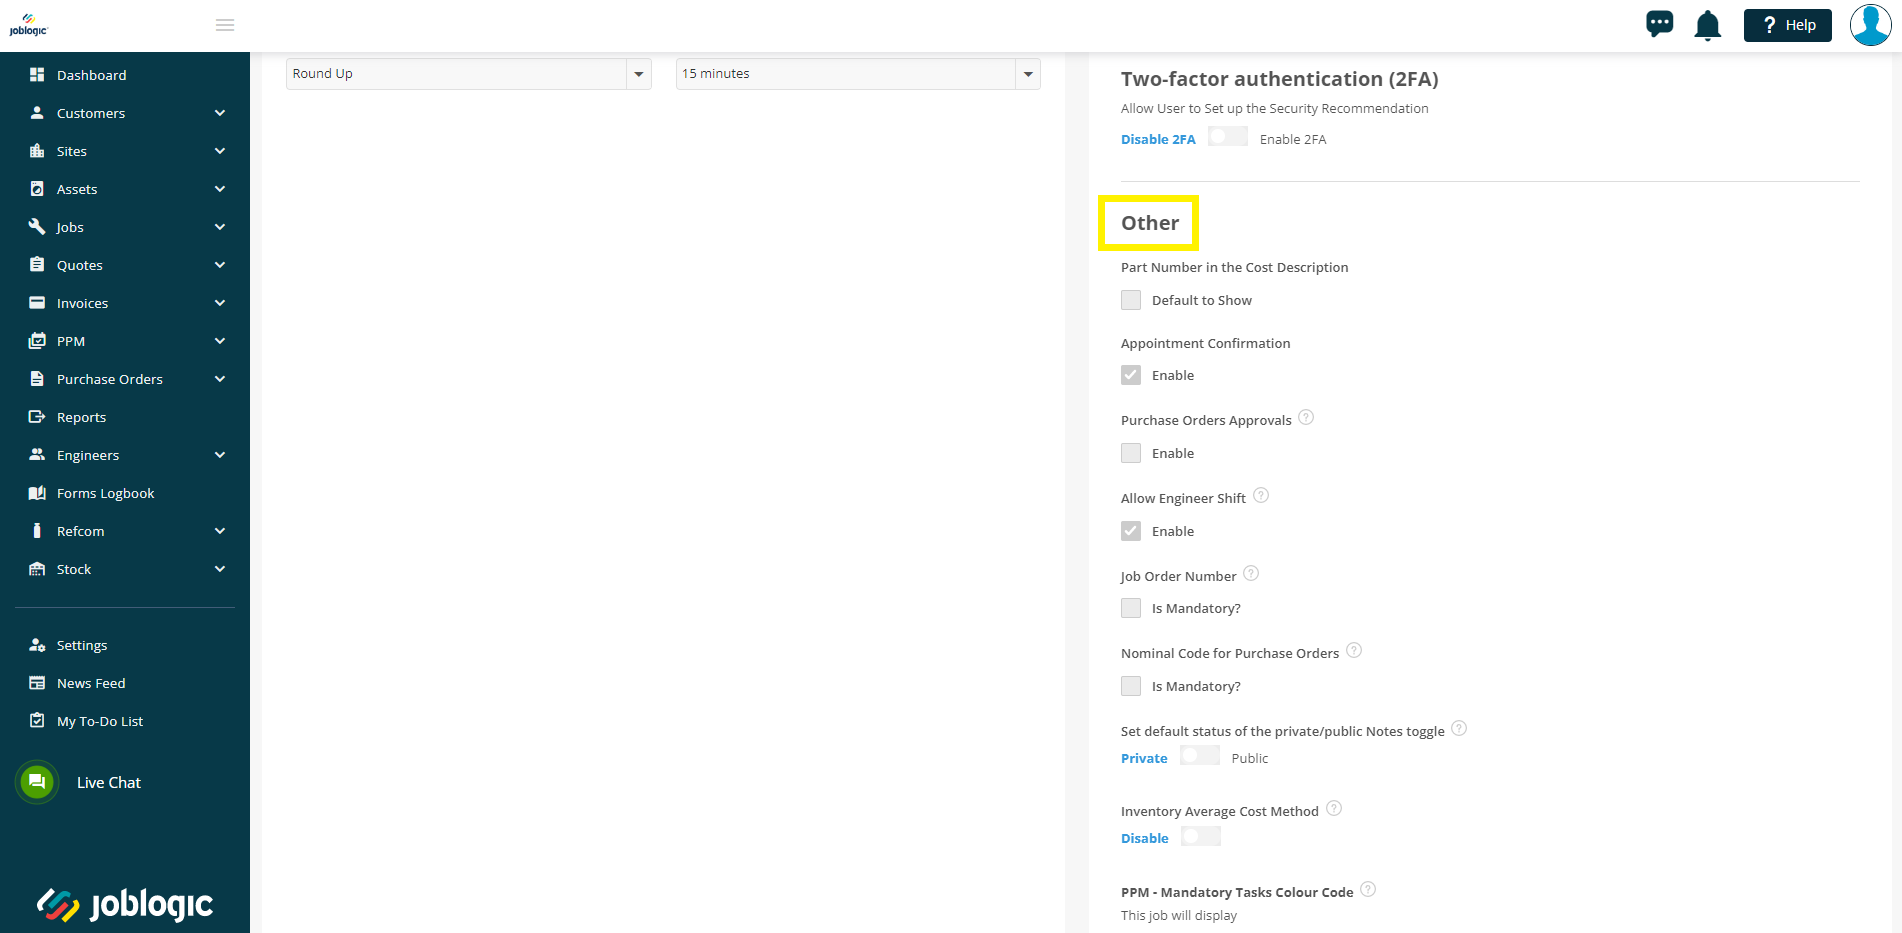
Other
The Other area concerns default settings relating to additional aspects of the back office, mobile app and customer portal.
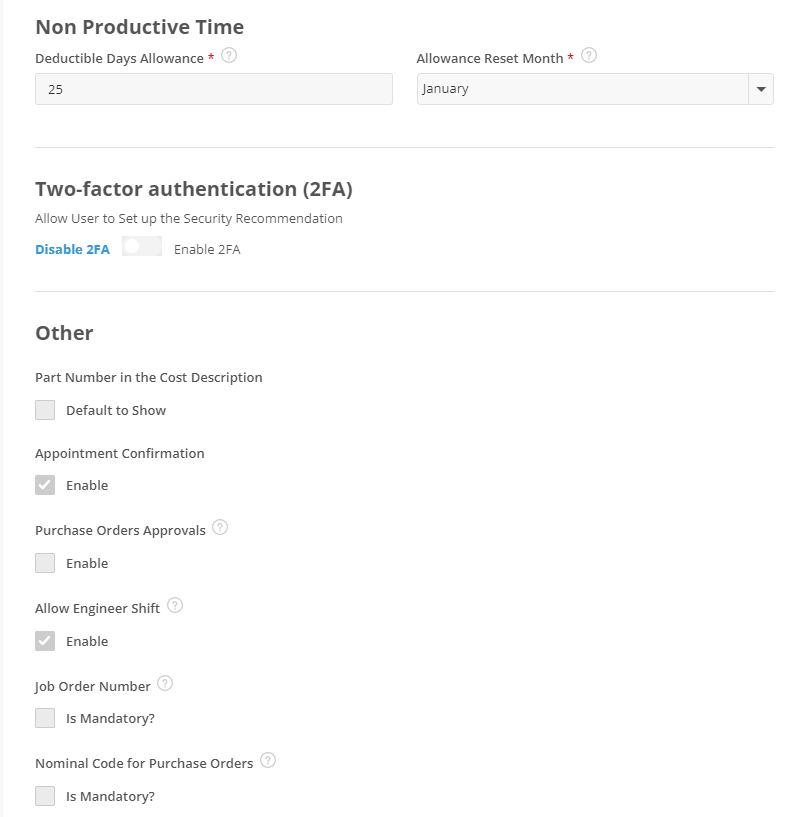
We will define each setting below to help you decide what you would like to set each as for your Joblogic account. These settings are universal across your dataset and so setting these defaults does so for all other users of your Joblogic system.
Non Productive Time - This setting refers to your default non productive time deductible allowance and your allowance rest month. For example, it might be that in general the majority of your employees get 25 days annual leave and that this takes effect from January to December. Alternatively, annual leave may follow a business year of April to March. The allowance can be changed against each member of your team in more specific settings. This setting refers to what a staff member deductible allowance initially generates as when created.
Two-factor authentication (2FA) - This setting refers to switching on two-factor authentication logins for your Joblogic account meaning that users will need to provide two pieces of login authentication evidence. In Joblogic this refers to the system sending an email to the user's recorded email address with a verification code to enter after having already entered the accounts username and password credentials.
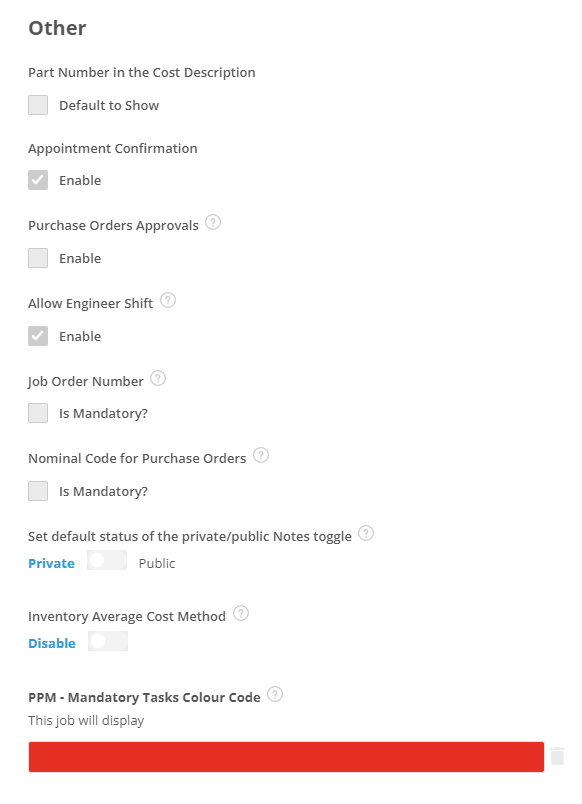
Part Number in the Cost Description - This setting refers to how the Parts cost lines against jobs will show. If the ‘Default to Show’ checkbox is enabled it means that the part number set against a part will auto populate in the description field alongside the parts name/description when adding that part as a cost against a job.
Appointment Confirmation - Joblogic provides a function where job appointments need to be confirmed/approved by the customer before sending them to the engineer. Selecting the ‘Enable’ tick box refers to switching this on for your Joblogic account meaning that allocated appointments need to be confirmed with your client before deploying the visit to your engineer.
Purchase Orders Approvals - Joblogic provides a function whereby purchase order approvers can be set within your Joblogic account. Purchase orders (P.O’s) of a certain value can therefore be submitted to these approvers for sign off before submitting the P.O. Selecting the ‘Enable’ check box refers to switching this function on for your Joblogic account.
Default PO Limit - If you do tick ‘enable’ on the above setting, a new box will appear - ‘Default PO Limit’. This is a free type text field where you can determine the minimum value that will need to be approved before being accepted.
Allow Engineer Shift - Joblogic contains an engineer shift feature whereby engineer’s can be sorted into and assigned shifts of work such as day and night shifts. The ‘Enable’ tick box refers to switching this feature on for your Joblogic account.
If this is switched on, the system will ignore any previous hours set against the engineer. It will instead look at the Engineer Shifts via Settings > Engineer Shifts
Job Order Number - Ticking the ‘Is Mandatory?’ checkbox will result in the ‘Customer Order Number’ field within your Joblogic becoming a mandatory field to enter when logging a job in the back office, via the mobile application and the customer portal.
Nominal Code for Purchase Orders - Selecting the ‘Is Mandatory?’ tick box will result in you needing to enter a ‘Nominal Code’ against a PO line before being able to save it.
Set default status of the private/public Notes toggle - similarly to the ‘Default status of the private/public notes toggle’ setting mentioned above for the mobile app, this setting works the same but for notes made via the back office.
When recording a note via the back office, users are presented with a couple of options - ‘Make Private’ or ‘Make Private and show on Mobile’
Private notes can still be hidden from certain users within the back office if permissions are set a such via Settings > Staff.
This settings refers to whether notes created by the back office user initially generate as public or private notes, removing the need for them to manually select the toggle button to the required privacy status.
Inventory Average Cost Method - This setting is related to the stock P.O and the price per unit of parts. If a part recorded in the parts library is set at a specific price and a stock P.O is raised for this part at a different price, the system will revalue the price of this part in settings based on the average price of the stock p.o price vs price per unit set against the part in settings. For example, if a material is set as £10 in the parts library and a stock P.O is raised for this same part as £20 the system will revalue the part as £15 once the stock item has been marked as delivered. This function also takes into account the quantity of the item in stock valuing the part based on an average of stock P.O price vs quantity in stock vs price originally set in the parts library.
PPM - Mandatory Tasks Colour Code - Joblogic provides a function whereby tasks set for PPM (Planned Preventative Maintenance) jobs can be set to be mandatory, meaning that they must be marked as completed before your engineer can complete their visit to that job. This setting allows you to colour code such visits on the Joblogic planner via a colour of your choice. It is initially set as red but can be changed to any of the colours available on the colour pallete.
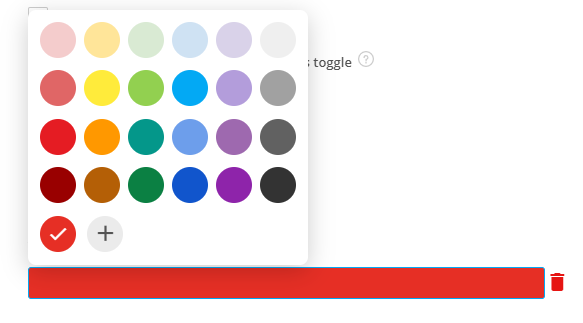
The colour setting refers to changing the colour of the mandatory task icon set against a PPM visit on the planner.
Further Support
For further information or assistance with the above, contact our Support Team on 0800 326 5561 or email support@joblogic.com. Alternatively, our Customer Success Management team can be reached by emailing customersuccess@joblogic.com
Publishing Details
This document was written and produced by Joblogic’s Technical Writing team and was last updated on the date specified above. Be aware that the information provided may be subject to change following further updates on the matter becoming available or new releases within the system. Additionally, details within the guide may vary depending on your Joblogic account’s user permissions and settings or the electronic device being used.