Introduction
TradeHero is an app that will allow you to easily manage your business on the go, right from your mobile device!
This guide will help you through setting up your account, creating appointments, quotes, jobs and invoices.
Installation & Logging in
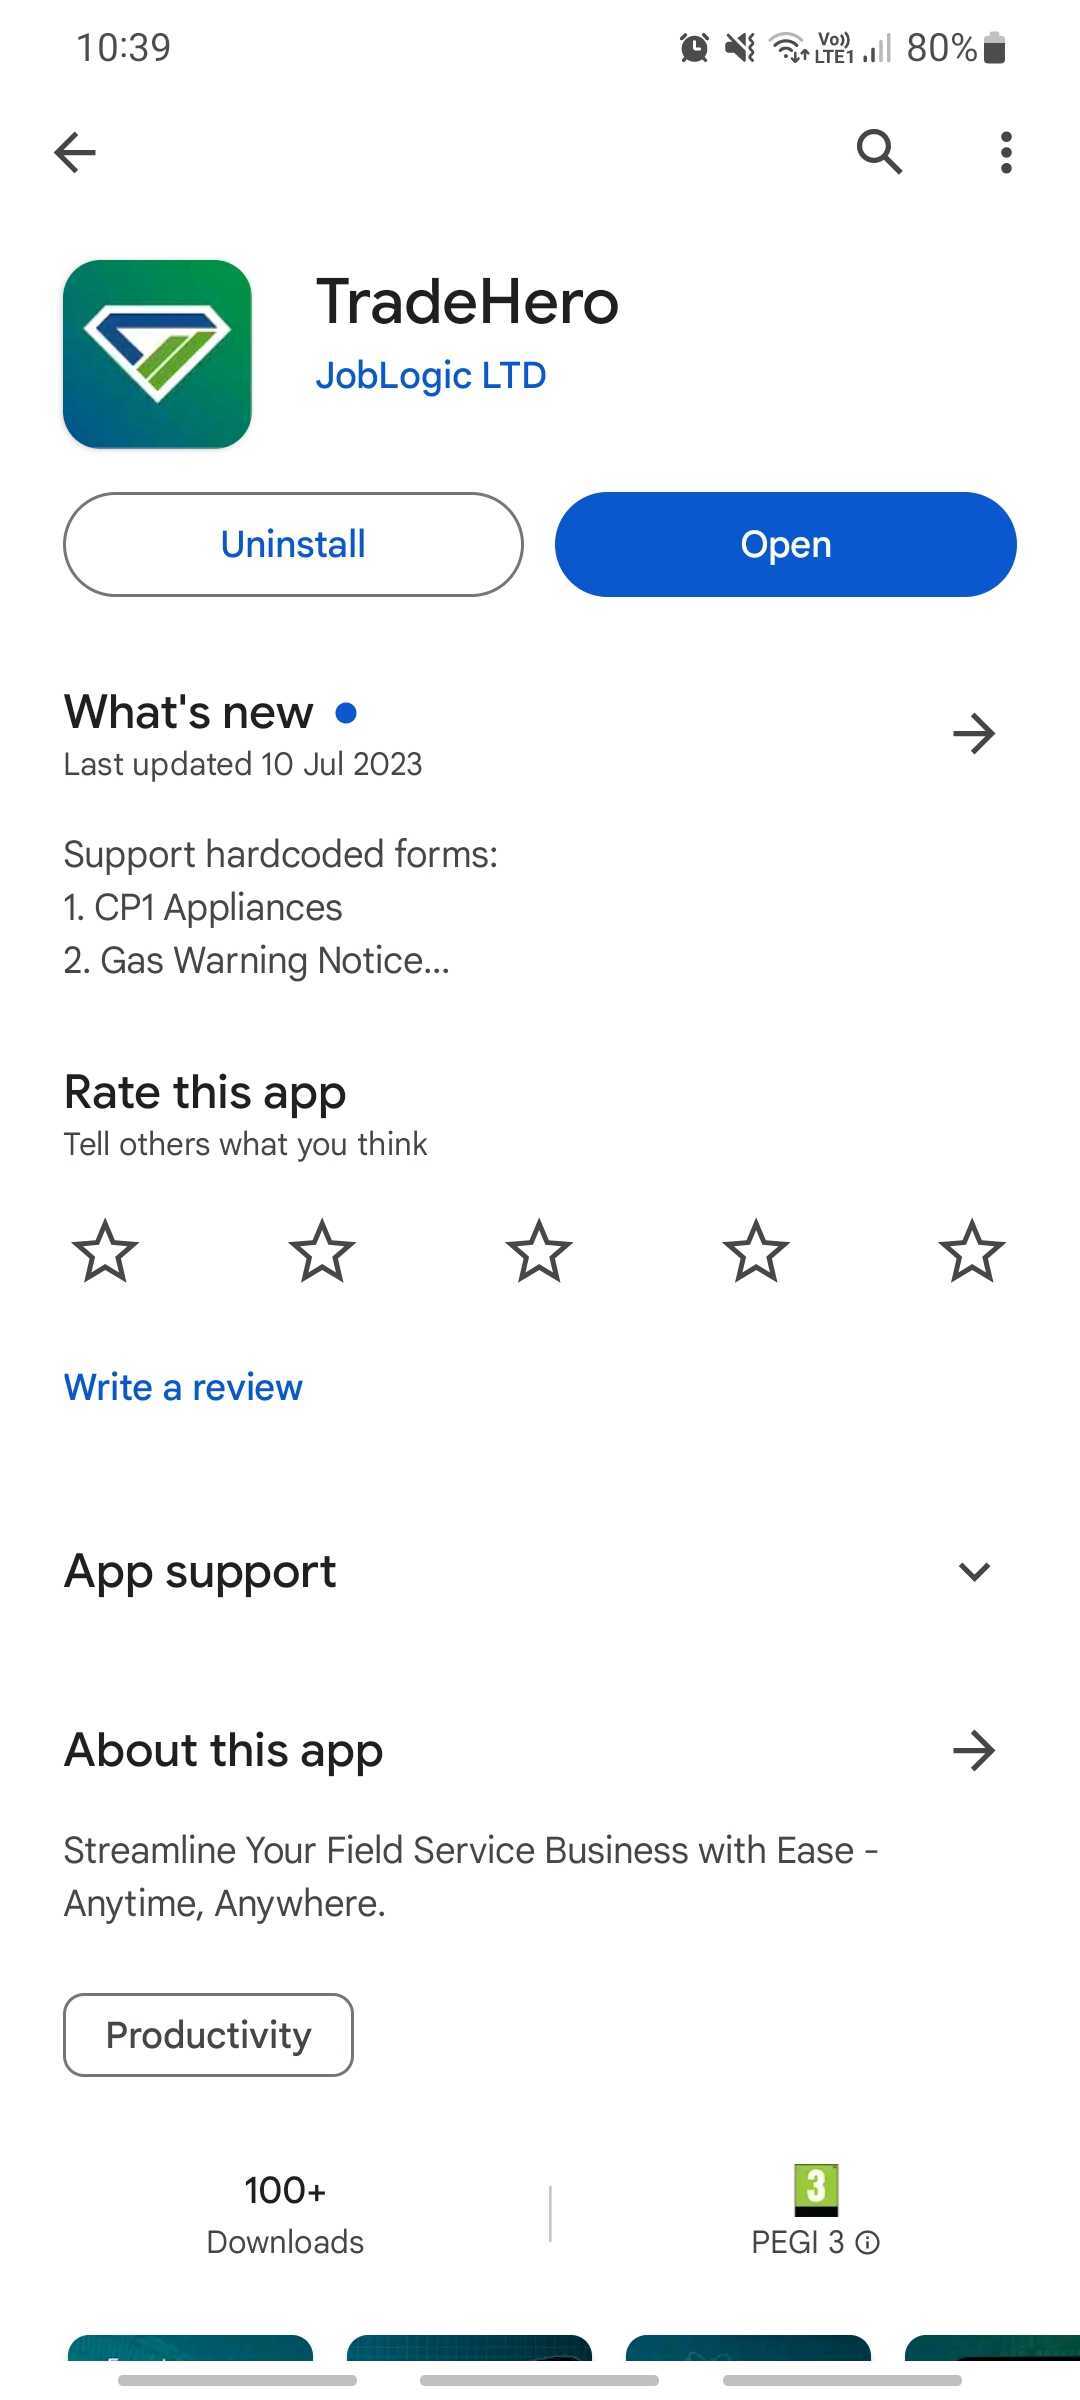
To install the app, go to the App Store for iOS devices or the Play Store for Android devices.
Next, you have a couple of options:
- Signup
- Sign in with Xero
- Sign in with Quickbooks
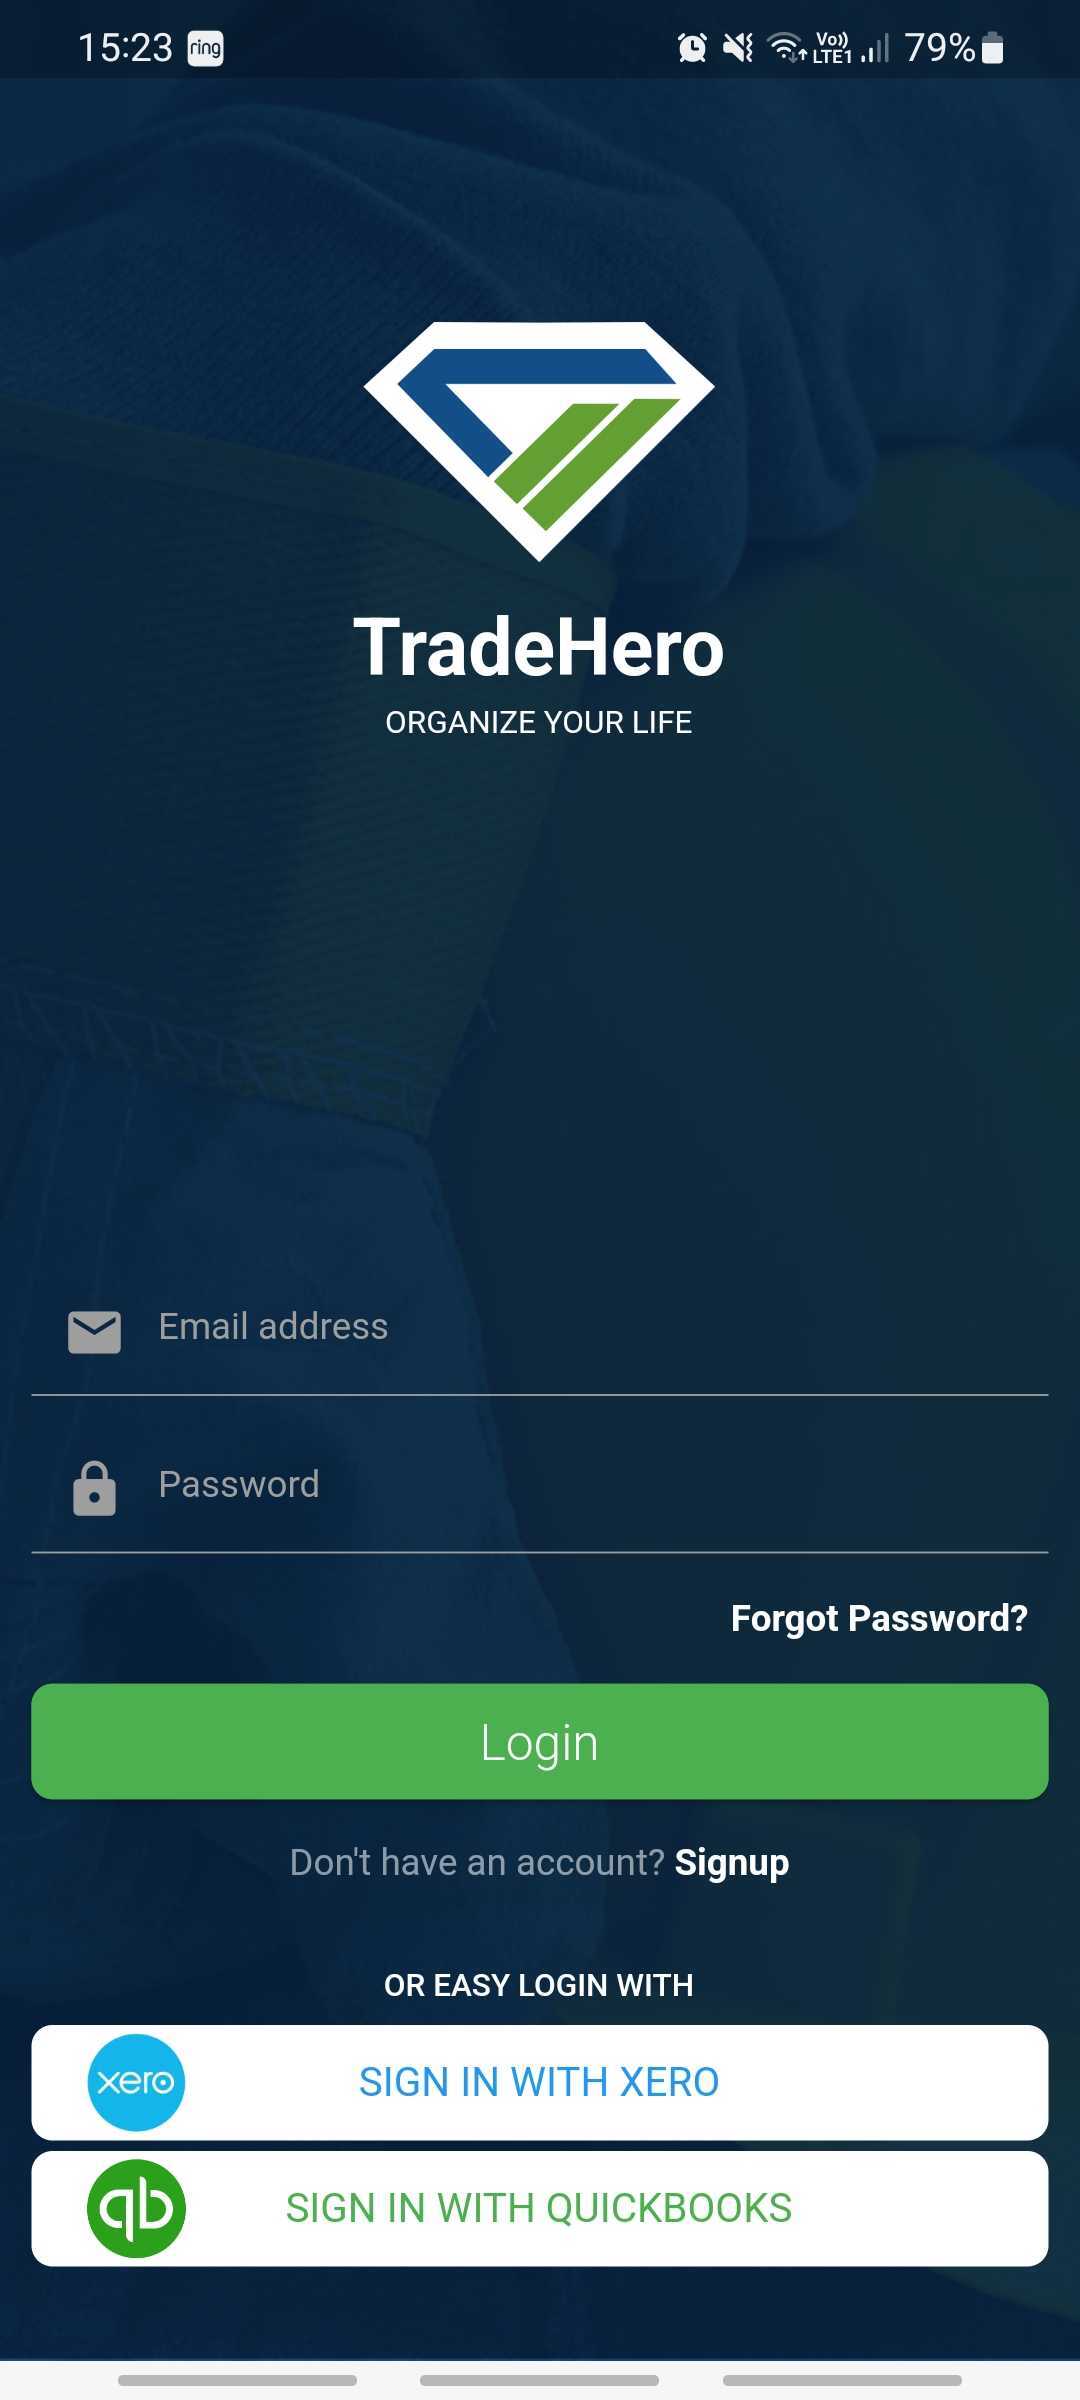
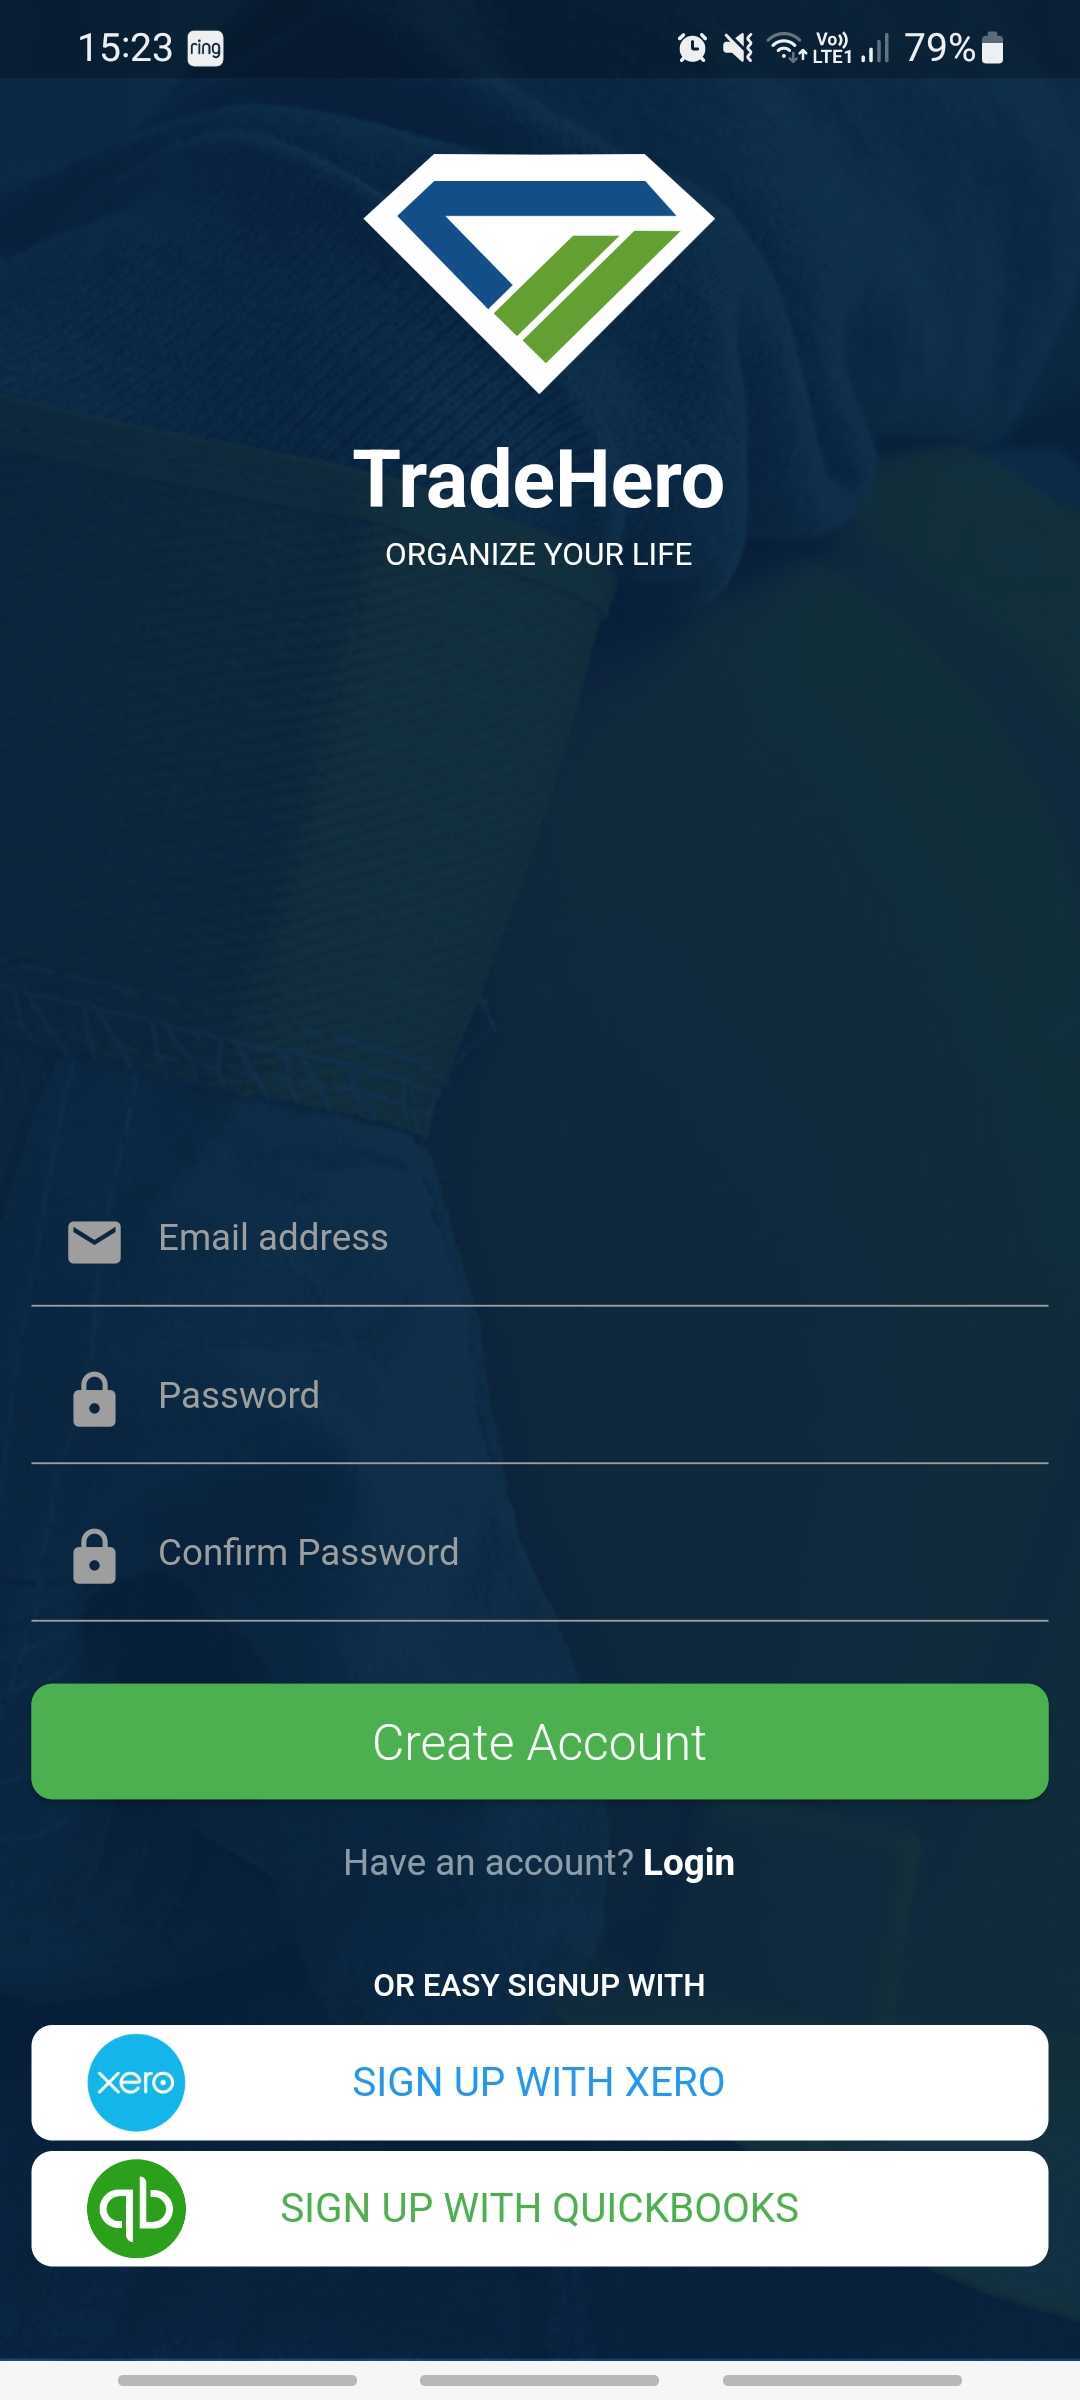
If you click Signup, you’ll be asked to enter an Email Address and Password. And then click Create Account.
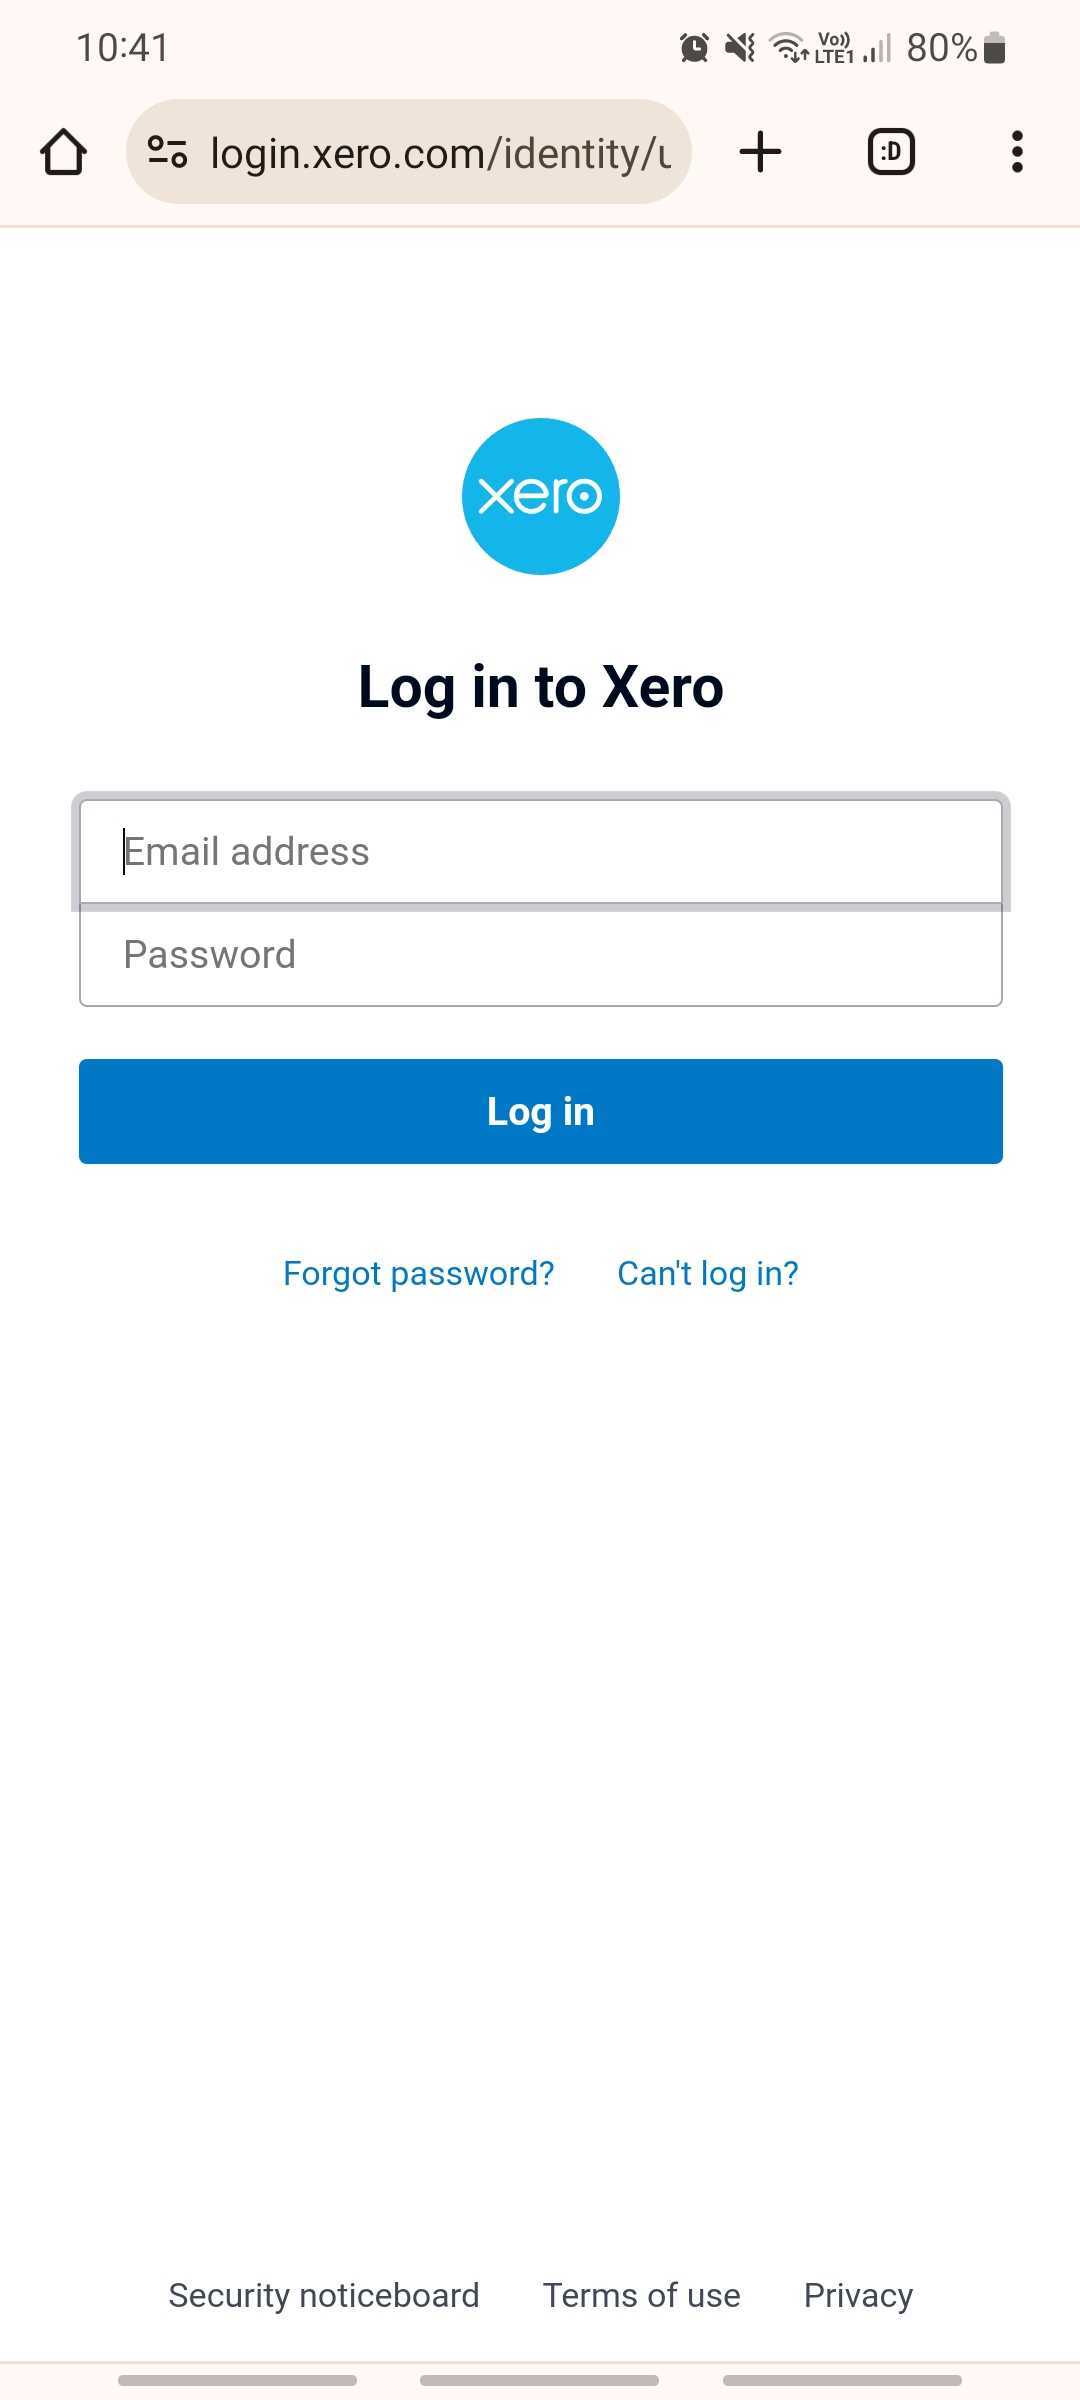
If you click Sign in with Xero or Quickbooks, you’ll be redirected to the relevant webpage to sign into your accounts package.

You’ll then receive an email. Go to your email app to confirm your identity.
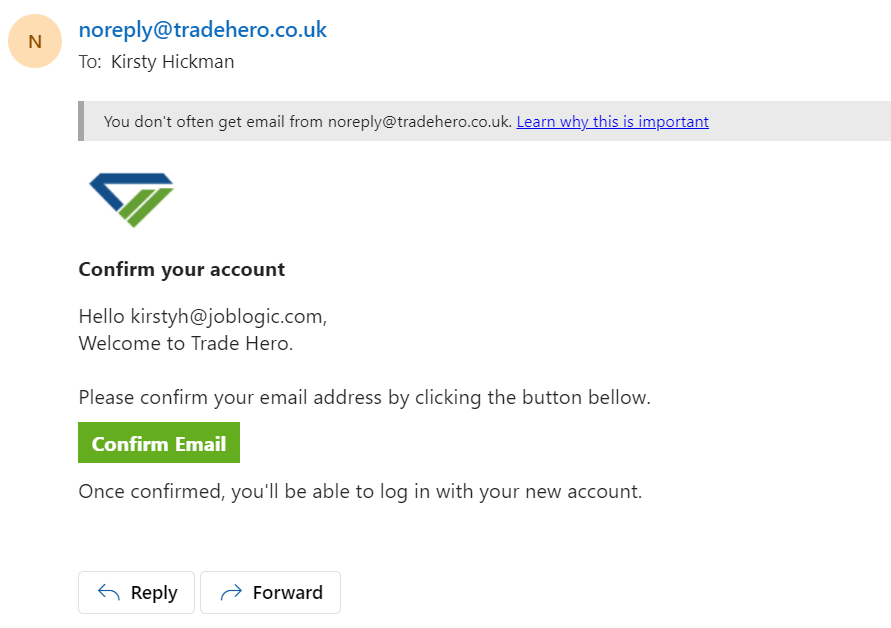
Finally, navigate back to the app and log in using your chosen credentials.
Main Dashboard
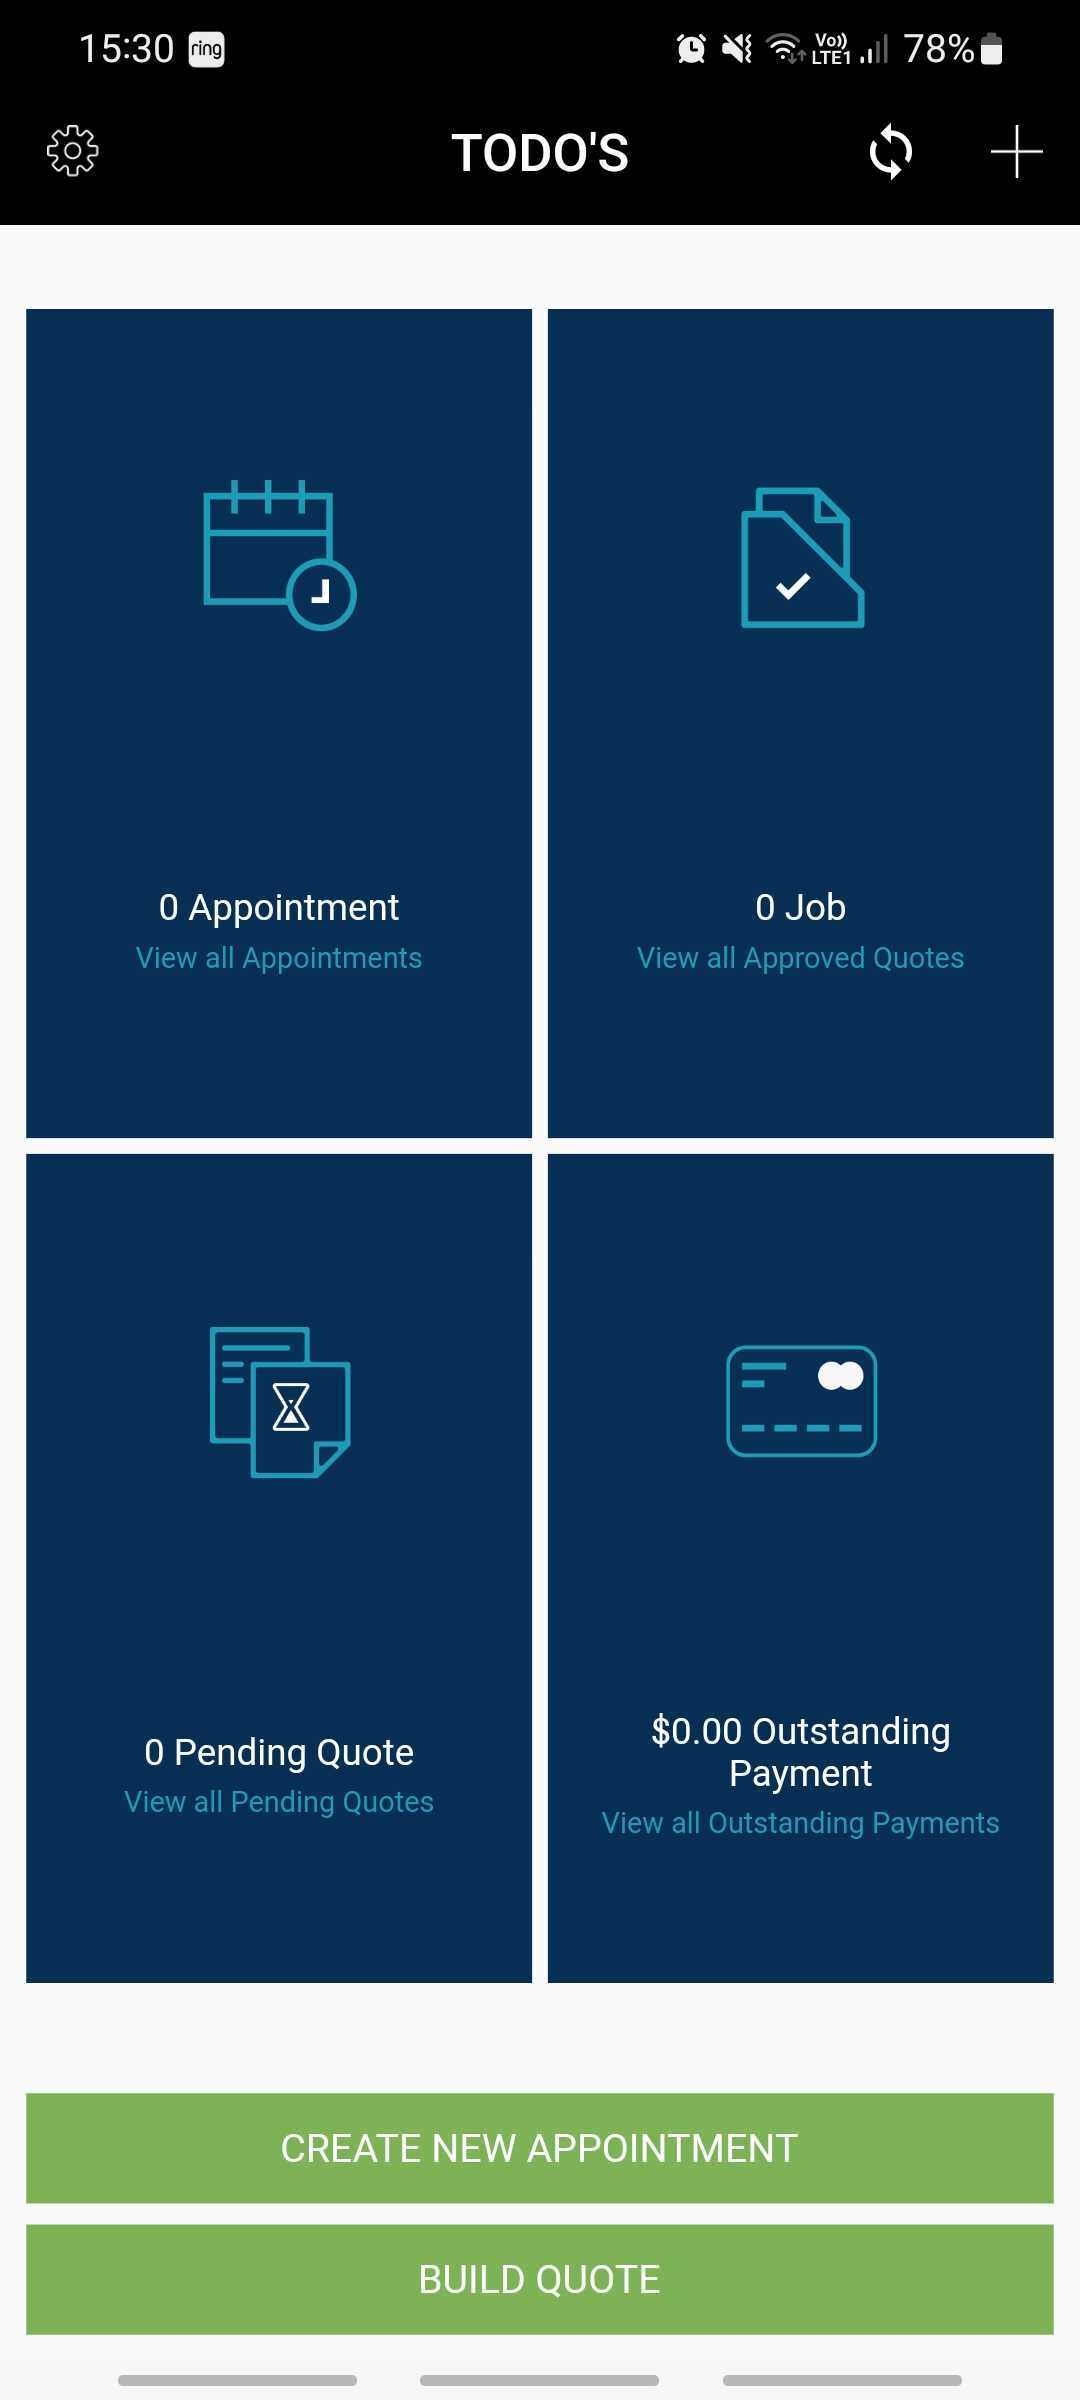
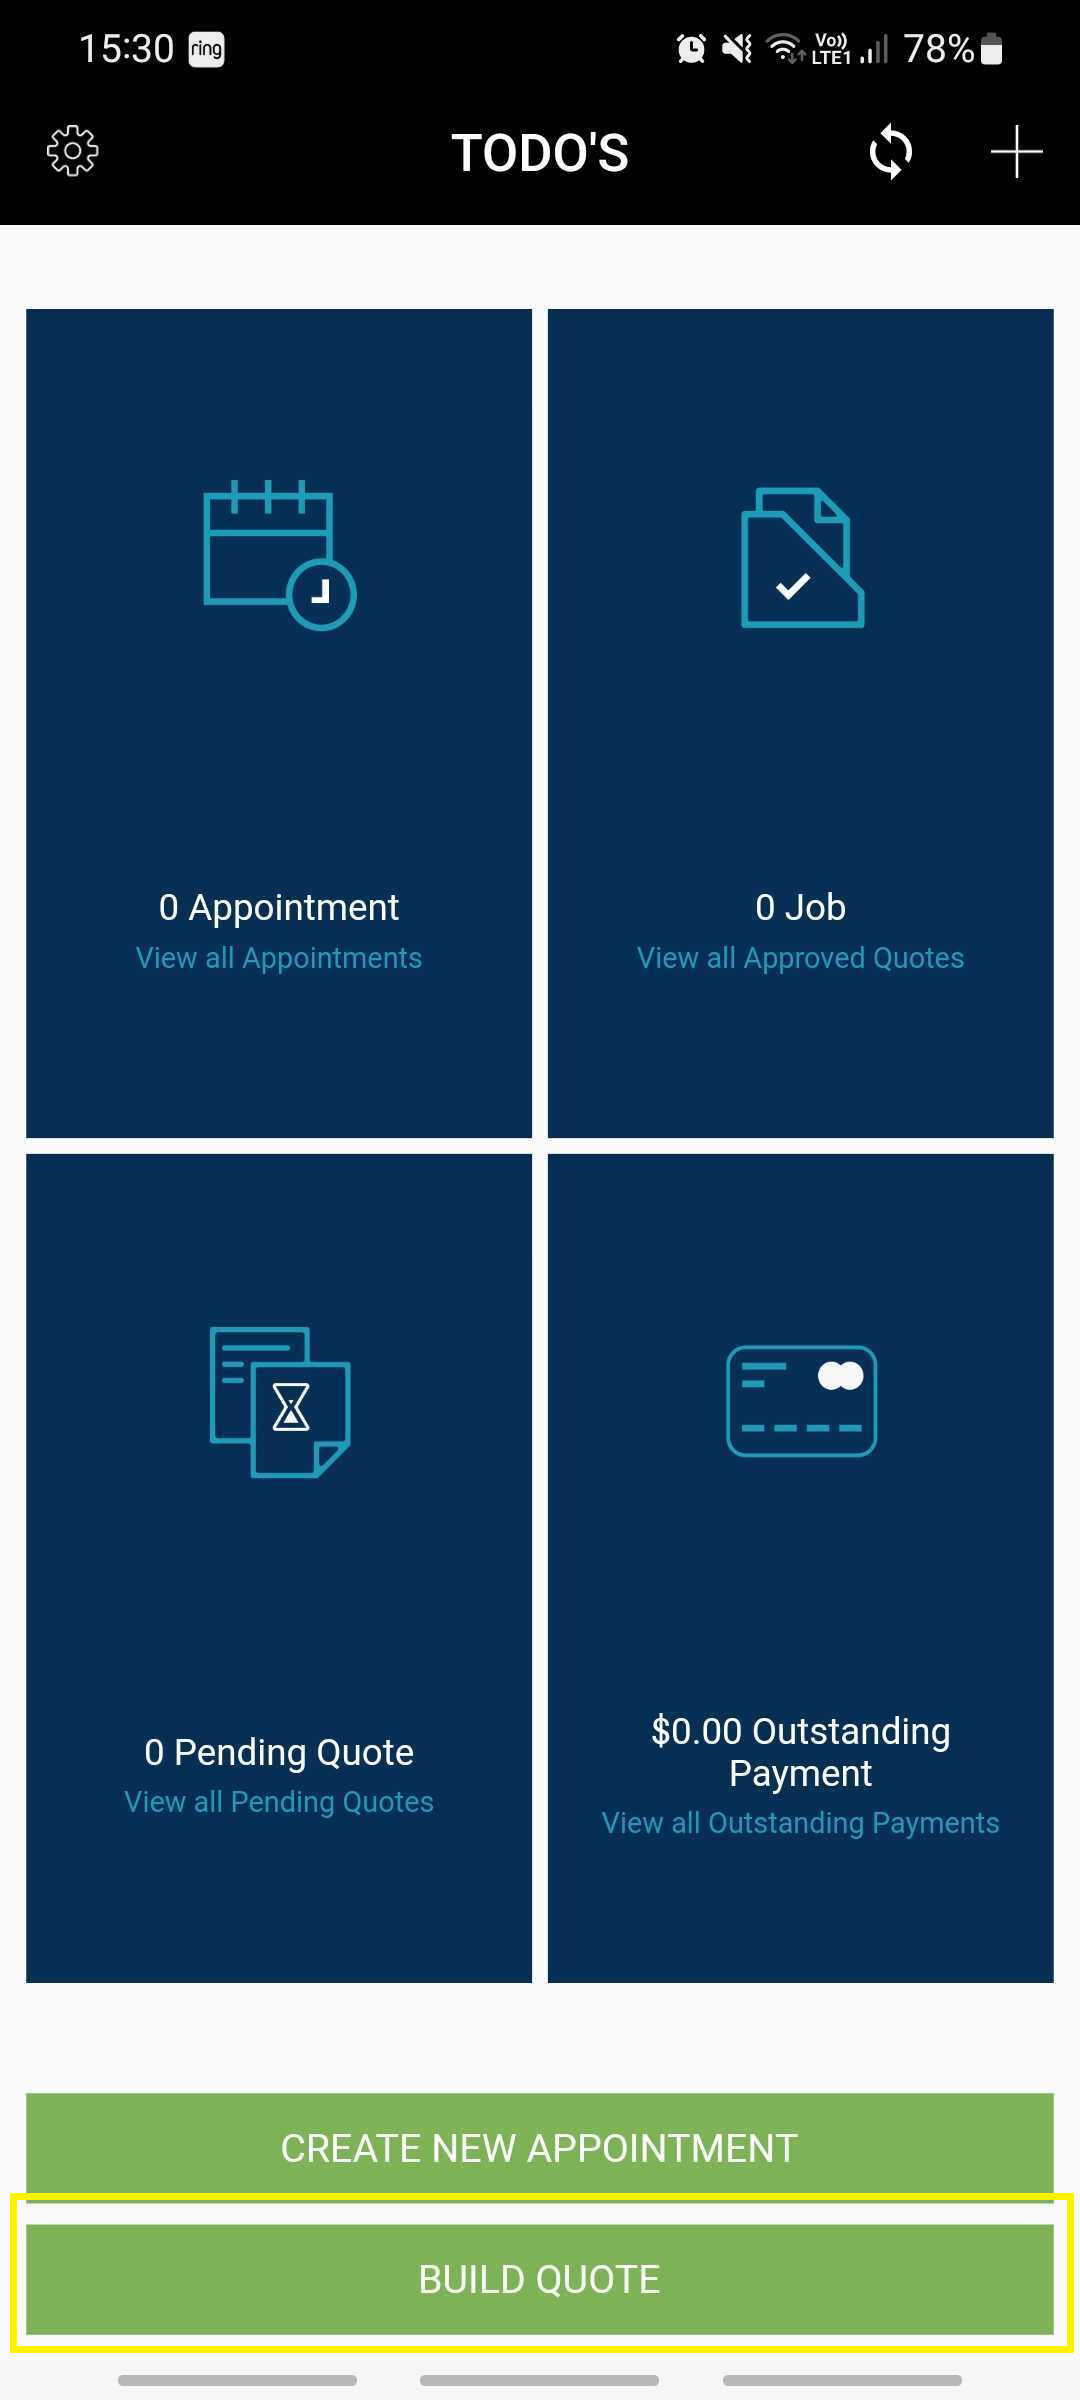
When you have logged in, you’ll land on the main dashboard page, which includes your appointments, jobs, quotes and invoices.
At the top of the screen, on the left are your Settings, and on the right, you can refresh your dashboard, or sync data between all devices that you have logged into.
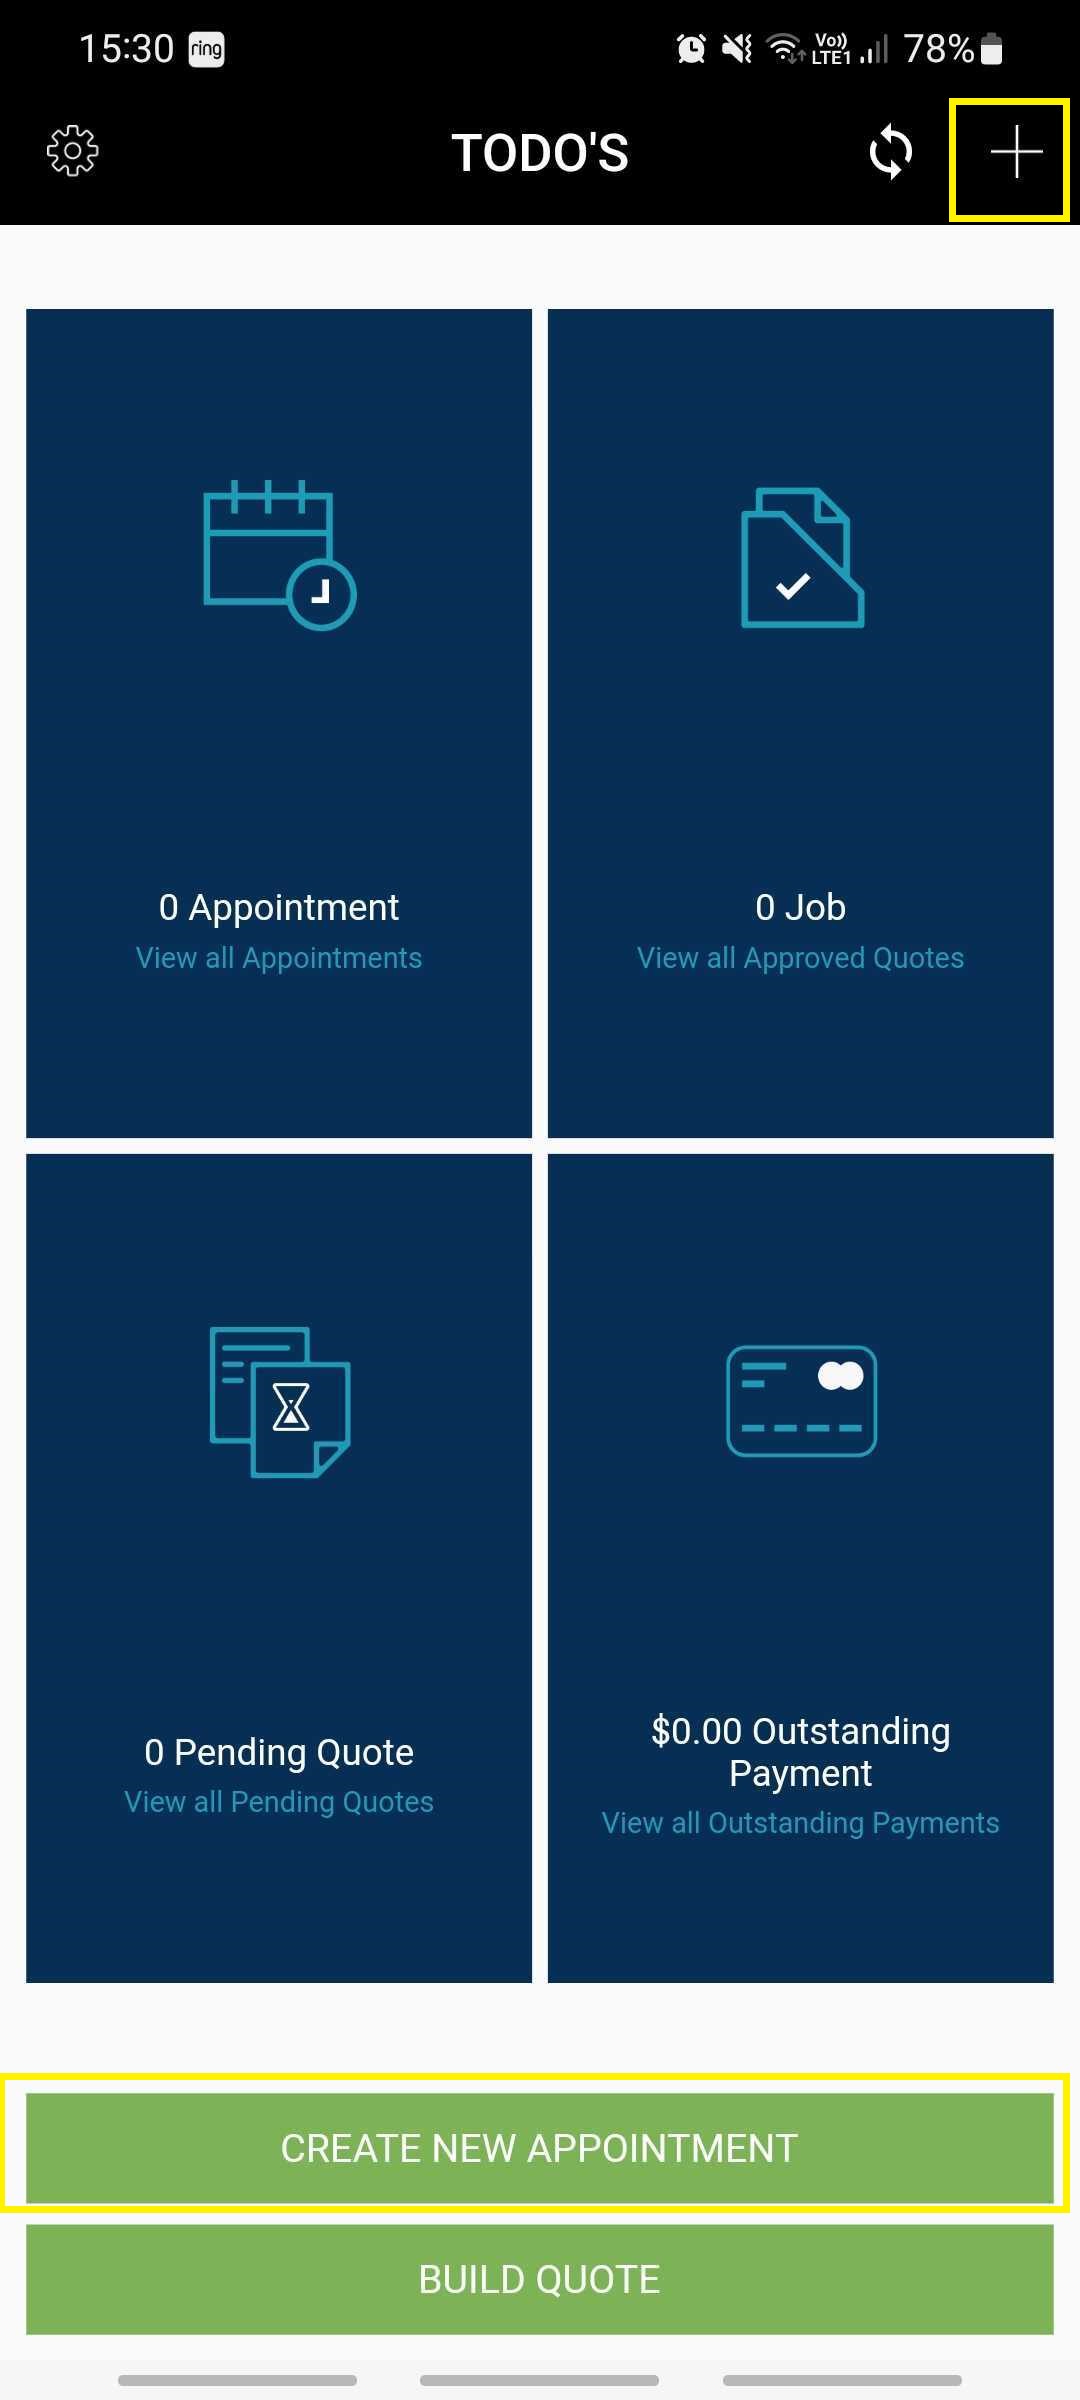
Finaly, you can click the + button to see your calendar and create a new appointment.
You’ll also have the options to Create New Appointment and Build Quote at the bottom of the screen.
Settings
Here, you can add various company and payment details where relevant.
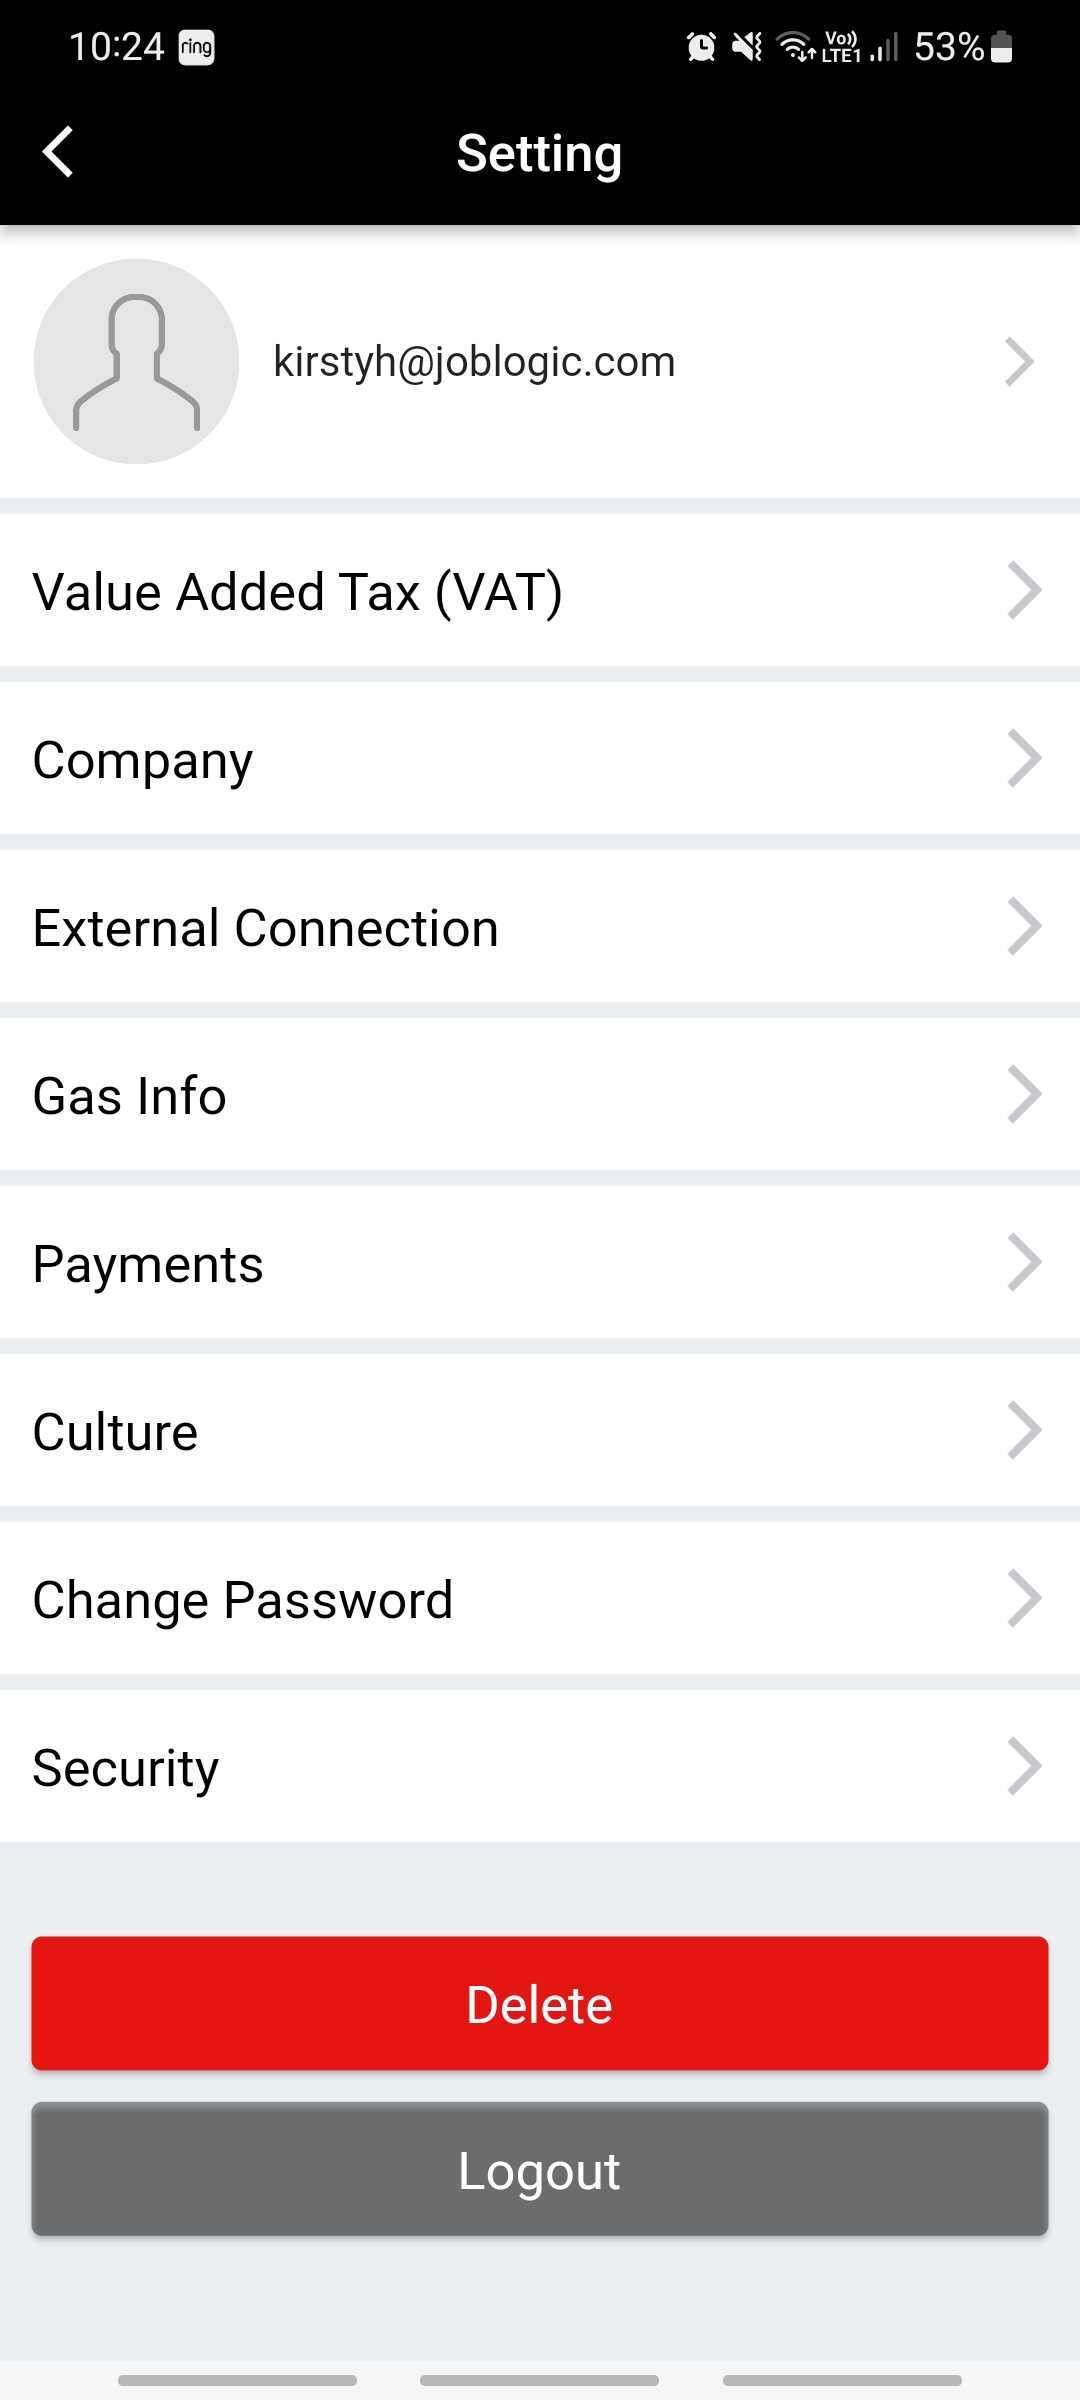
User Information
Add your name, phone and address, if you wish
VAT
If you are VAT registered, you can toggle the option and then enter your VAT reg number and percentage.
Company
If you have a registered company, you can add the name, contact information and logo here.
External Connection
Connect to City Plumbing if you have an account with them. You will then be able to choose Parts to order from their website.
Gas Info
If you are gas registered, you can add your Number here.
Payments
If you have a Stripe account, you can Connect it to TradeHero to take card payments through the app
Culture
Here you can update the date format and currency.
Change Password
Update your password here
Security
If you want added security, you can set up biometrics which will allow you to log in via fingerprint or facial recognition.
Appointments
The general process here is Appointment > Quote > Job. However, you can skip the appointment if you want to go straight to building a Quote.
To create a new appointment, either click the button at the bottom of your screen, or the + button in the top right
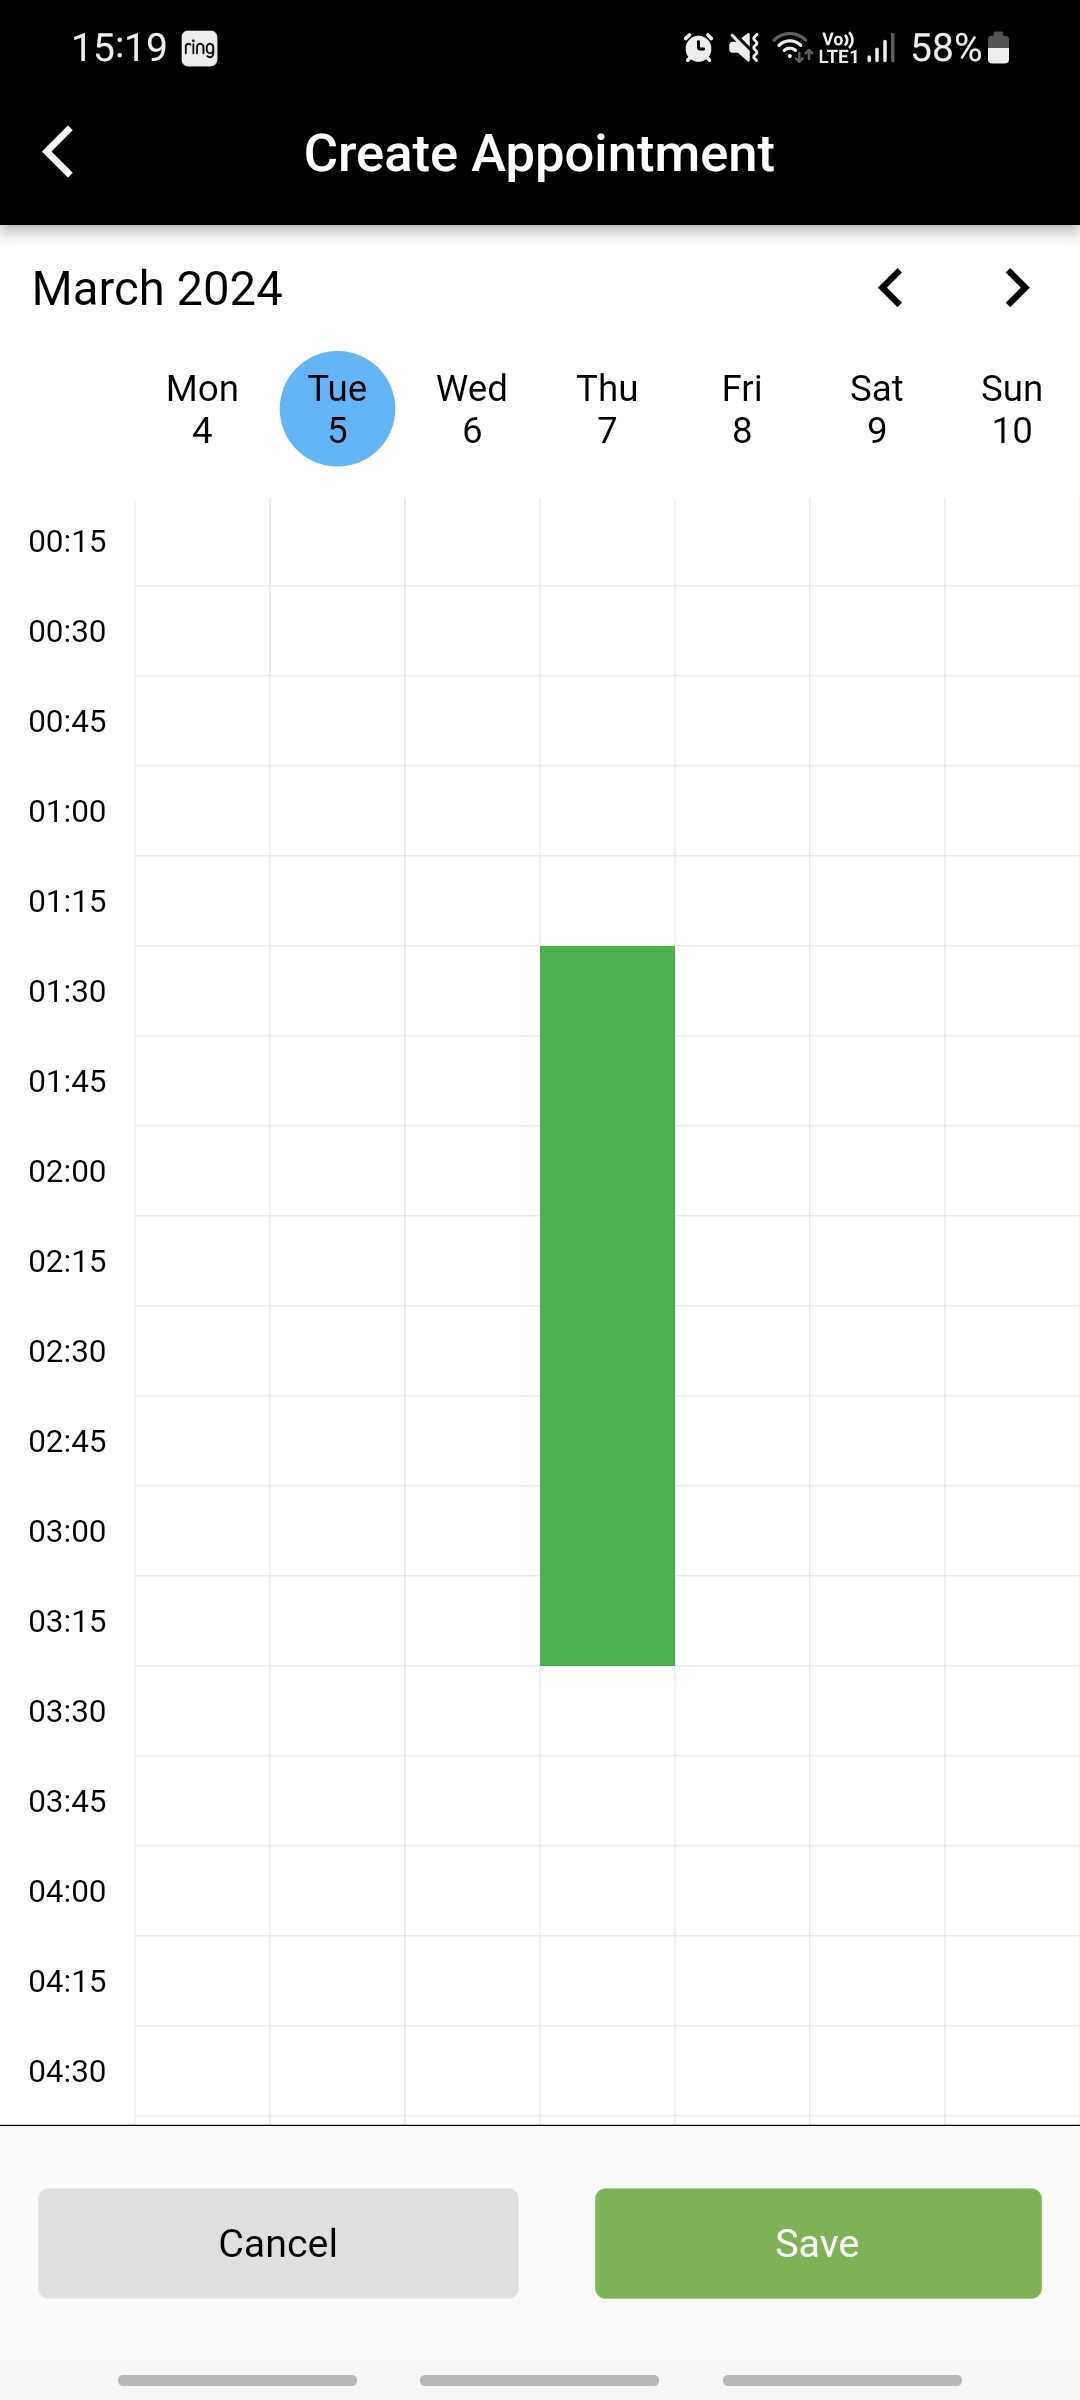
You’ll be redirected to your calendar page, in a weekly view. Click the arrows to navigate to another week.
Next, click the relevant date/time box. You can also hold and drag to extend the time as required.
Click Save to enter your appointment details.
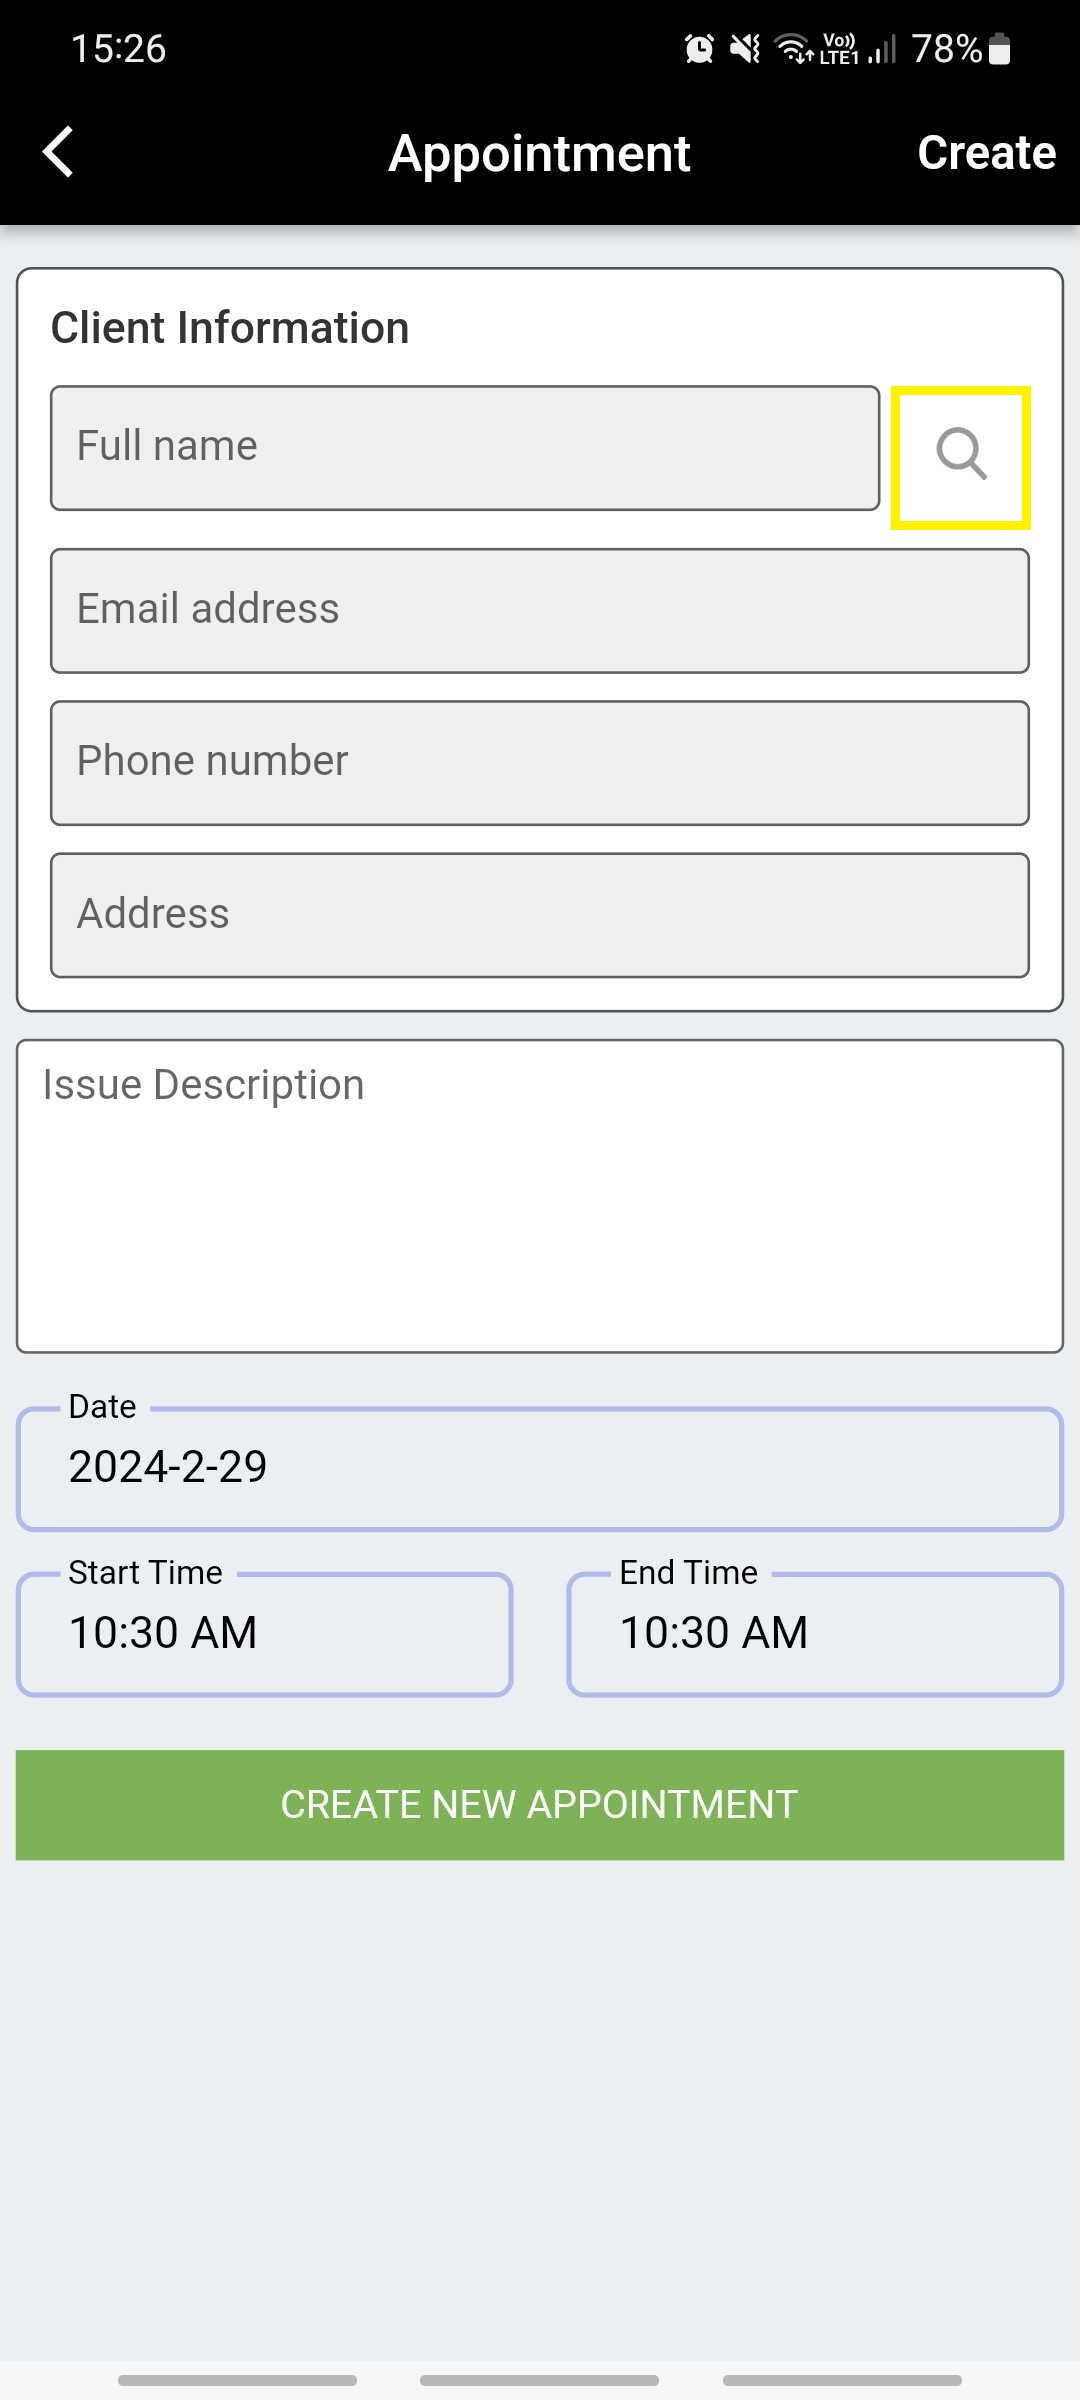
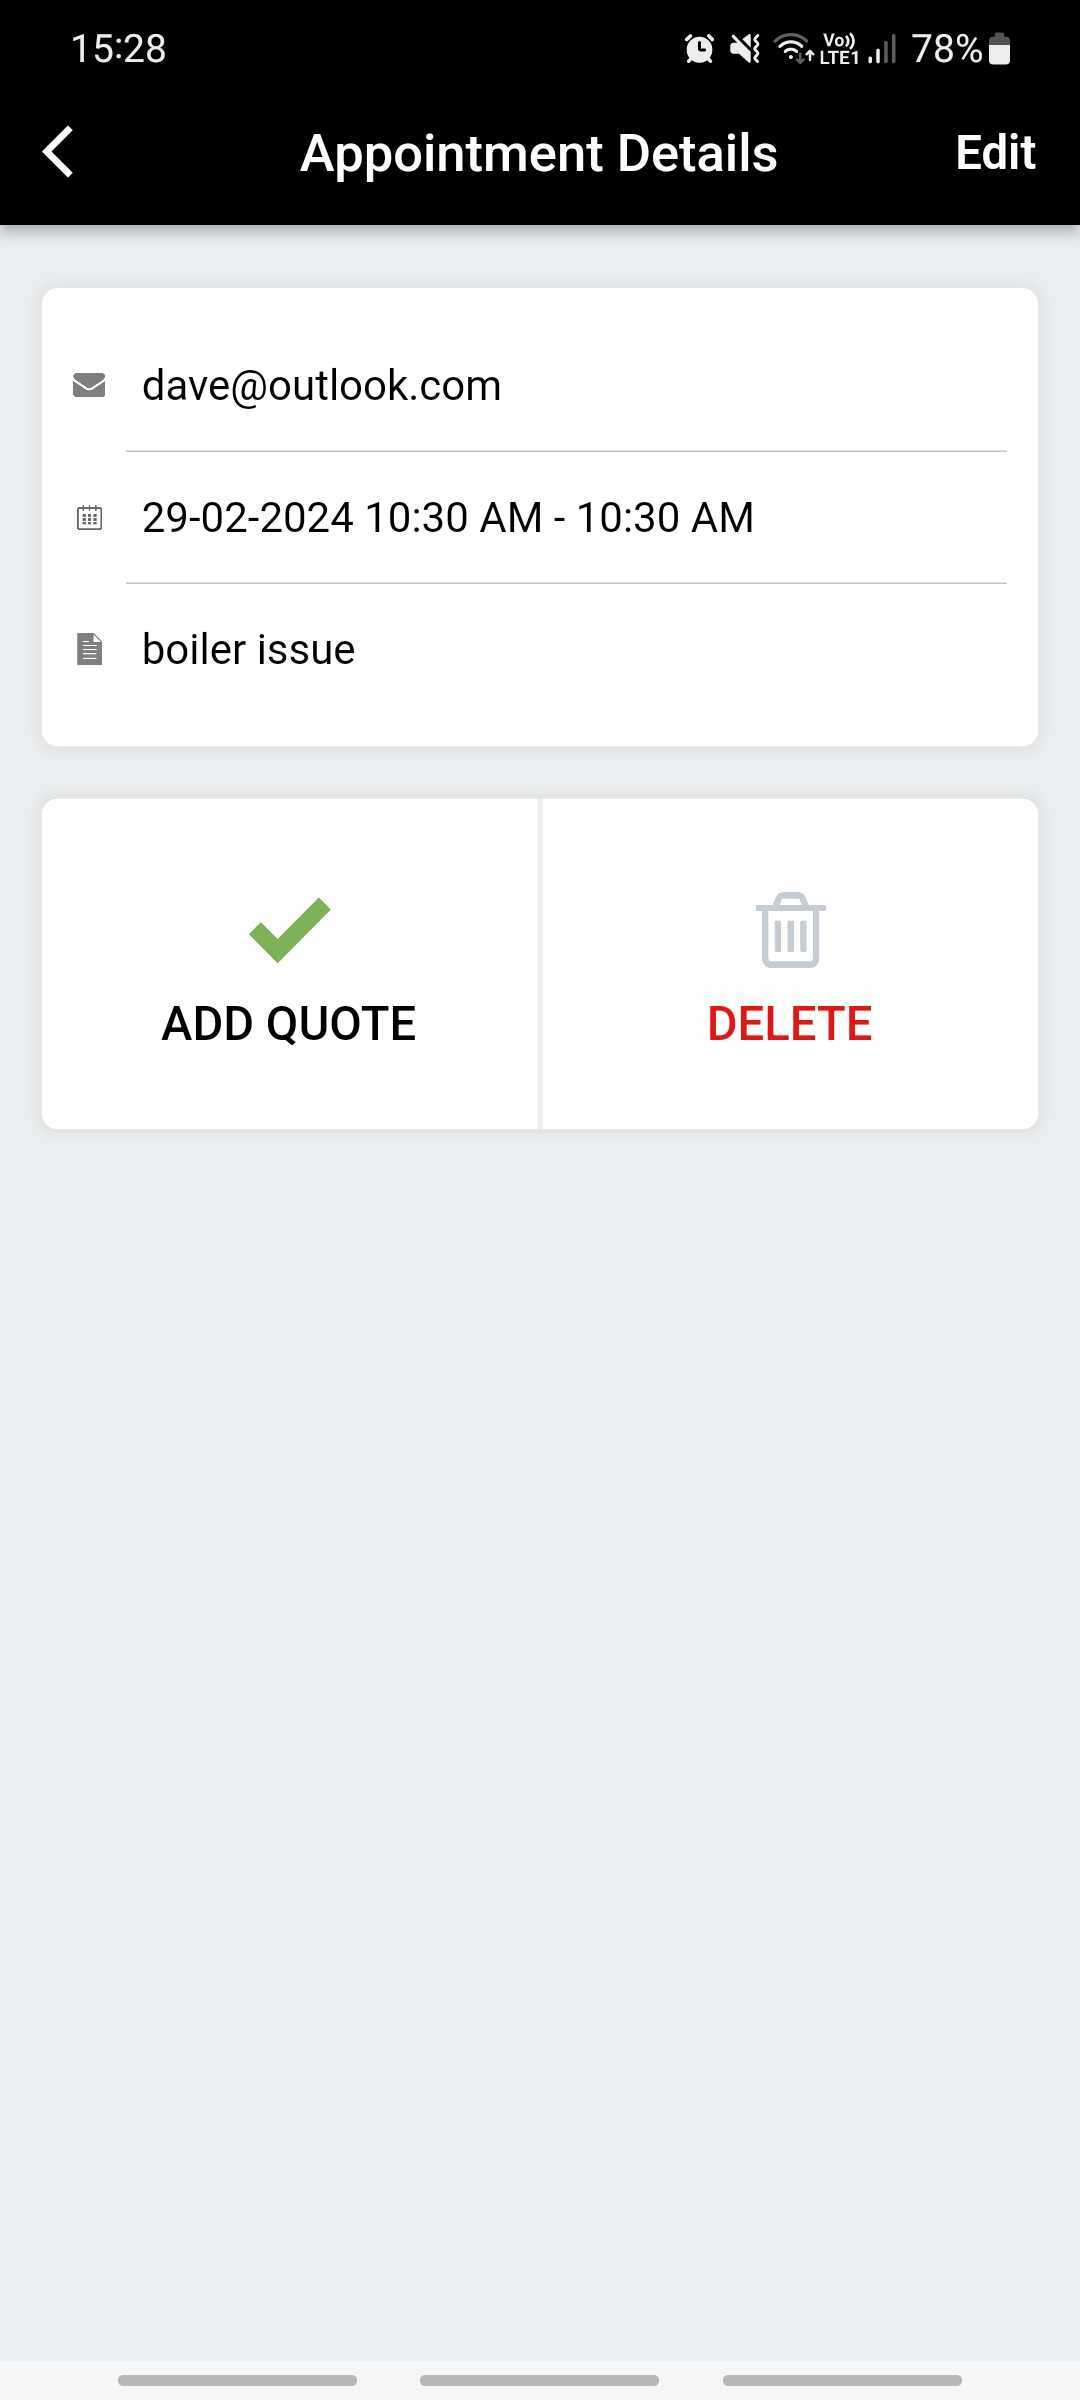
On this screen, you can add the client’s information and a description of the issue.
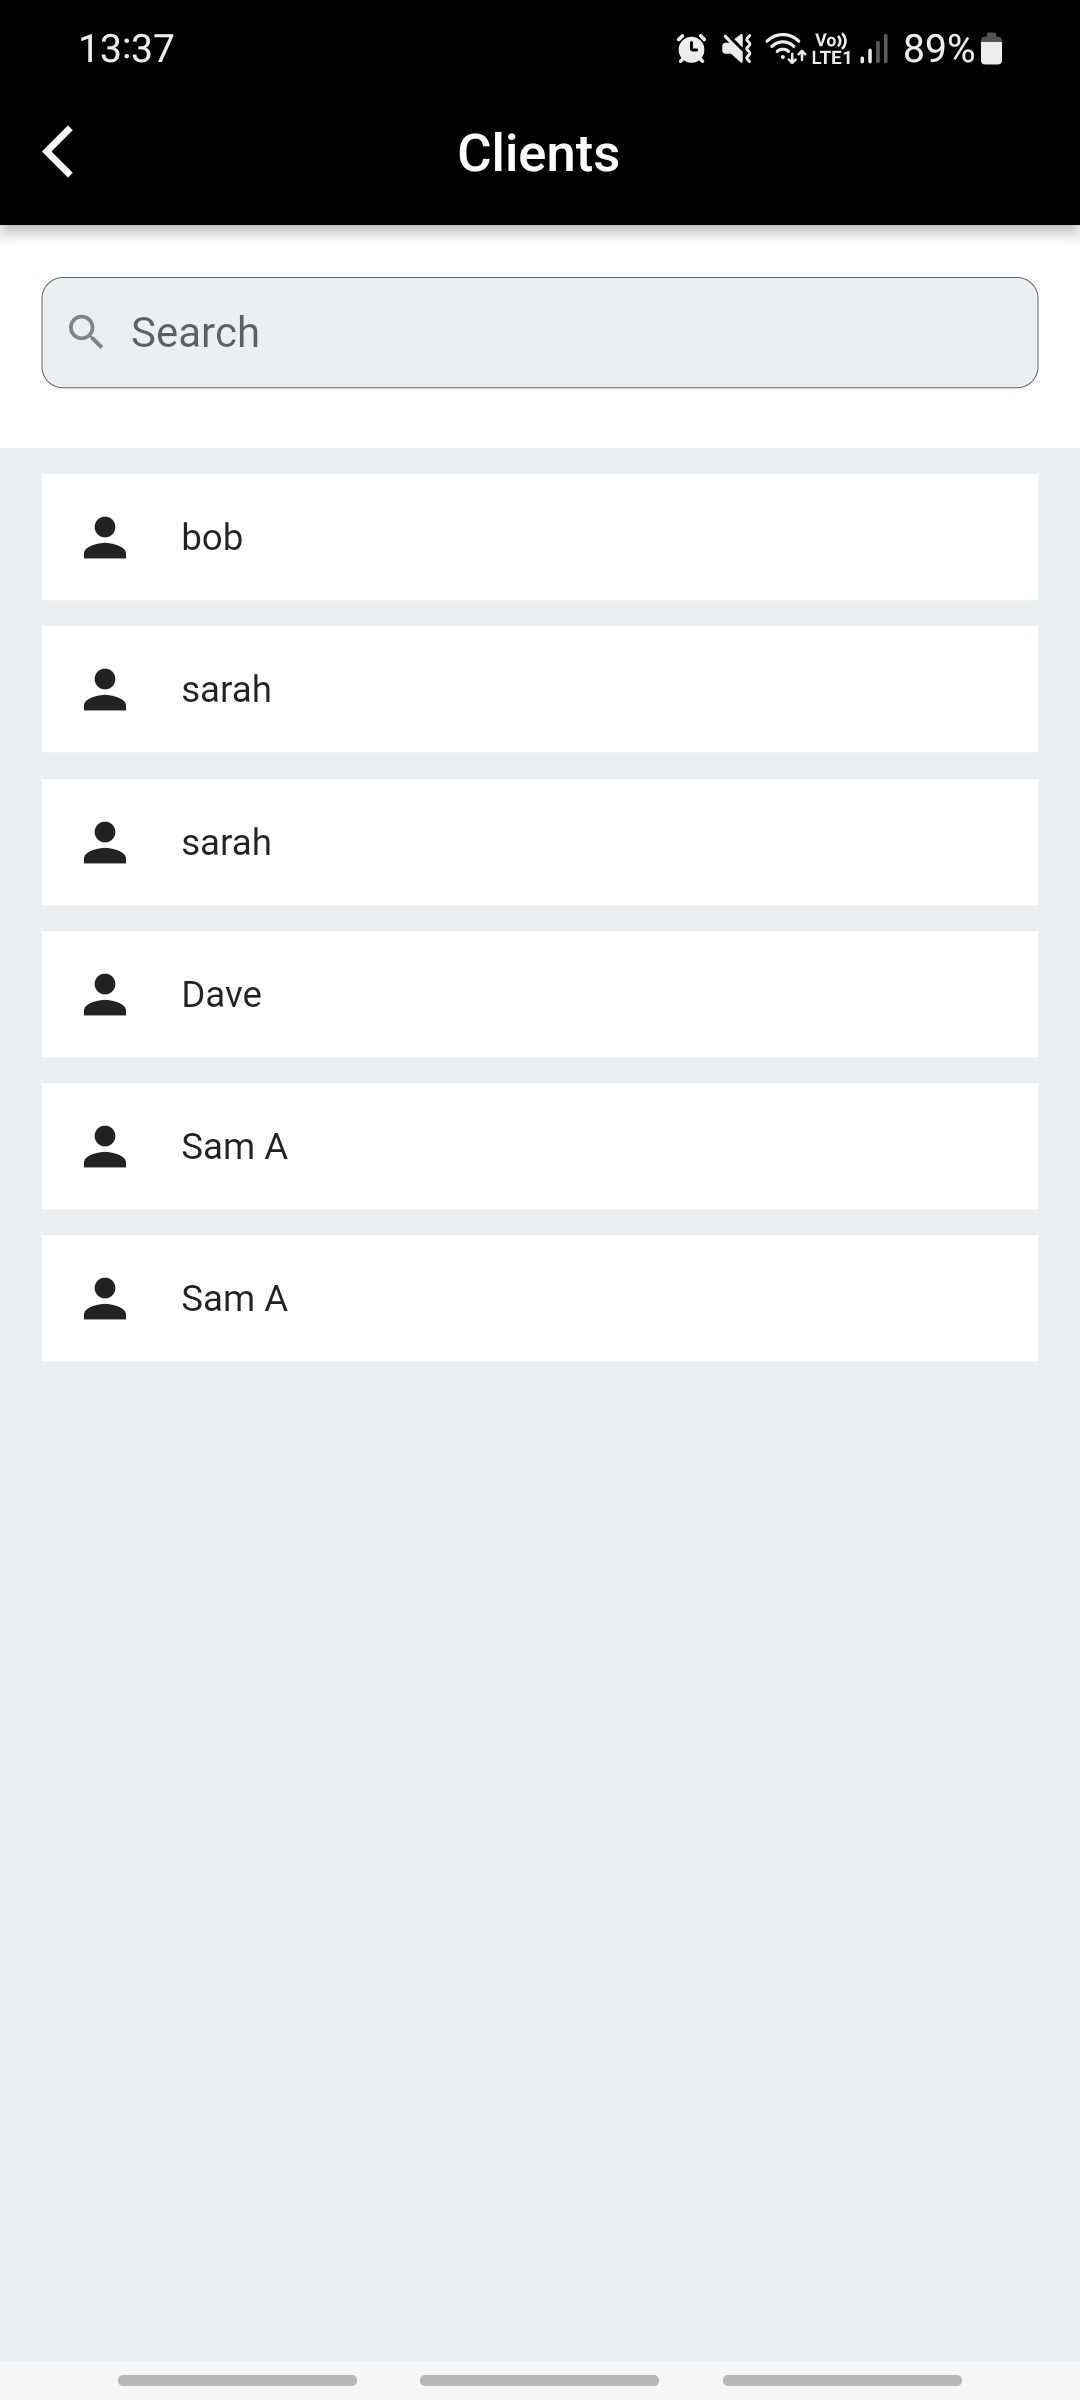
When you enter new customer details and create an appointment, the system will automatically save the contact information. Next time you want to create an appointment, you can click the search icon to choose from your list, rather than entering the data again.
You can then confirm the date and start/end time before choosing ‘Create New Appointment’
Quotes
You can either add a quote from an appointment by clicking the tick, or by going into the appointment record and clicking Add Quote
Alternatively, you can click Build Quote from your main dashboard page
If you are choosing to build a quote from your dashboard, you will firstly need to enter the contact information and issue description. (If you add a quote from the initial appointment, these details will be filled in already and the app will skip this process)
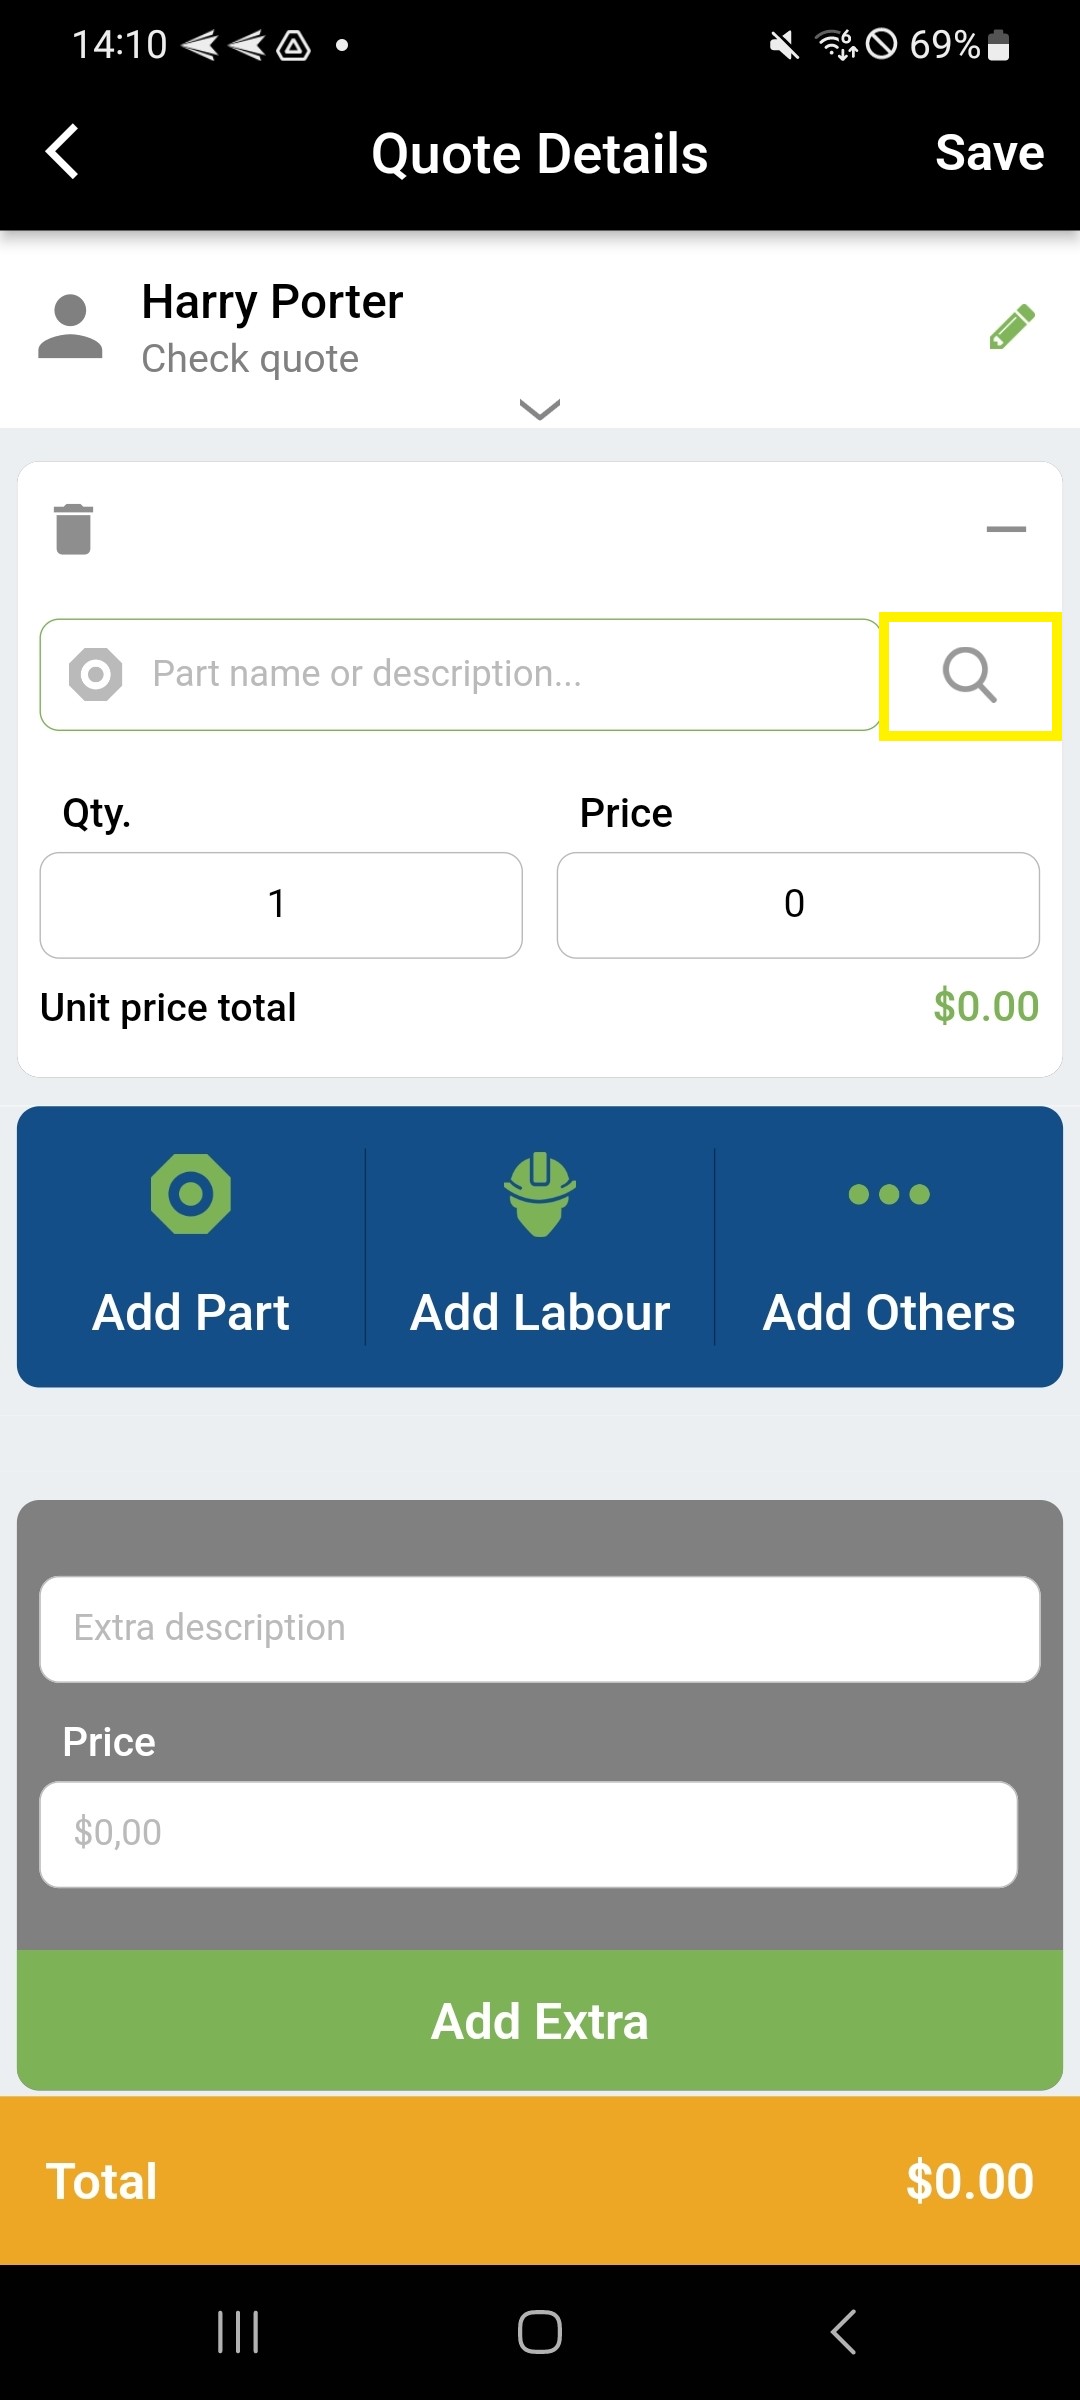
You will then be transferred to your Quote Details page
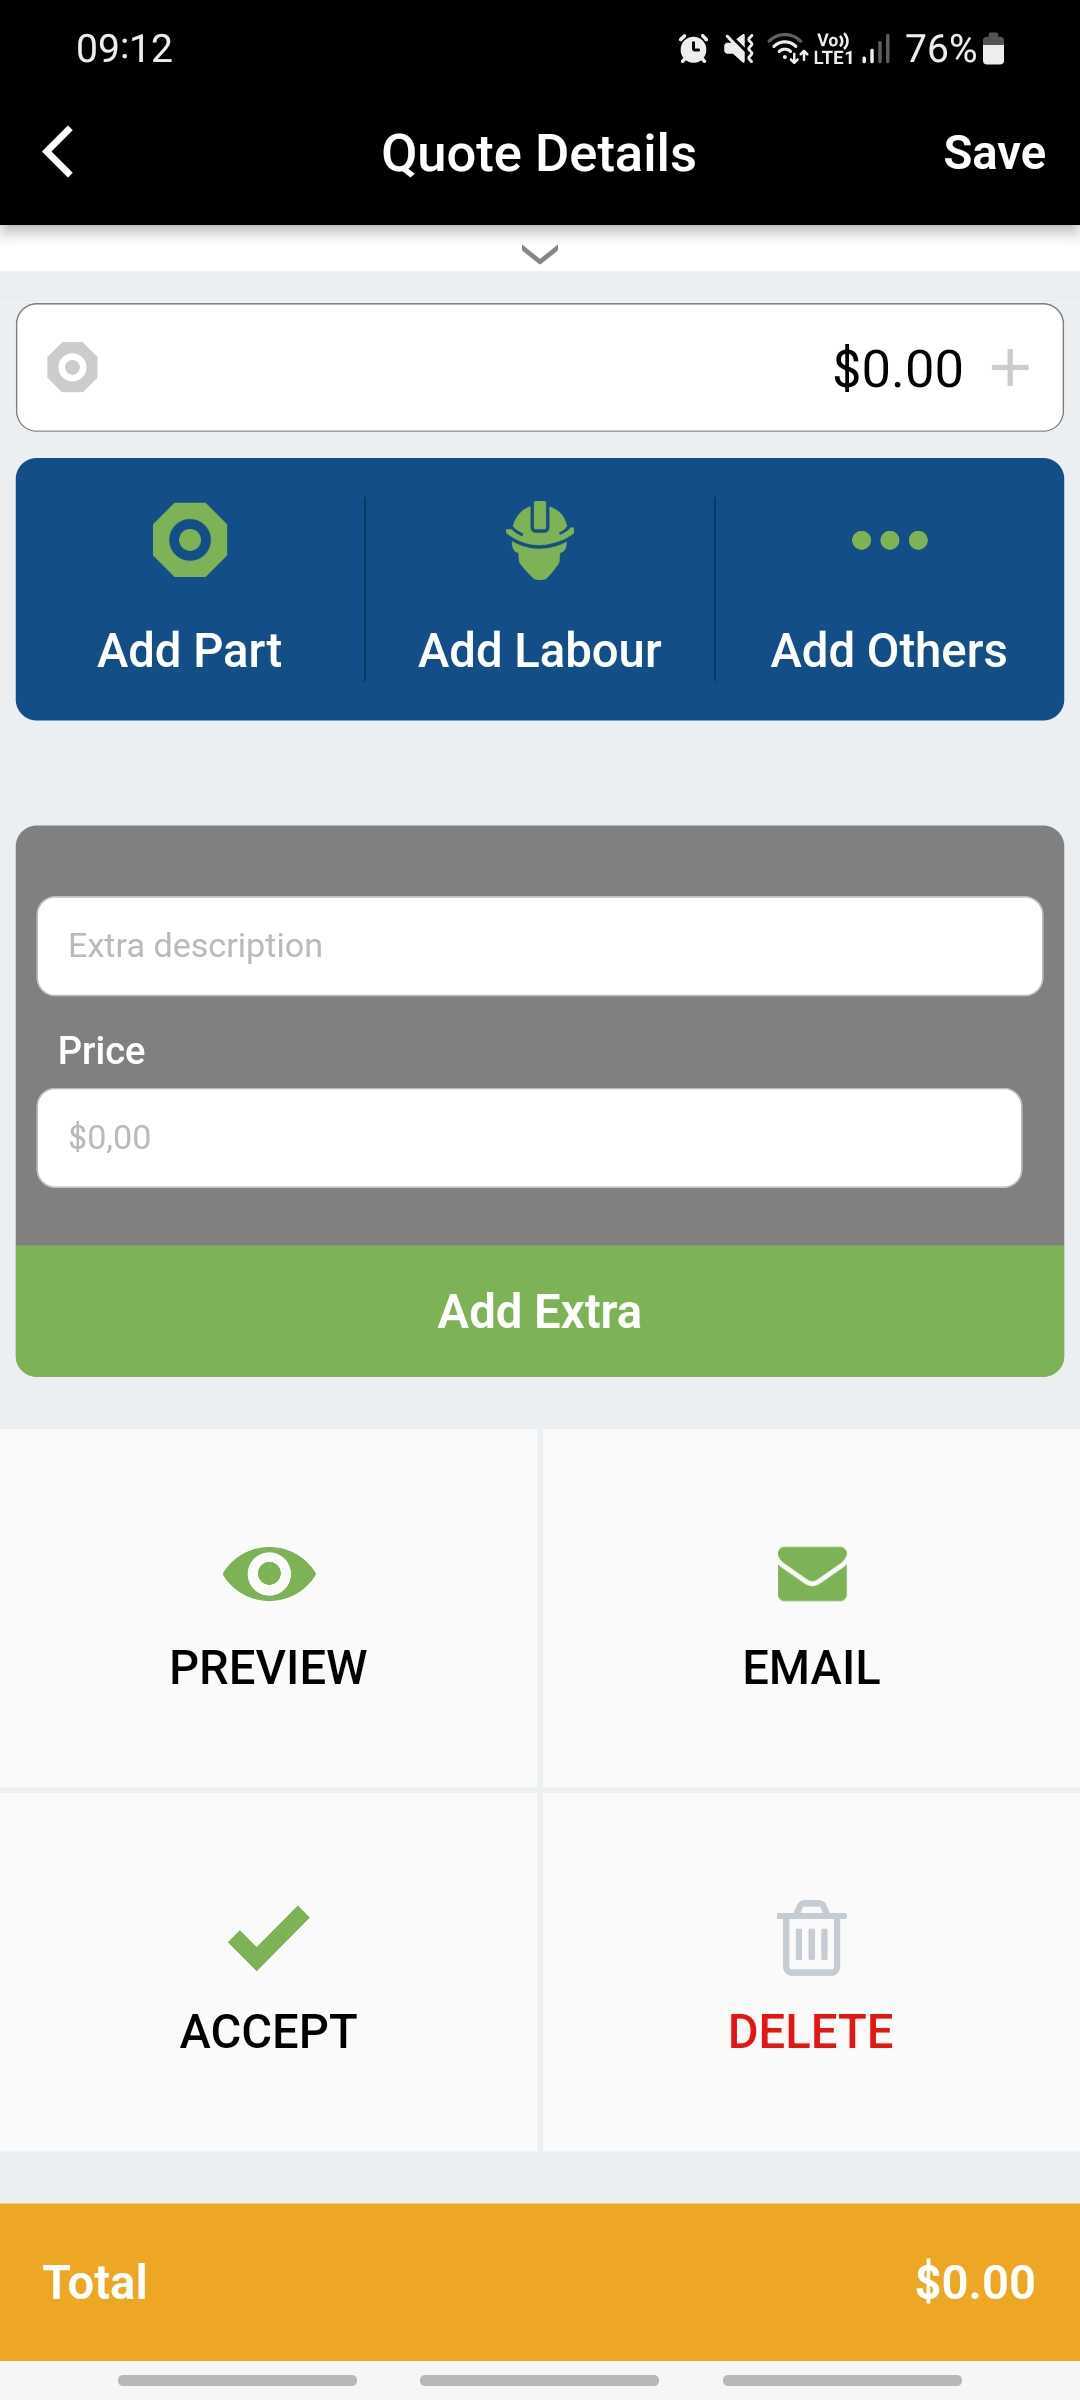
Here, you can add Parts, Labour costs or Other items if necessary.
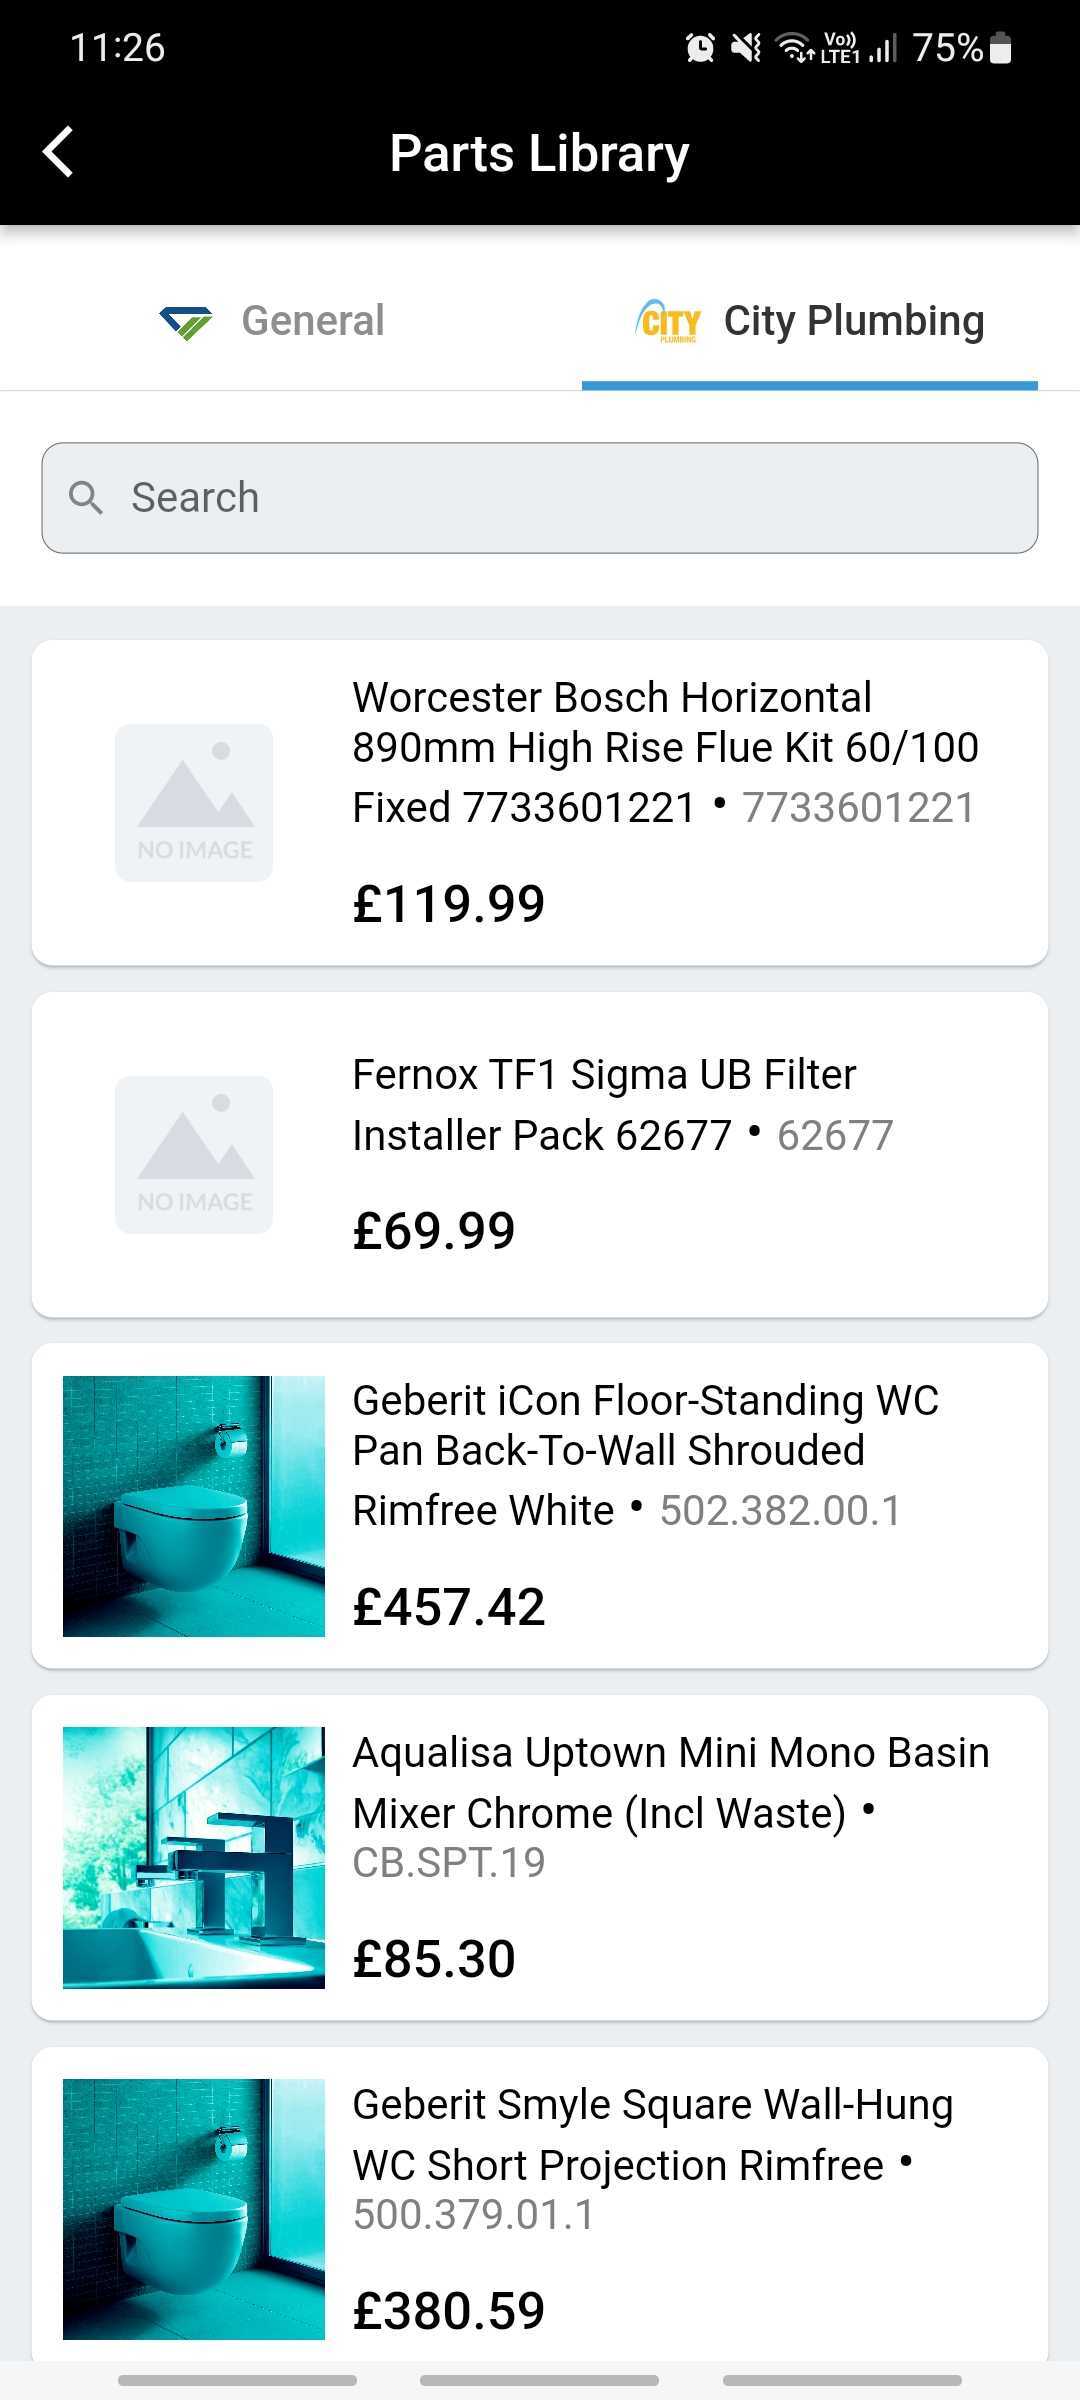
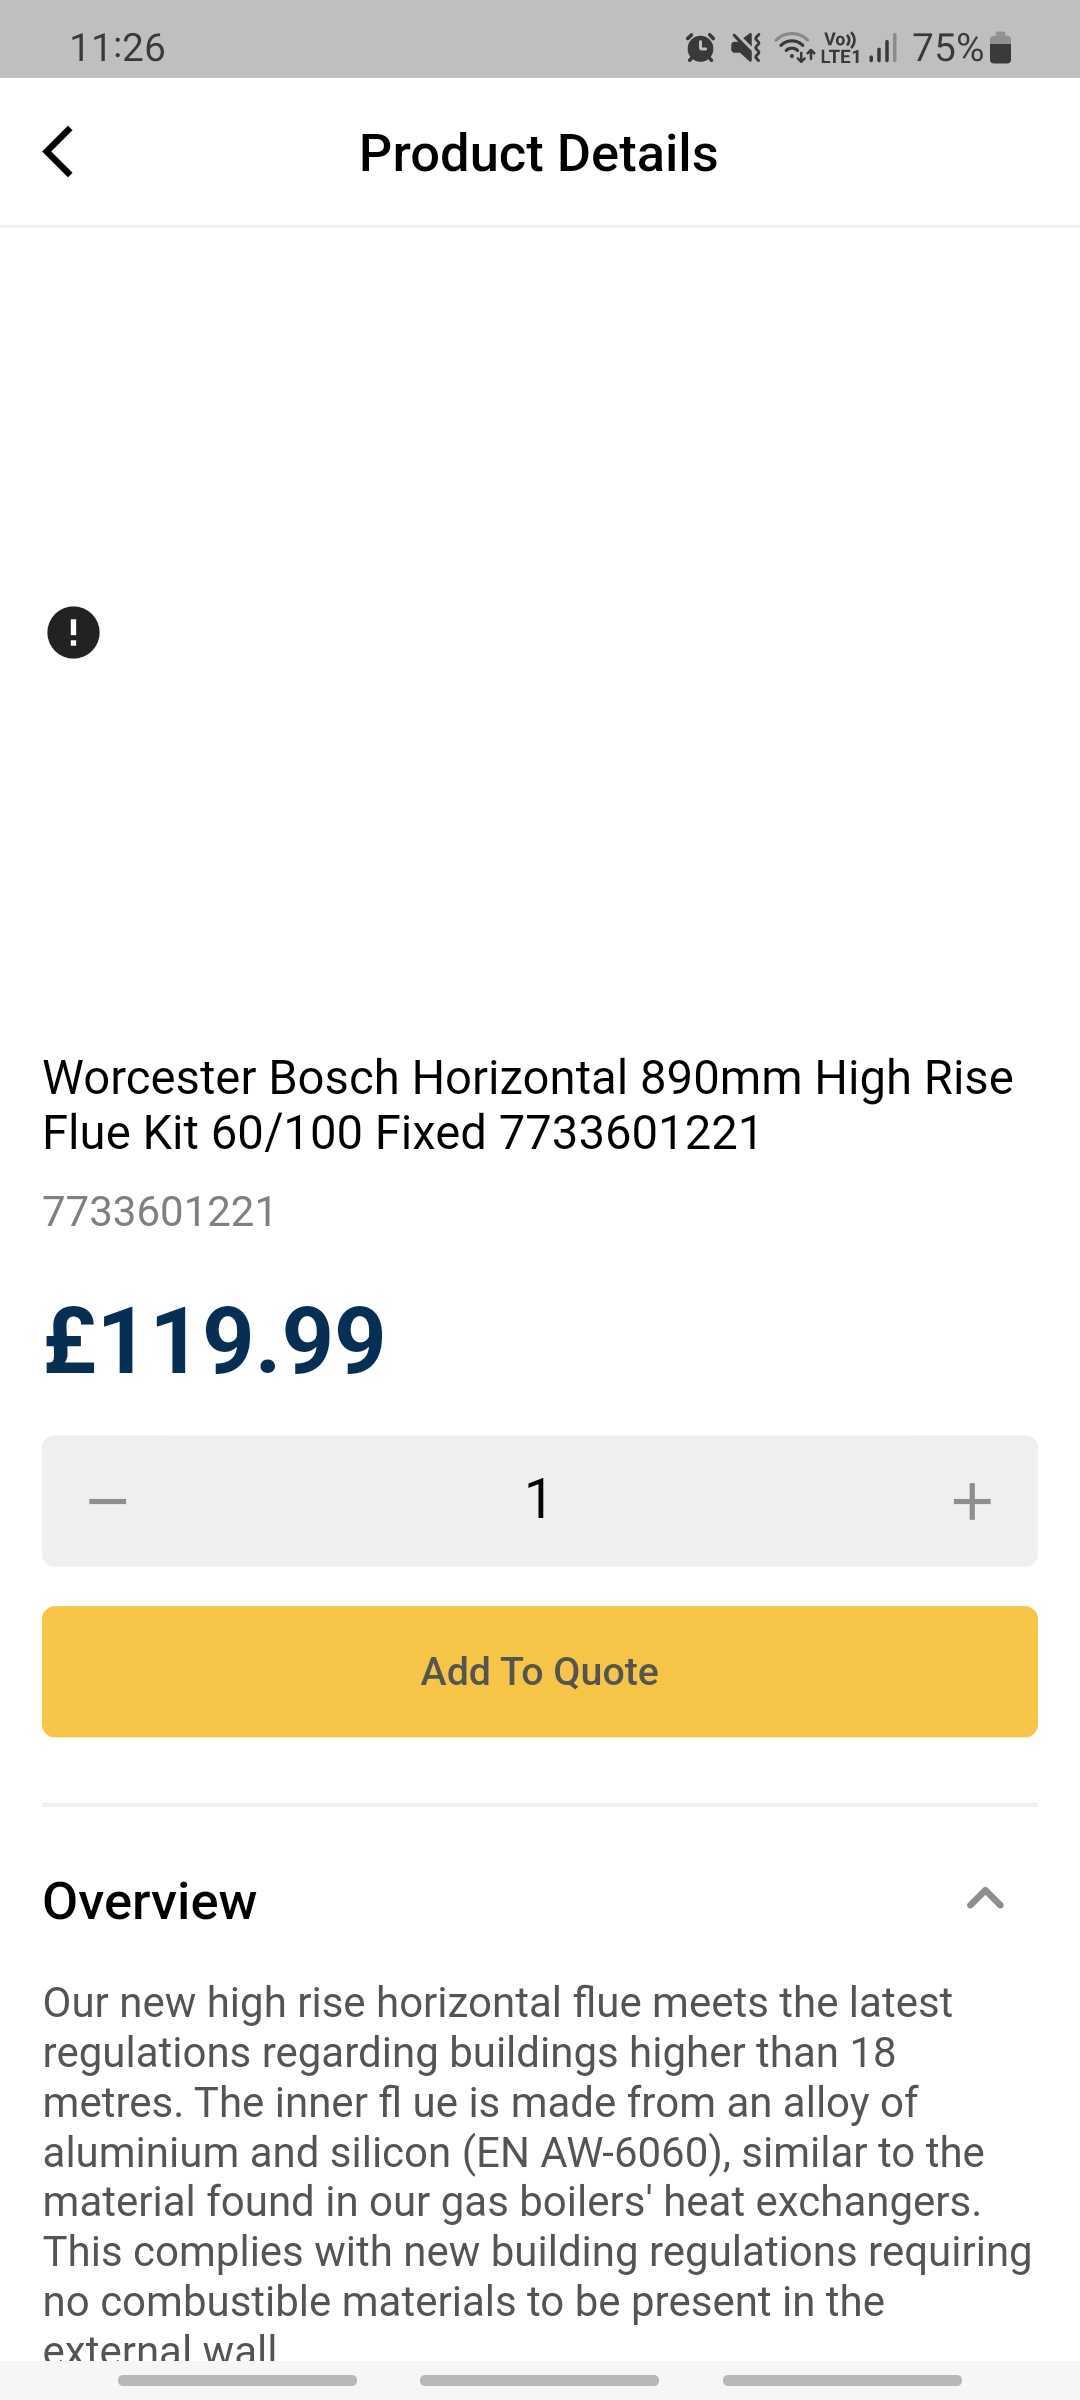
Similar to the contact list, you can select the search icon to choose from your previous listed parts, or to choose from the City Plumbing website (if you have set up your account via Settings)
To select a City Plumbing part, click the relevant item and you’ll be presented with the Product Details page, where you can amend the quantity if needed, and then click Add to Quote.
You can also add Extras for any optional offers you want to provide.
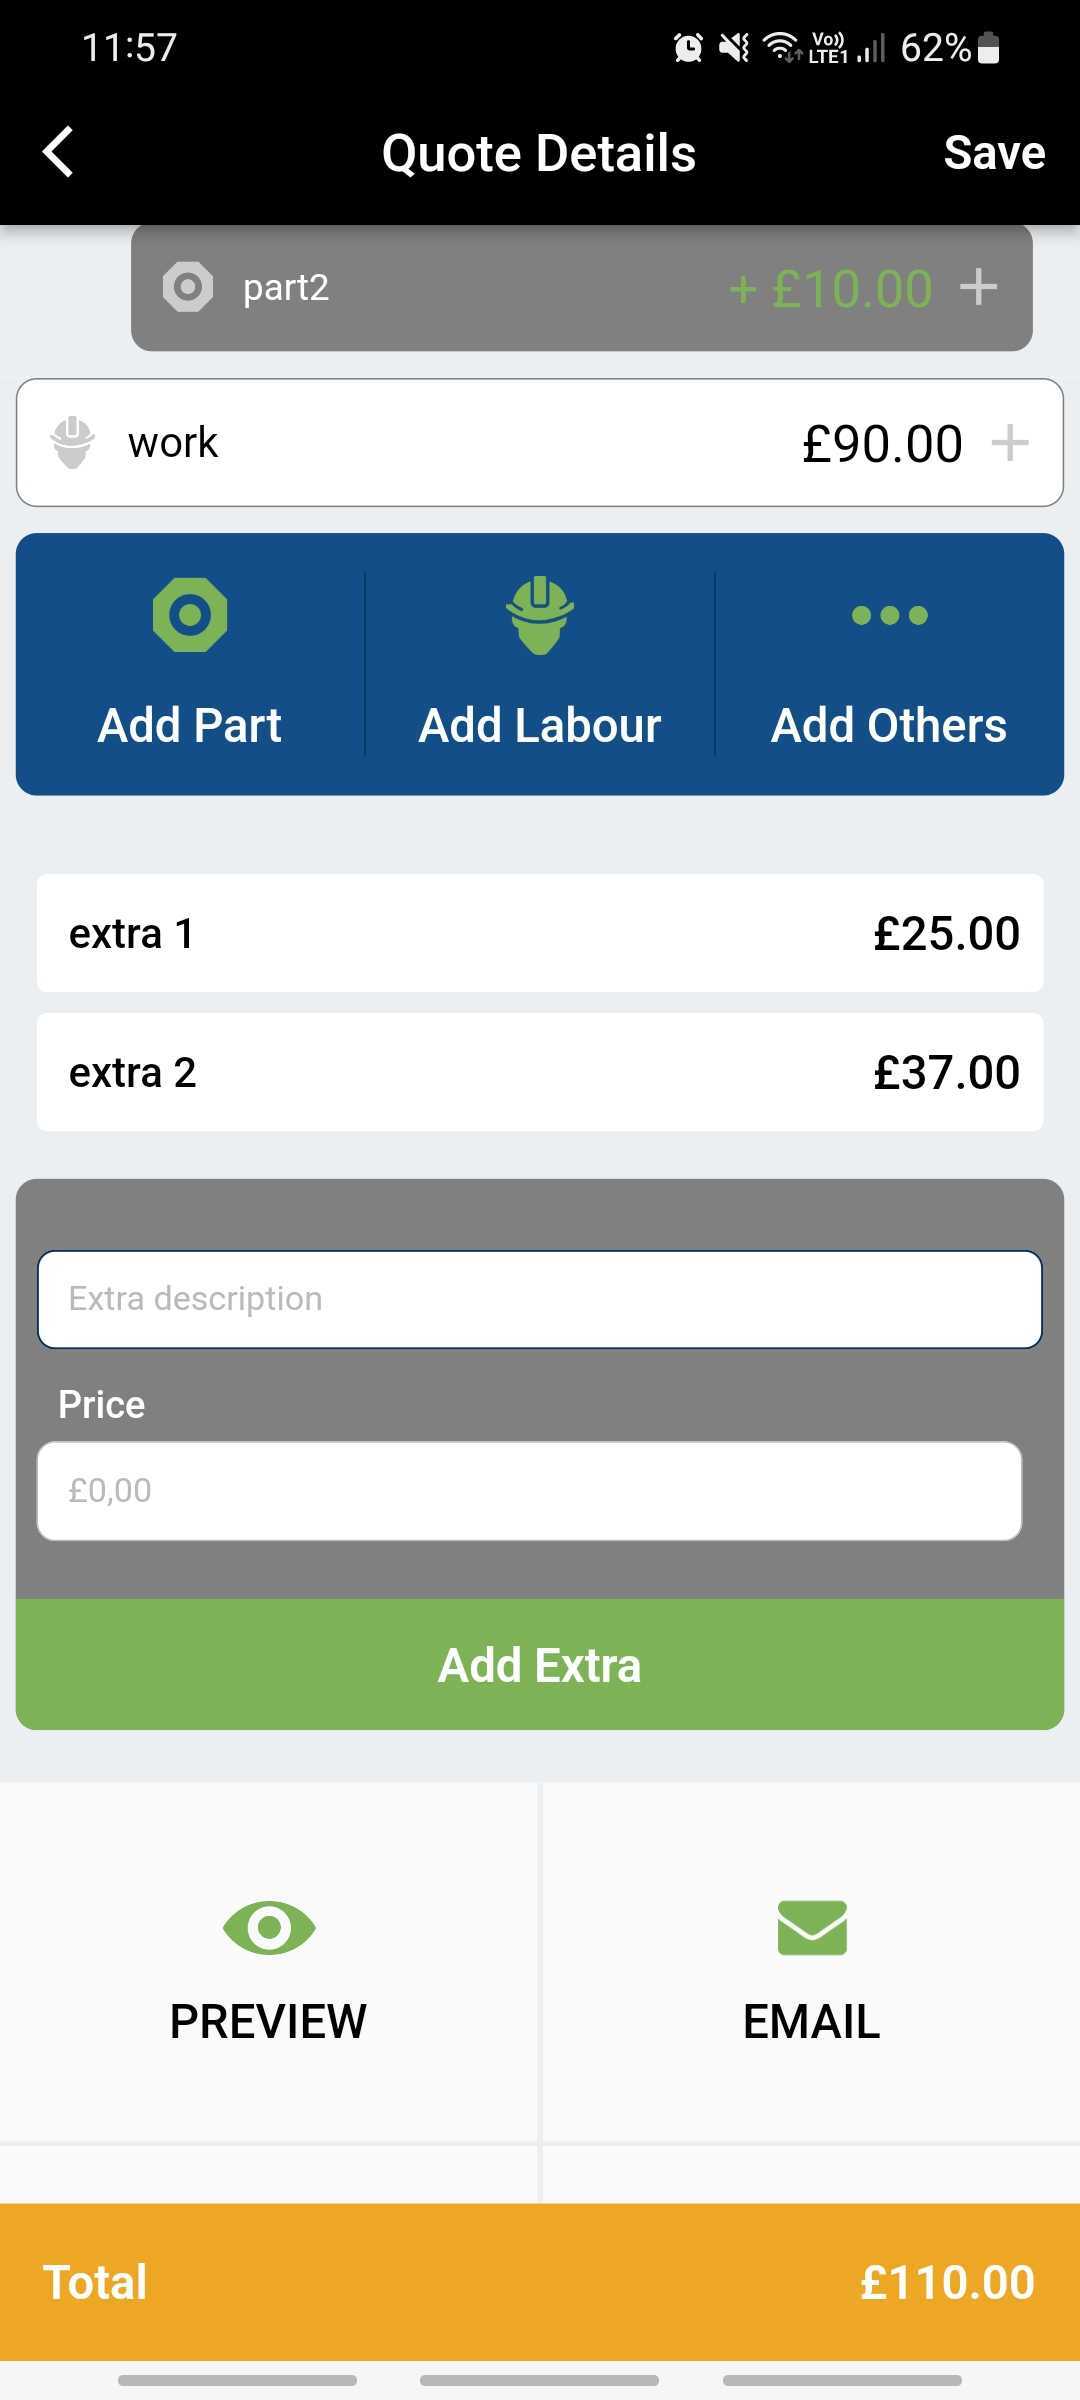
Finally, you have the option to Preview, Email, Accept and Delete
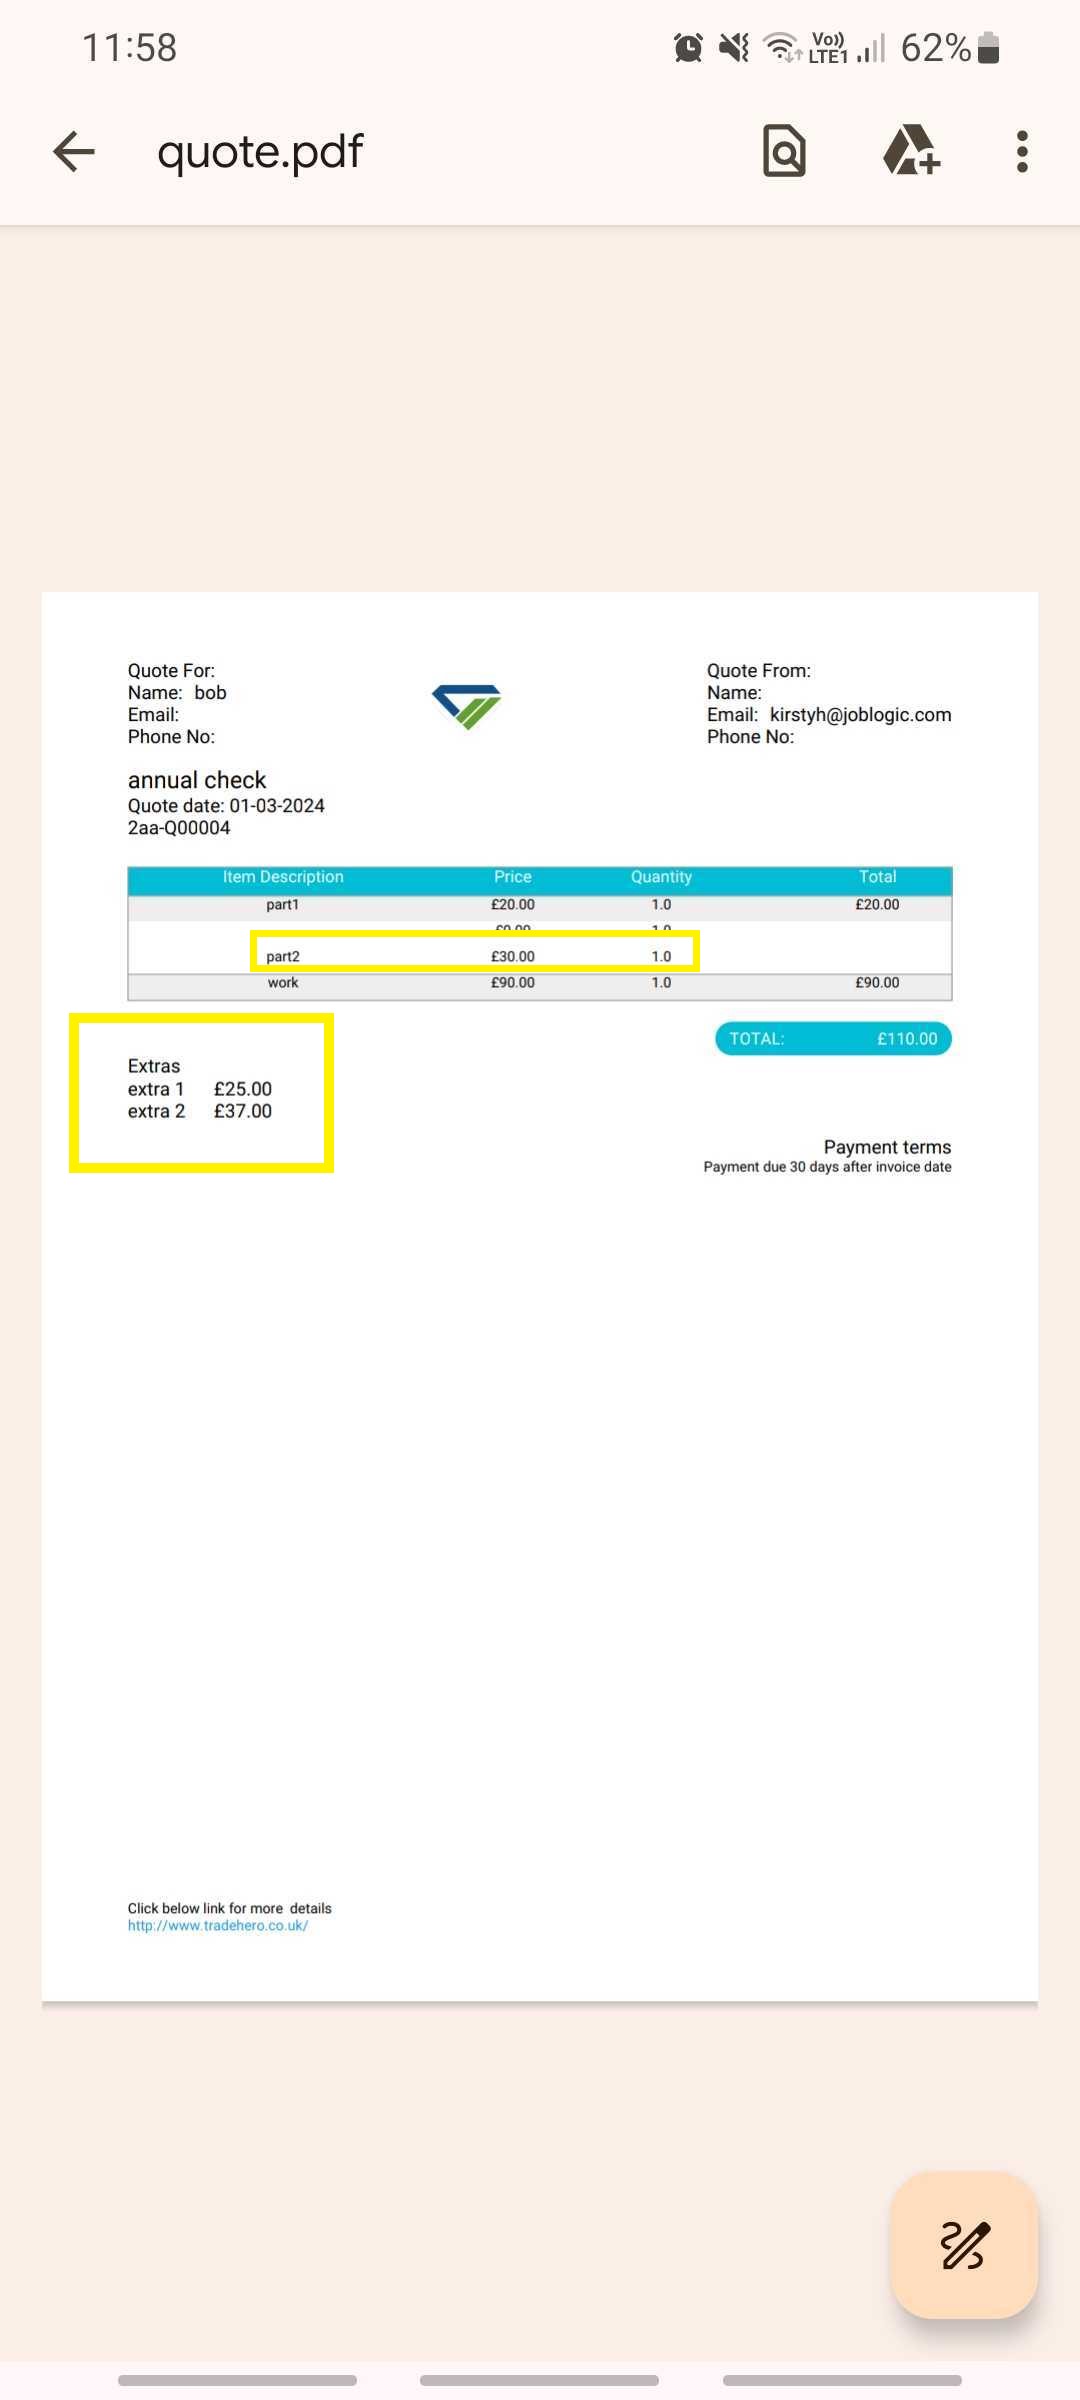
The preview option will open the quote template. You should be able to download or print from here should you need to.
The Extras will not be included in the overall total for your quote; however the prices will show for your customers reference should they wish to go ahead with any.
Alternatively, click Email to send the quote directly via your chosen email provider.
When it comes to Accepting the quote, you will then be able to select which parts they have chosen and any extras that were agreed upon.
Next, you can either choose to Accept the Quote, or Accept and Schedule.
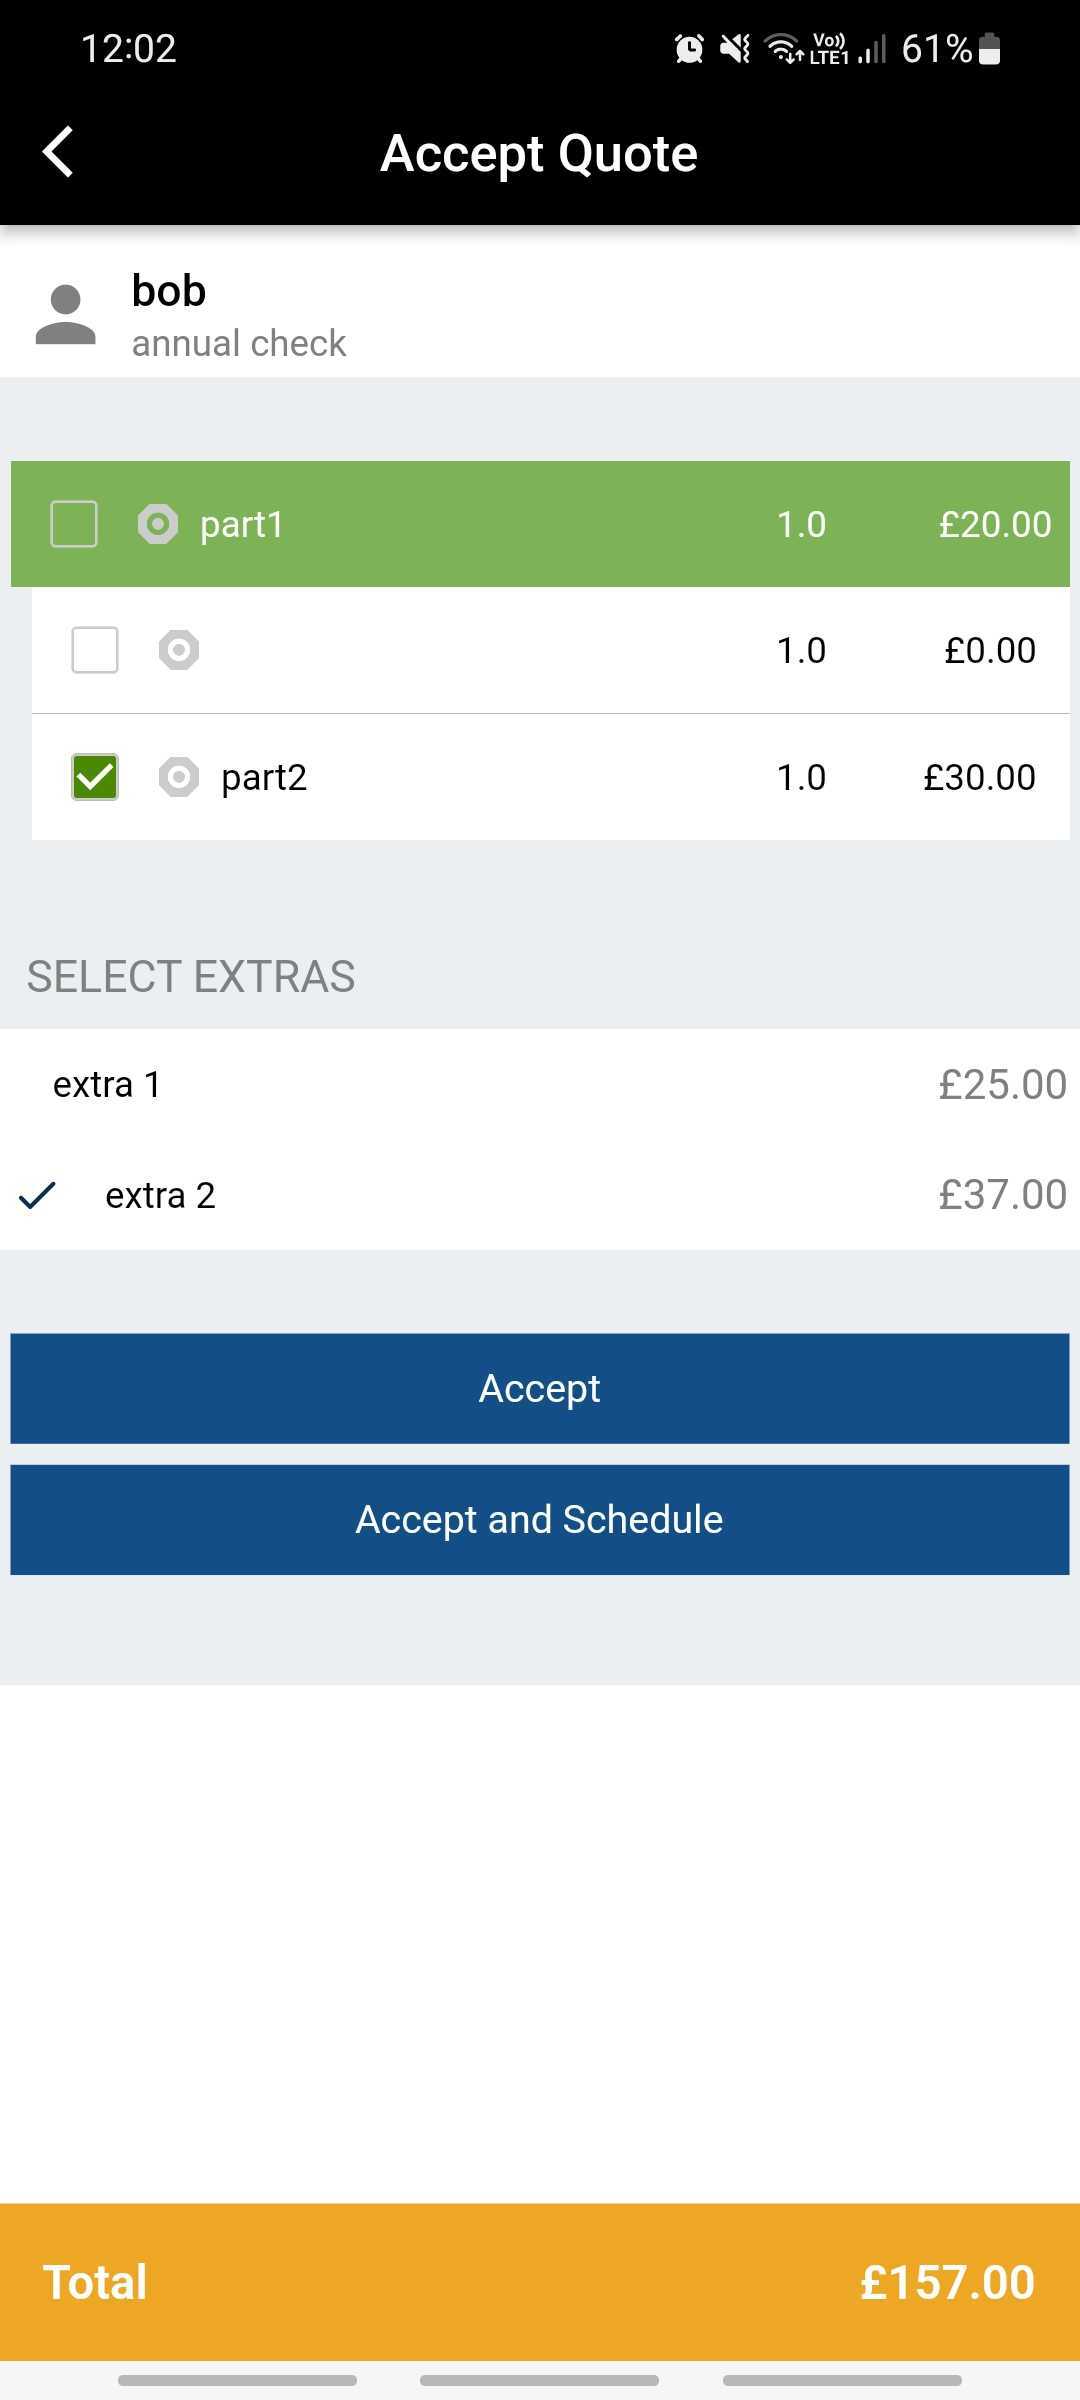
Accepting the quote moves it to your Jobs section, without a date or time associated with it.
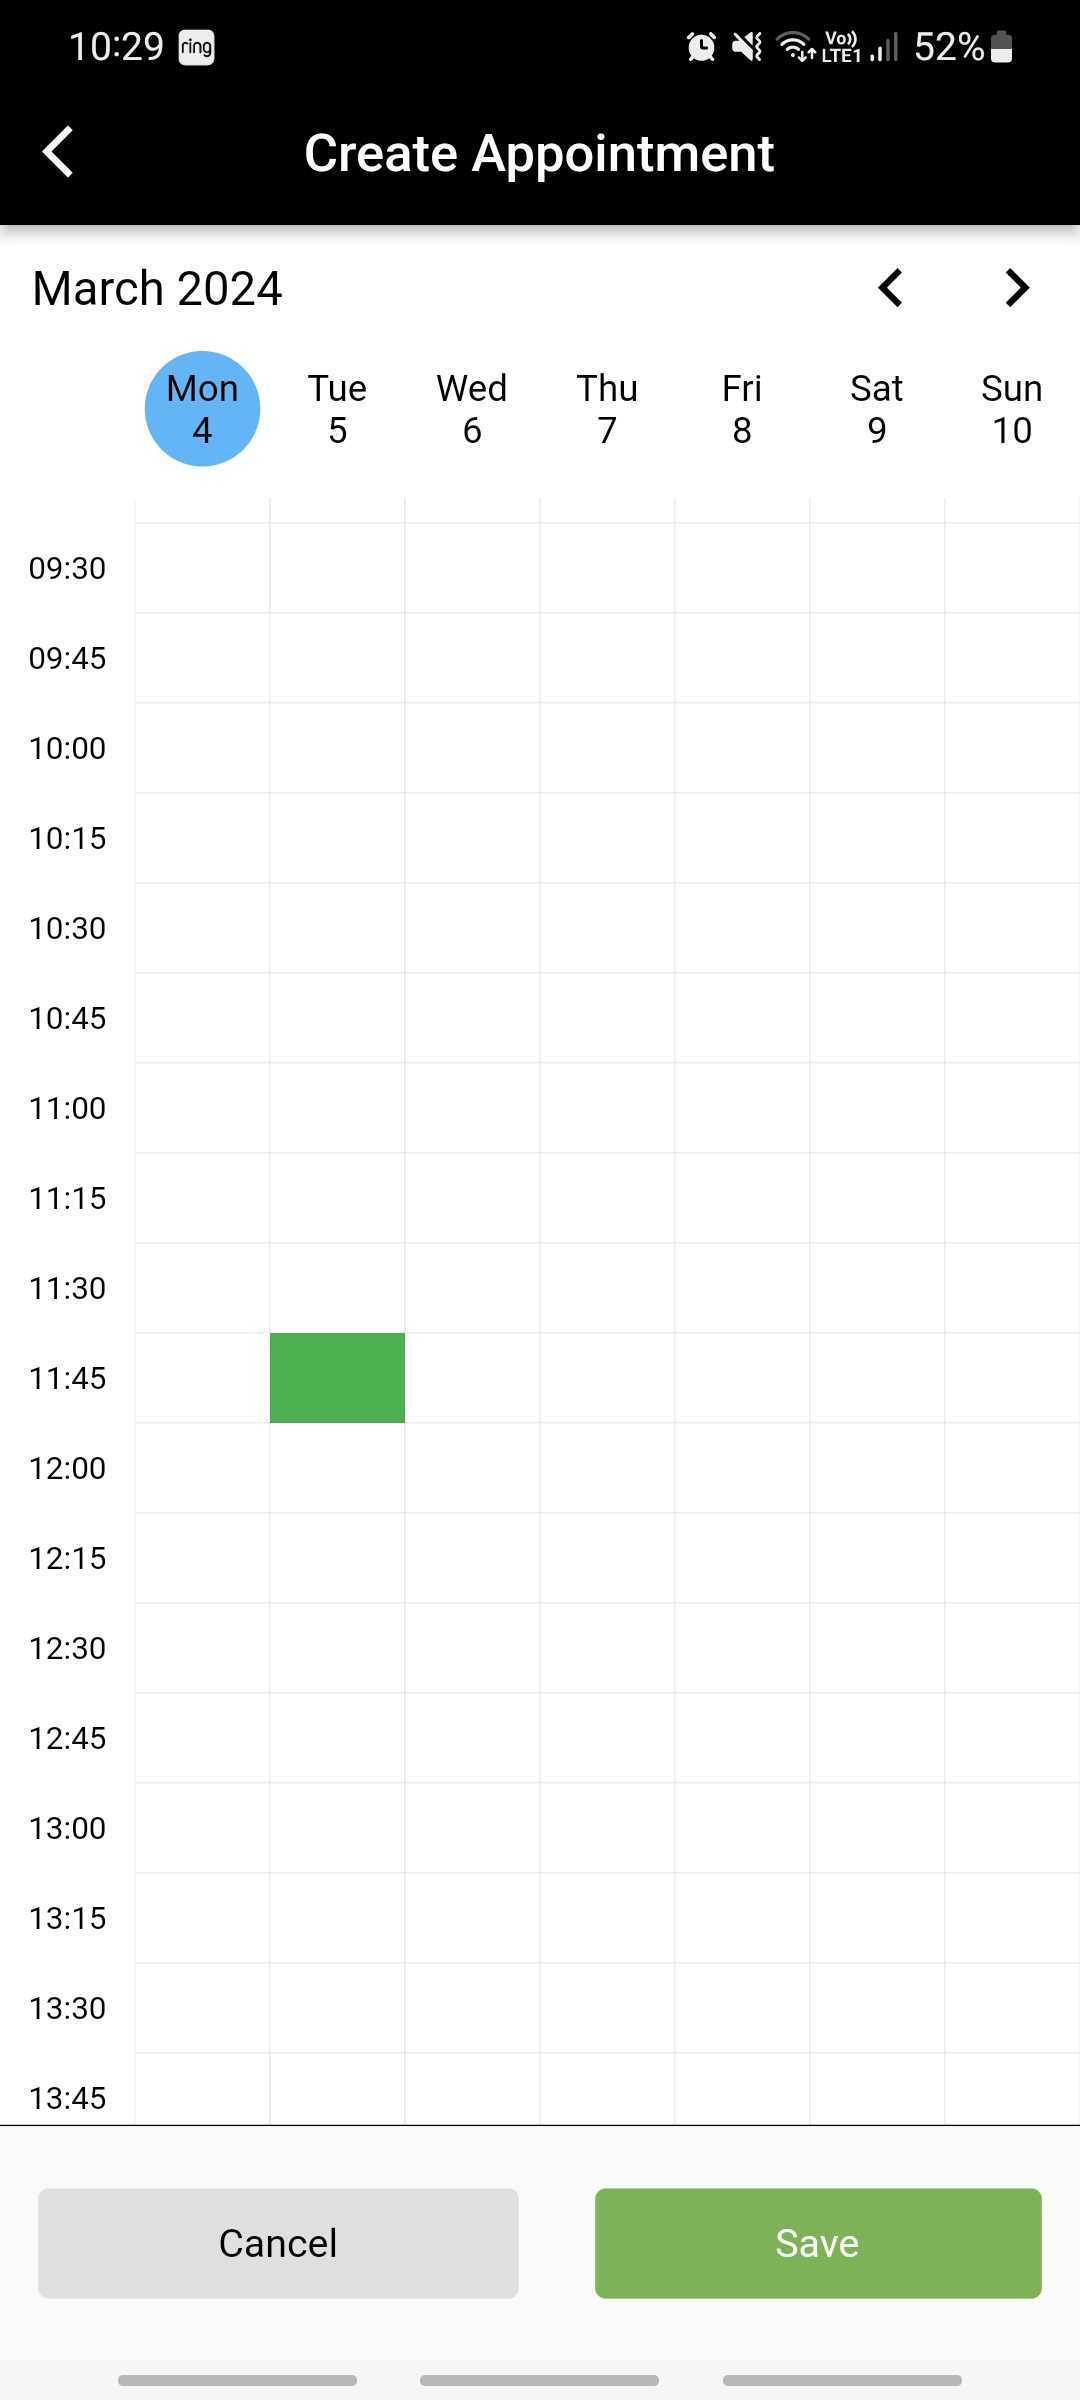
Accept & Schedule will take you to your planner, where you can choose a slot and click Save. This again will move it to your Jobs section.
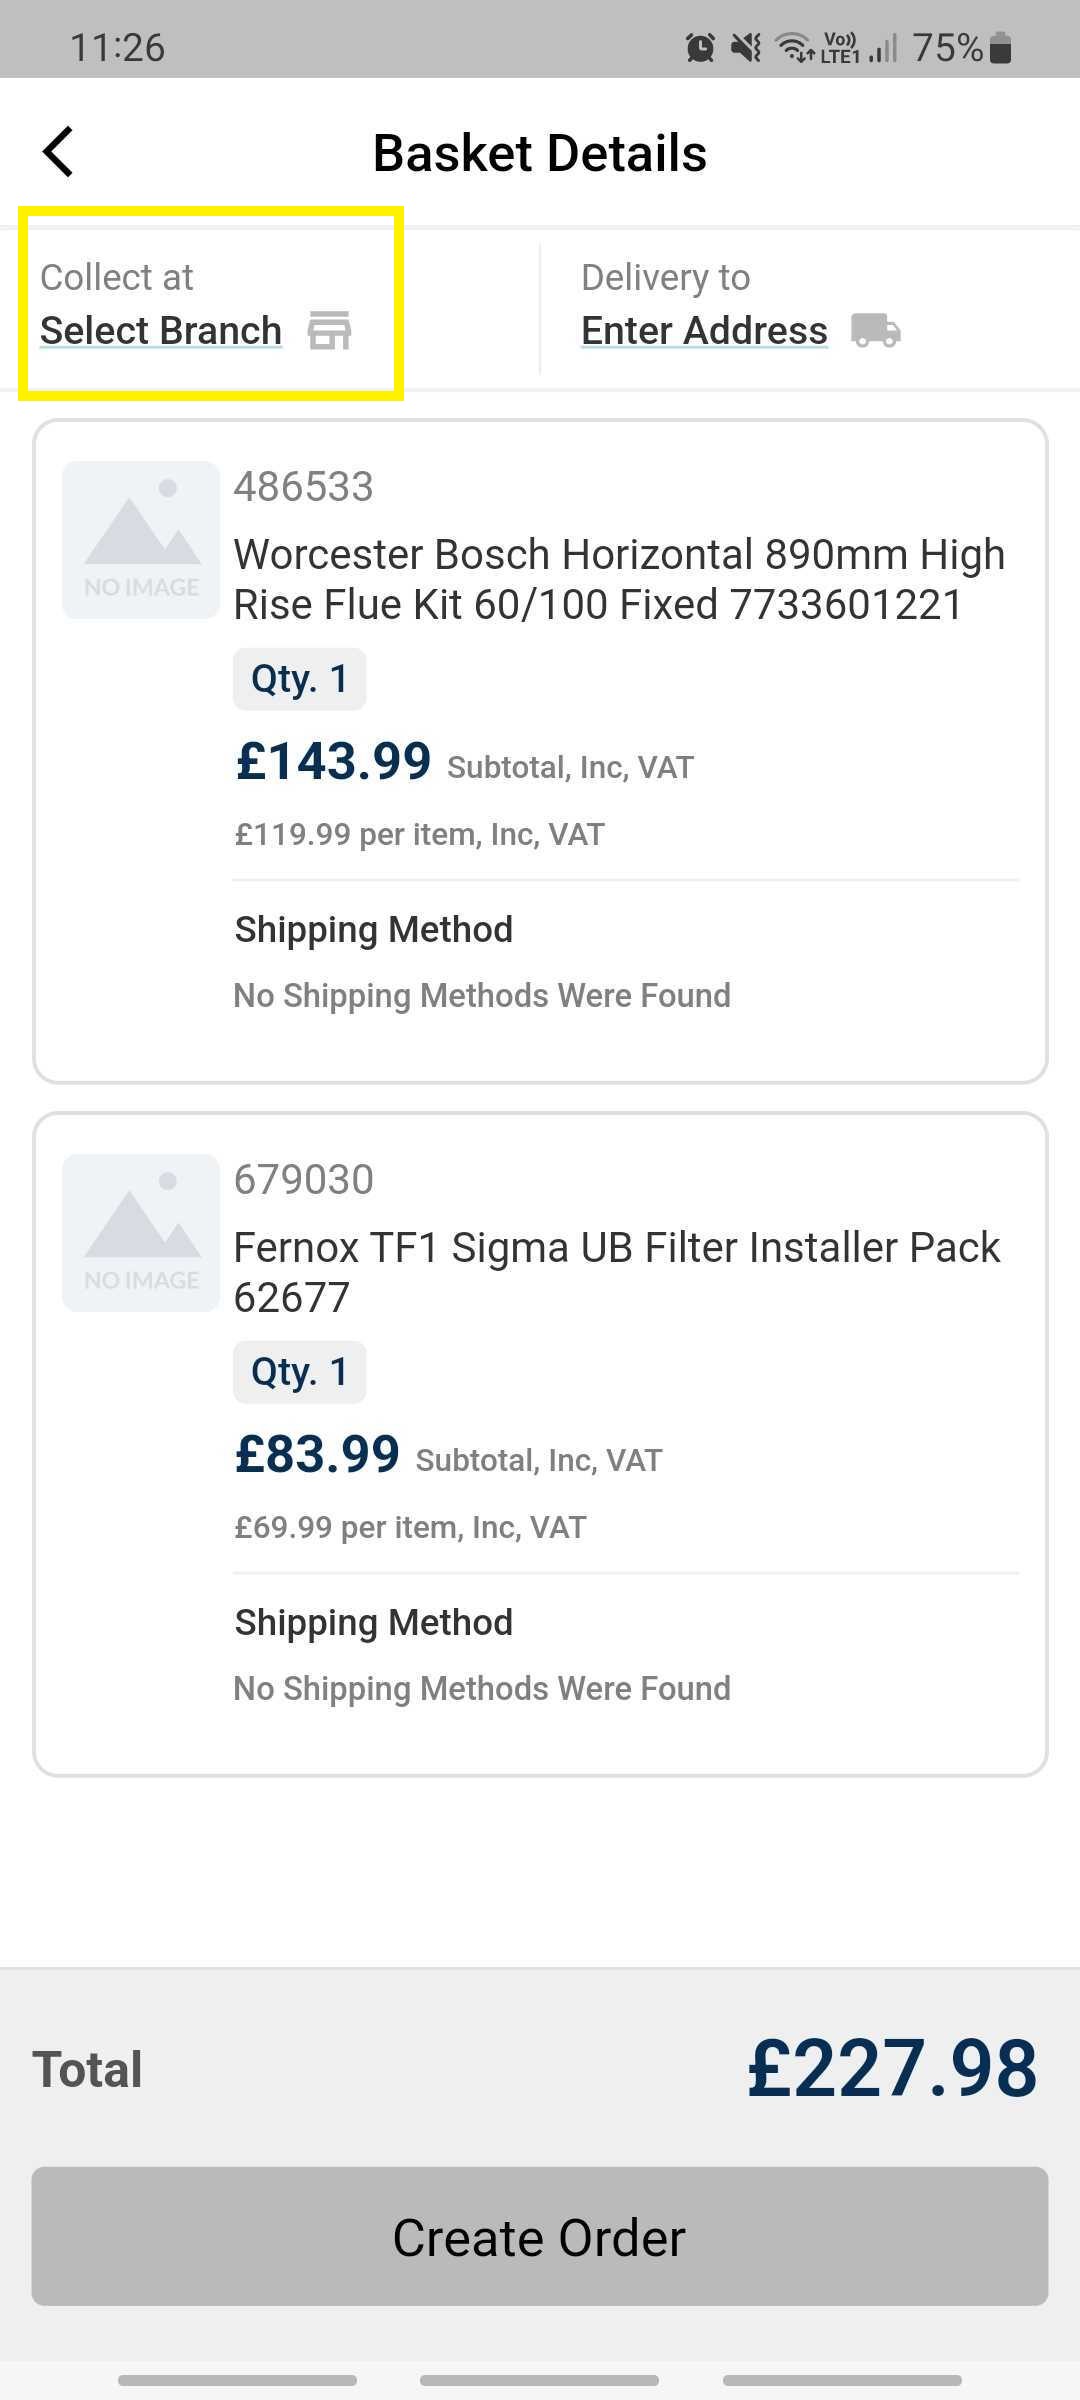
If you have chosen any City Plumbing parts, you will need to create this order. You’ll need to choose whether to collect it or have it delivered.
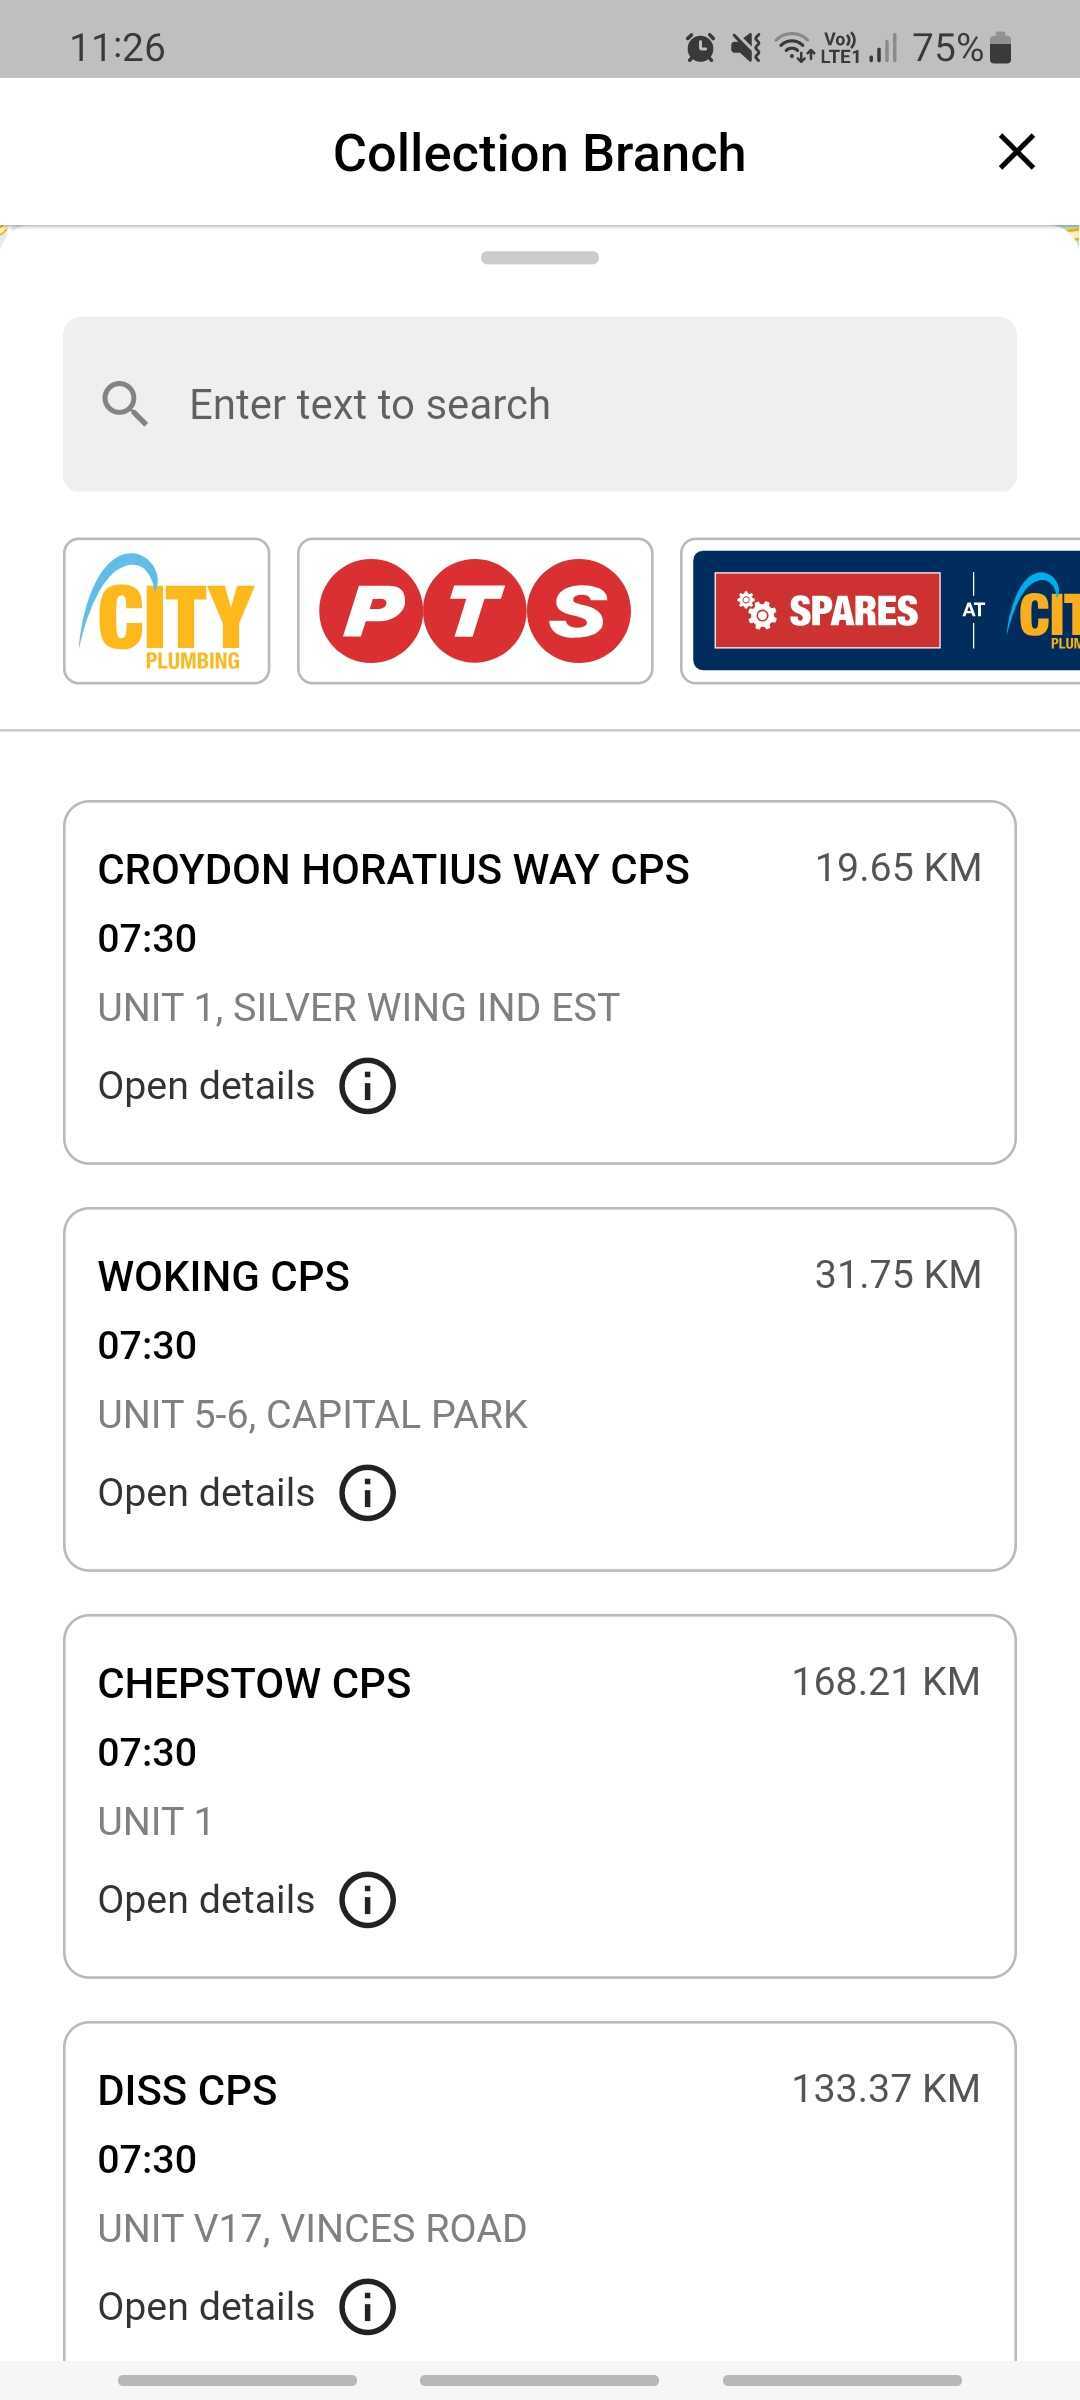
To choose a collection branch, click the Collect At option at the top
From here, use the Search box to type your city to filter your local branches and then click on your chosen branch.
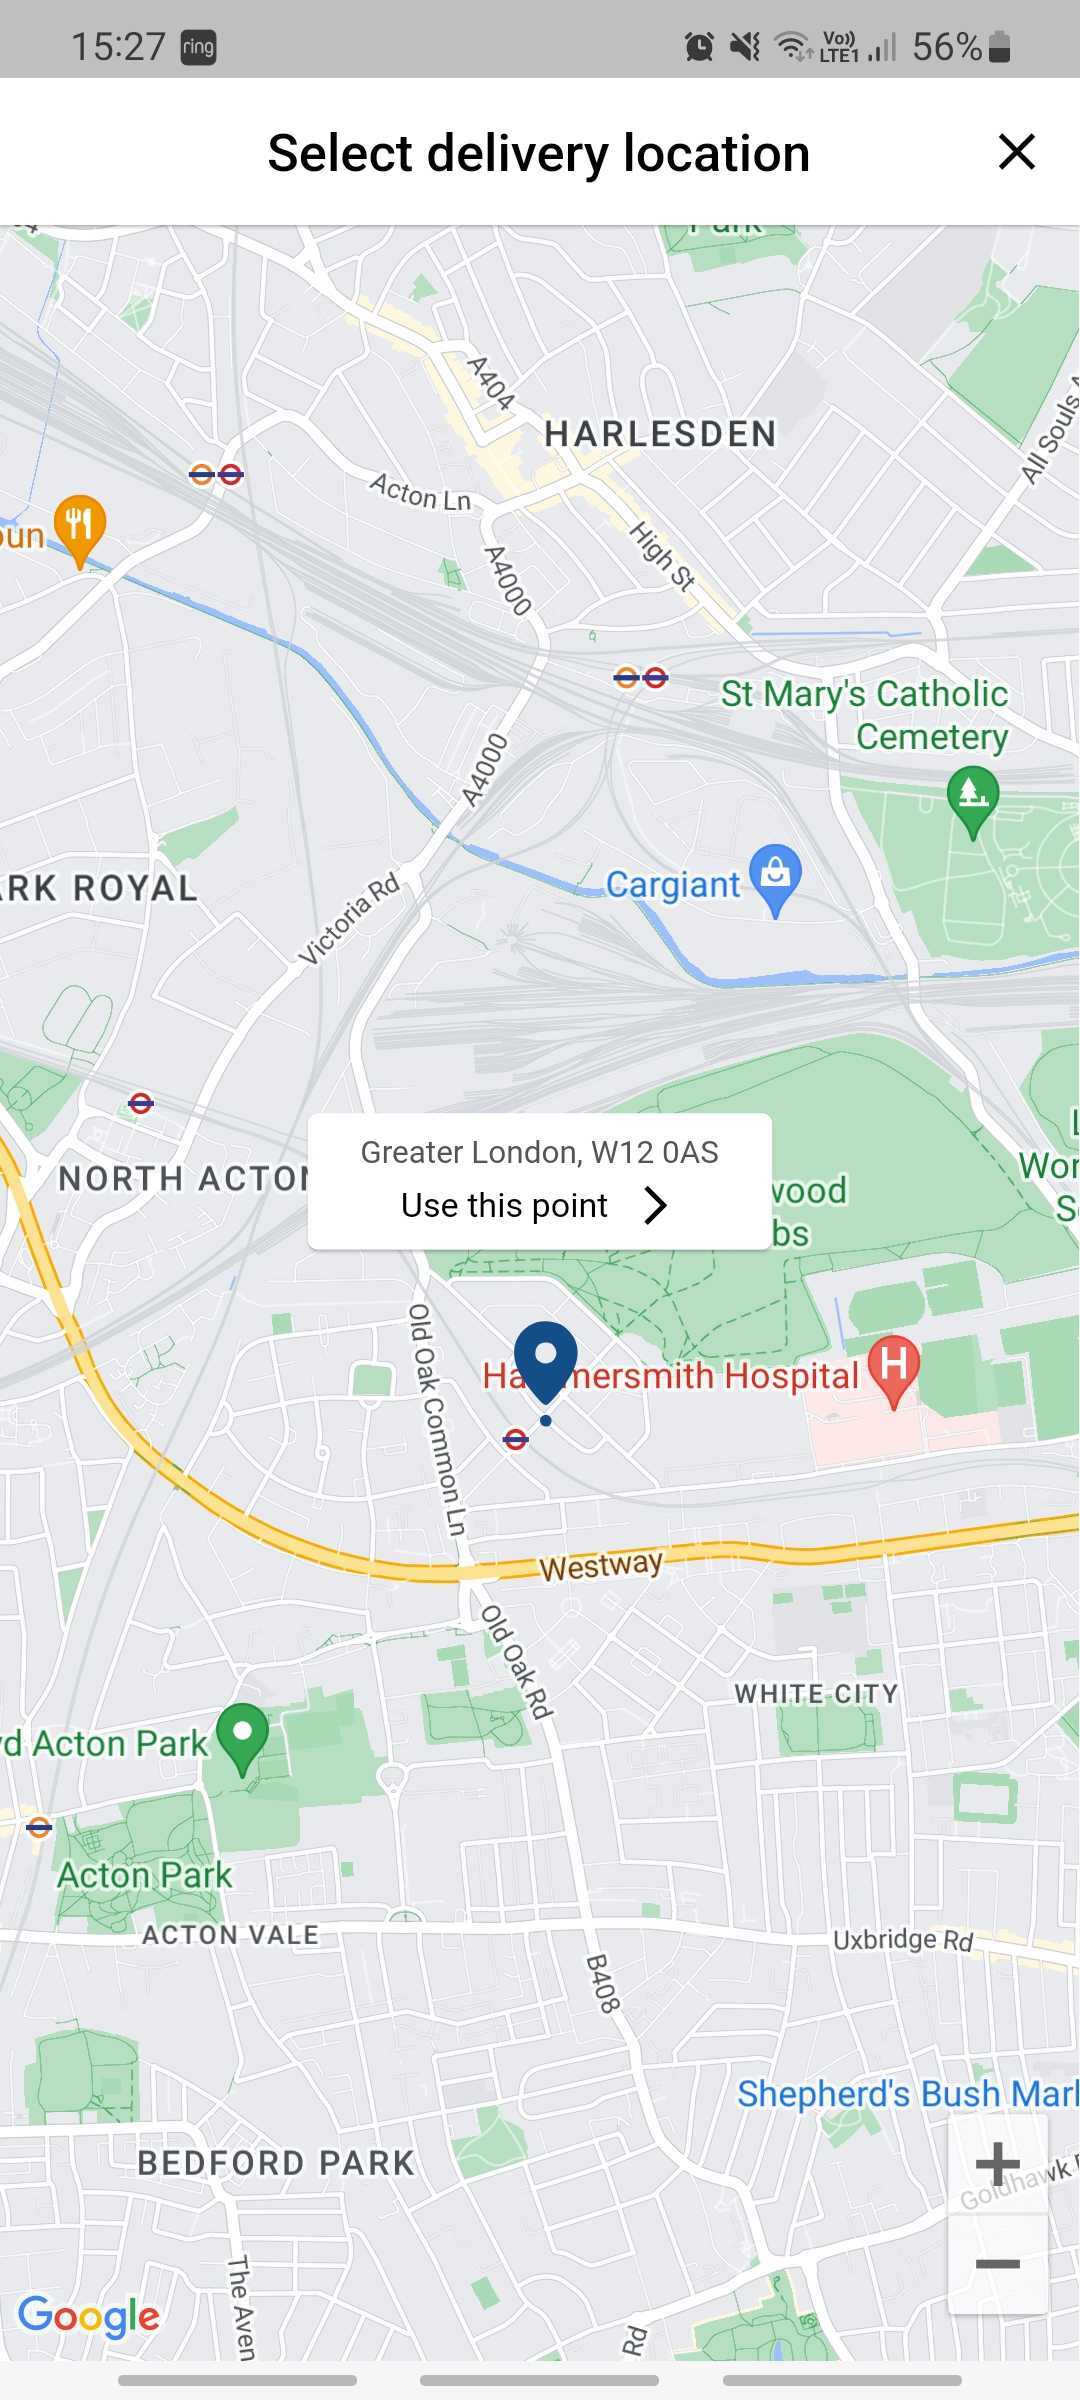
Alternatively, click the Delivery To option in the top right.

Manoeuvre the map to your chosen location. Click ‘Use this point’ to confirm or enter the address manually.
If you have more than one part, you can opt to have each item collected or delivered on an individual basis.
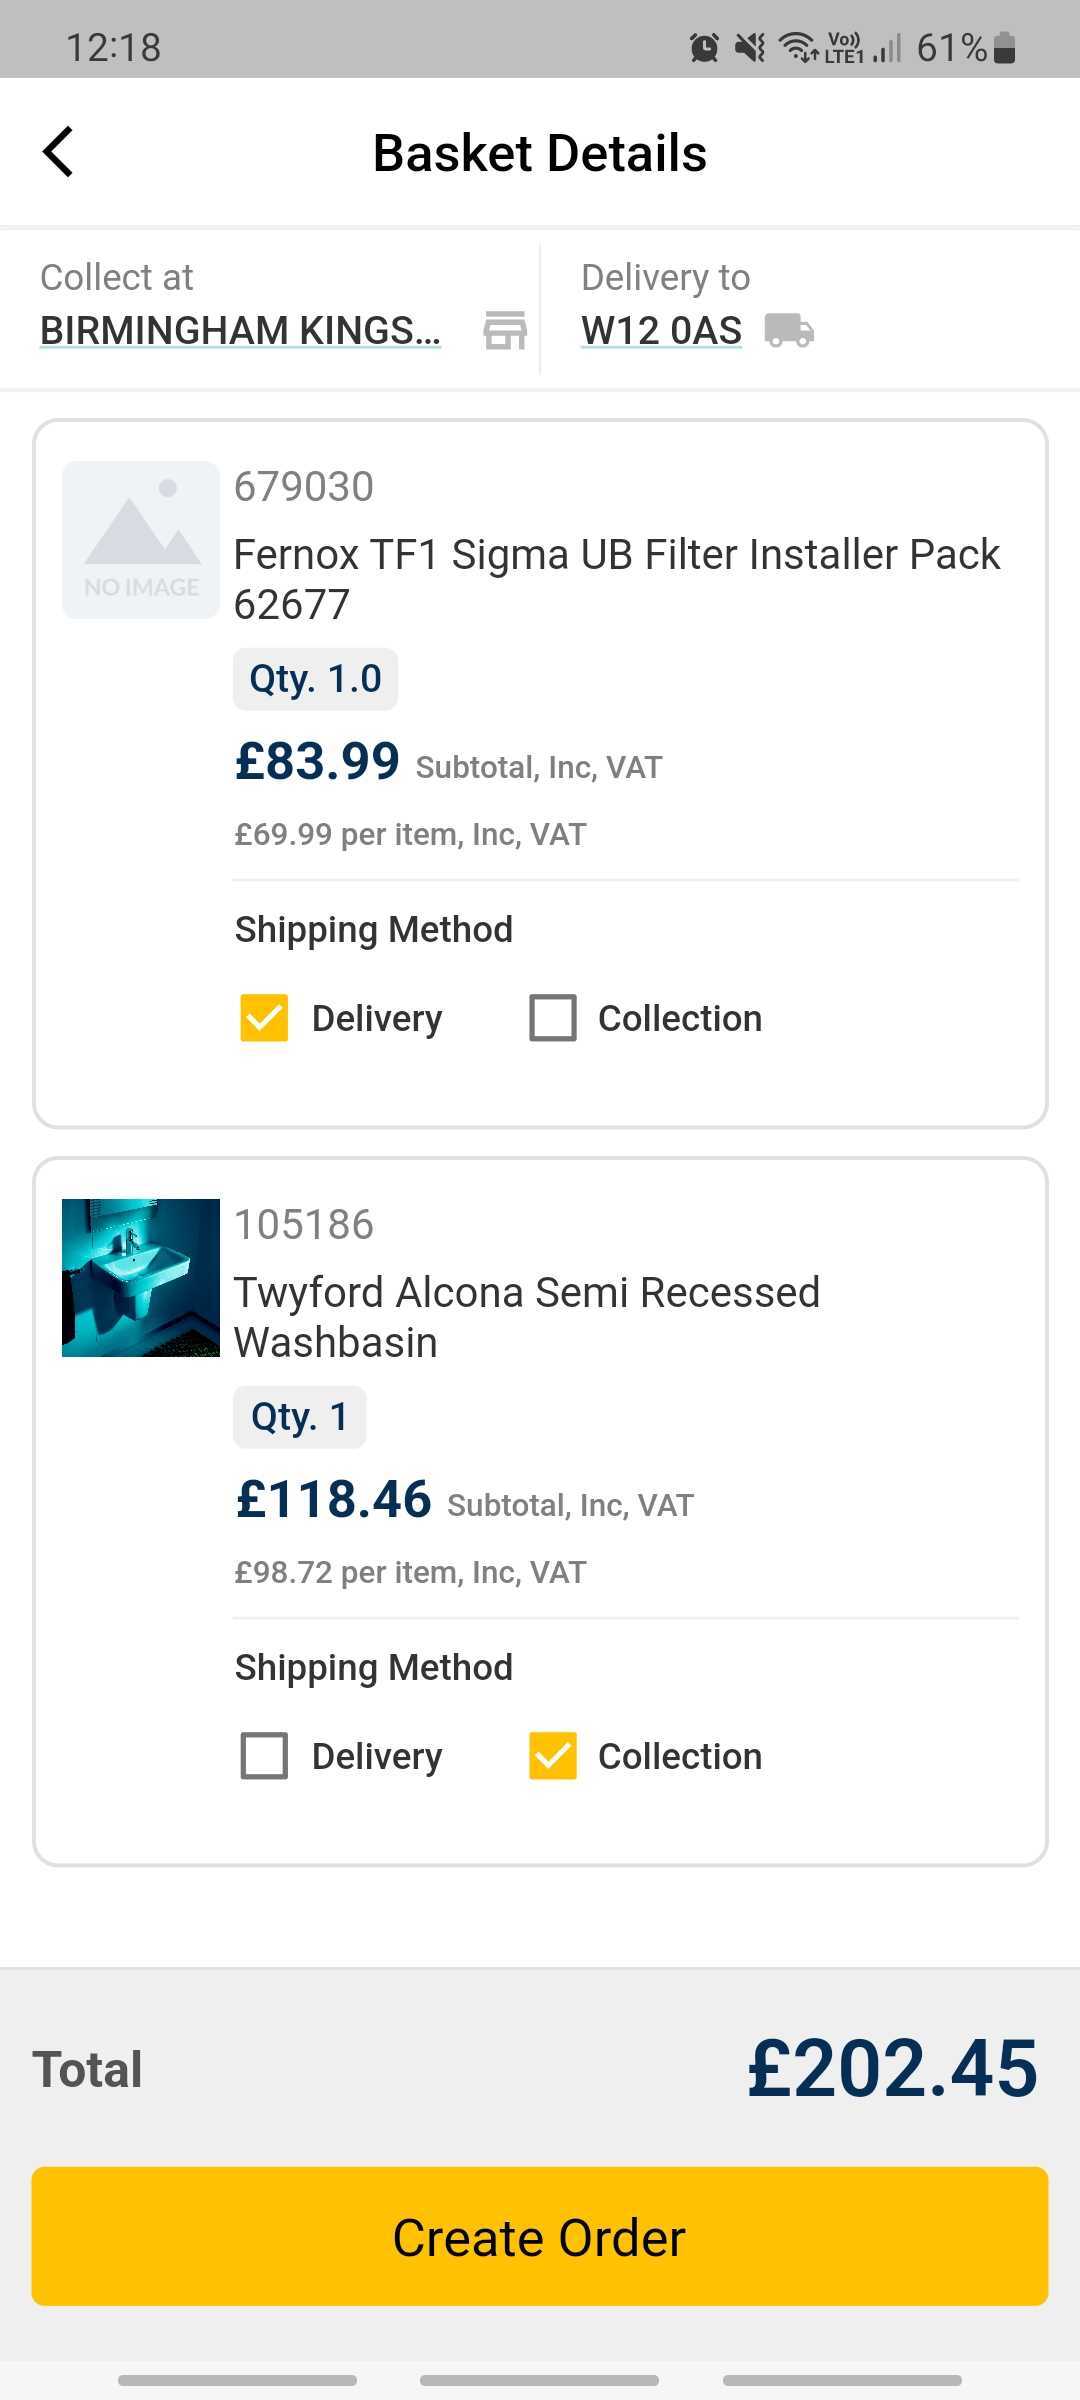
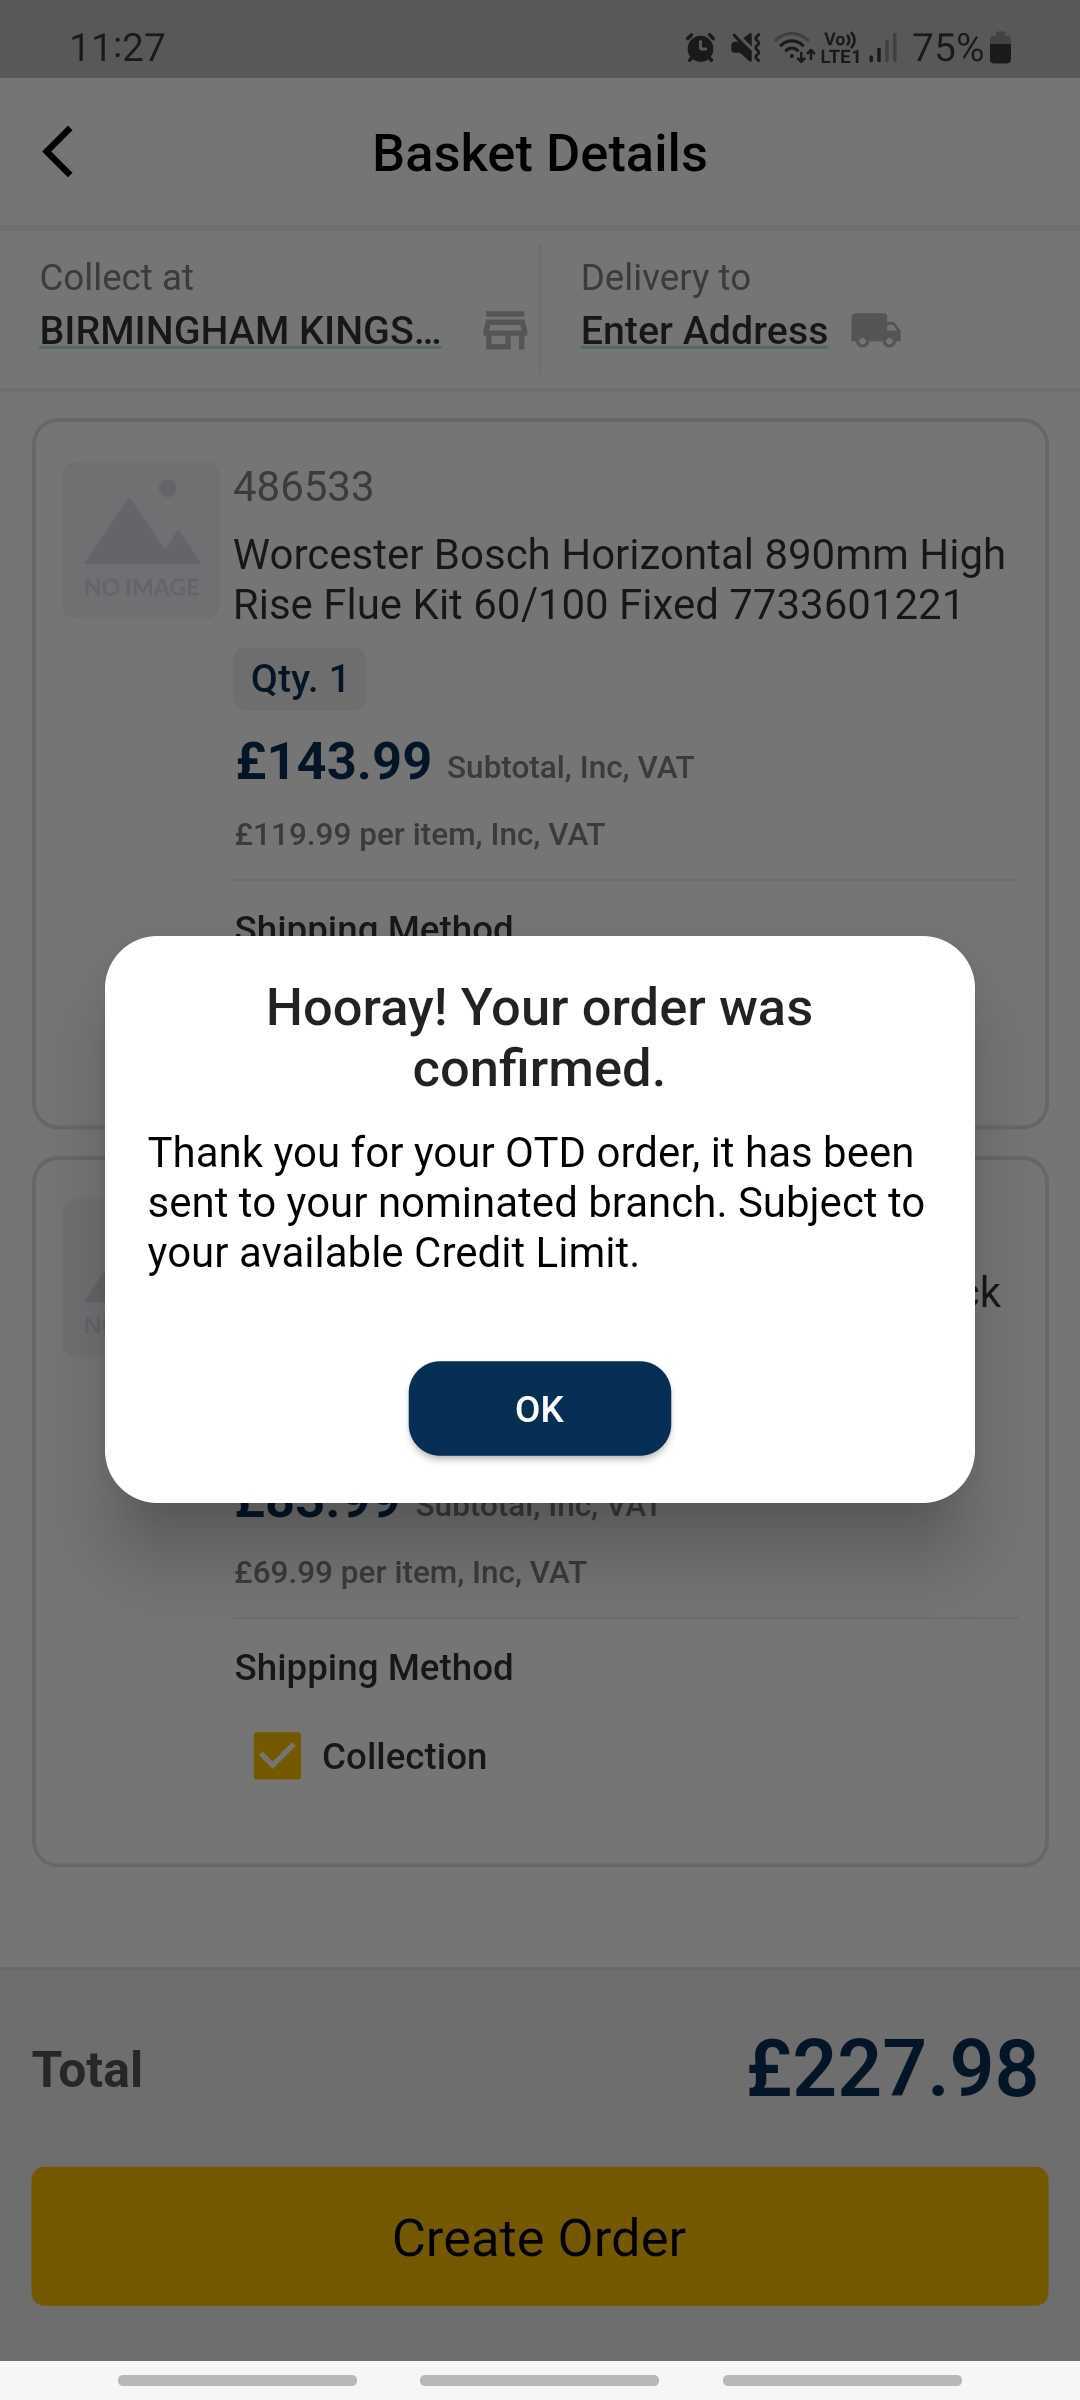
Click Create Order. Your order has now been sent to City Plumbing who will be in touch.
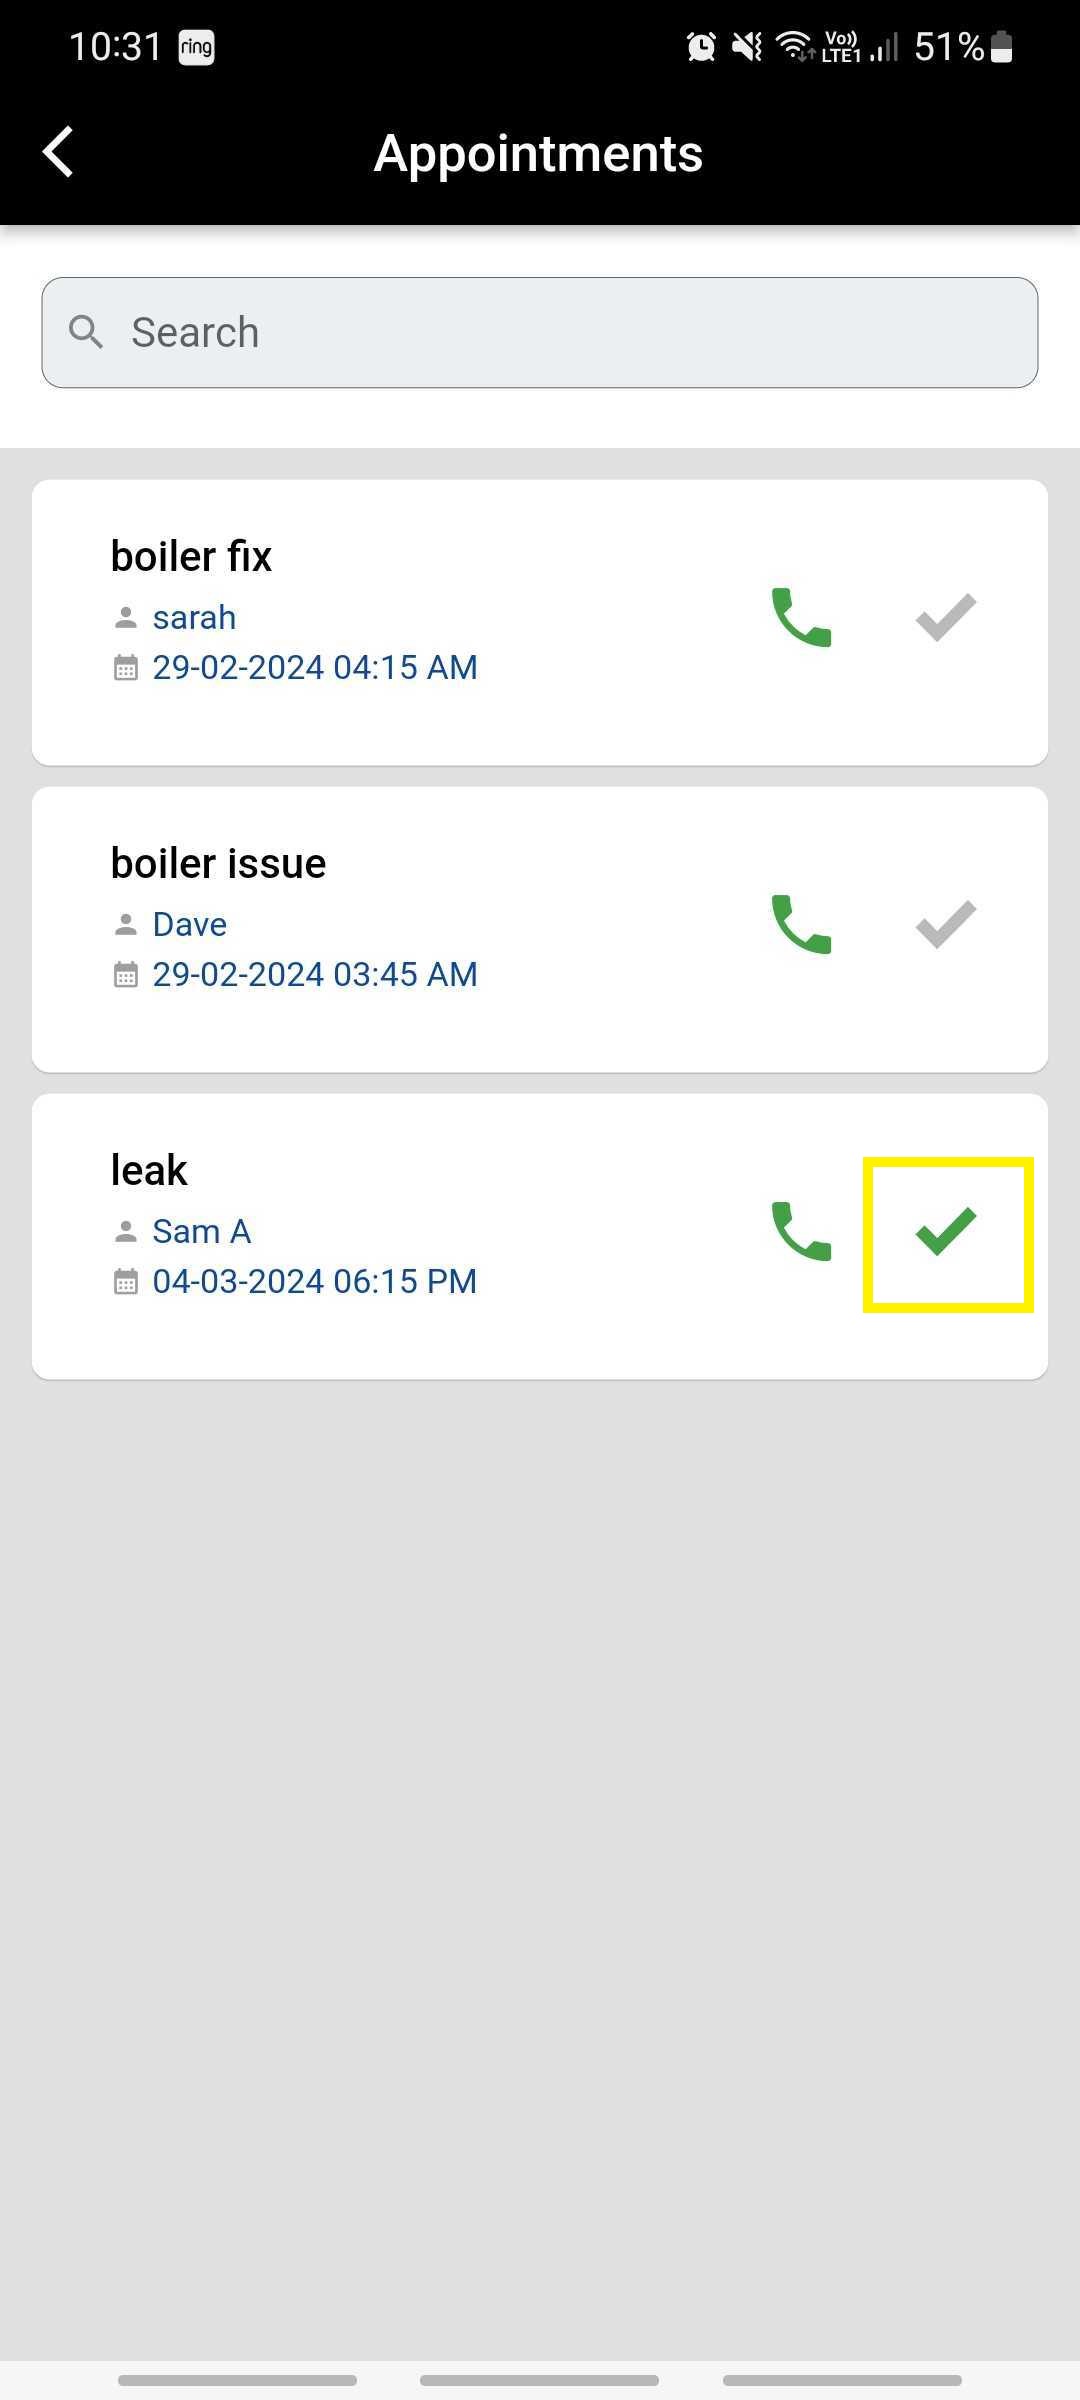
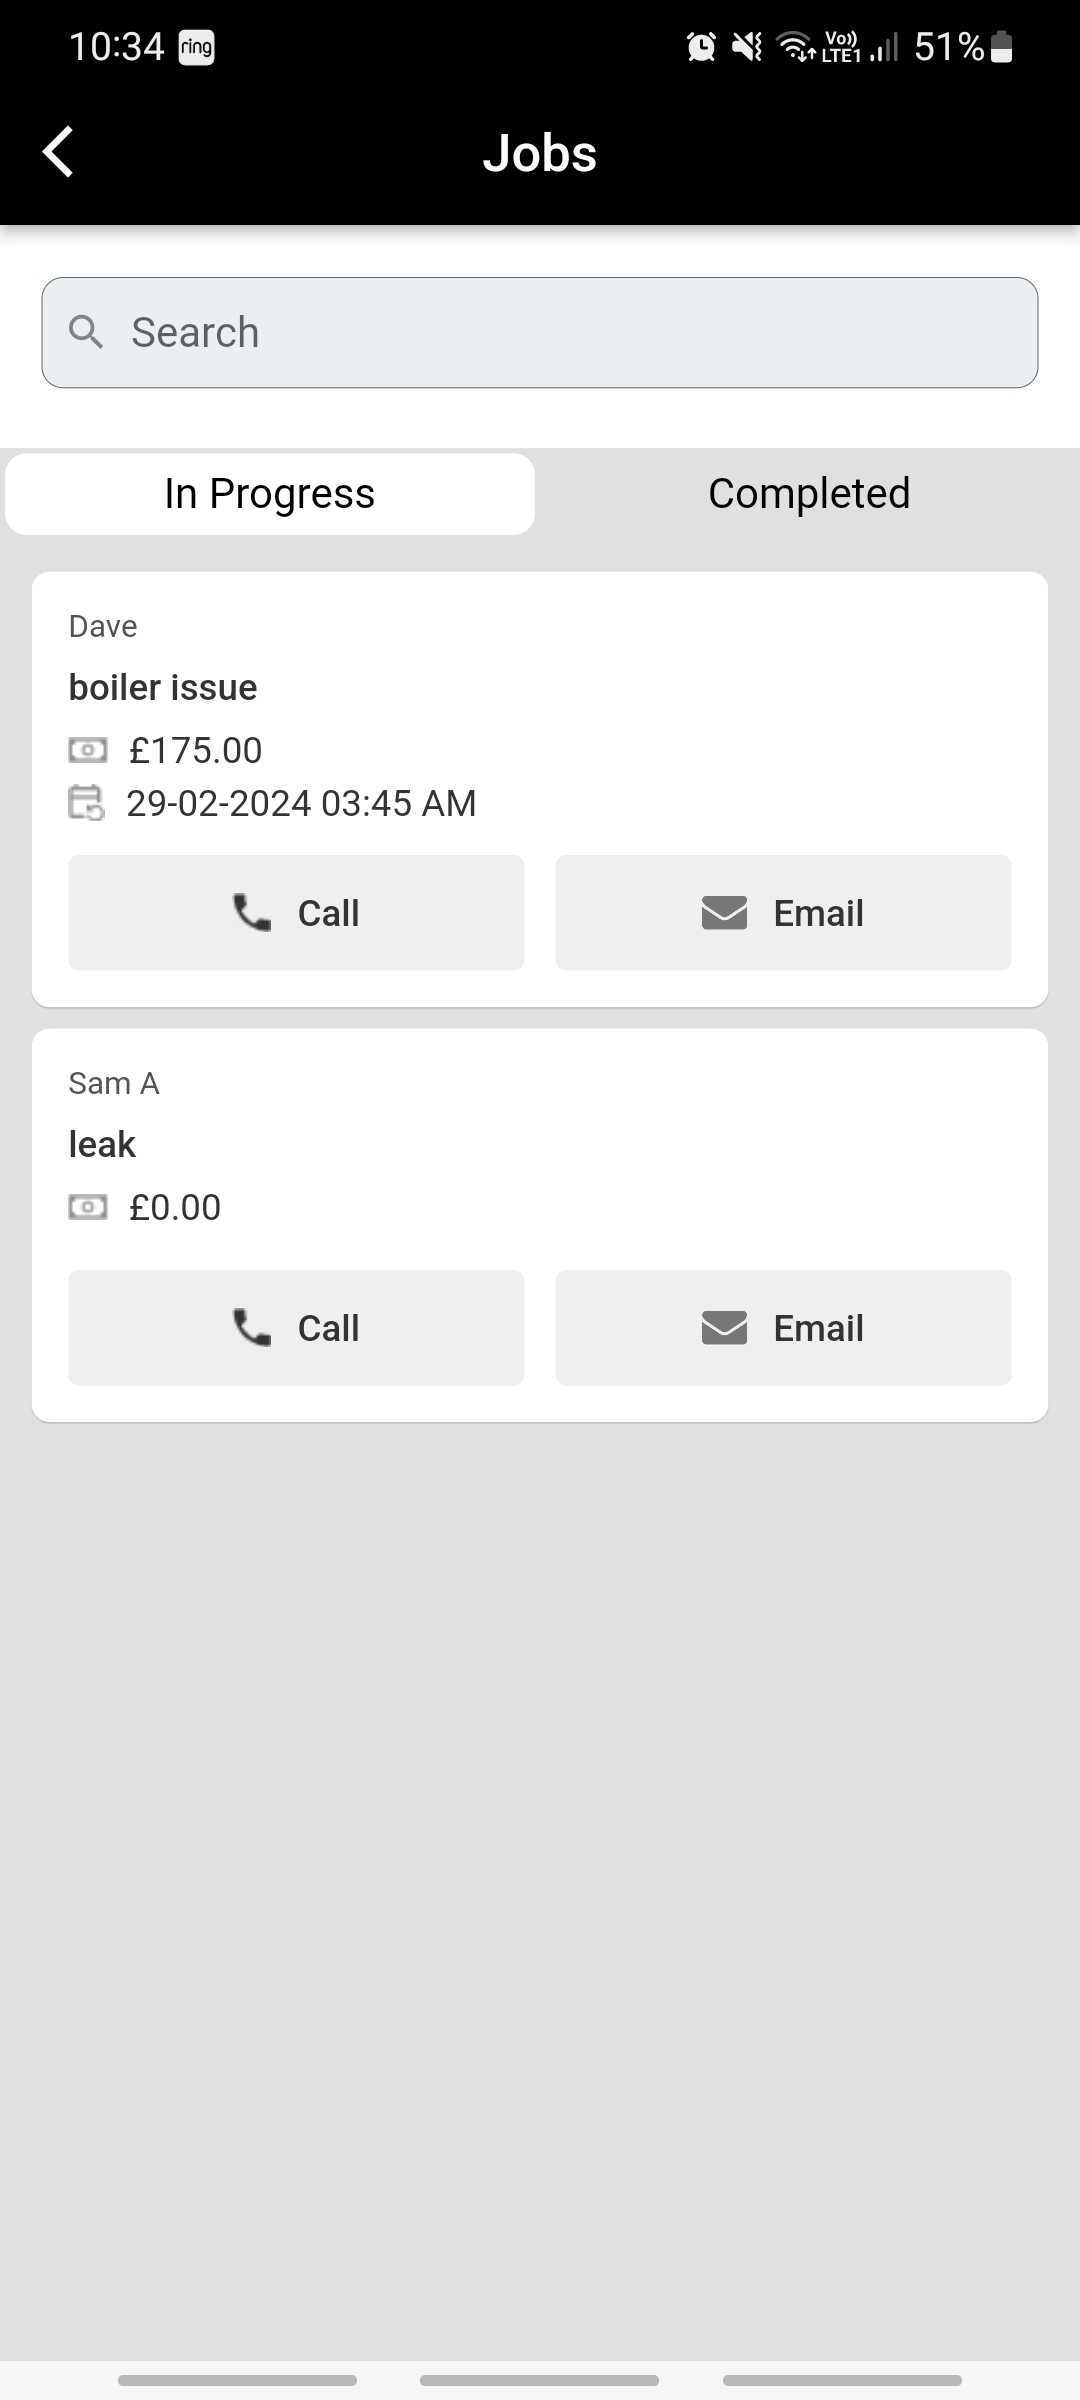
Jobs
Your Jobs page has two tabs: one for In Progress jobs and another for Completed jobs. Use the search function at the top to filter down your list as needed, by searching a client's name or the job description.
Any jobs that have been scheduled will have the date and time visible on the main list here.
You can Call or Email your customer from this screen by clicking the relevant buttons too.
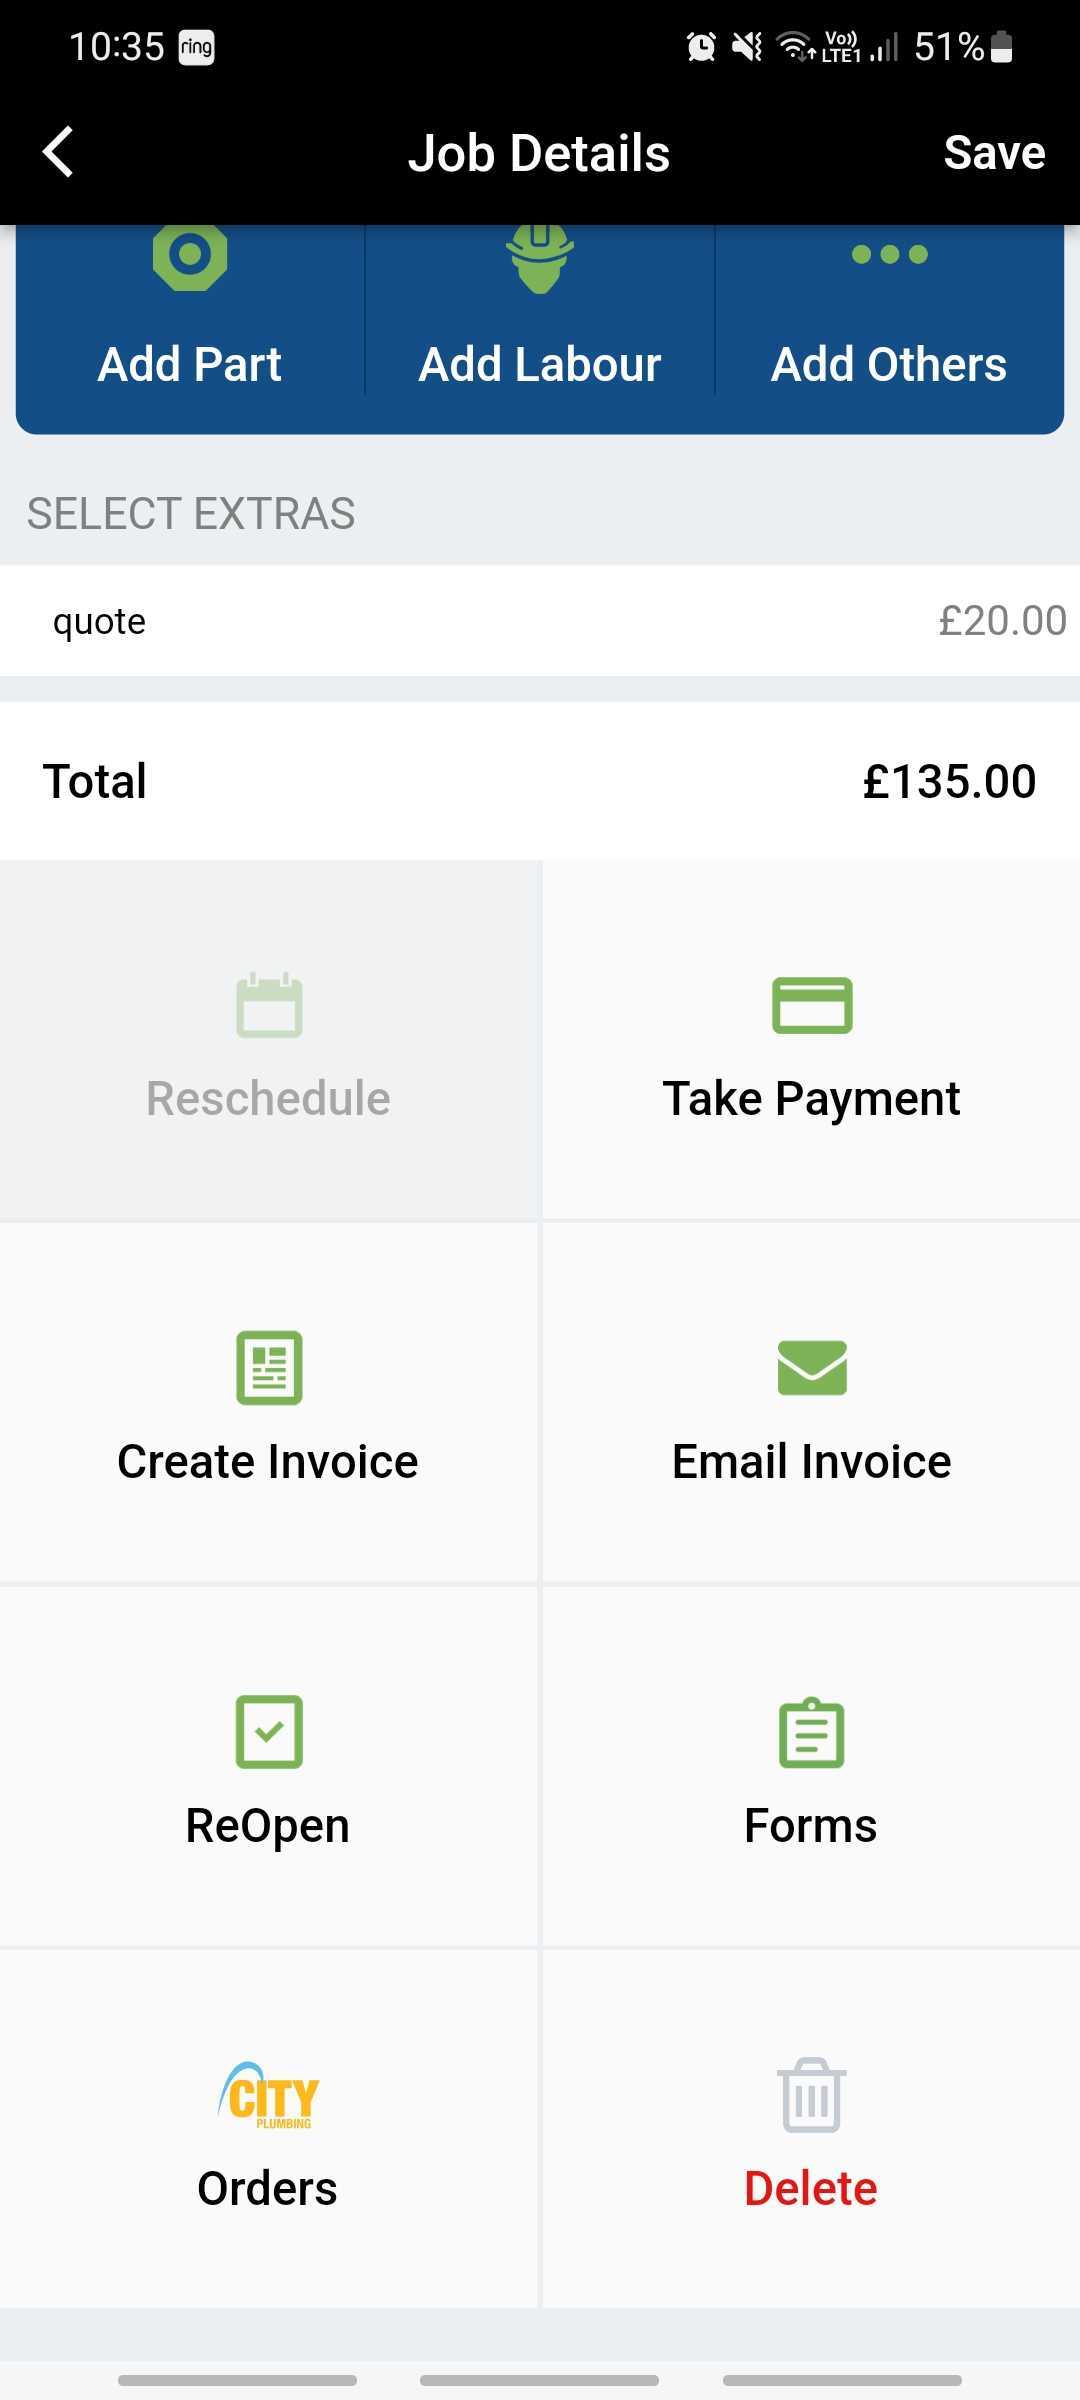
Click on a job to view the Job Details page. From here you can amend or add further costs, if required
Further down on this screen, you’ll also be able to reschedule, take payment, create invoice, email invoice, complete job, complete forms, check your City Plumbing order, or delete the job.

Rescheduling a job will take you back to the calendar screen where you can choose a new date and time, and then click Save.
Click Create invoice to view or download a copy. Alternatively, click Email Invoice to send the invoice straight to your customer via your email application.
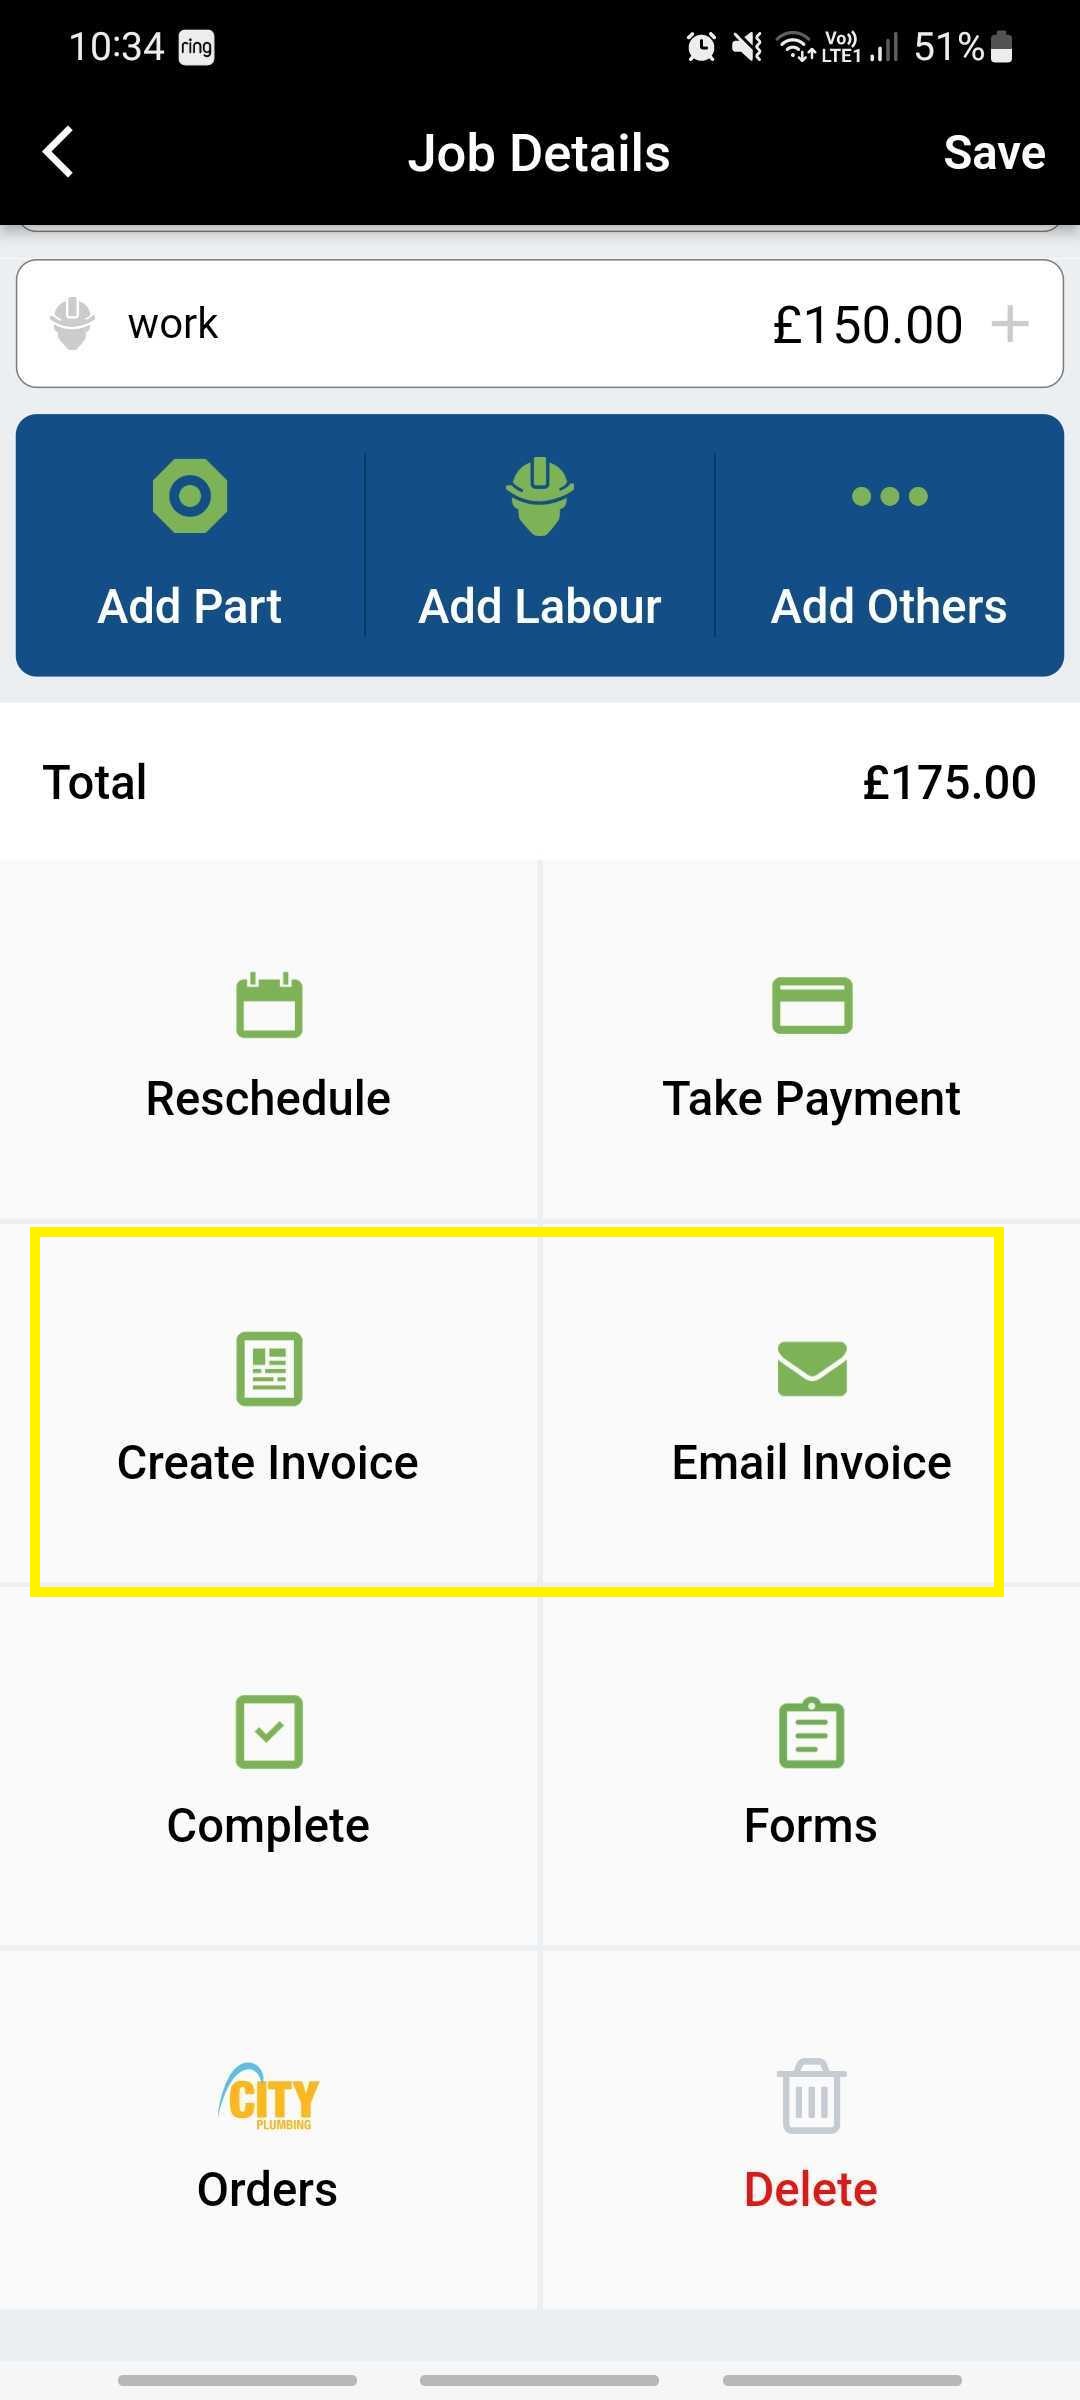
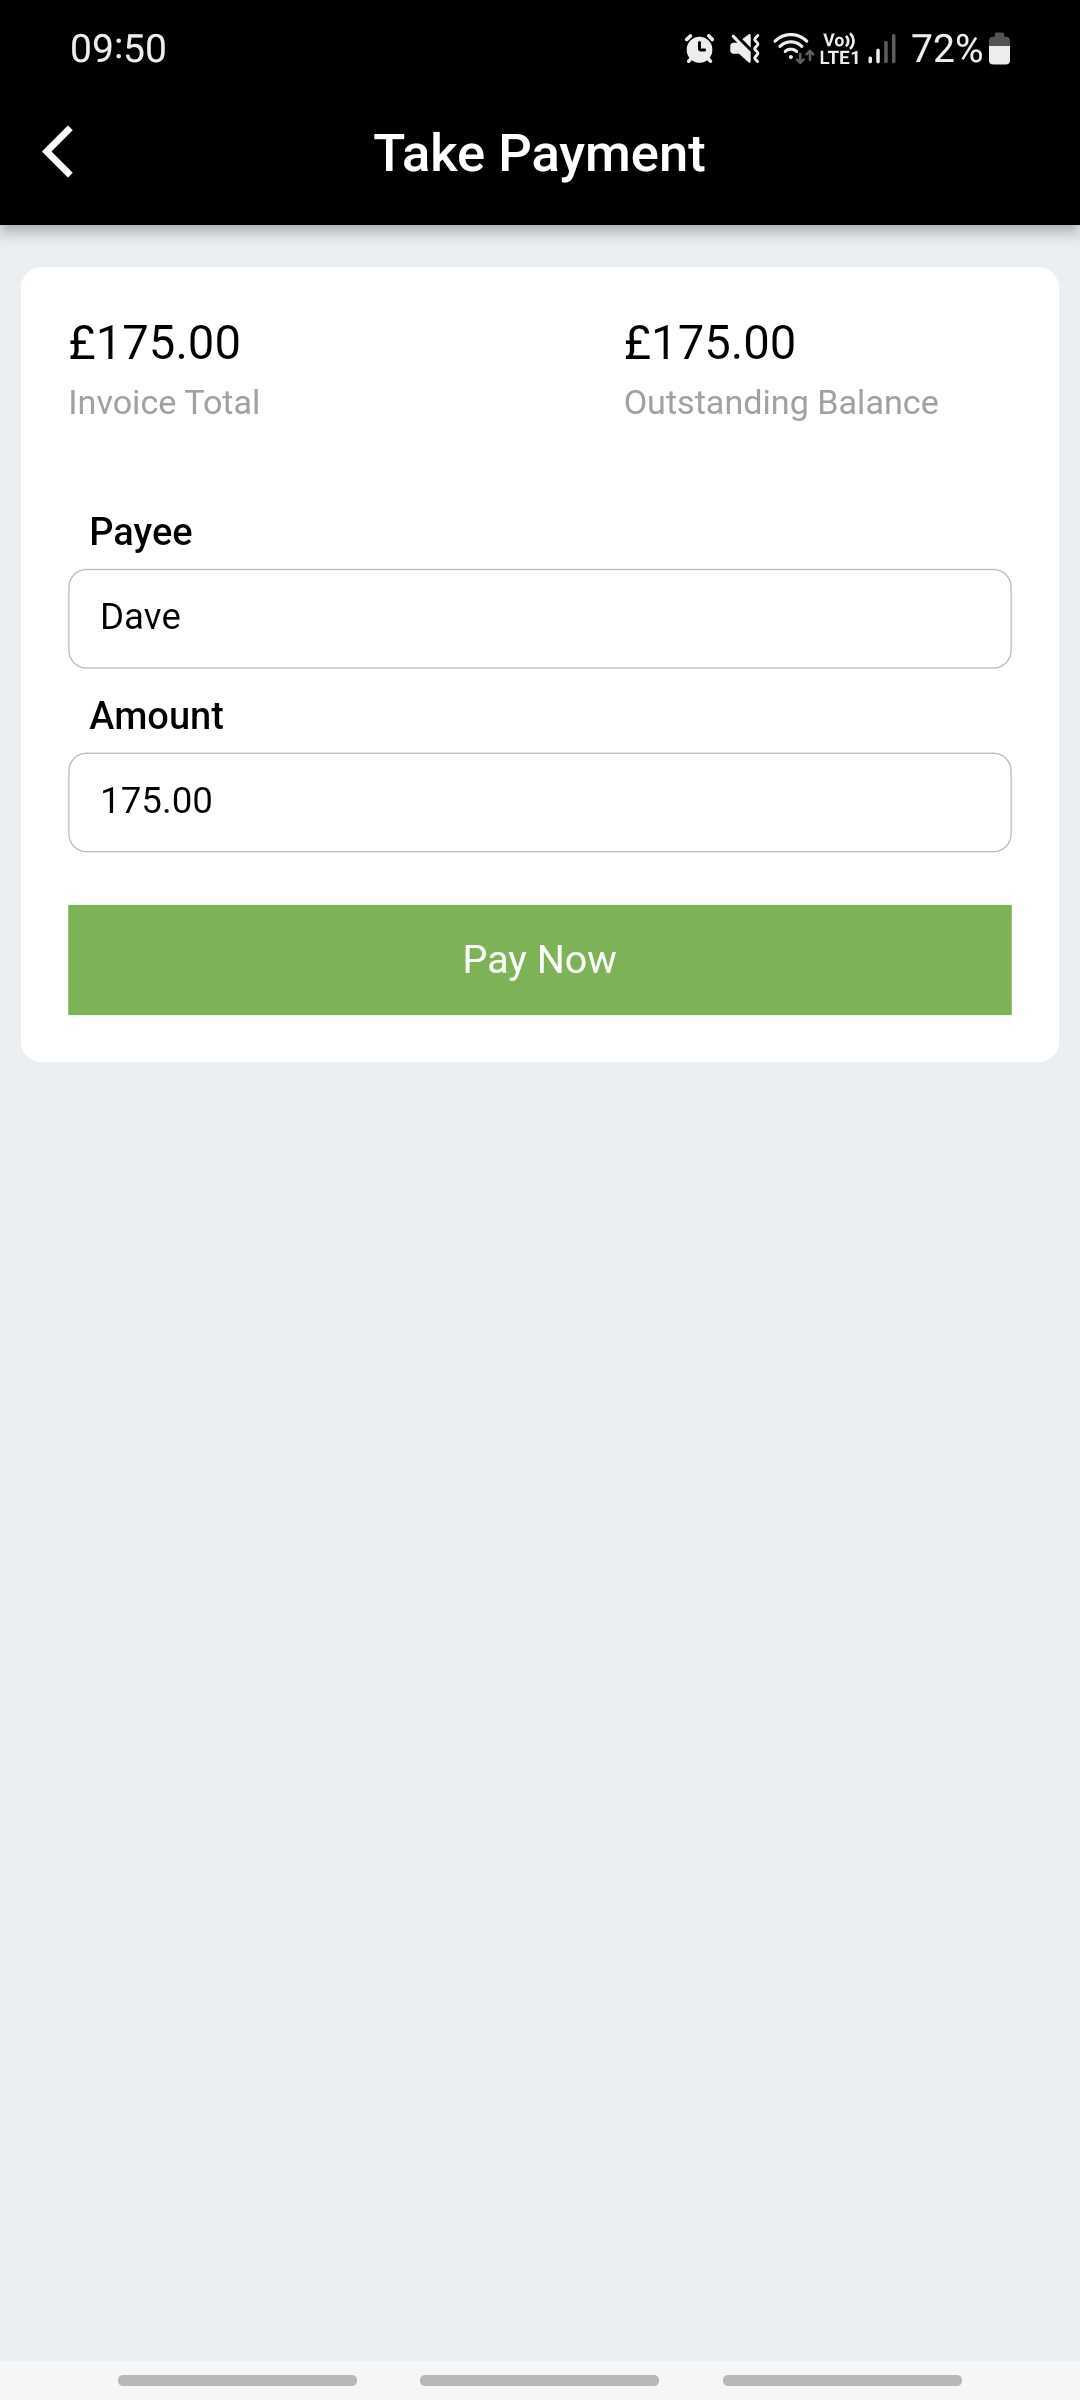
You can log any payments you receive via the Take Payment button. From here, you can choose Cash or Card
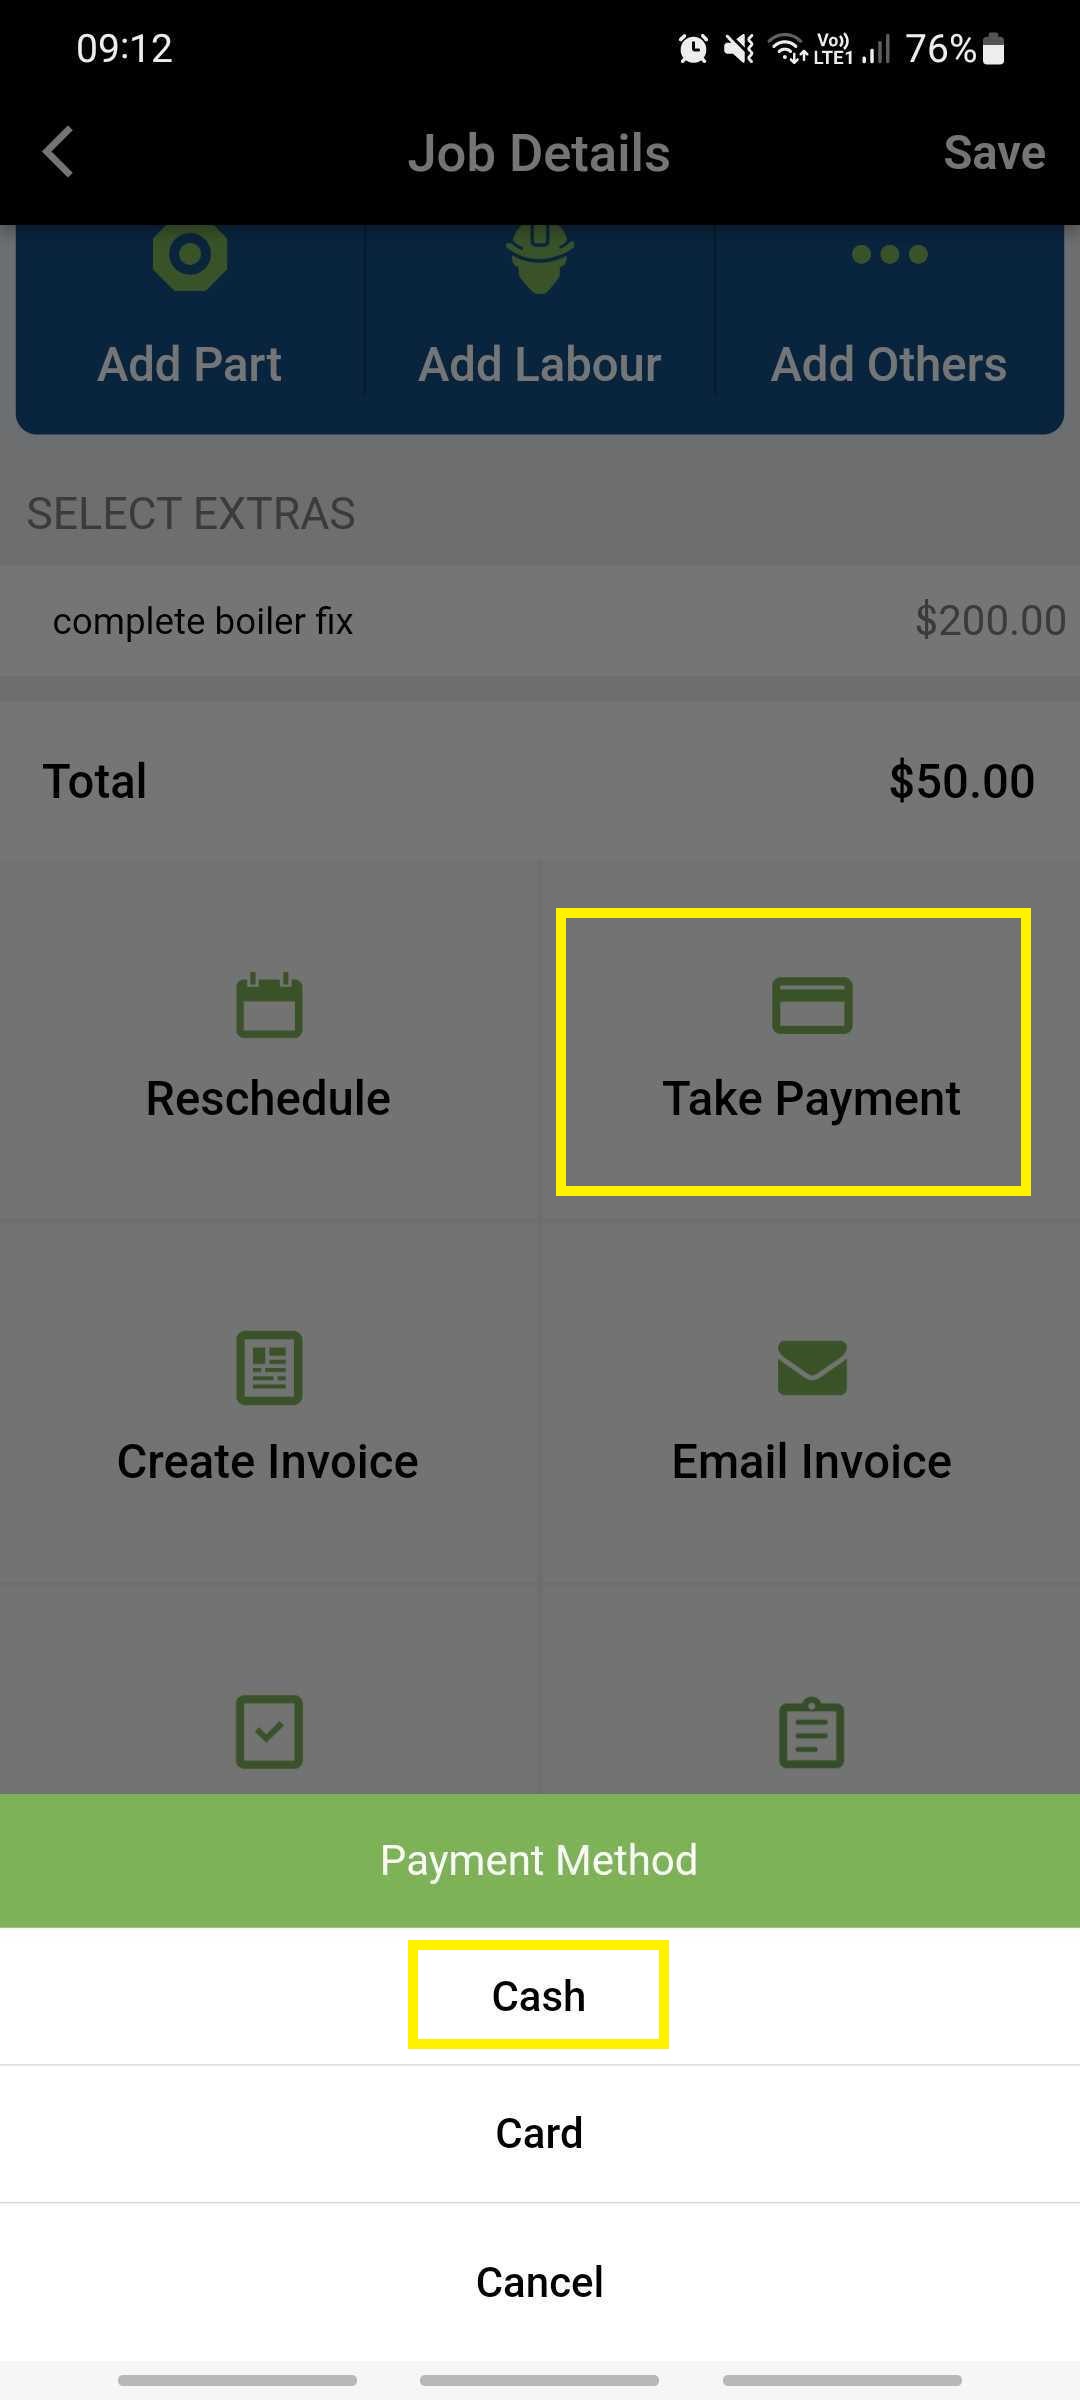
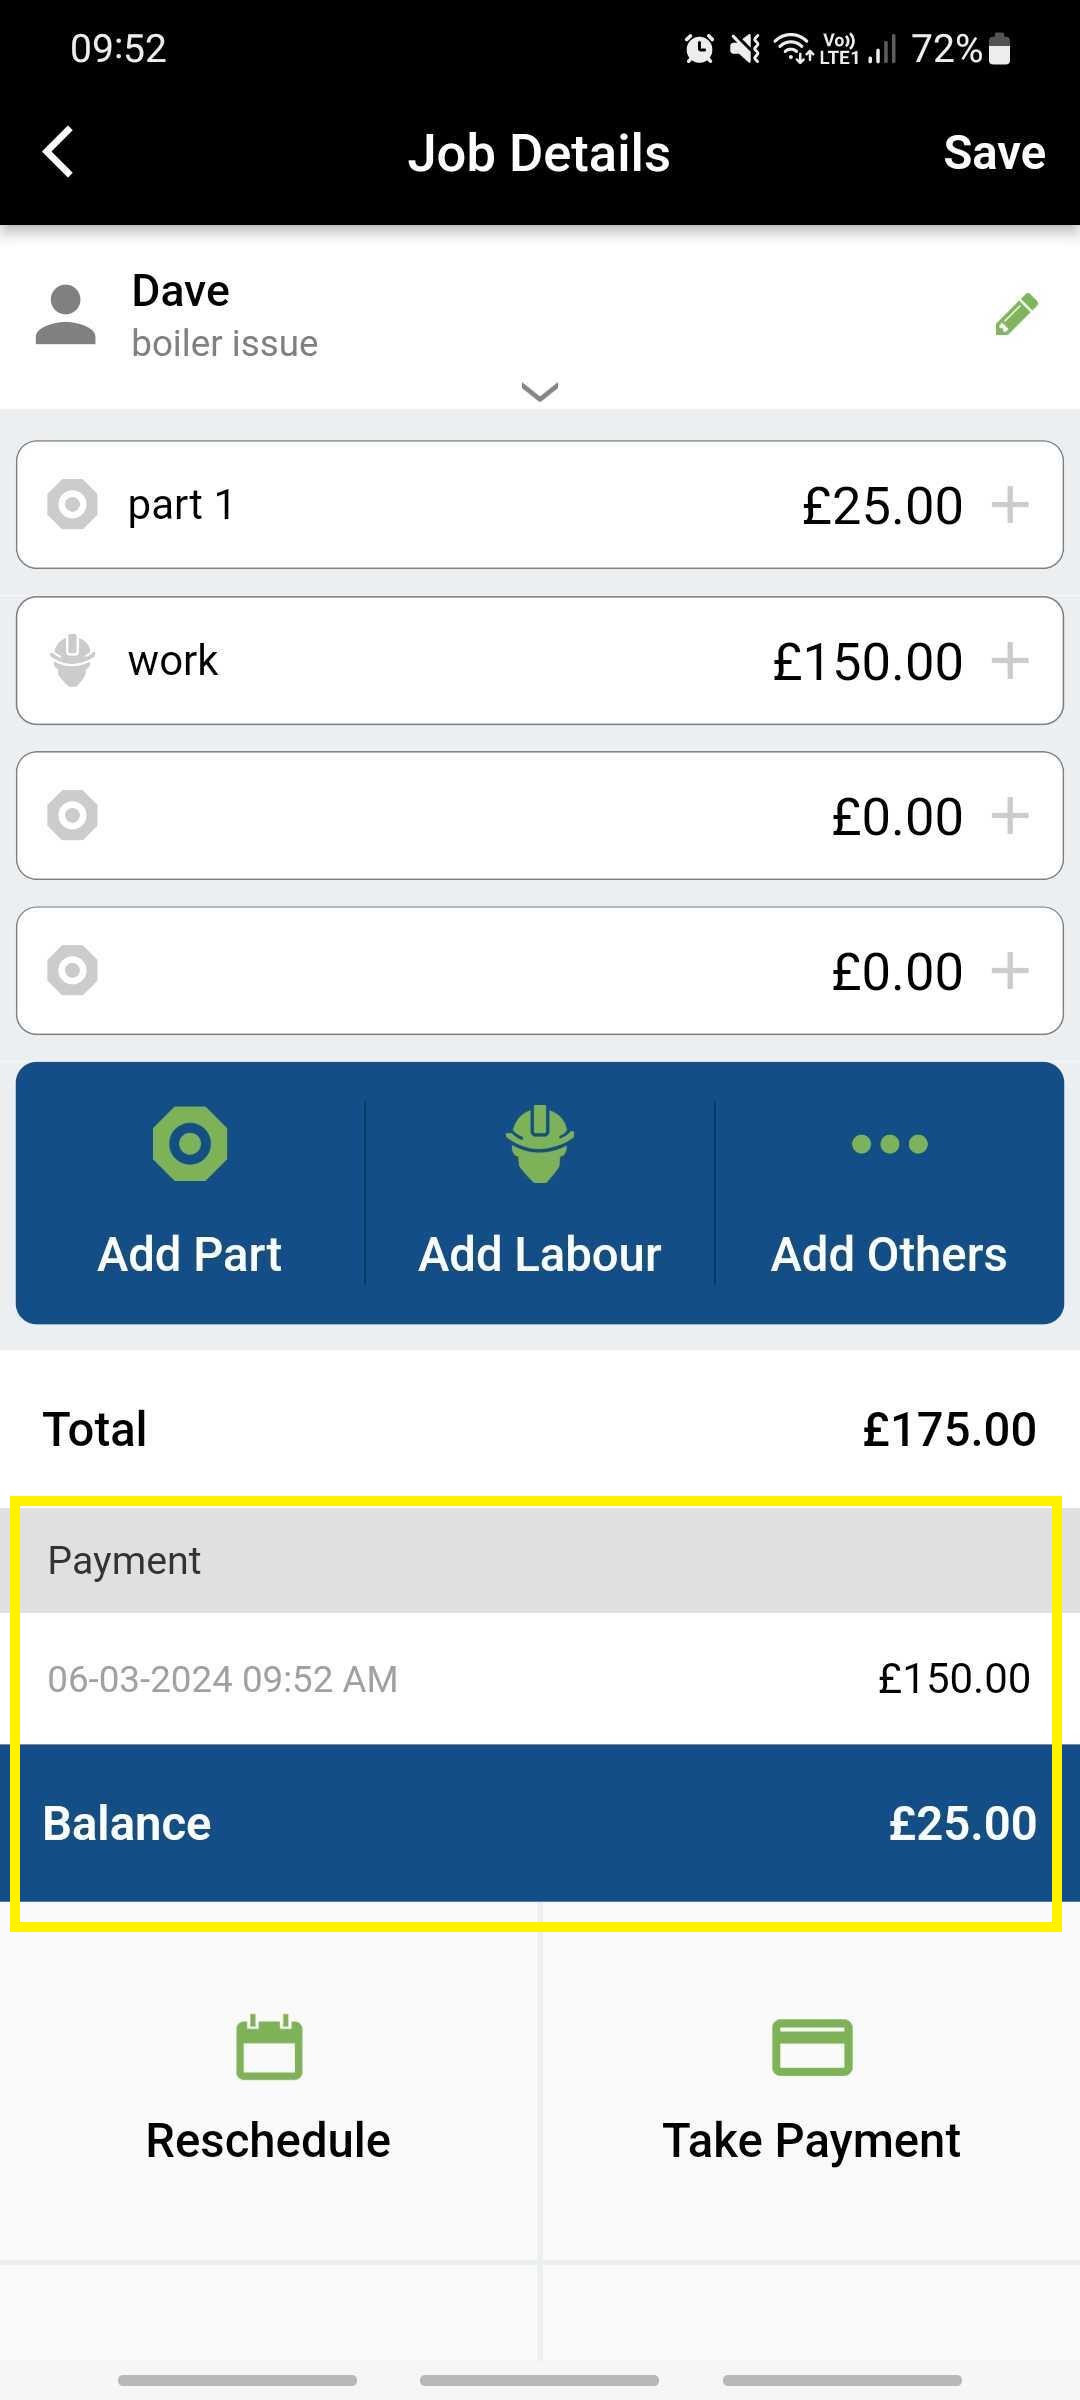
If you received Cash, click this option and you’ll be taken to a new screen to enter the payment details. The details will be auto filled to the contact's name and full amount. You can amend the amount if a deposit was taken for example, and then click Pay Now.

The payment will now show on the Job Details page, along with the updated outstanding balance.
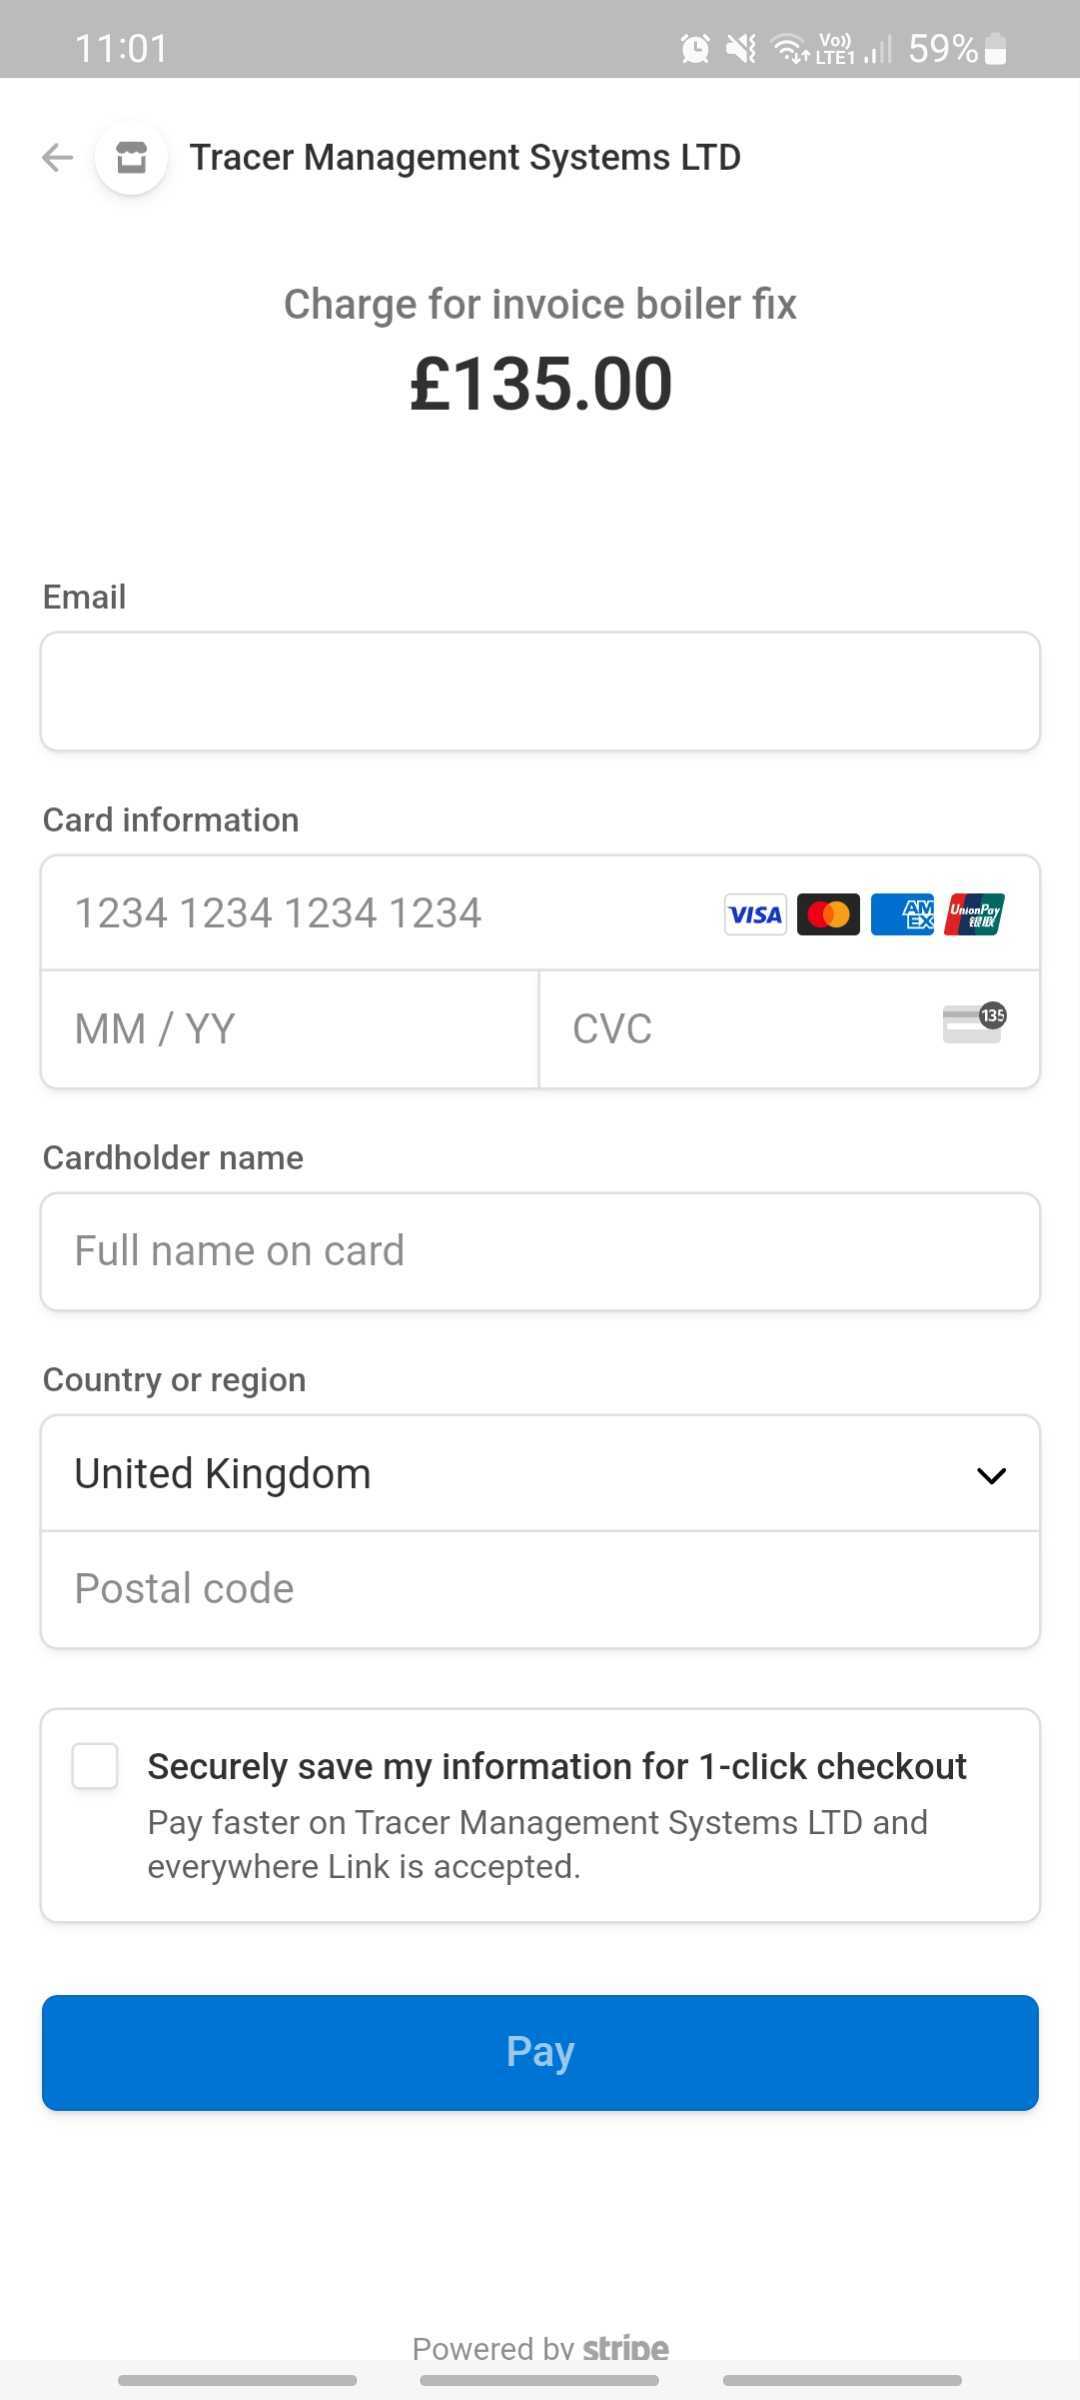
If you wish to take a card payment, you will firstly need to connect to Stripe. This can be done in the Settings as mentioned earlier, however it can also be done as you take payment for the first time.
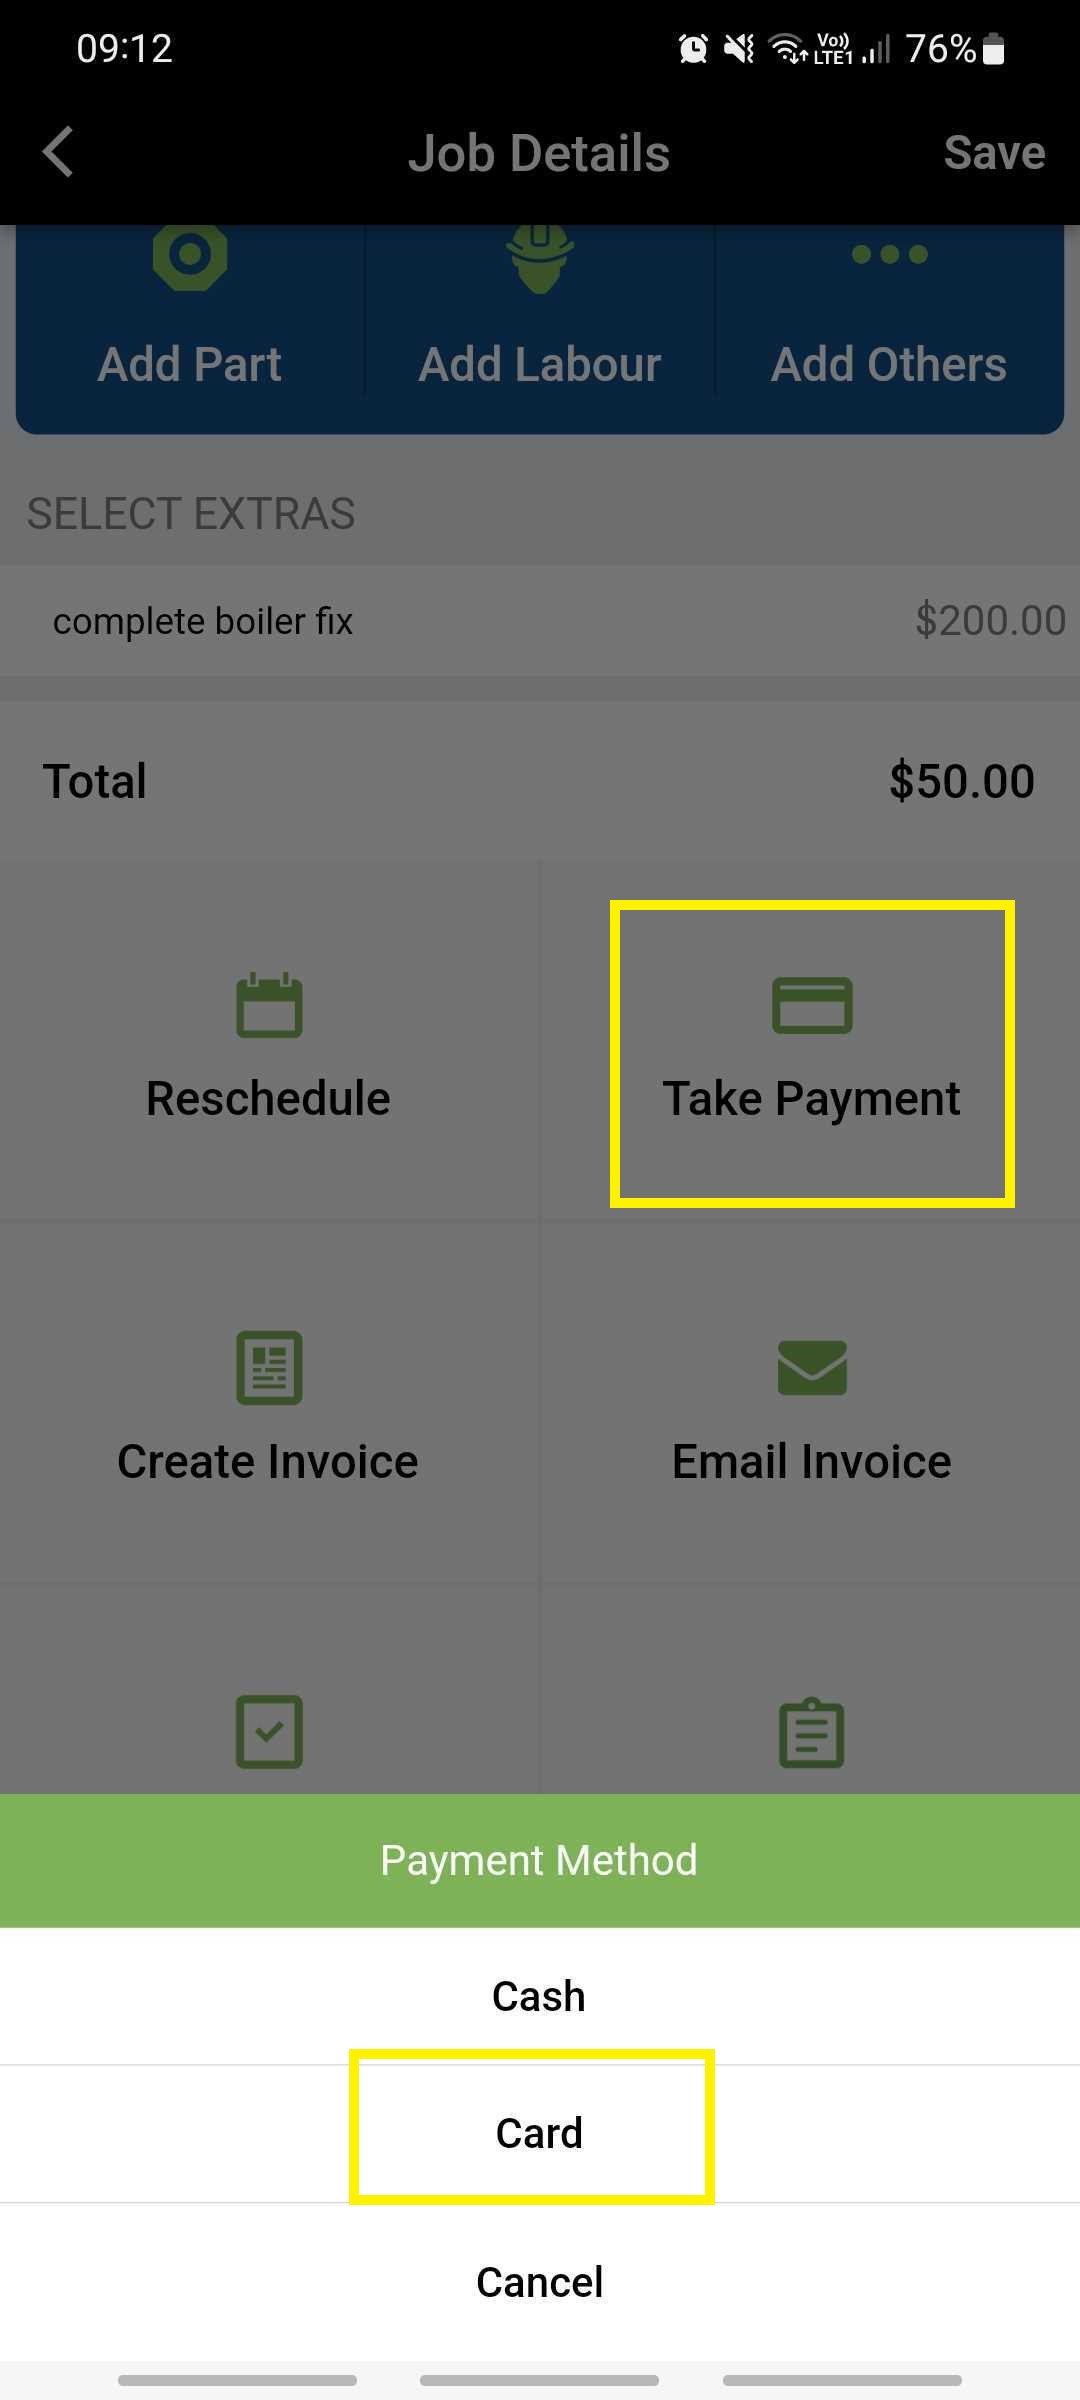
Again, amend the contact / amount if needed, and then click Pay Now. If you are not yet connected to Stripe, you’ll receive a message
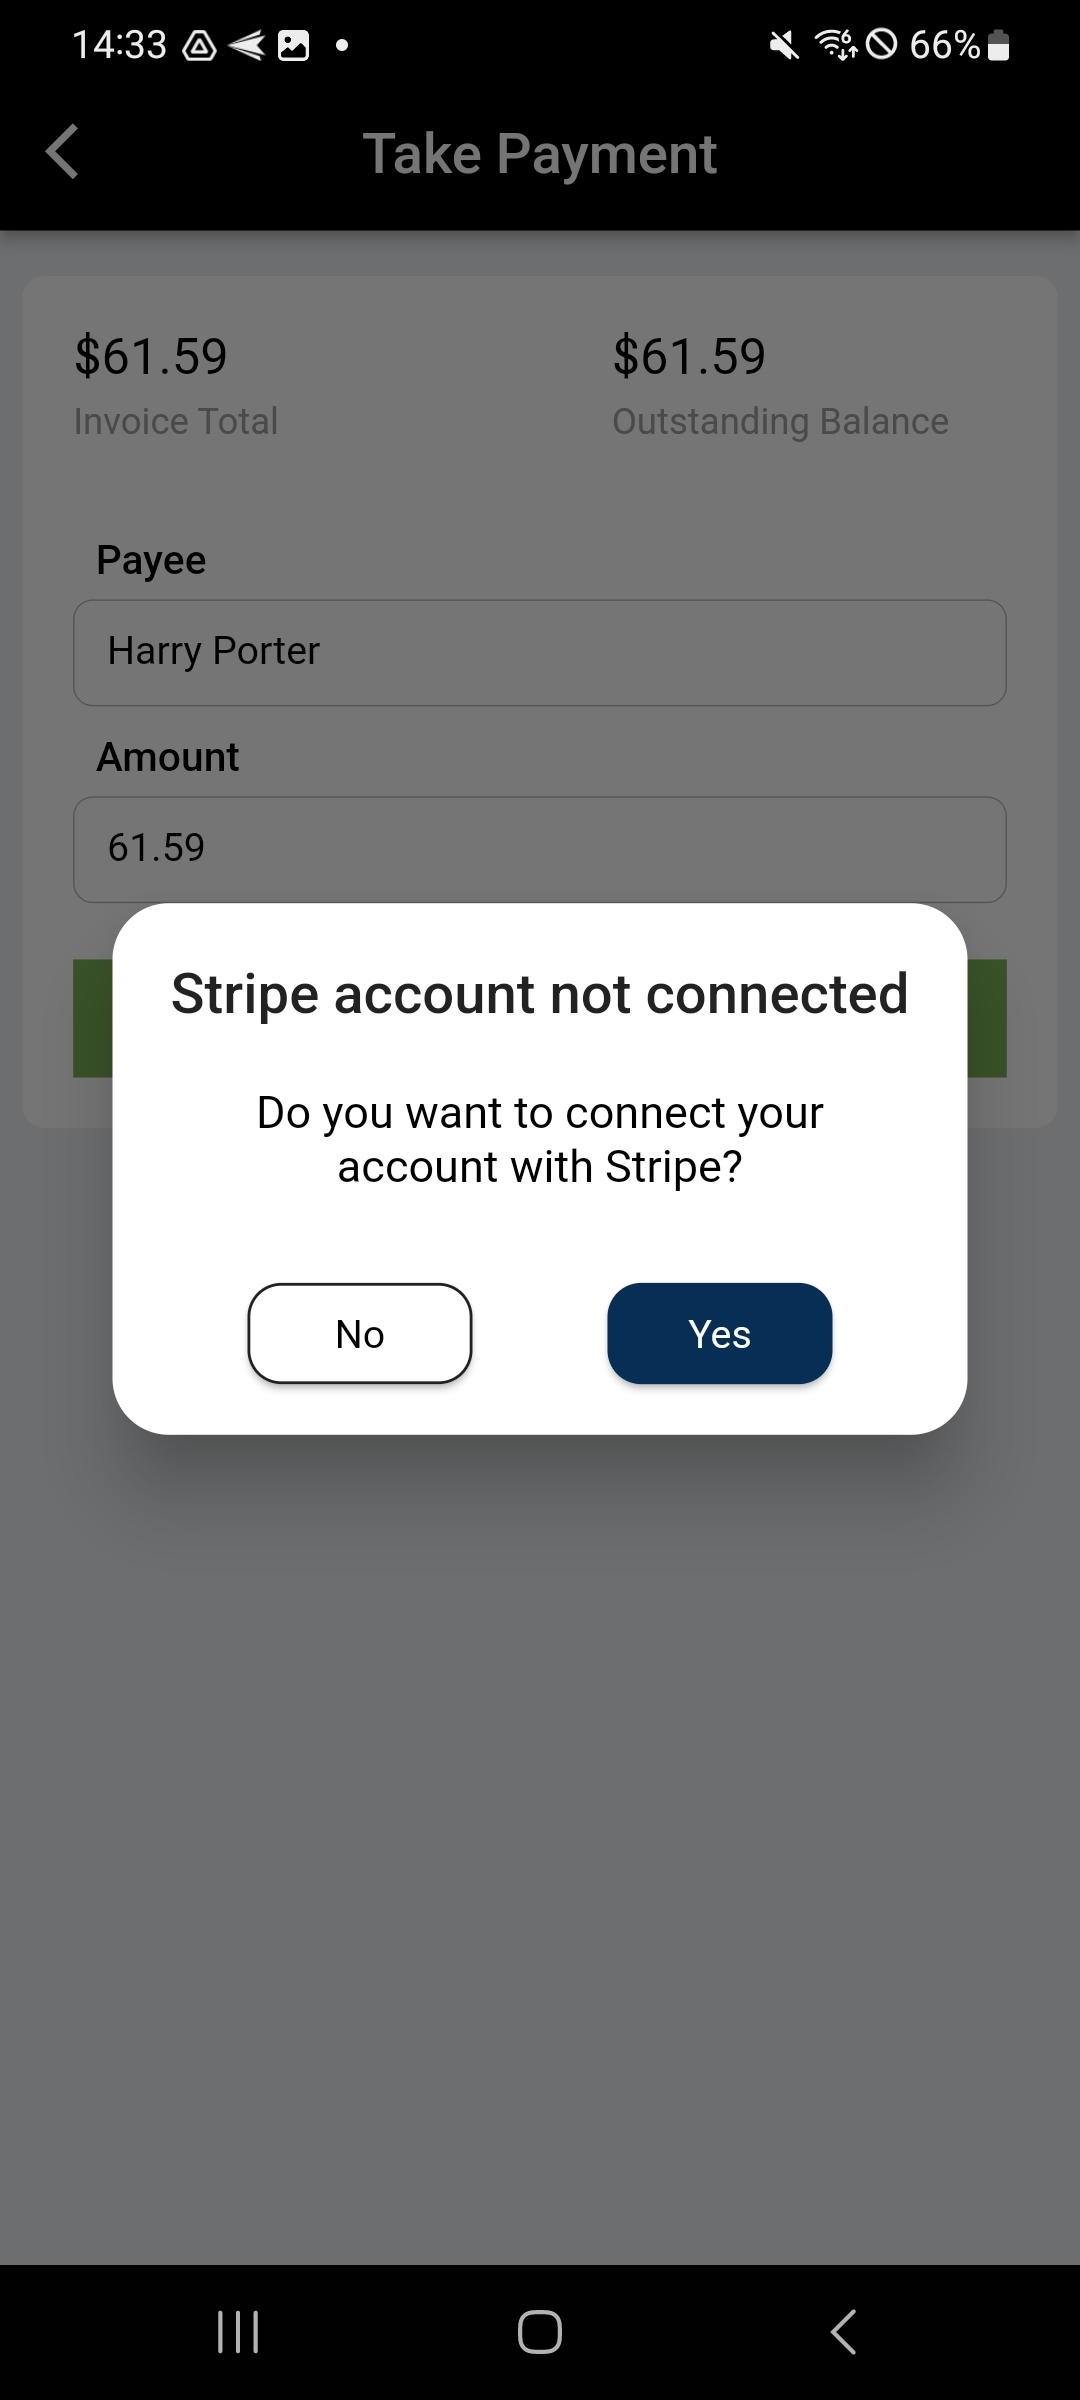
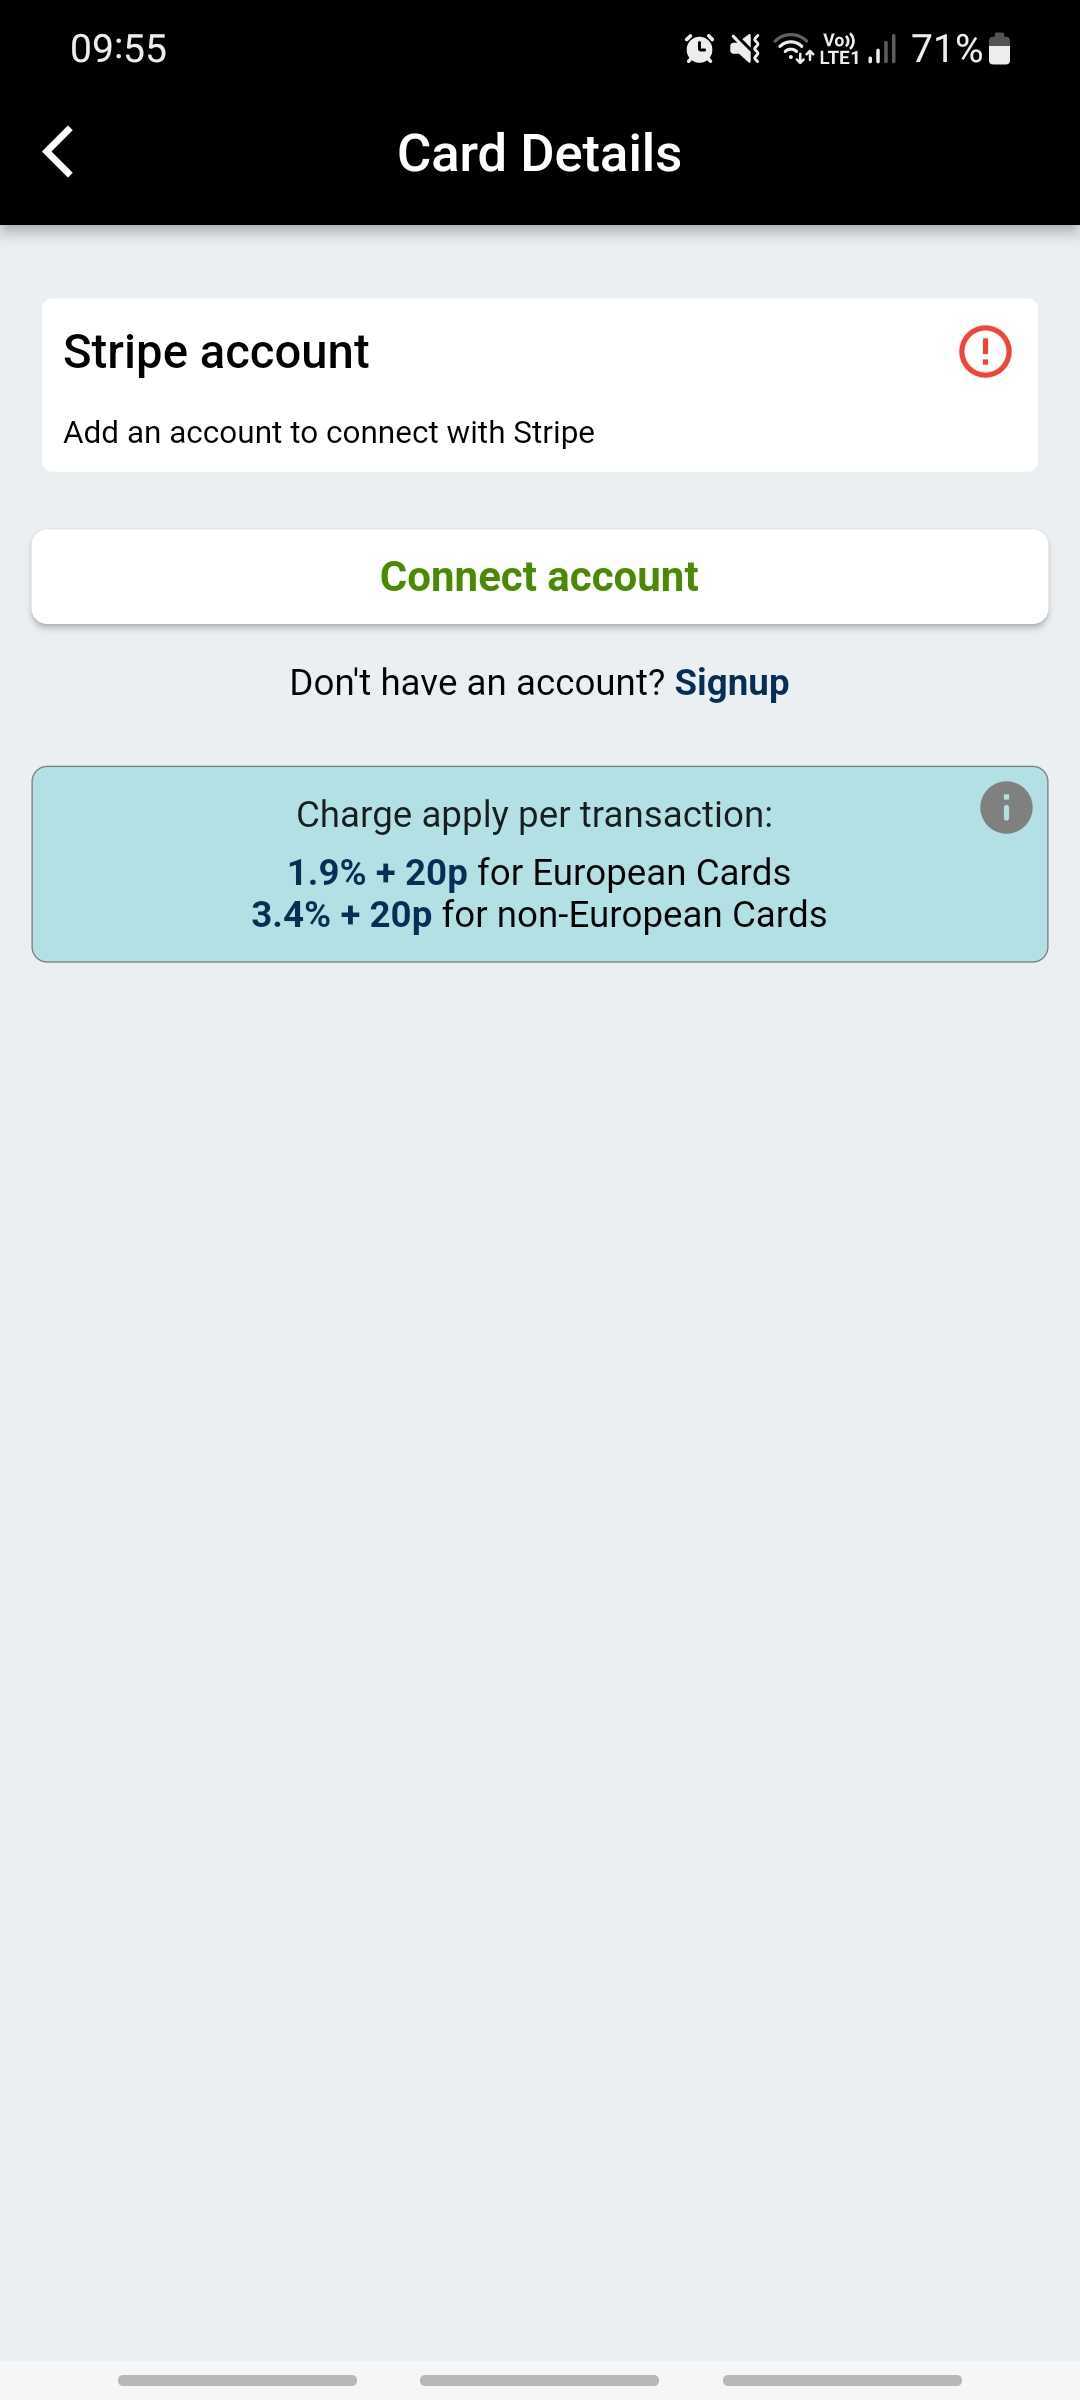
If you click Yes, you’ll be taken to a new screen to Connect your account. Please be aware charges will apply.
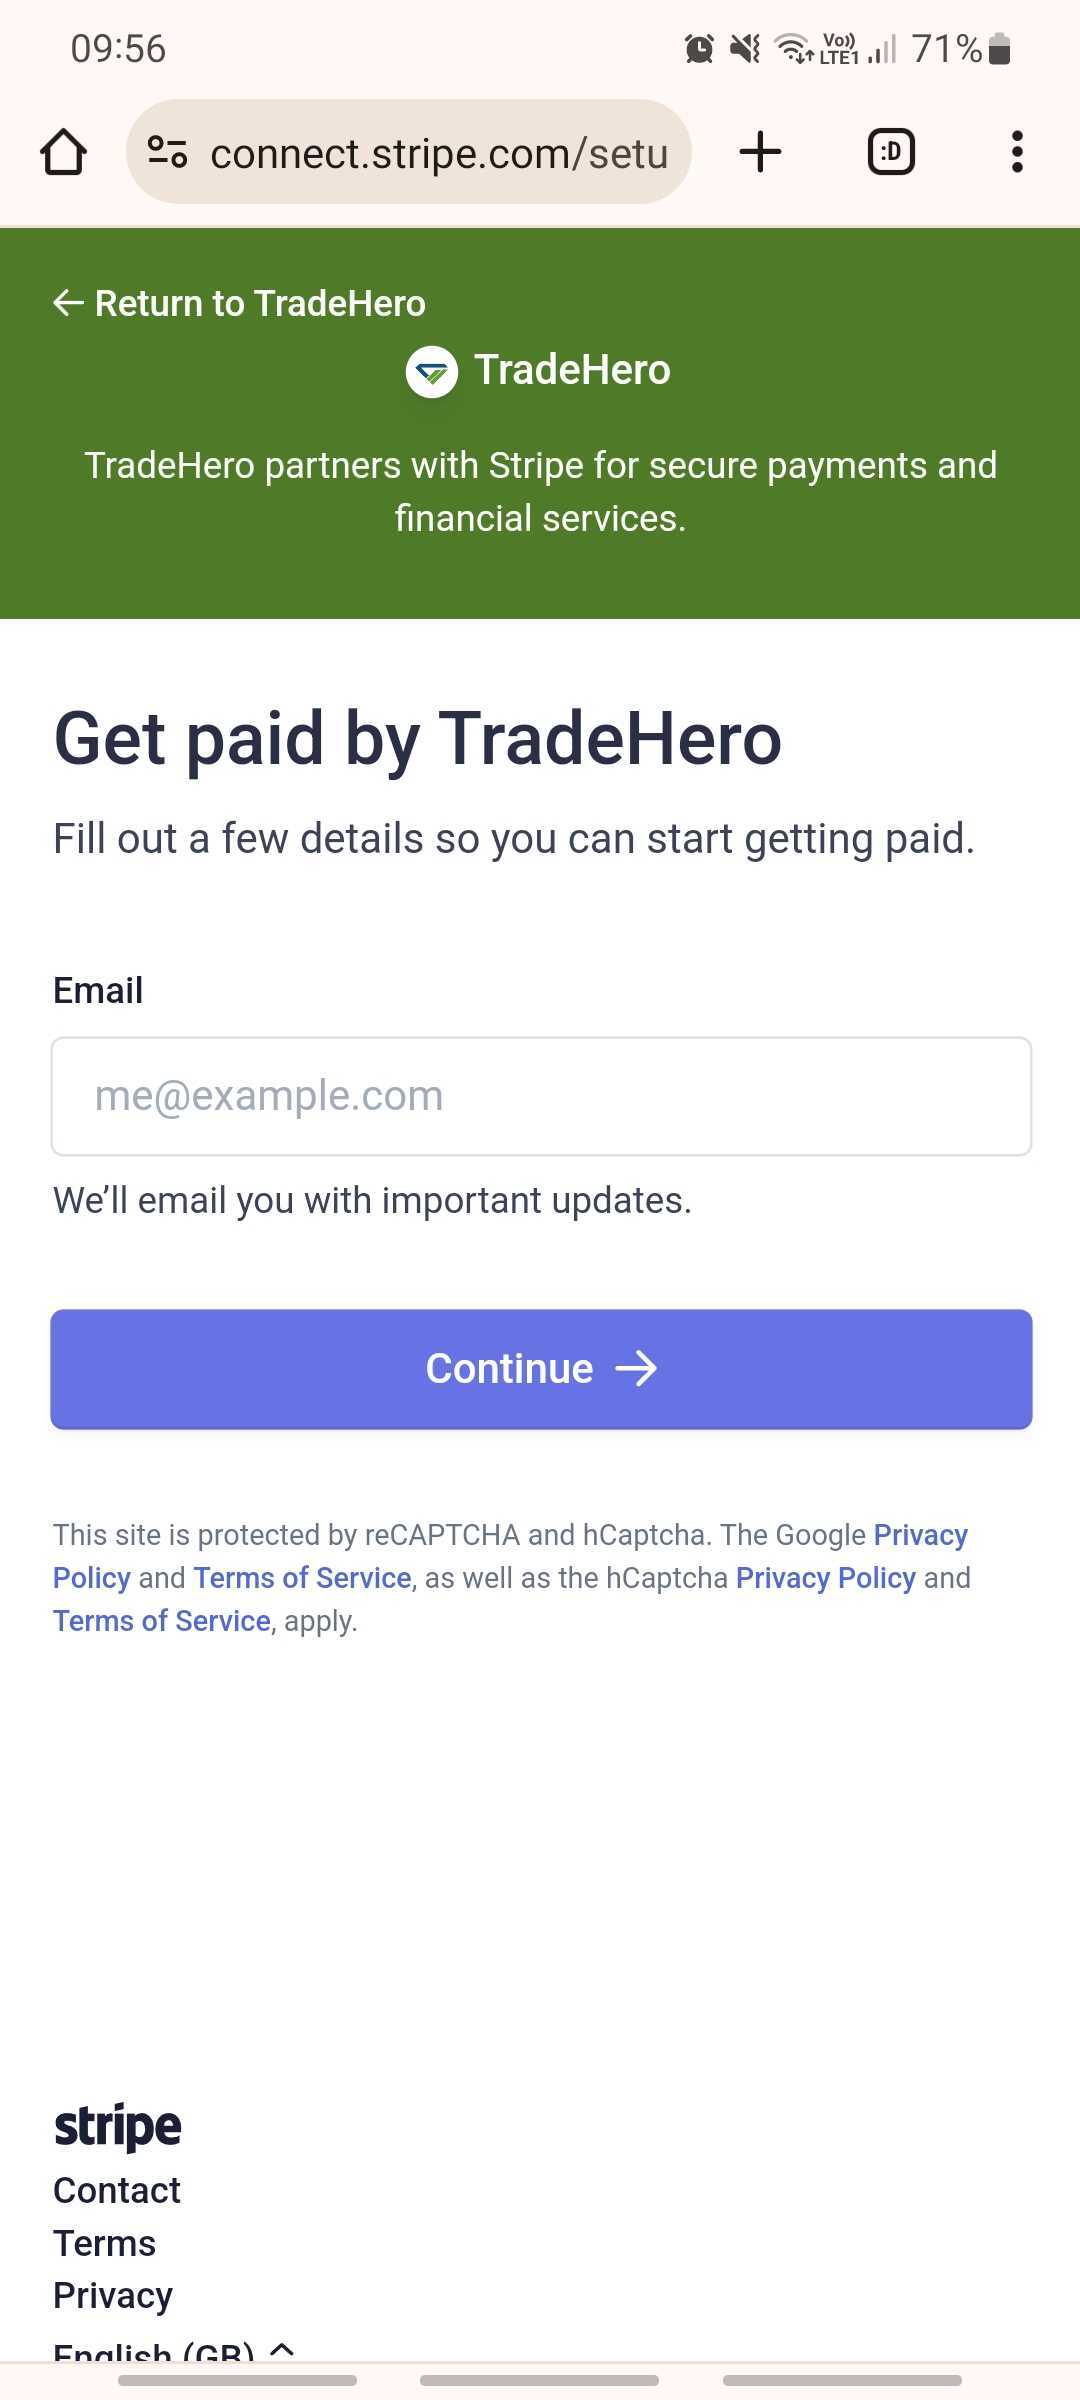
Click Connect Account, and then enter your Stripe email address
Now you are connected, you can take card payments through TradeHero. Enter the customer details and then click Pay.
When you have finished the work, you can click Complete to close the job. This job will still be available to you via the Completed tab. Here, you will still be able to edit costs, take payment (if payment is still outstanding), or raise an invoice.
You also have the ability to reopen the job should it be required. It will simply move back to the In Progress tab.
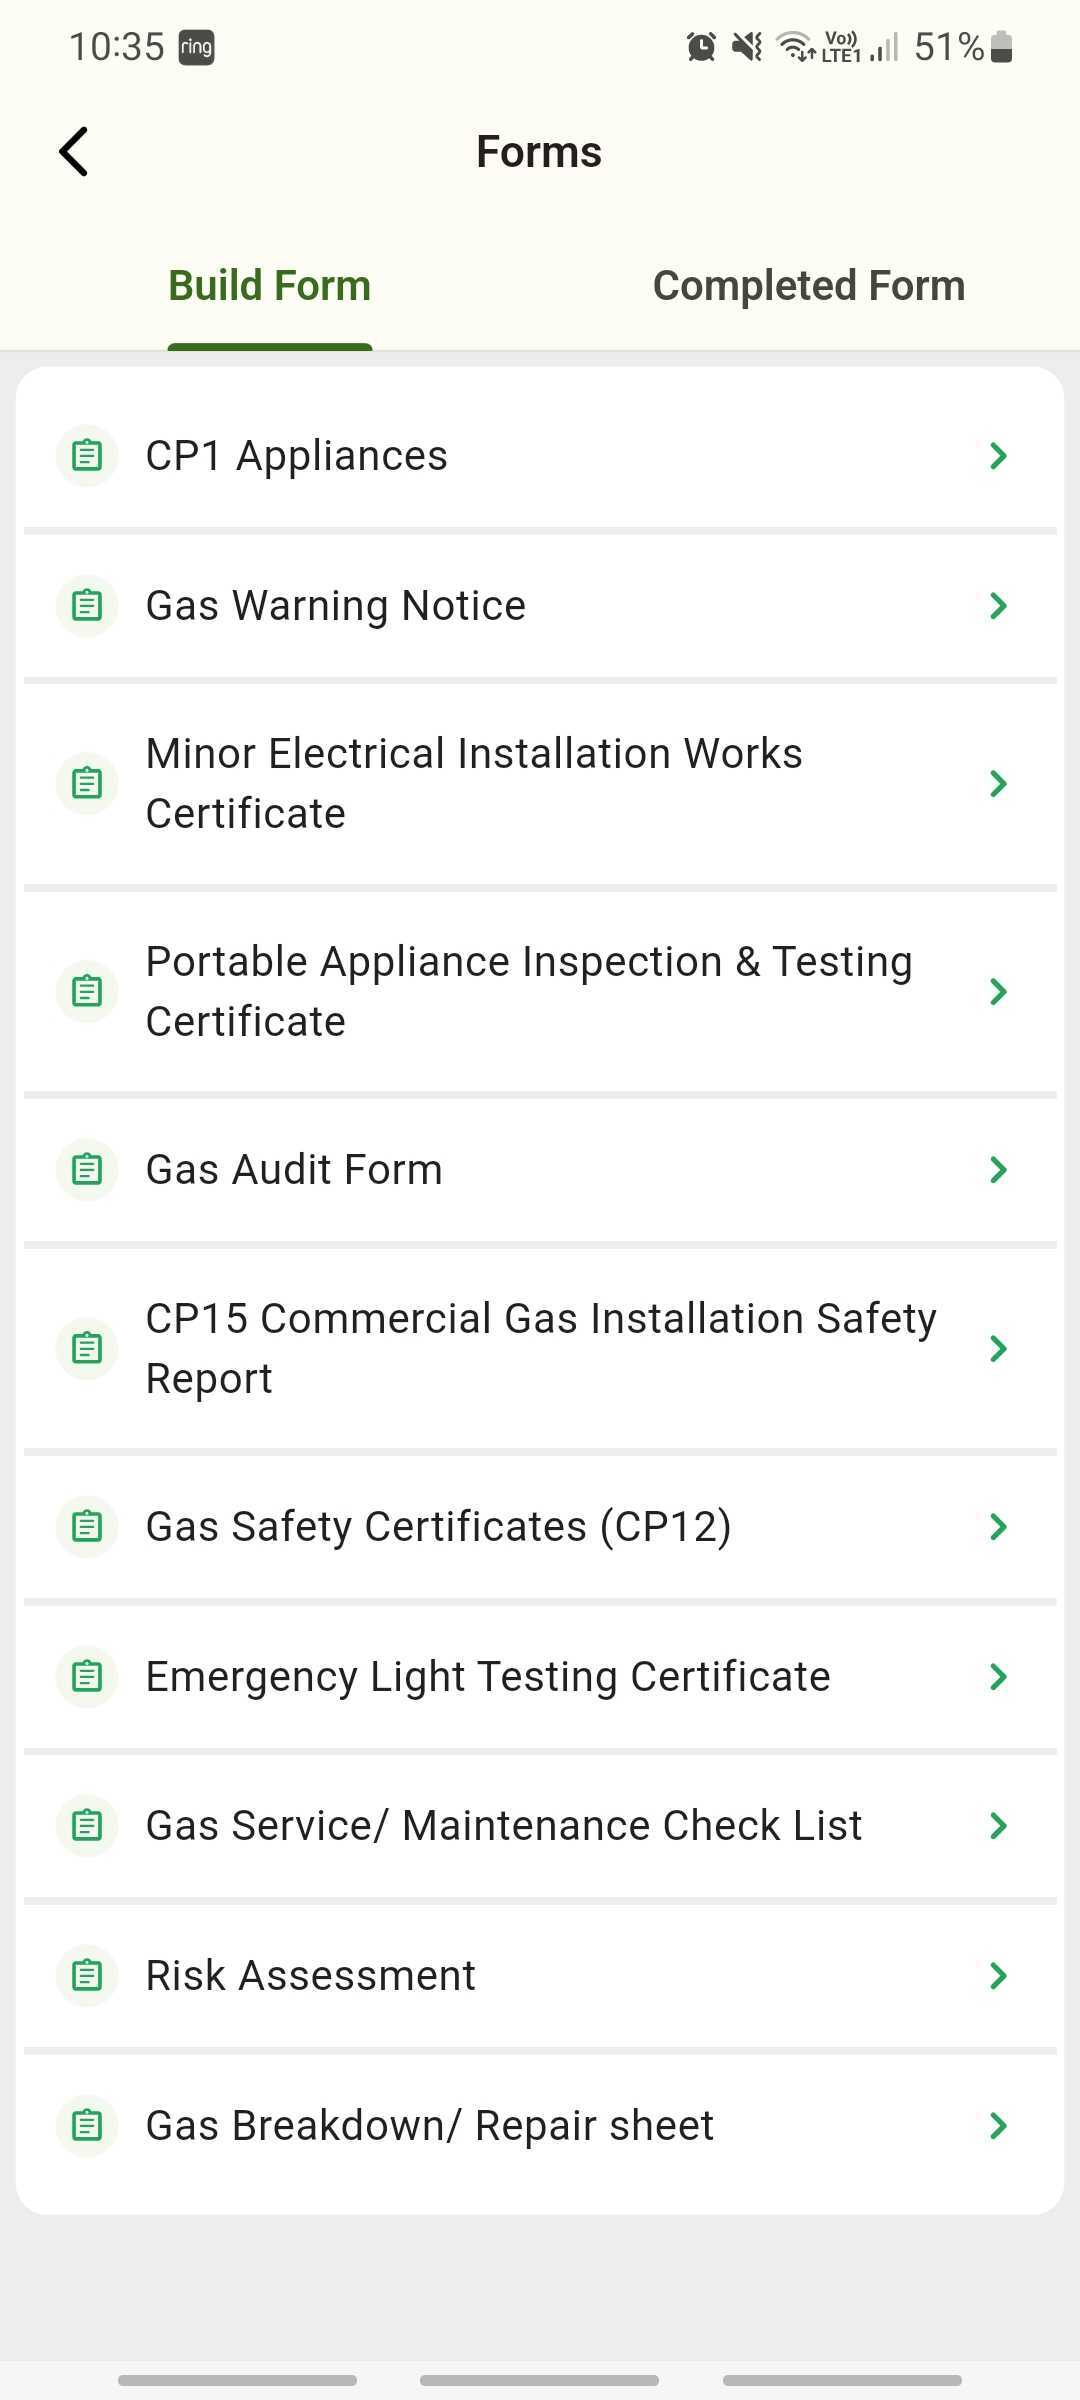
Forms
There are 11 forms available for you to use where necessary.
If you start a form and come away from that screen or the app in general, it will be saved, and you can come back to it later.
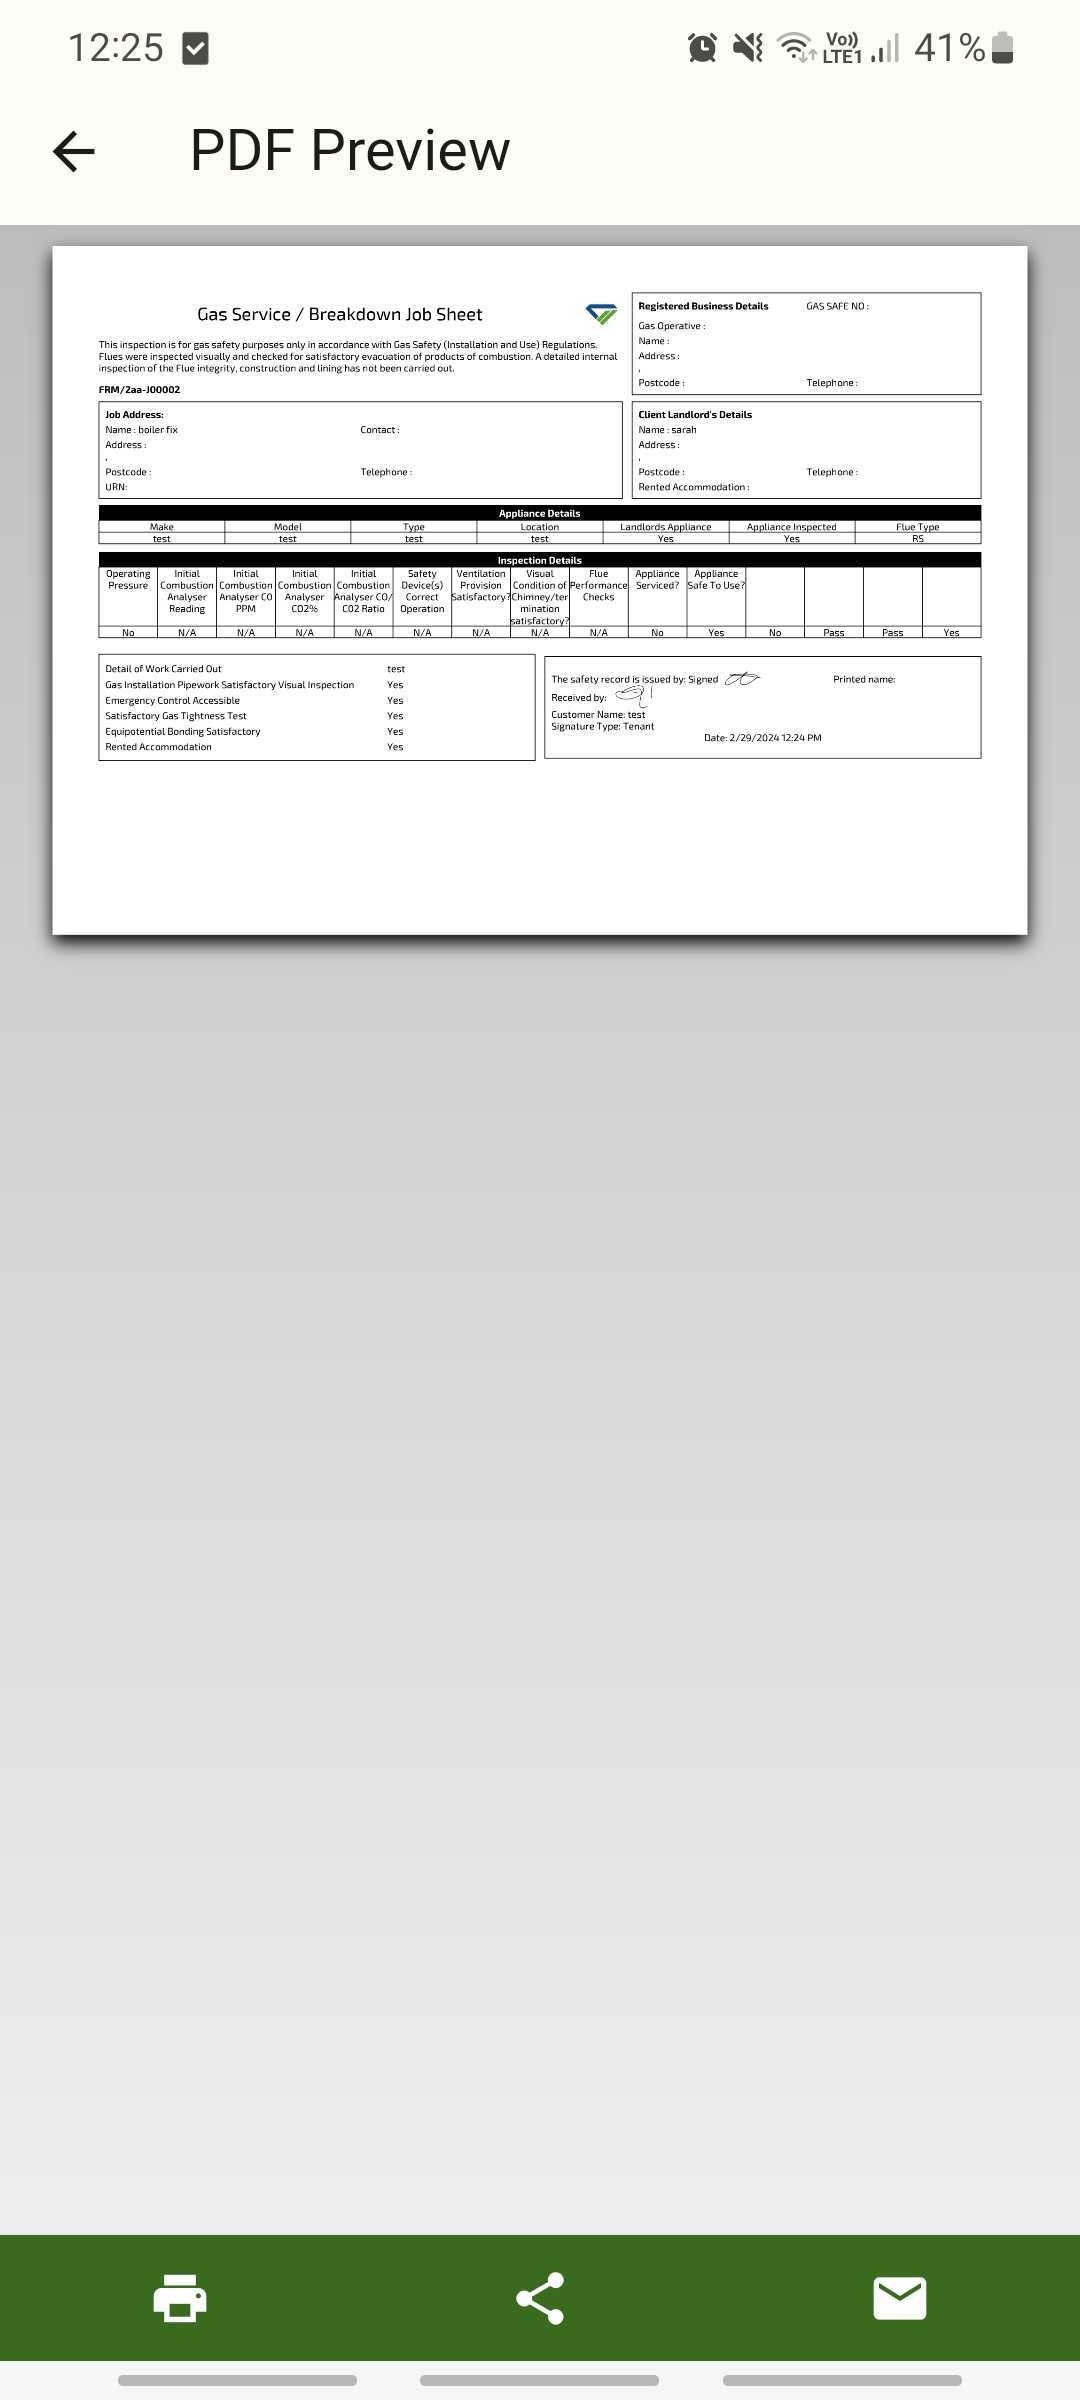
Once a form is completed, you’ll get a PDF preview, which can be printed, shared, or emailed
Outstanding Payments
This screen has two tabs; one for Outstanding payments, and another for Paid.
In the outstanding section, you’ll see any jobs that have been completed or have an invoice against them (not necessarily completed) and have a value higher than 0 where the full payment has not yet been taken.
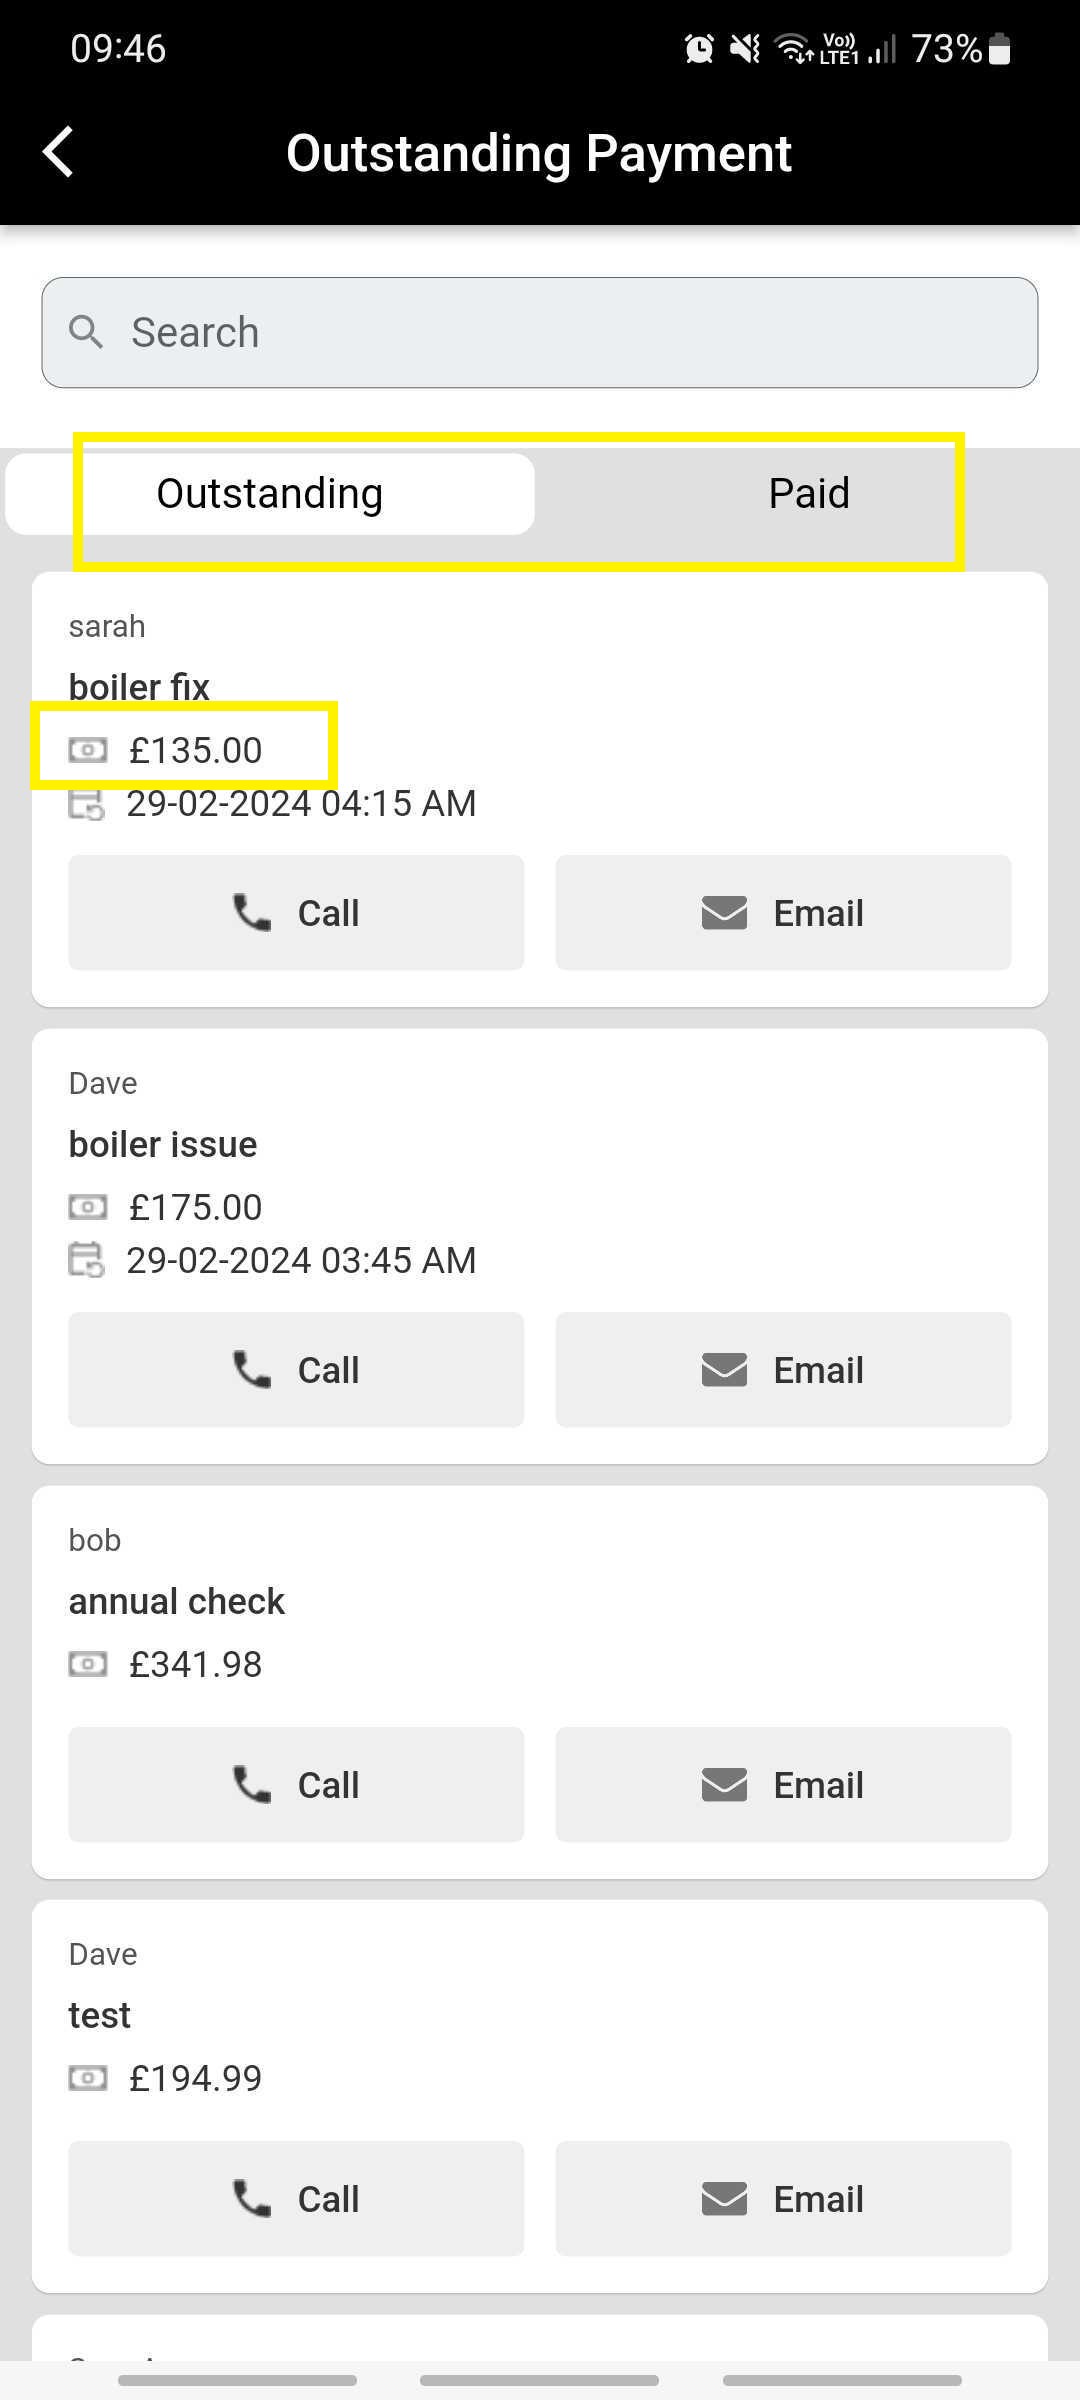
Click on a job to view the Job Details screen. From here, you’ll be able to Take Payment, or create/send an invoice as required. See above for further information on taking payments.
Further Support
For further information or assistance with the above, contact our Support Team on 0800 326 5561 or email support@joblogic.com. Alternatively, our Customer Success Management team can be reached by emailing customersuccess@joblogic.com
Publishing Details
This document was written and produced by Joblogic’s Technical Writing team and was last updated on the date specified above. Be aware that the information provided may be subject to change following further updates on the matter becoming available. Additionally, details within the guide may vary depending on your Joblogic account’s user permissions.