Introduction
Joblogic provides a vehicle tracking feature which will allow our users to track and monitor their engineer's vehicle locations. This user guide will detail how our vehicle tracking module can be set up and used within the Joblogic back-office system.
The Purpose of Vehicle Tracking
Some of the industries within Joblogic’s customer base are required to have a vehicle tracking system in place for compliance and insurance purposes, and so our vehicle tracking function has been introduced in order to accommodate such customers. However, regardless of need for this function due to compliance or insurance, vehicle tracking is a very useful feature for anyone who uses it. It can be used to help ensure the safety of colleagues, improve teamwork between the office and engineer, and reduces the need for more manual means of communication. It also allows for more accurate and consistent location readings when used in addition to our mobile tracking feature.
Setting Up Vehicle Tracking
In order to set up vehicle tracking within your Joblogic account, a hardware tracking device for each relevant vehicle must first be obtained from us. Please note that the vehicle tracking feature is sold separately. Contact our sales team (sales@joblogic.com) or your customer success manger (CSM) (accountmanager@joblogic.com) for further details.
Once the vehicle tracking service has been confirmed with your CSM, they will arrange for you to be contacted by our support team where they will request that you provide some details (applicable vehicle registrations numbers and engineer names, for example). These details will be used to configure the tracker devices against your Joblogic account before we send them out. You will then be sent your tracking devices once completed.
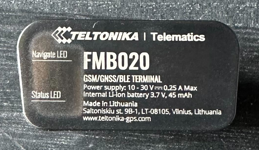
The Tracking Hardware Device
The tracking hardware device will appear the same or similar to the below.
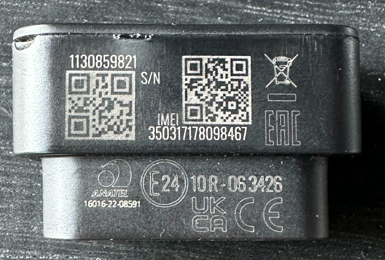

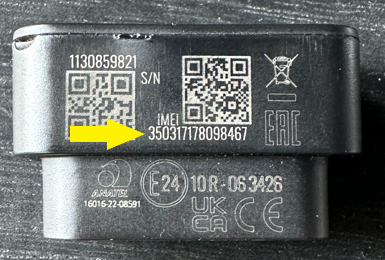
Once received, check and make note of each device’s IMEI number (International Mobile Equipment Identity; a unique identification number) and which vehicle each device corresponds too (your CSM and/or our support team will provide you with each device’s corresponding vehicle registration to be assigned to based on the information gathered from you previously). This is information will be required at a later point and will need to be entered within your Joblogic account. The device’s IMEI number is located as pictured below.
Fitting the Tracking Device
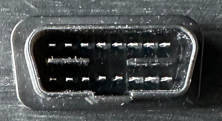
The tracking device needs to be fitted to the applicable vehicle that is being tracked (it is this device that is tracked and feeds back to your Joblogic account). The device is compatible with all vehicle’s OBD Port (On-board diagnostics port) and needs to be manually fitted here.
Within the vehicle, the port is usually located under the dashboard, beneath the steering wheel column of the vehicle (points 1, 2 or 3 below) but this can differ depending on the vehicle. If not located beneath the steering wheel column, it may be located in any of the areas indicated by points 4 – 9 below.
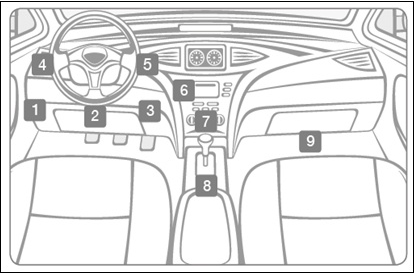
(Verizon - Locate the OBD-II Port)
Also, check the vehicle’s user manual for specific instructions on where this may be located within the vehicle.
To install the device, remove the OBD port’s protective covering (if it has one) and gently push the socket of the tracking device into the OBD Port.
Associating the Device to your Joblogic Account
The vehicle tracking device needs to be associated to your Joblogic account. To achieve this, log into the Joblogic account that the vehicle tracking device(s) is to be associated with.
Navigate to the settings area down the left side navigation menu and select ‘Library’.
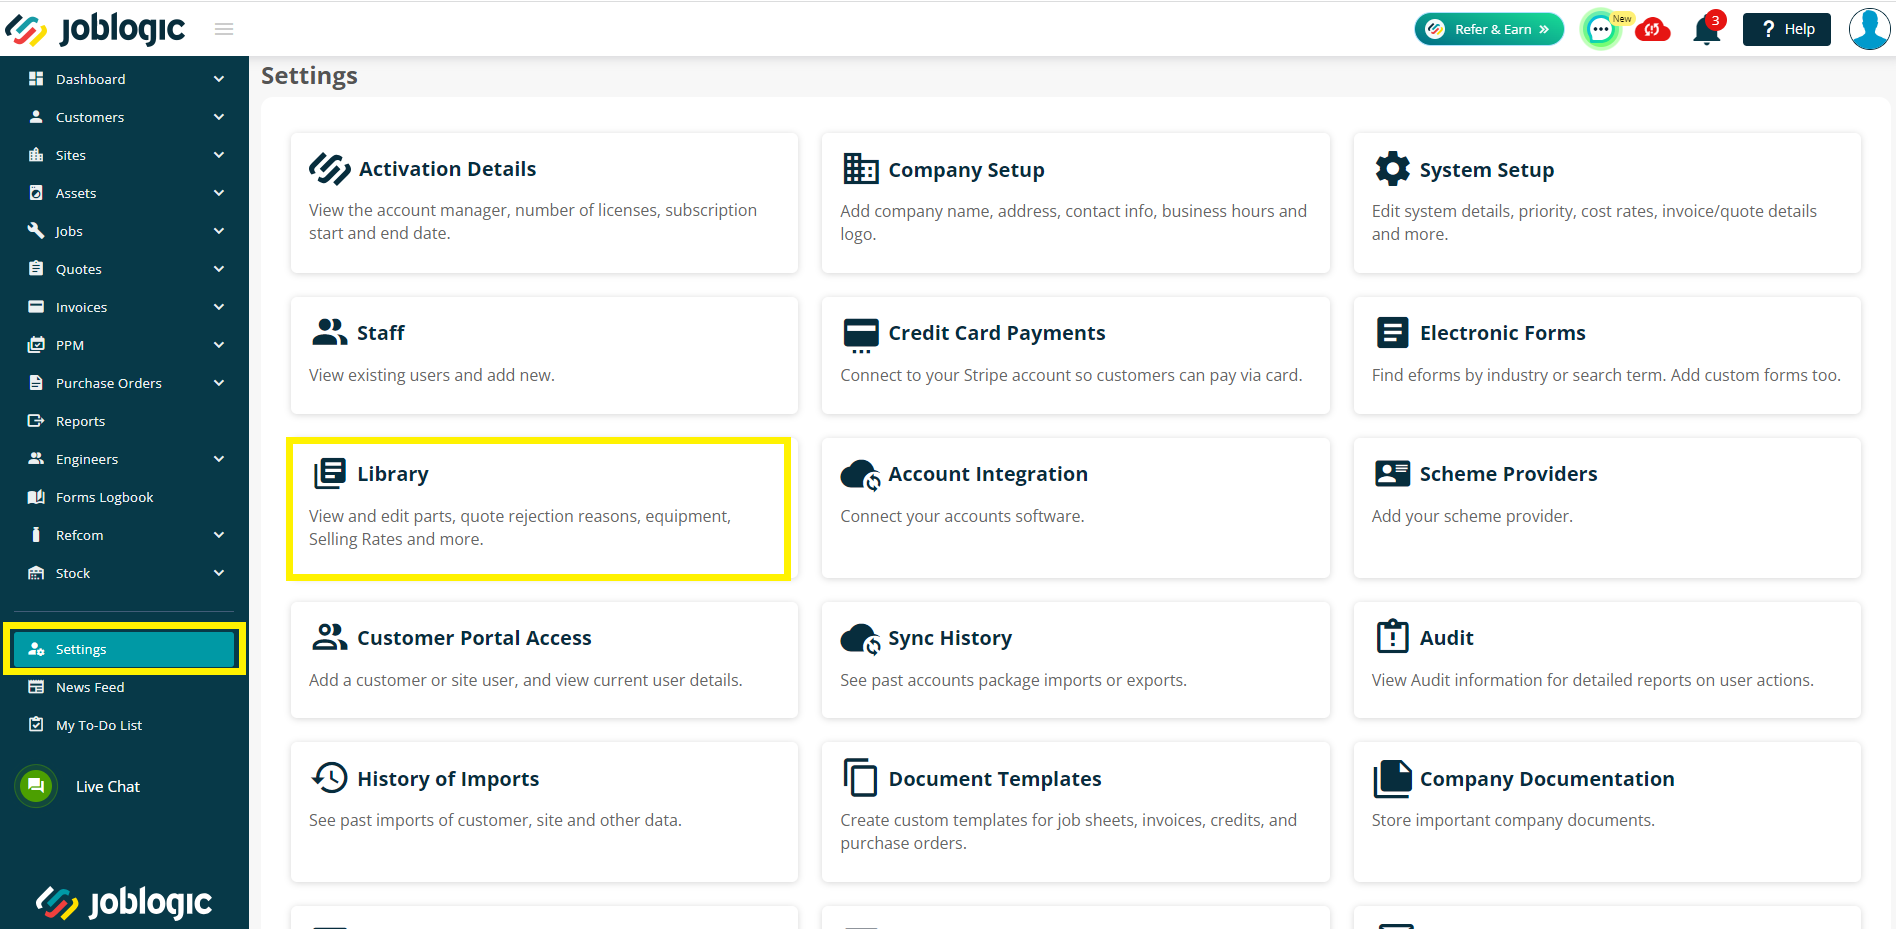
Within the library, select the vehicles area.
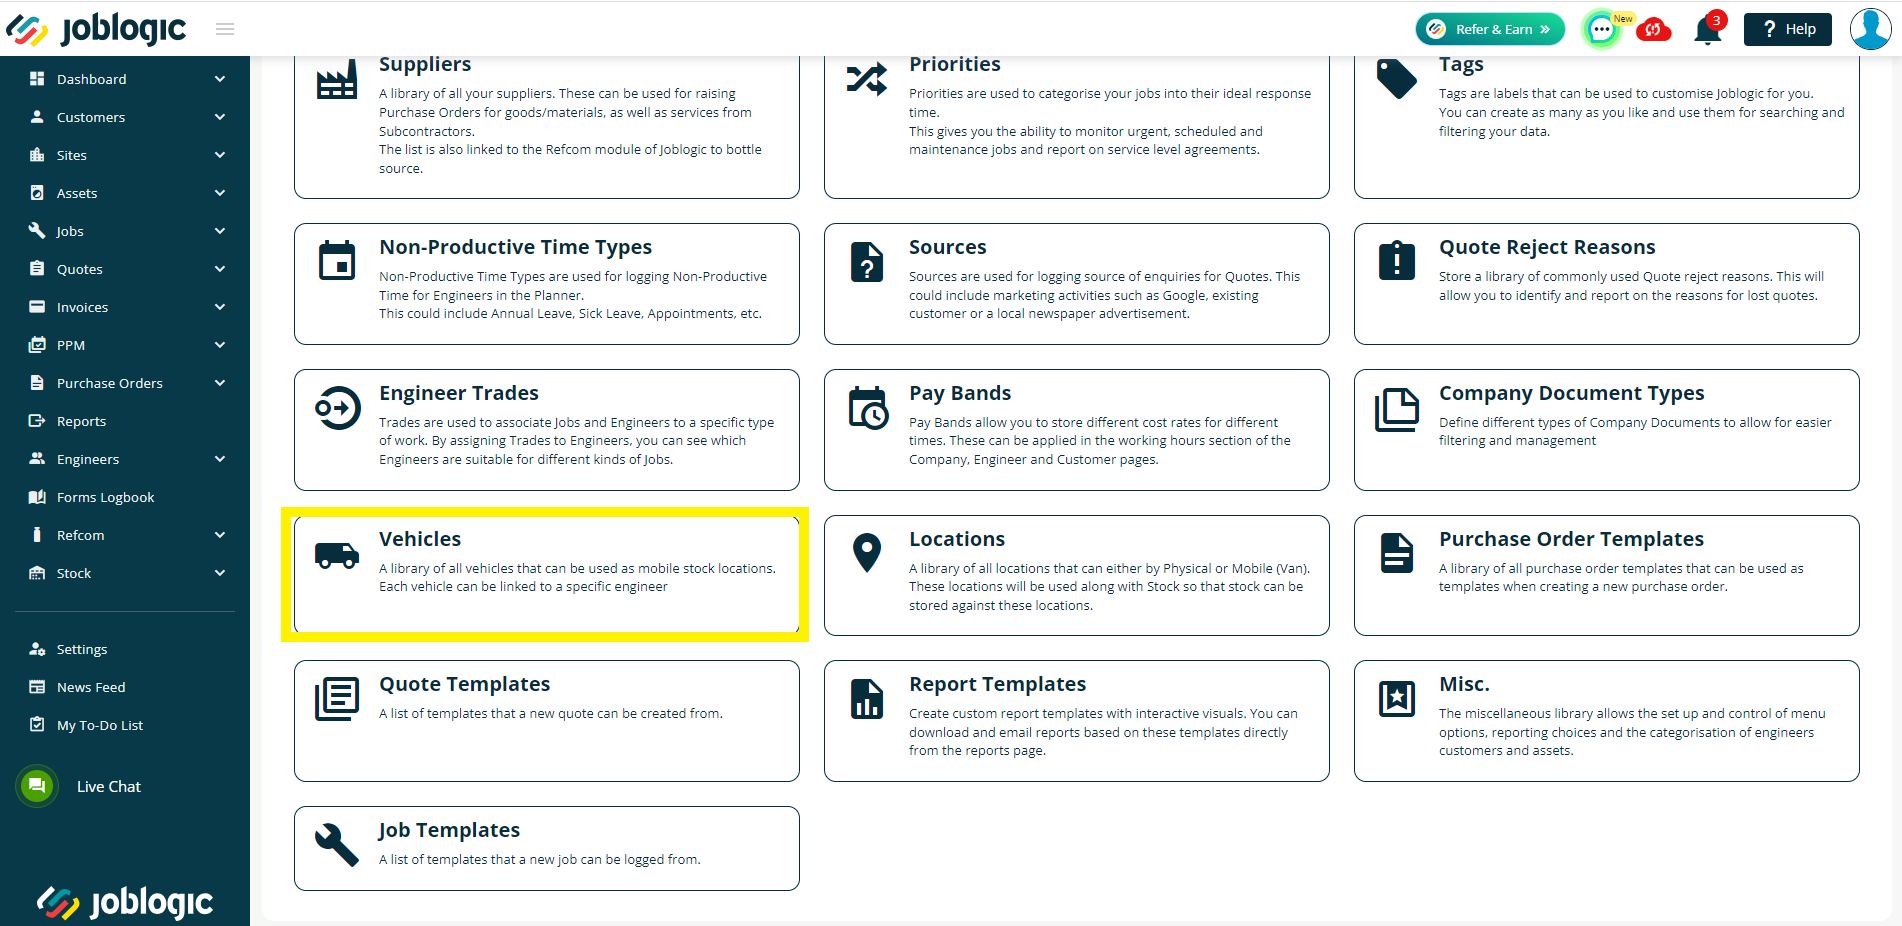
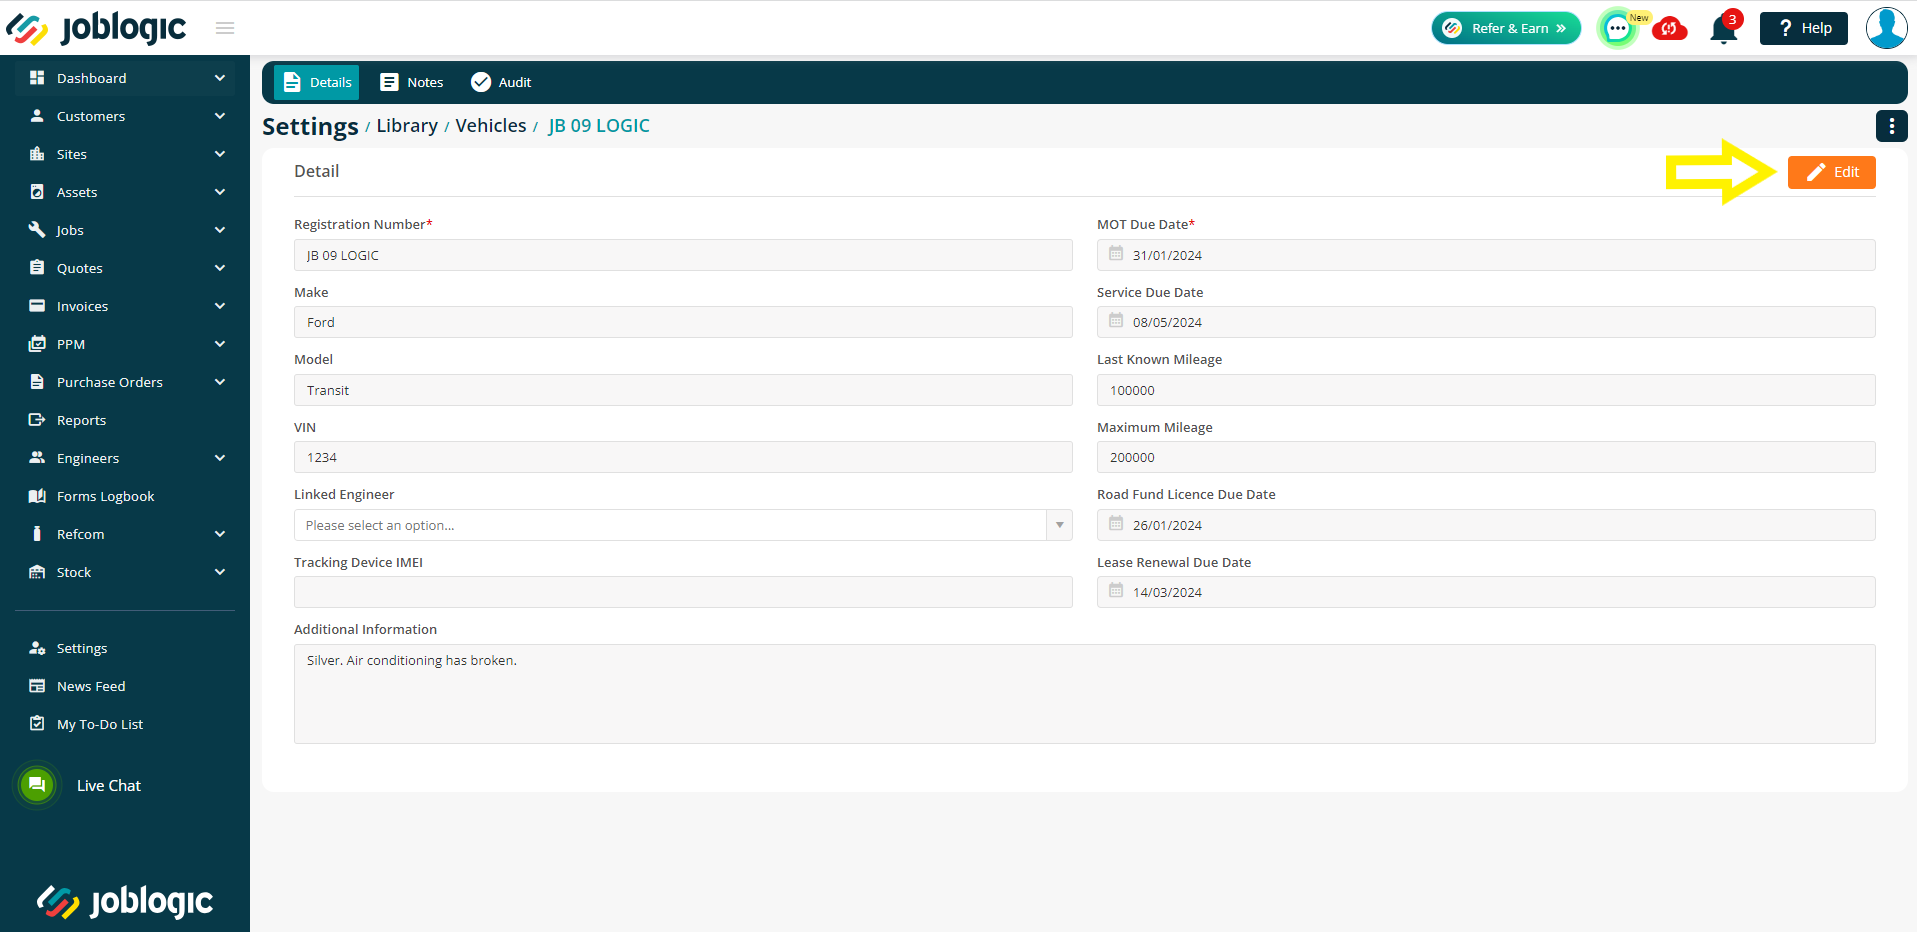
Select the vehicle that the tracking device(s) is to be fitted on and associated to by selecting the ‘Reg. number’. If the vehicle does not exist in your Joblogic account, it can be created via the green ‘Add Vehicle’ option.
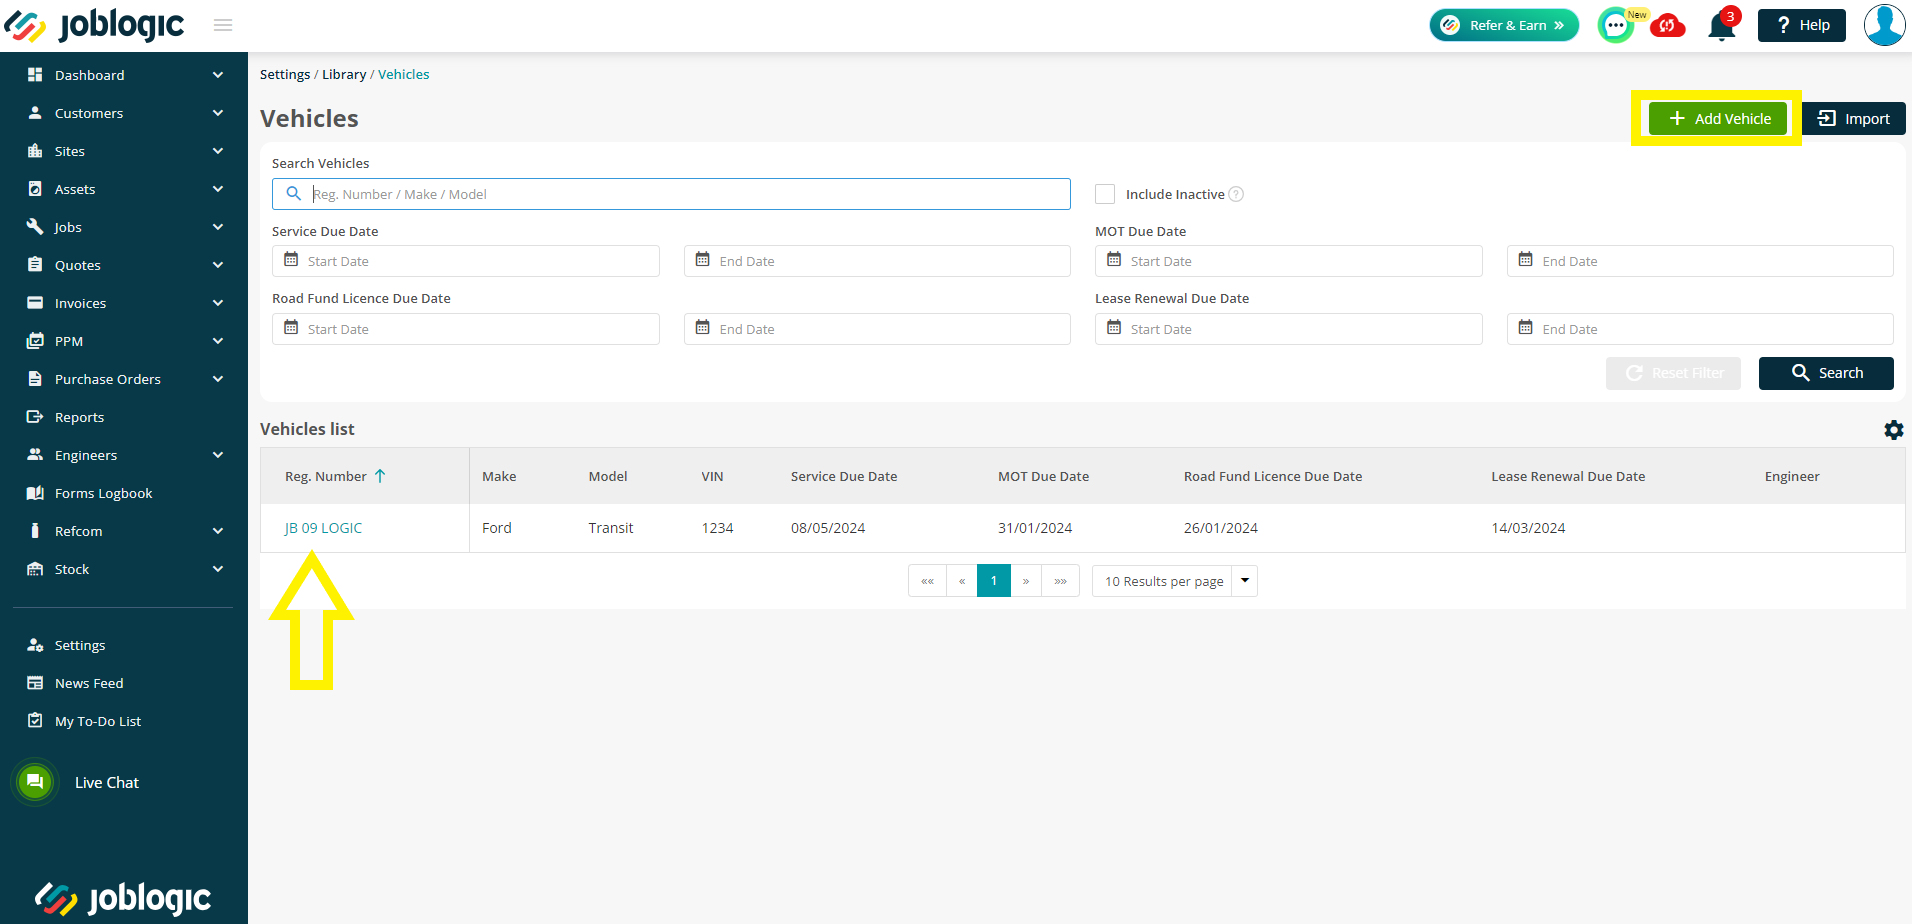
Select the orange ‘Edit’ option.
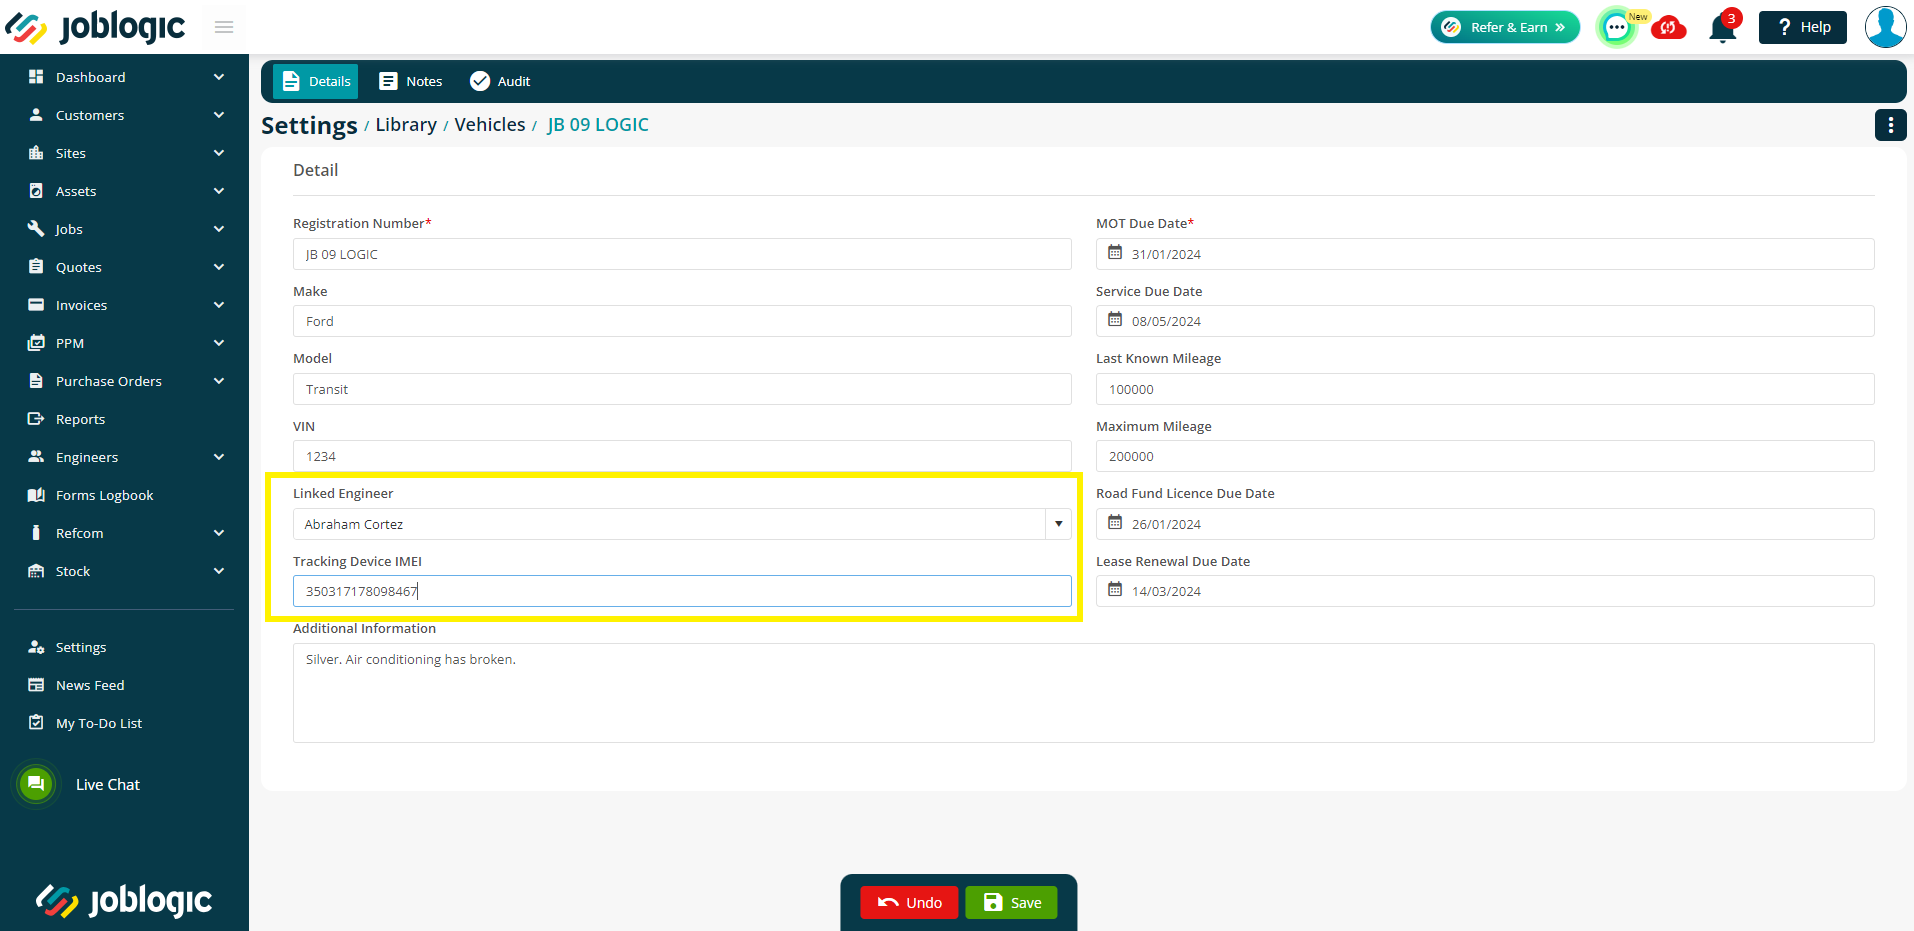
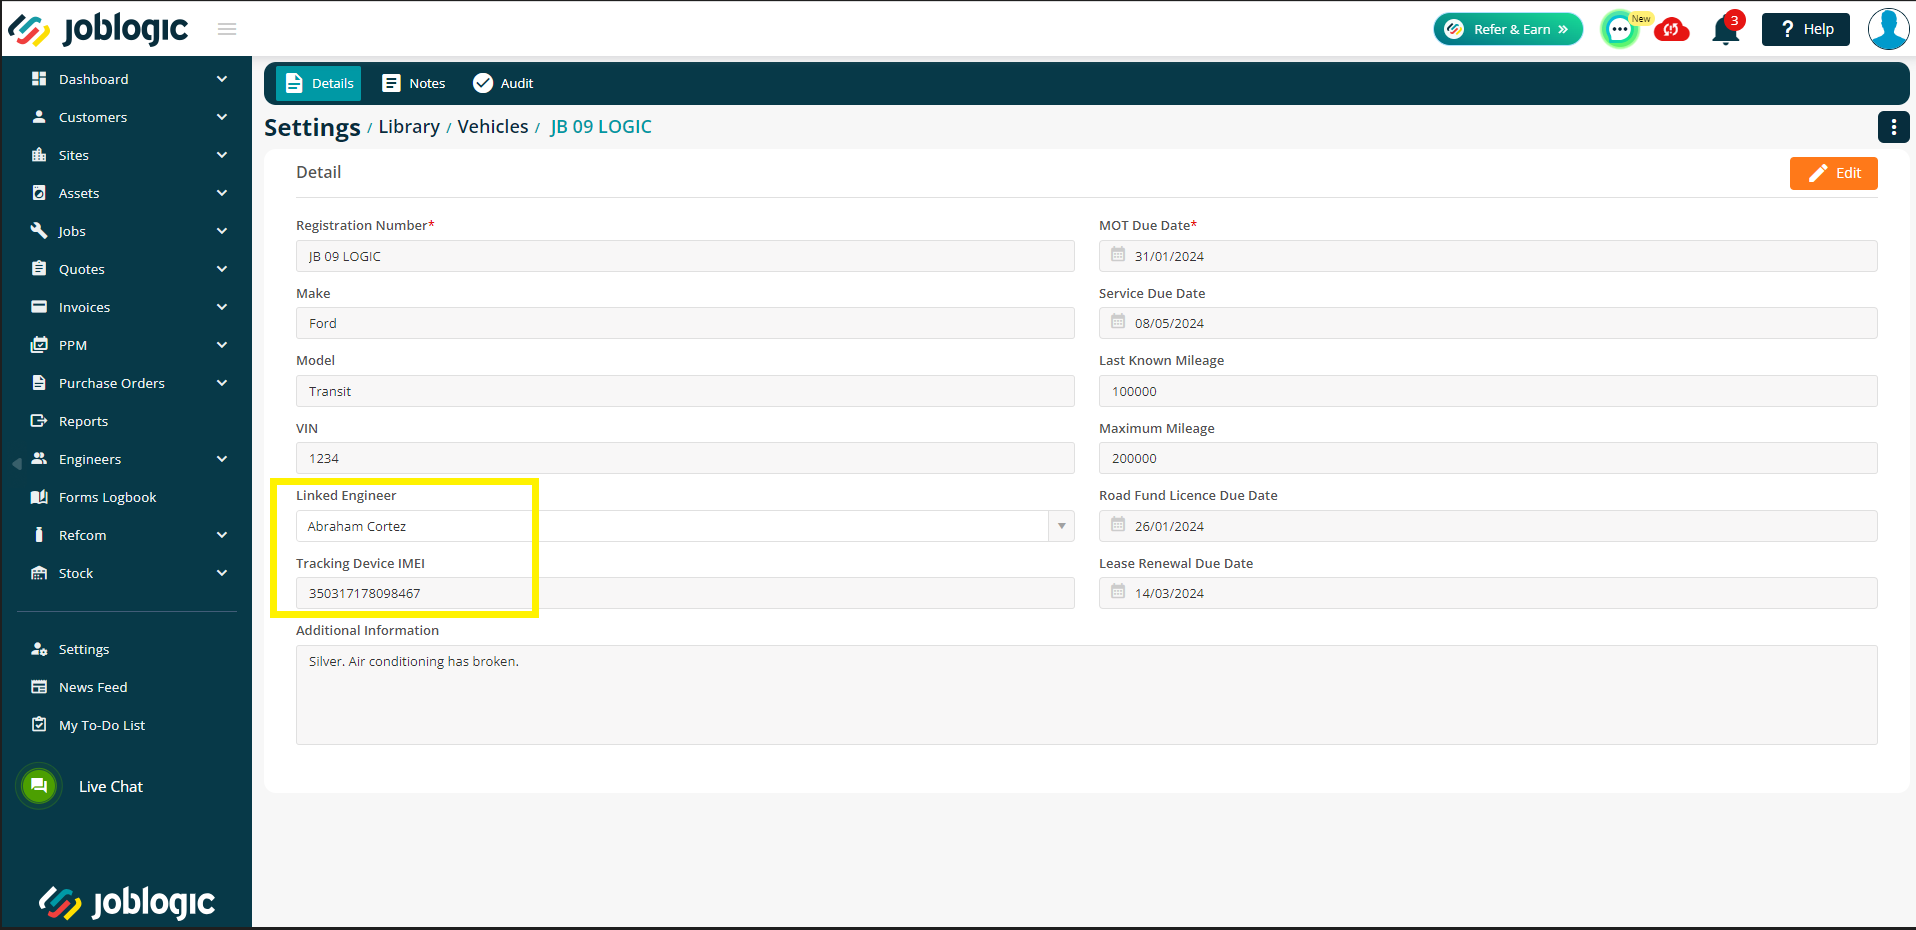
In order to associate the tracking device to a recorded vehicle within your Joblogic account, the ‘Tracking Device IMEI’ number must be filled in. You can also add a ‘Linked Engineer’ to the vehicle if you wish.
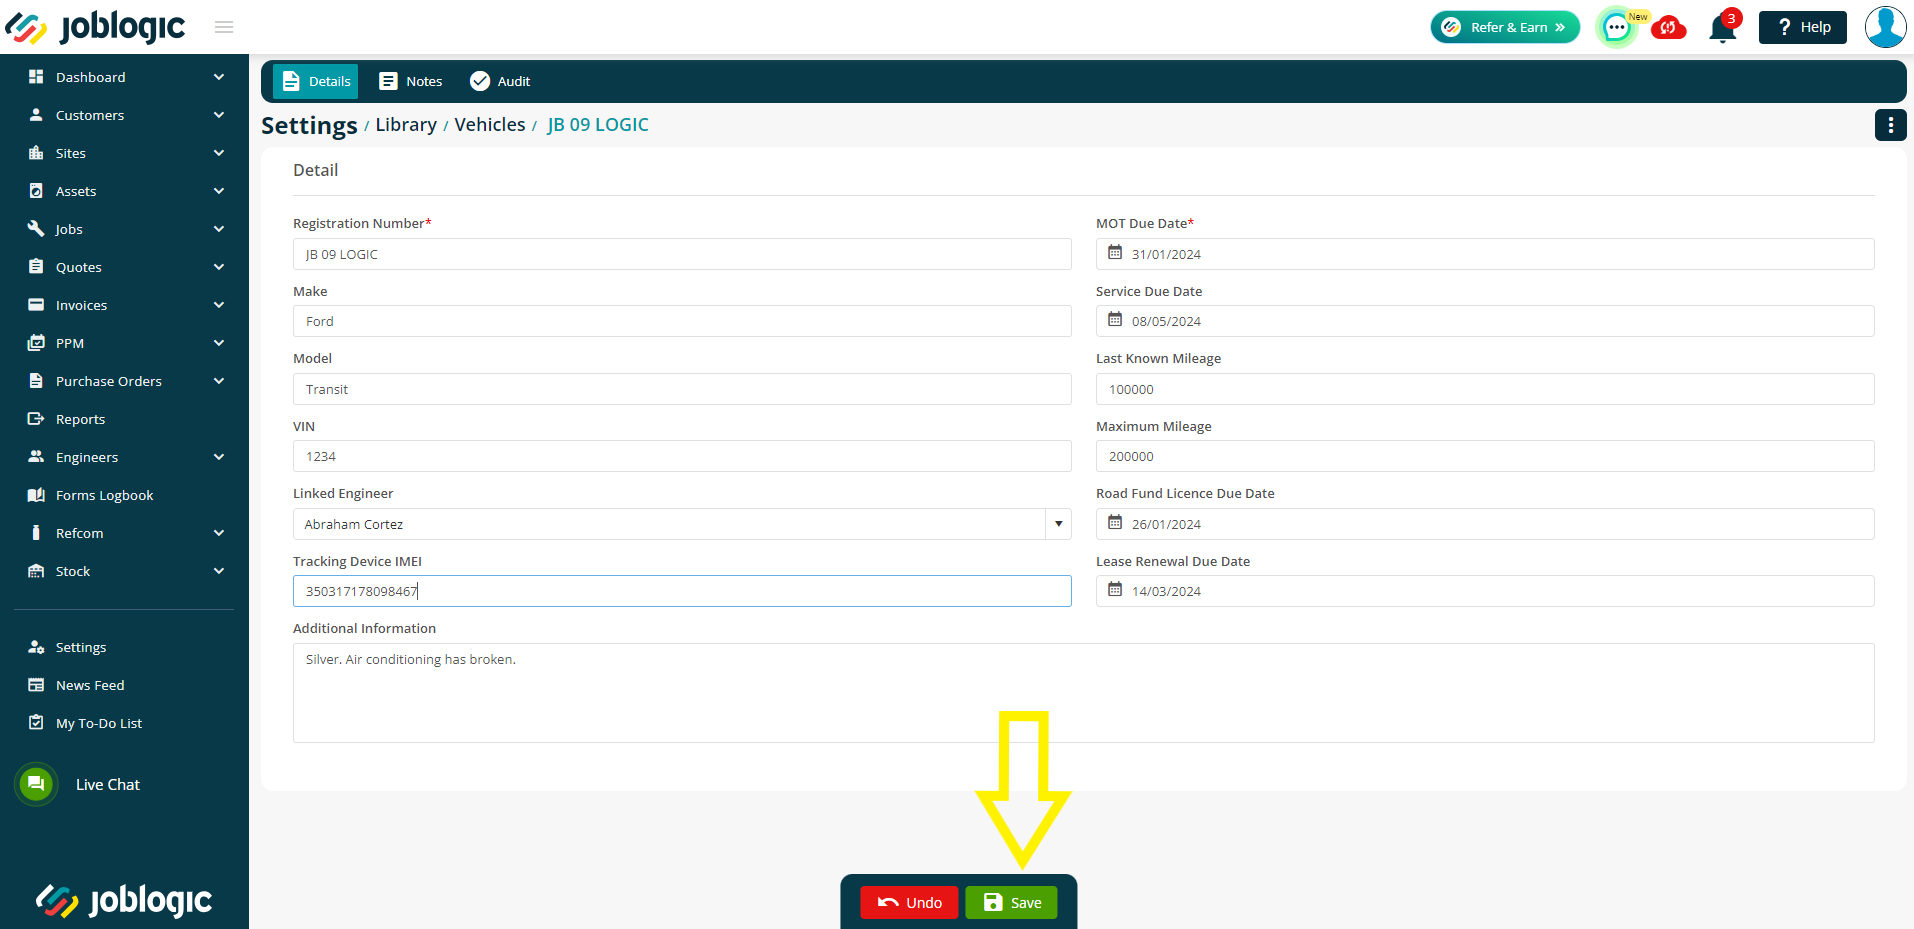
Select the save option and the vehicles updated details will log.
Contact your Customer Success Manager
Once the tracking hardware device has been fitted to the vehicle(s) and the device(s) has been associated to your Joblogic account, please contact your CSM (accountmanager@joblogic.com) letting them know that each has been actioned. There are then some final steps that our technical team will need to action before the feature is activated. Once activated your CSM will let you know and you will then be able to start using the vehicle tracking feature.
Using Vehicle Tracking within Joblogic
Once your vehicle tracking functions have been activated, and the vehicle has completed some tracked journeys, back-office users will then be able to view the vehicle tracking of the relevant vehicles. There are both a historical and live tracking options available.
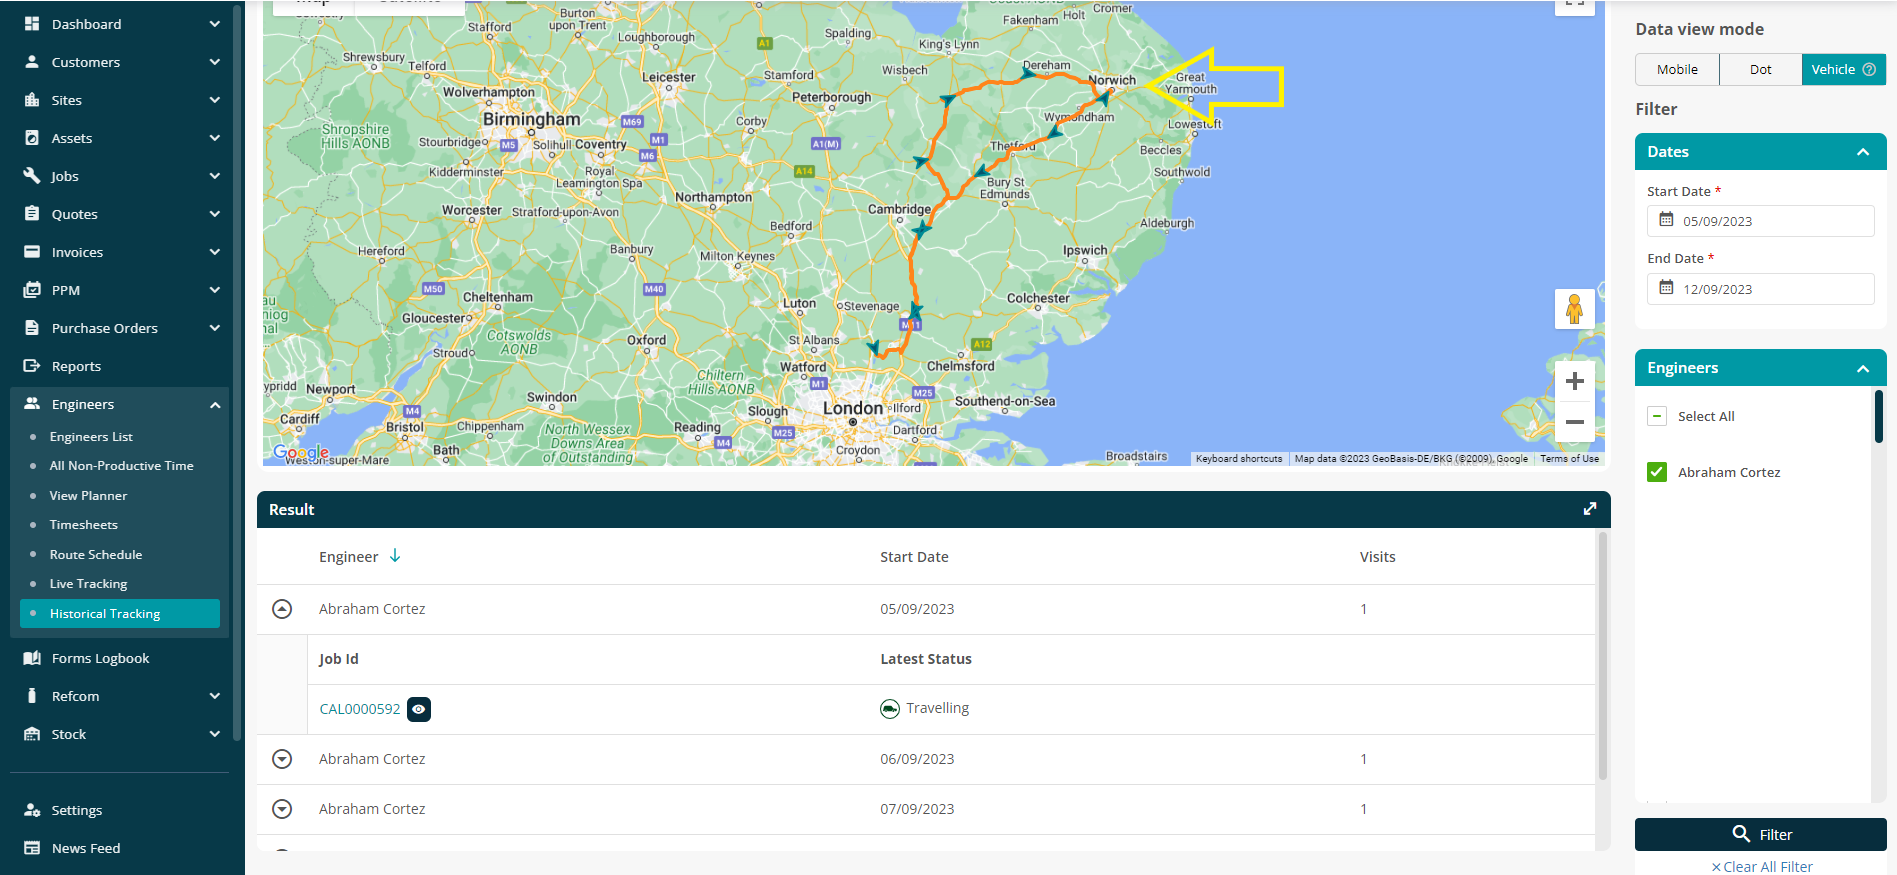
Historical Tracking
Historical tracking will show a destination map detailing each location and journey of the vehicle within a selected timeframe.
To do this, navigate to the engineers’ area down the left side menu and select ‘Historical tracking’.
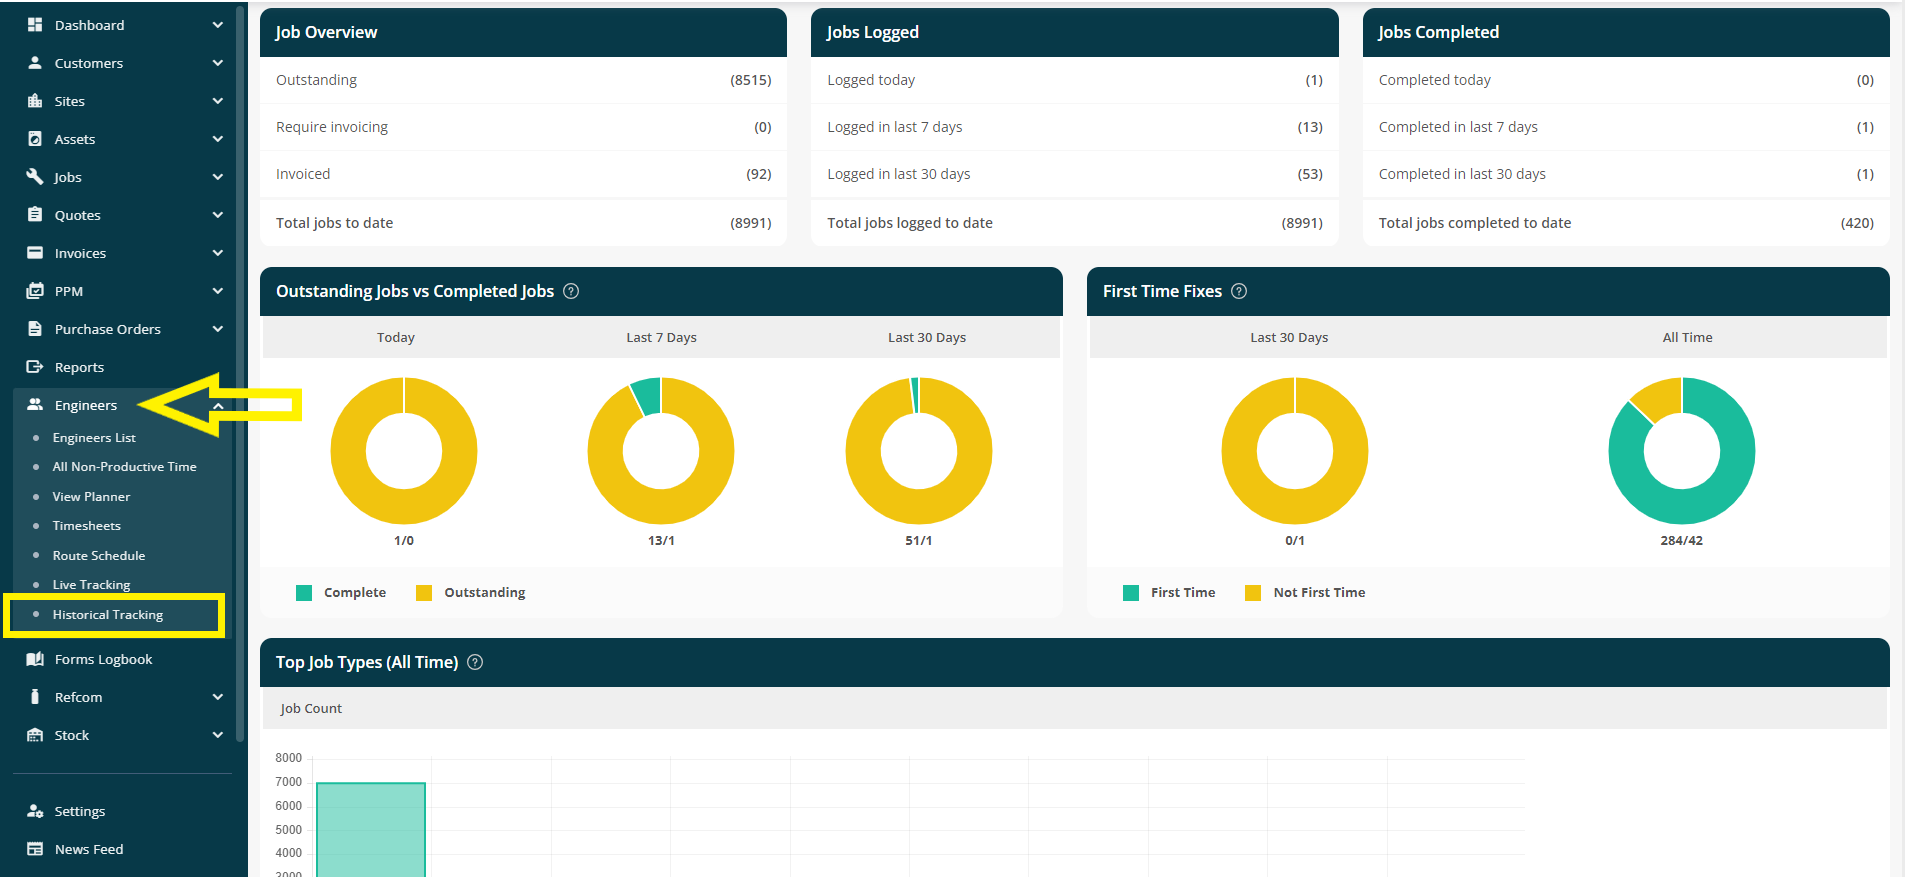
Within the historical tracking area, the engineers’ linked vehicles are filtered and selected to identify the tracking history (not the vehicles themselves). It is also important to note that vehicle tracking maps are associated to each individual job that the engineer conducts.
Within the mobile view of the historical tracker, select the date range that you wish to see the vehicle journey history for (the date range that the associated jobs of the engineer/vehicle fall within) and select the vehicle by selecting the engineer linked to the tracked vehicle. Then select the filter option.
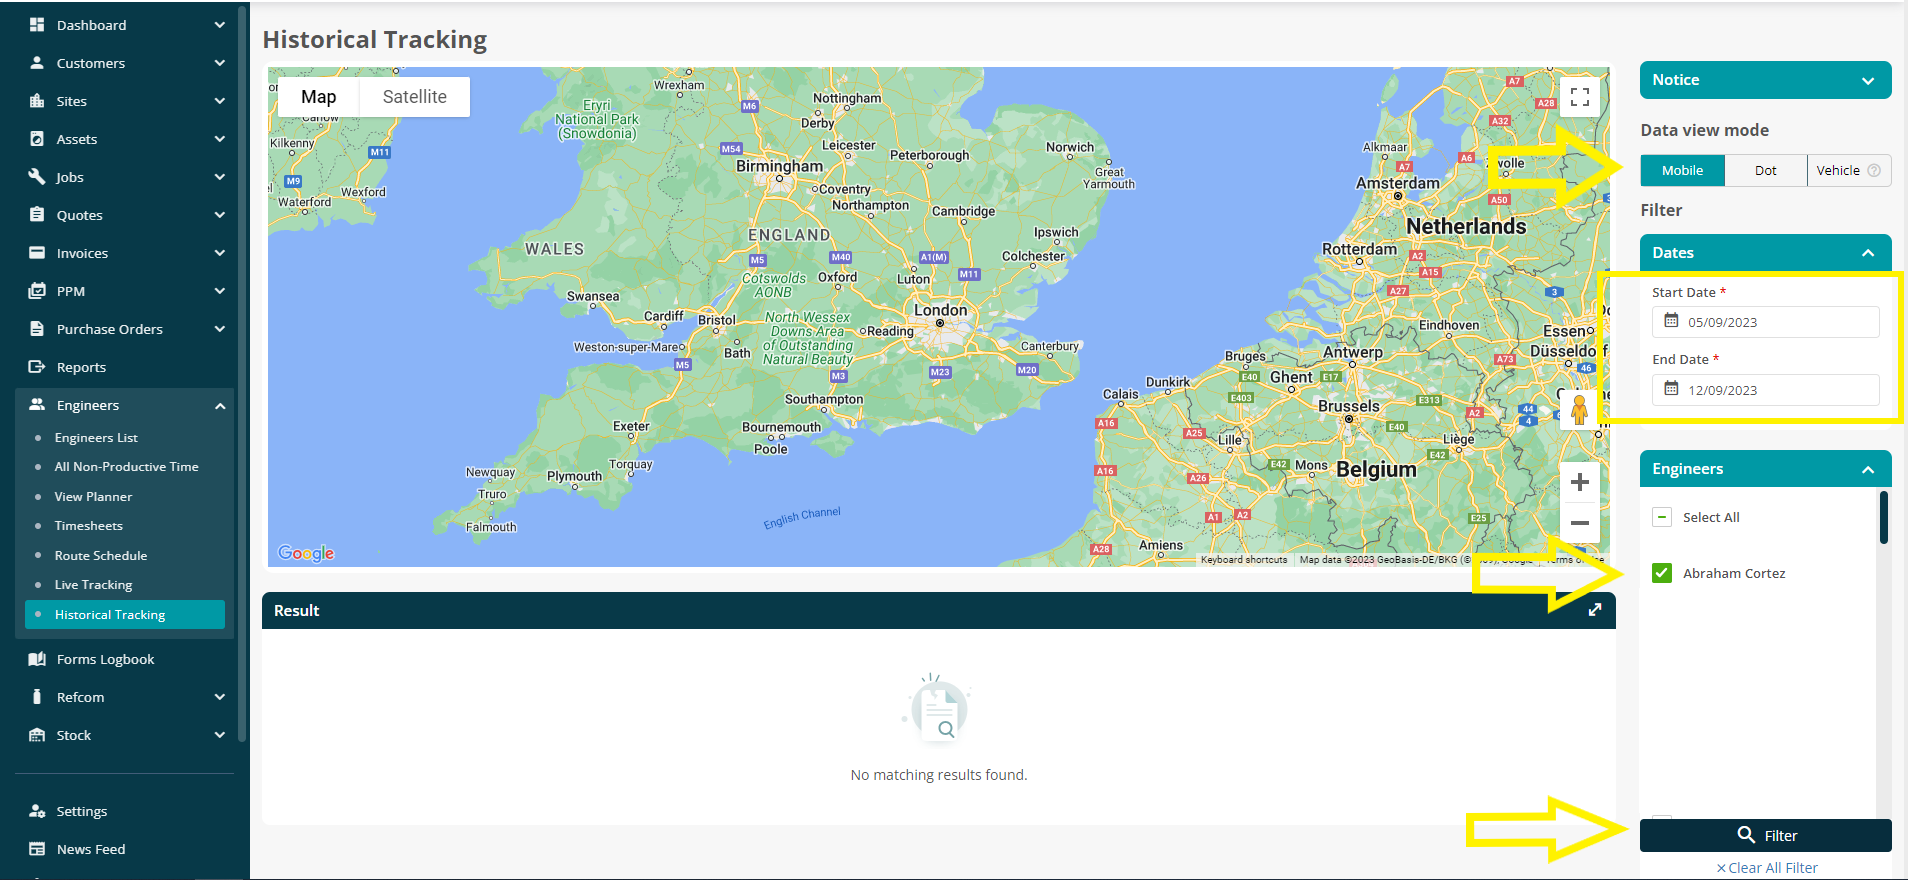
Select the drop arrow for the associated job that you wish to see the vehicle tracking history for and select the preview (eye) icon.

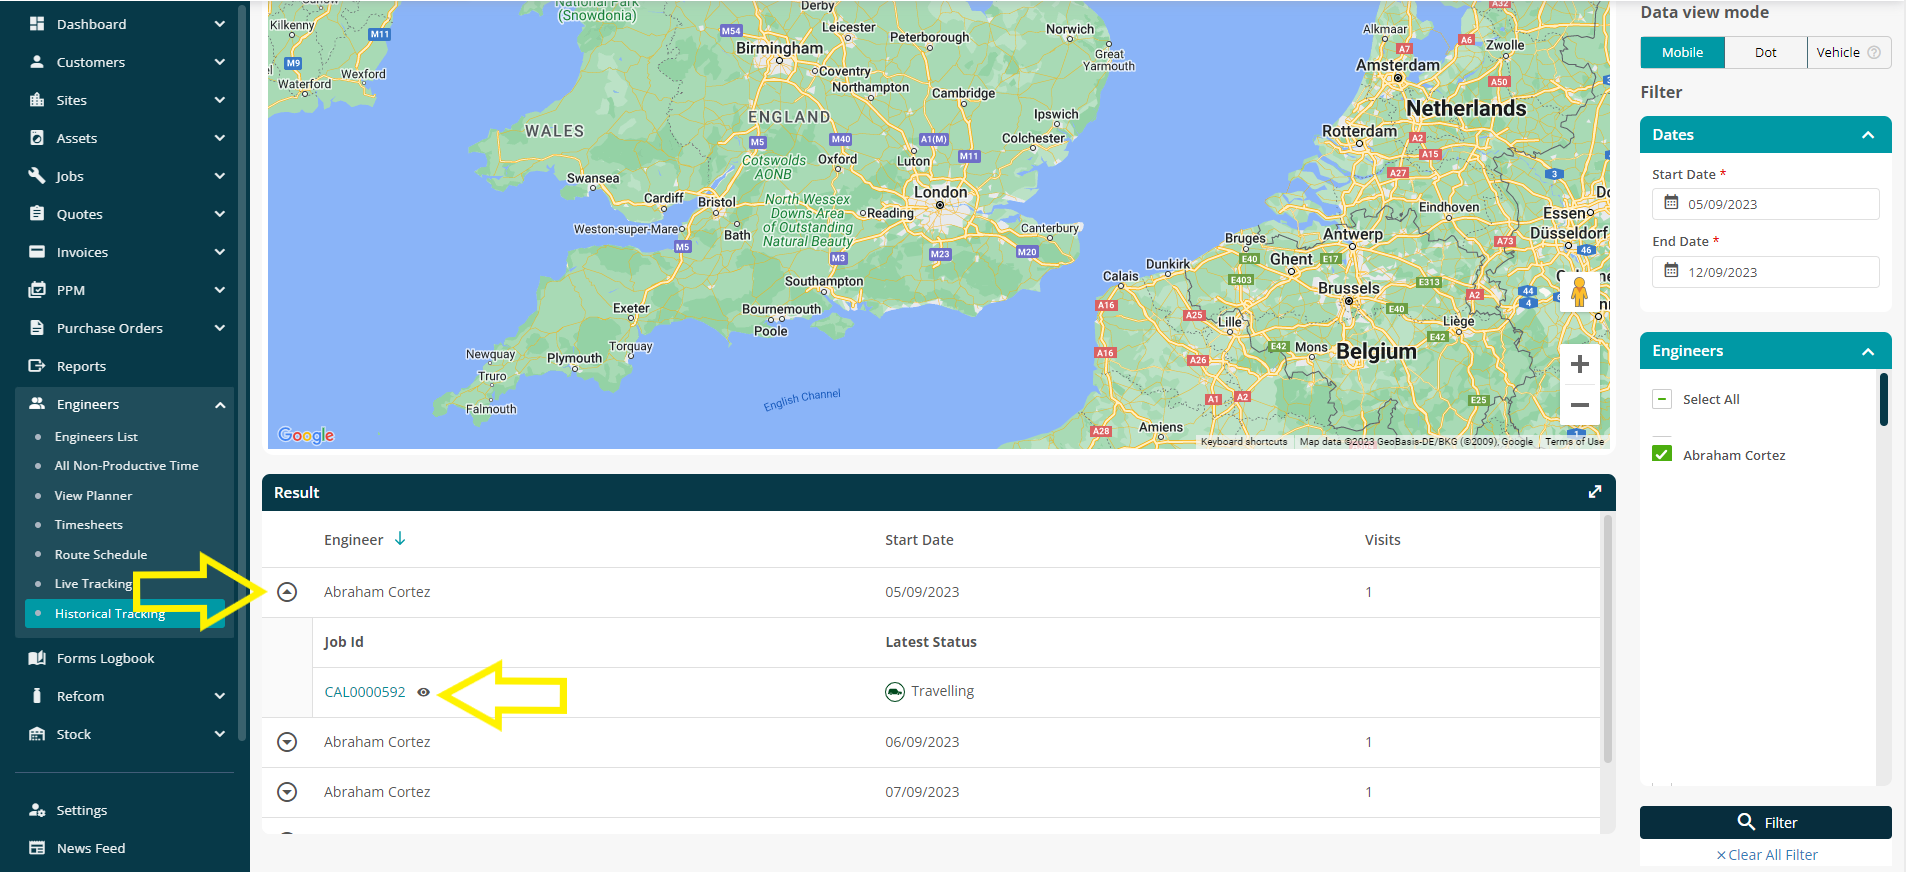
The page will then load and once completed, select the vehicle view.
The vehicle tracking history associated to the job and the linked engineer will show.
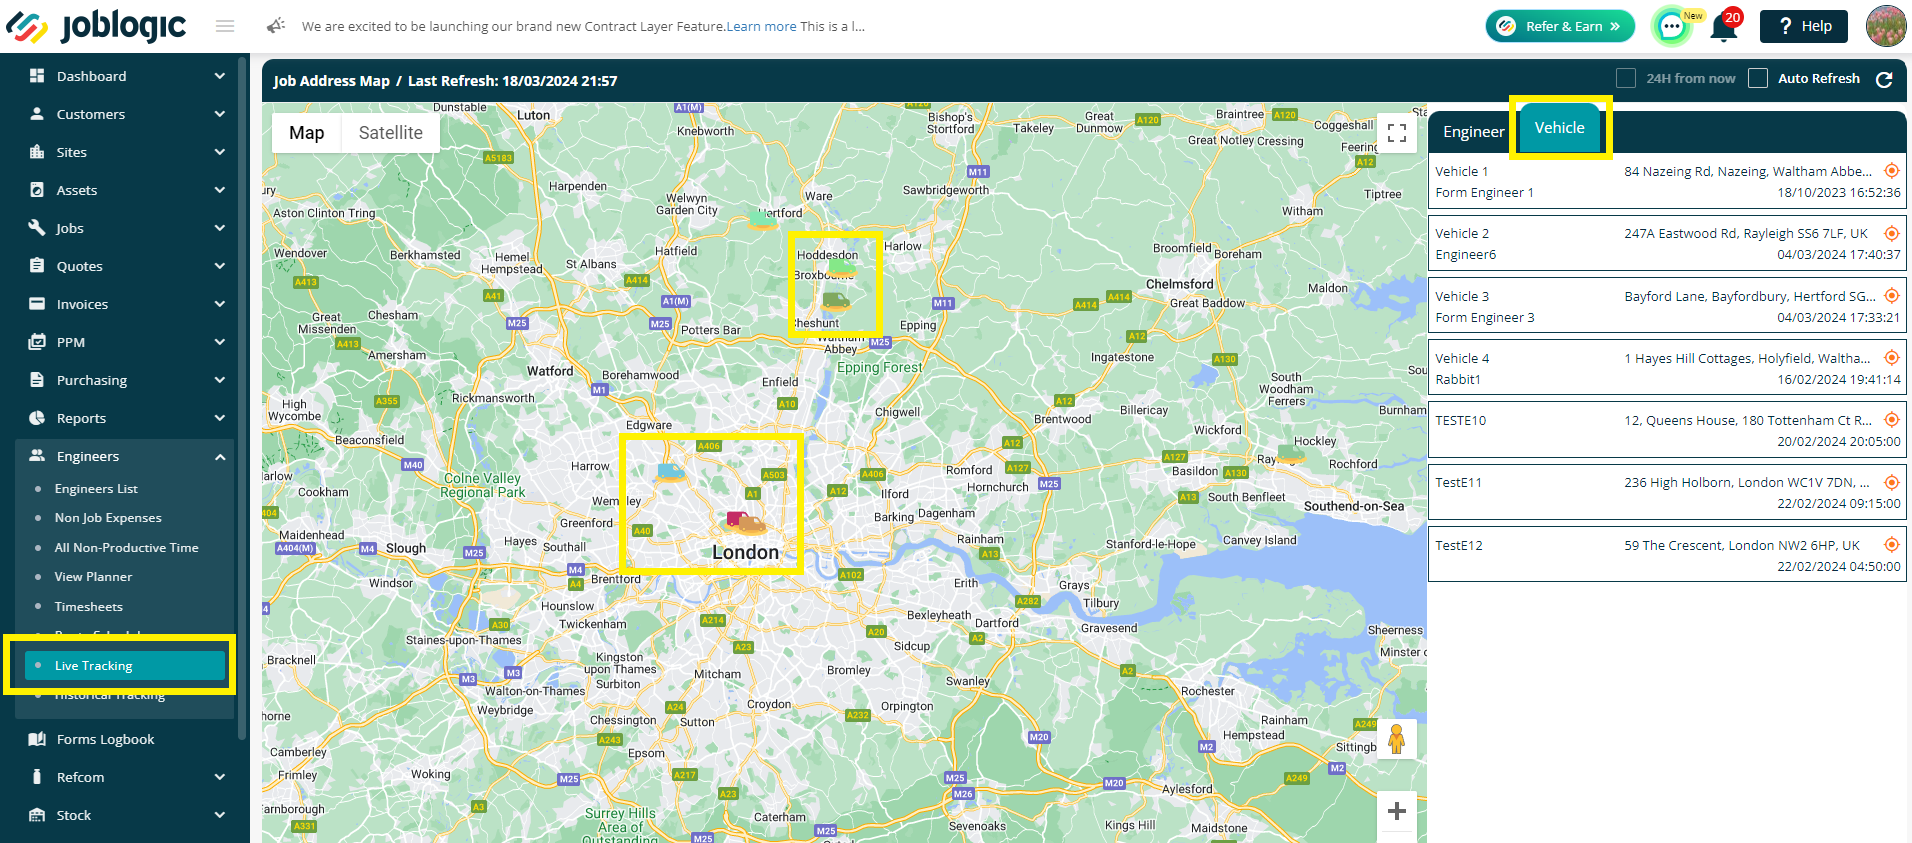
Live Tracking
To view the live location of your tracked vehicles, select Engineers > Live Tracking
You’ll be presented with a map of your engineer locations (as per their mobile app location).
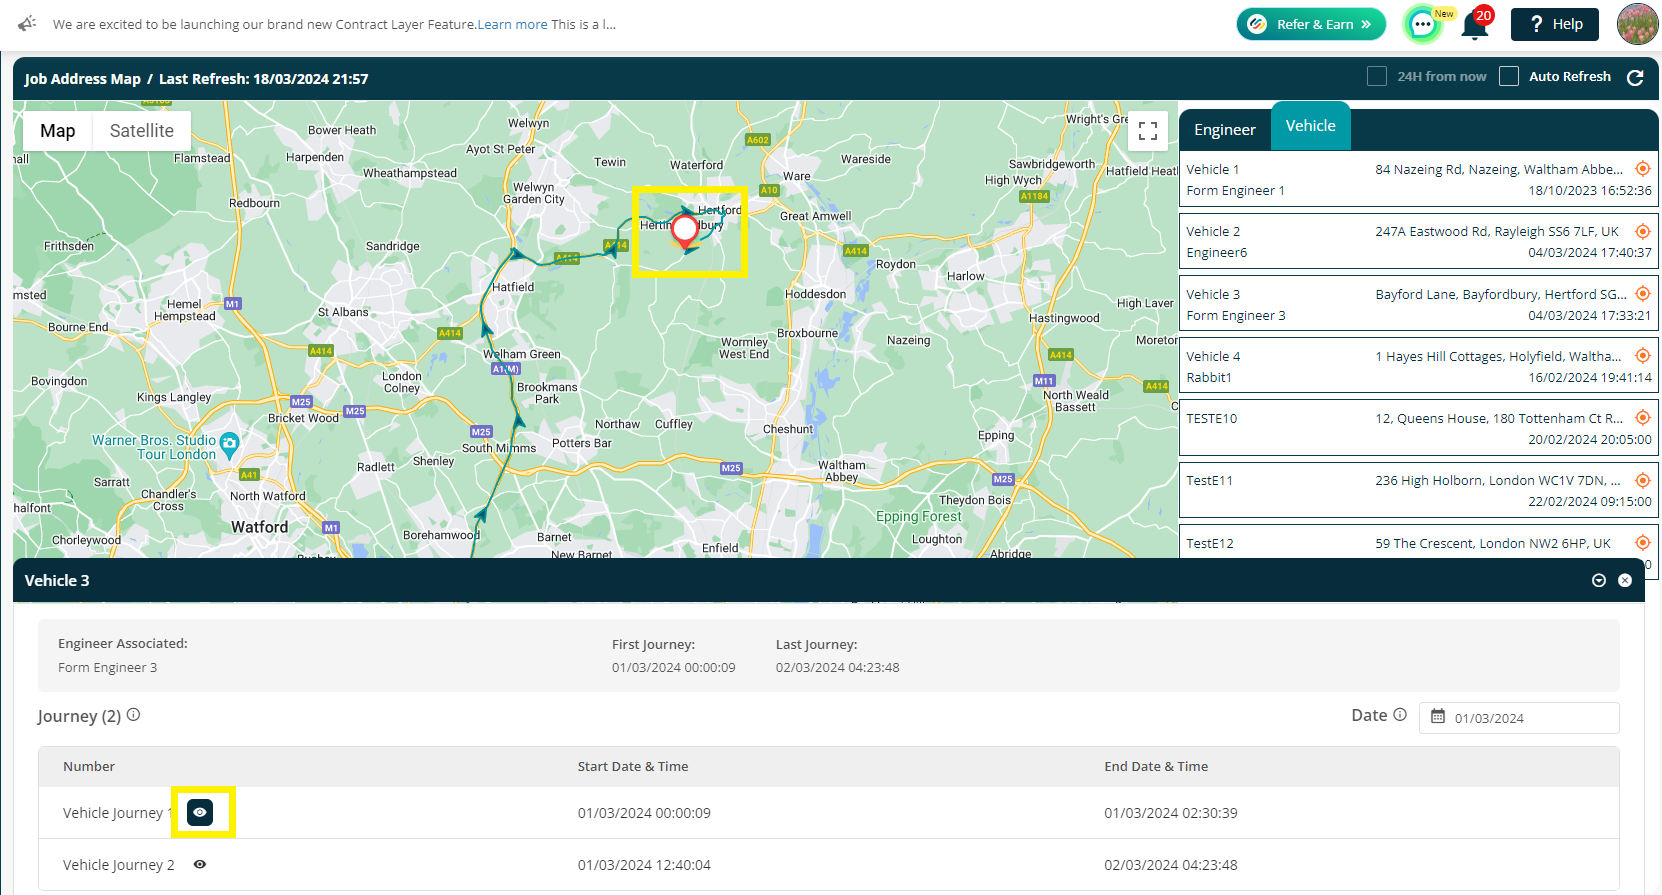
On the right, you can amend the view to Vehicle, to view the locations of your installed tracking devices.
The vehicle list will show you each of your tracked vehicles with engineer, written location and time details.
You’ll see their locations on the map, pinpointed by Van icons.
Hover over any van icon to view further information, such as Ignition Status (On/Off) and Movement (Yes/No)
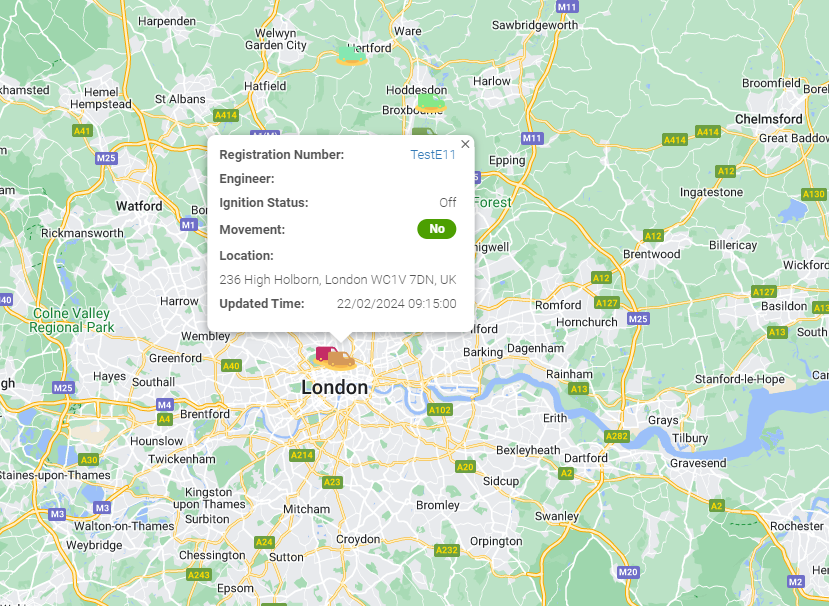
To find/select a specific Vehicle, click the orange marker to the right of the written list
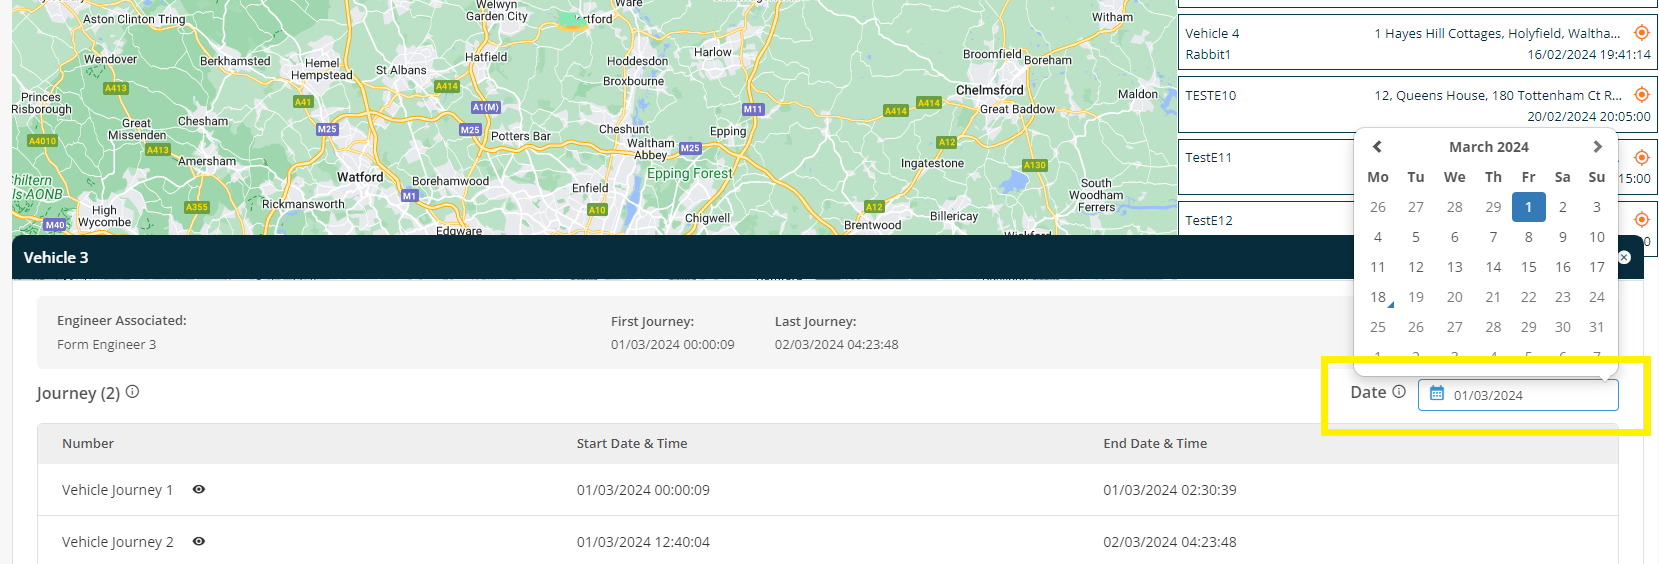
Selecting a vehicle will present you with a bouncing icon, to specify the location of the one you’ve chosen.
You’ll also have a journey box pop up at the bottom of the page
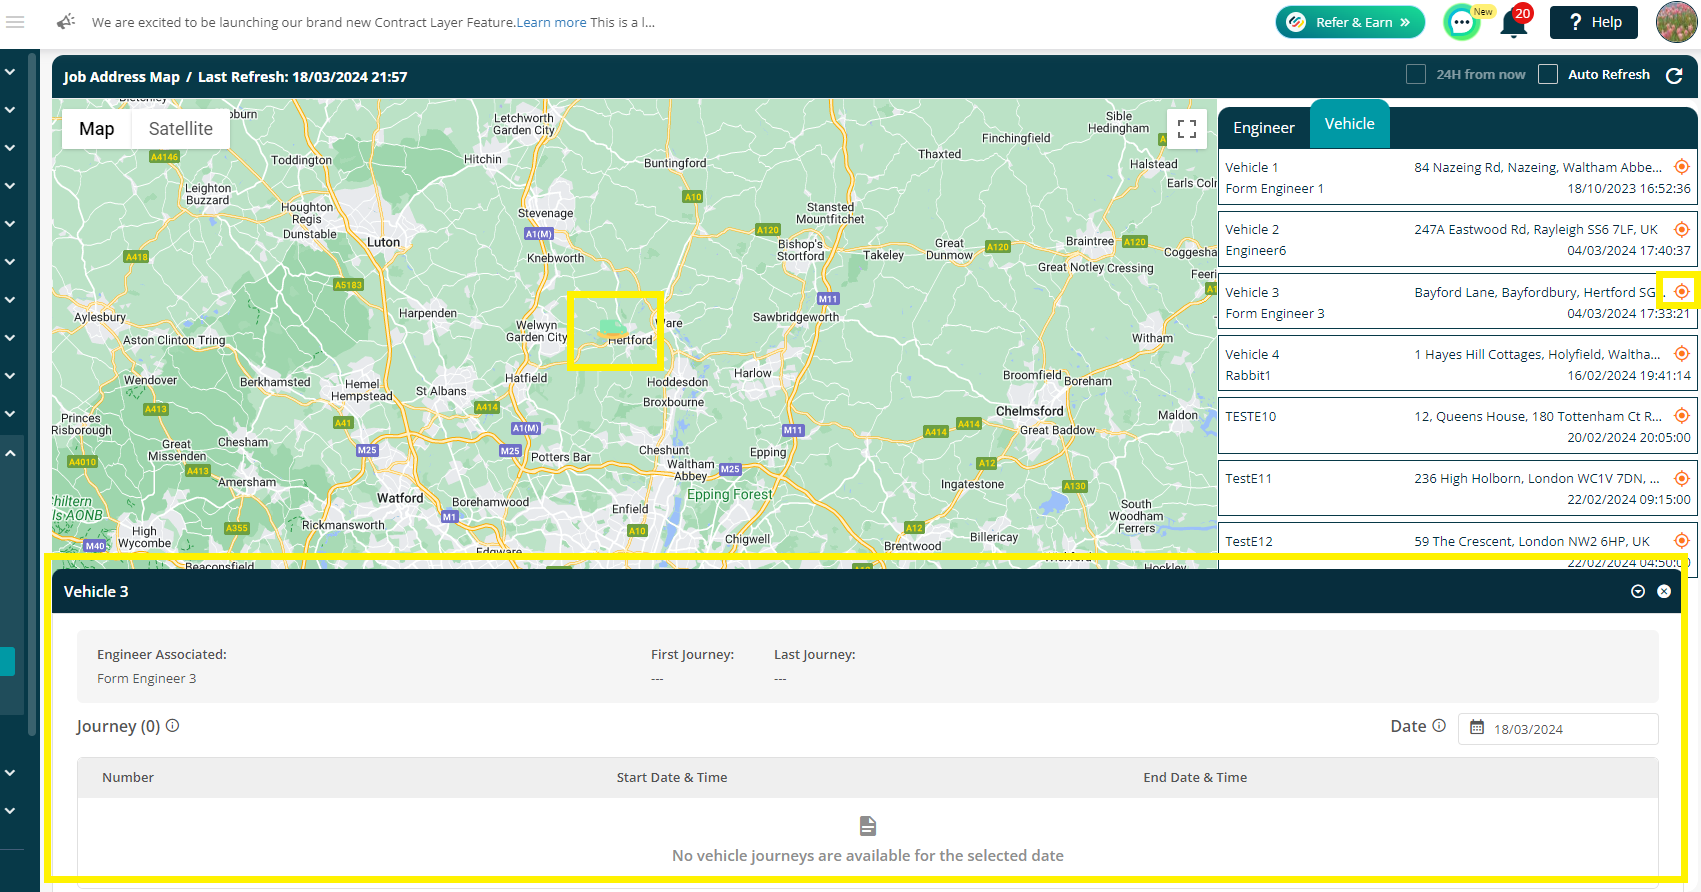
It will default to the current date; however, you can look at any day (within 6 months) by choosing the relevant date from the date picker.
This pop up will show you the First and Last journey times of the day. It will also break down the journeys in a list.
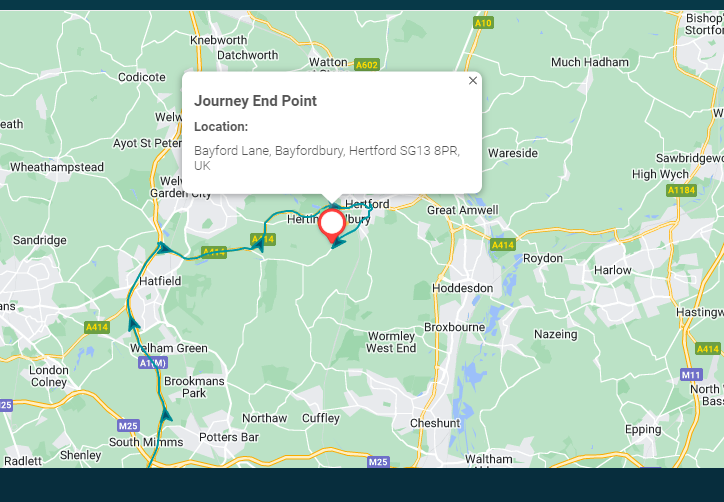
From here, you can click the eye icon to see the journey on the map. The journey will include the start and end points, as well as the route they took. Click the icon again to deselect the journey.
Use the arrow to minimise the Journey lists and to see the full map
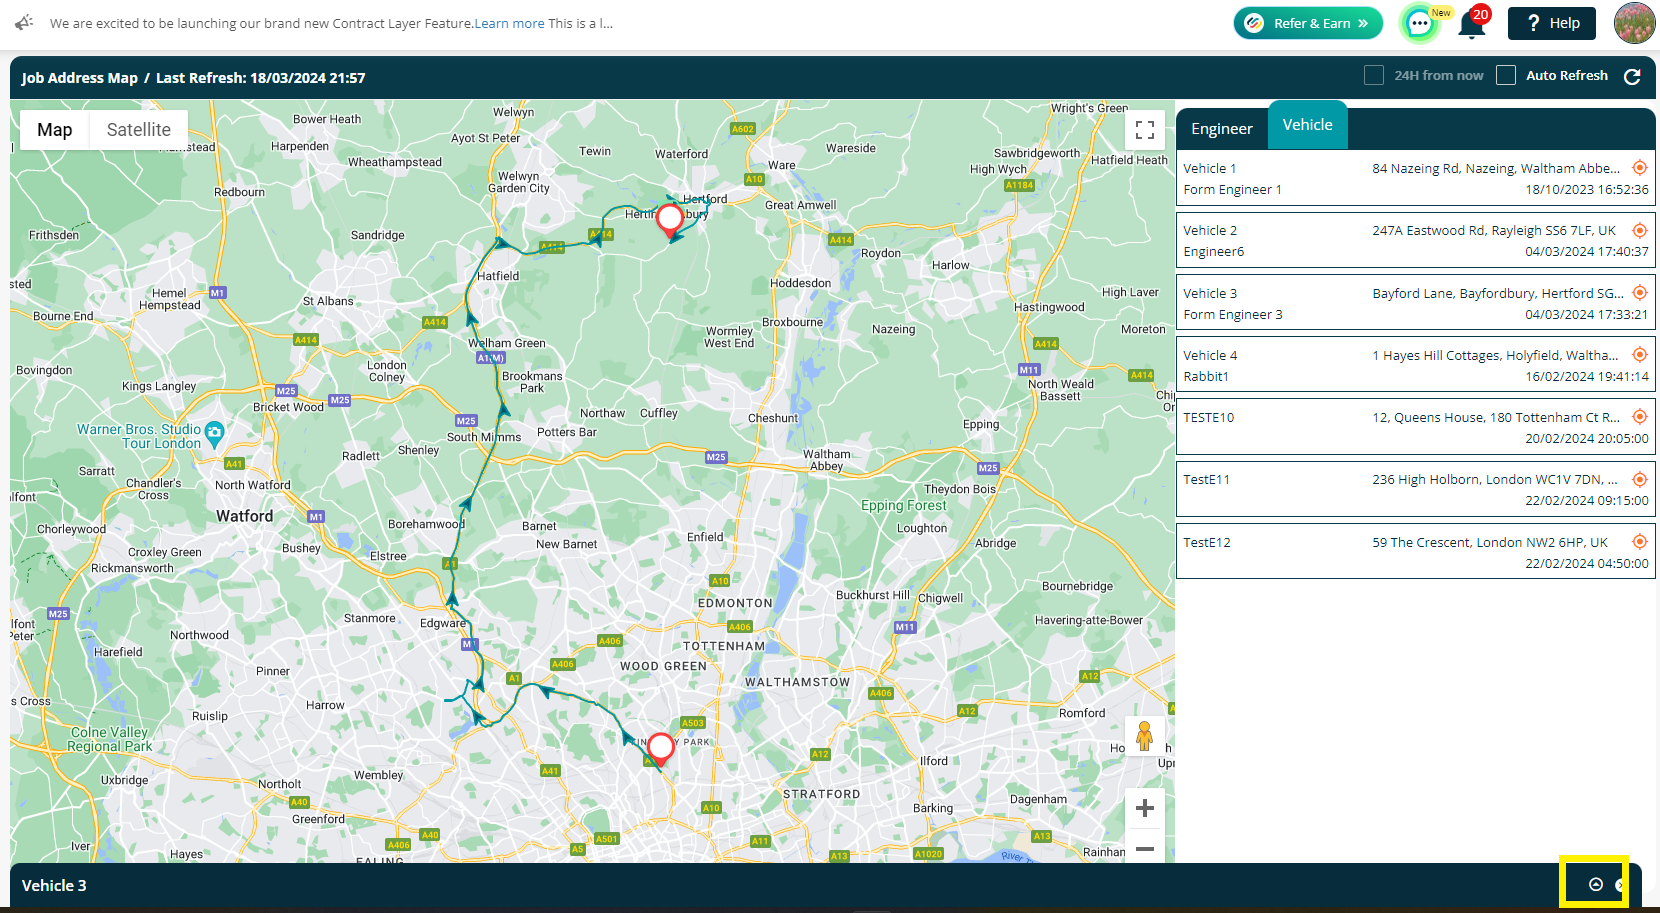
If you wish to return back to the main map, click the X.
Further Support
For further information or assistance with the above, contact our Support Team on 0800 326 5561 or email support@joblogic.com. Alternatively, our Customer Success Management team can be reached by emailing customersuccess@joblogic.com
Publishing Details
This document was written and produced by Joblogic’s Technical Writing team and was last updated on the date specified above. Be aware that the information provided may be subject to change following further updates on the matter becoming available or new releases within the system. Additionally, details within the guide may vary depending on your Joblogic account’s user permissions and settings or the electronic device being used.
References
- Verizon. Locate the OBD-II Port