Overview
The Invida integration lets you receive work from a main contractor who manages maintenance in Invida, deliver it in Joblogic, and keep the main contractor updated without re-entering anything in the Invida portal.
Who | Works in | Does |
Main contractor | Invida | Allocates reactive and planned (PPM) jobs to you, sets SLA targets and NTE limits, approves invoices |
Service provider (you) | Joblogic | Accepts or rejects work, allocates engineers or subcontractors, completes the work, invoices |
The workflow runs in this order:
- Configure each Invida customer's settings in Joblogic.
- Receive job requests from Invida and accept or reject them.
- Deliver the work in Joblogic as normal.
- Keep Invida updated — status, attendance, SLA milestones, time, notes and paperwork are sent automatically or with Send Paperwork.
- Invoice in Joblogic and send the invoice to Invida for approval.
All settings in this guide are configured separately for each Invida customer. Quote requests and RFQs are not covered by this release.
Before you start
The connection between Invida and Joblogic is set up by the Joblogic Support team once you subscribe to the Invida Integration app.
- Subscribe to the Invida Integration app from the Joblogic Marketplace.
- Ask the main contractor to set your company up as a service provider in Invida.
- Contact Joblogic Support to complete the connection. Support links each Invida customer to your Joblogic account.
- Once connected, each Invida customer appears under Settings > Invida Integration, ready to configure (see the next section).
Configure the Invida customer settings
Review every section below for each Invida customer before you accept live work, because these settings decide how jobs arrive and what is sent back to Invida.
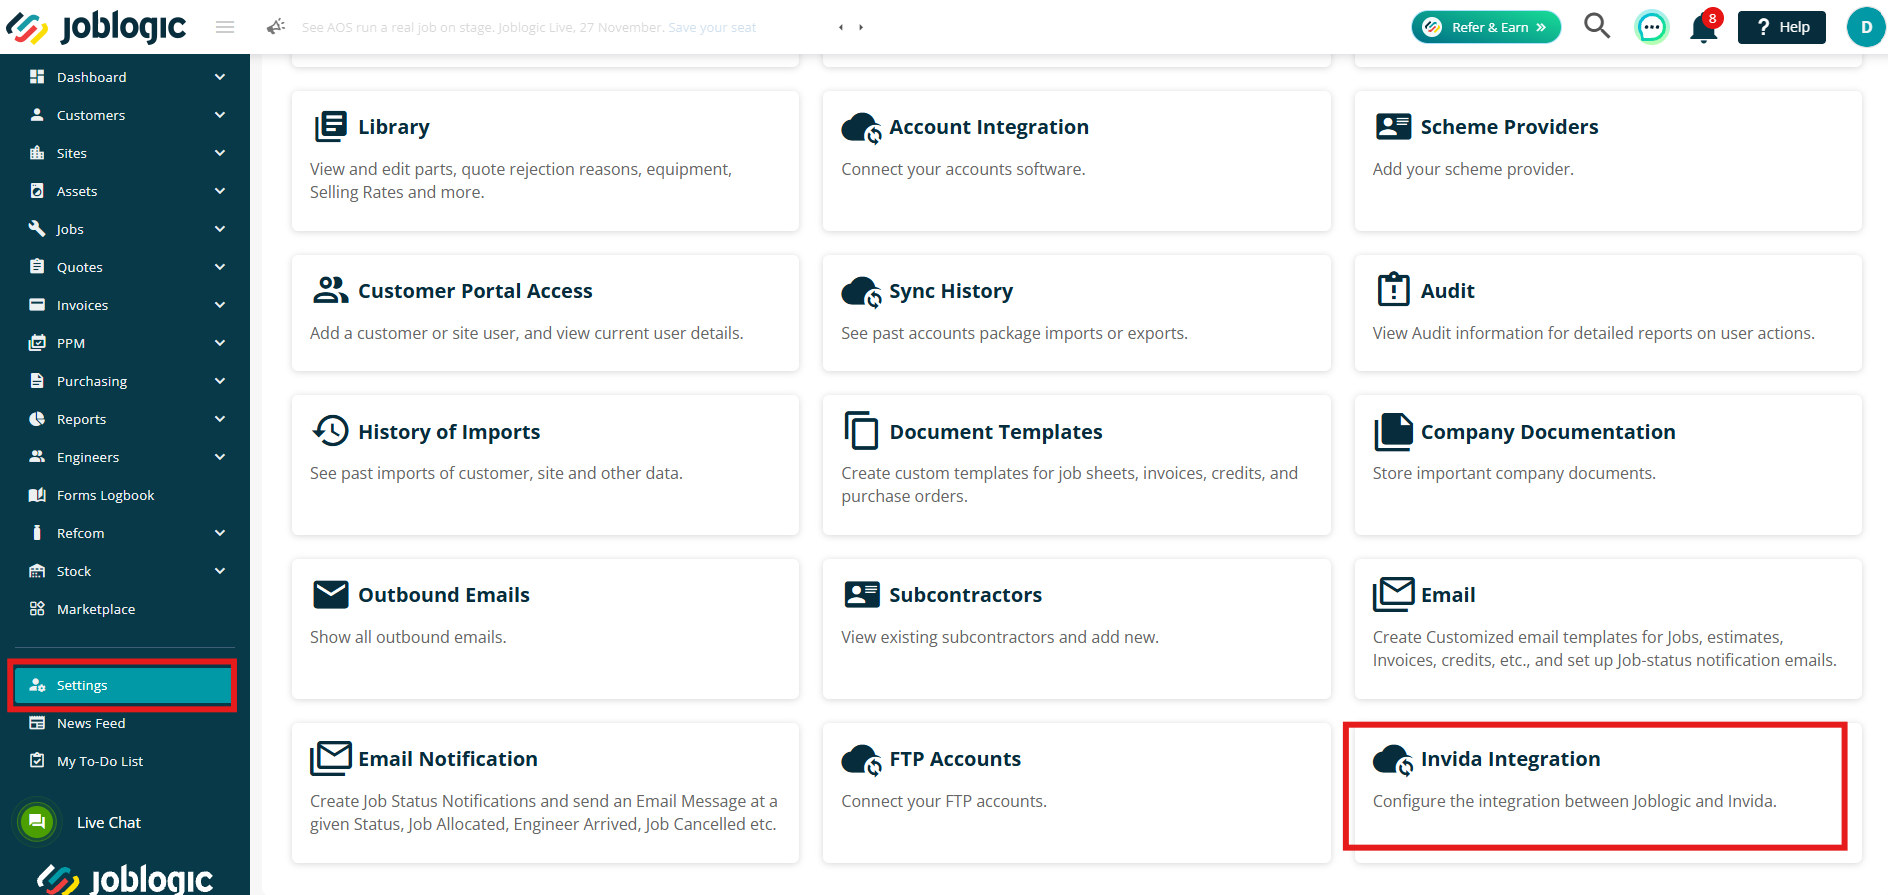
- Go to Settings > Invida Integration.
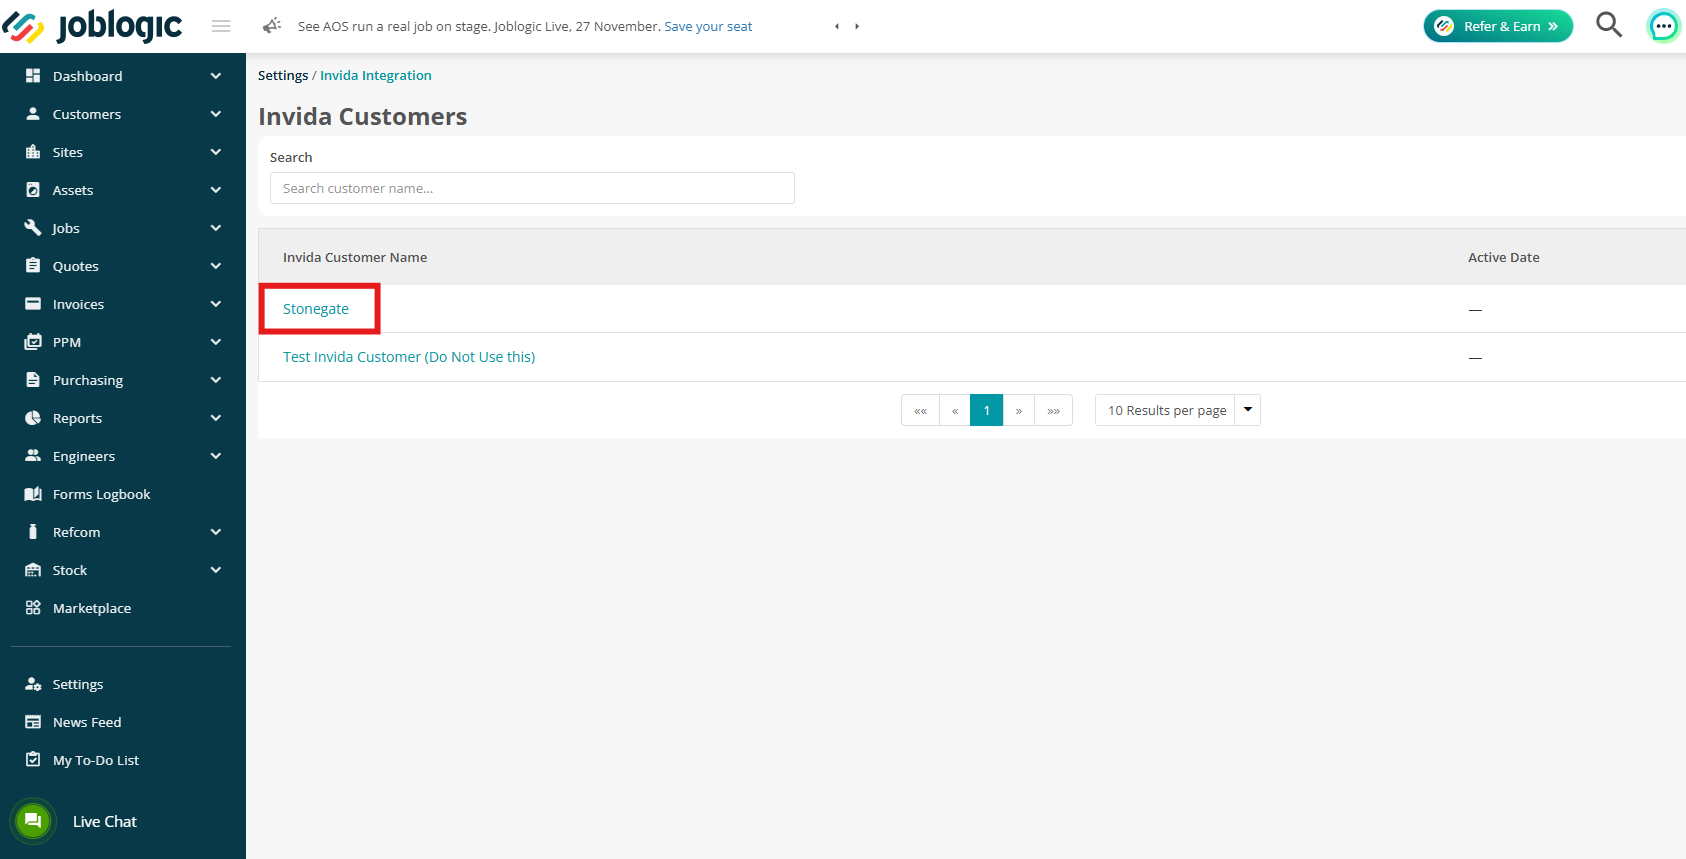
2. Select the Invida customer from the list.
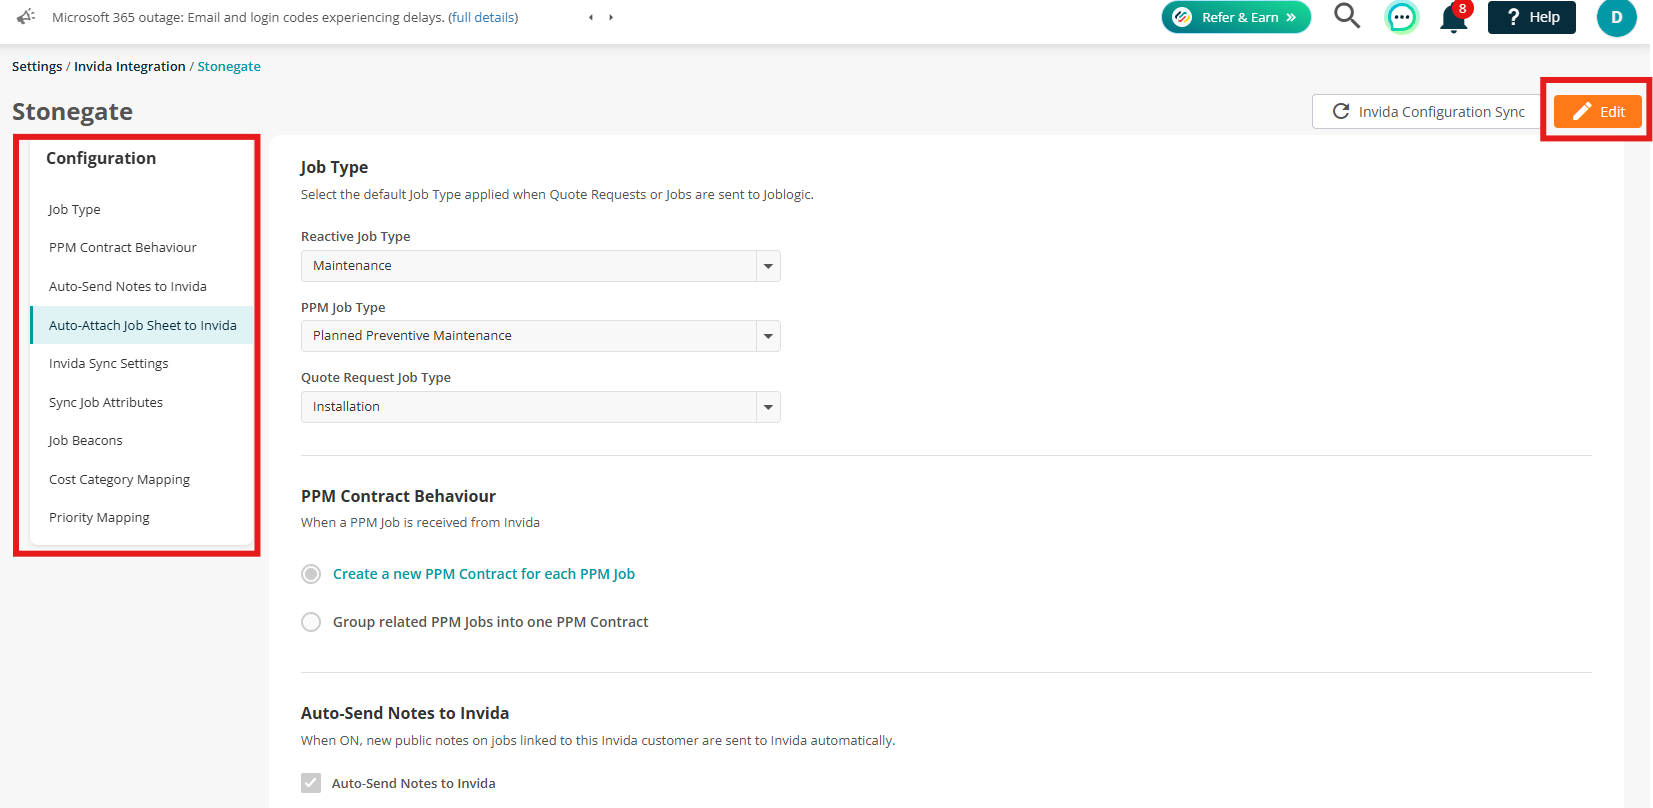
3. Select Edit. Scroll through the page, or use the menu on the left to jump to a section.
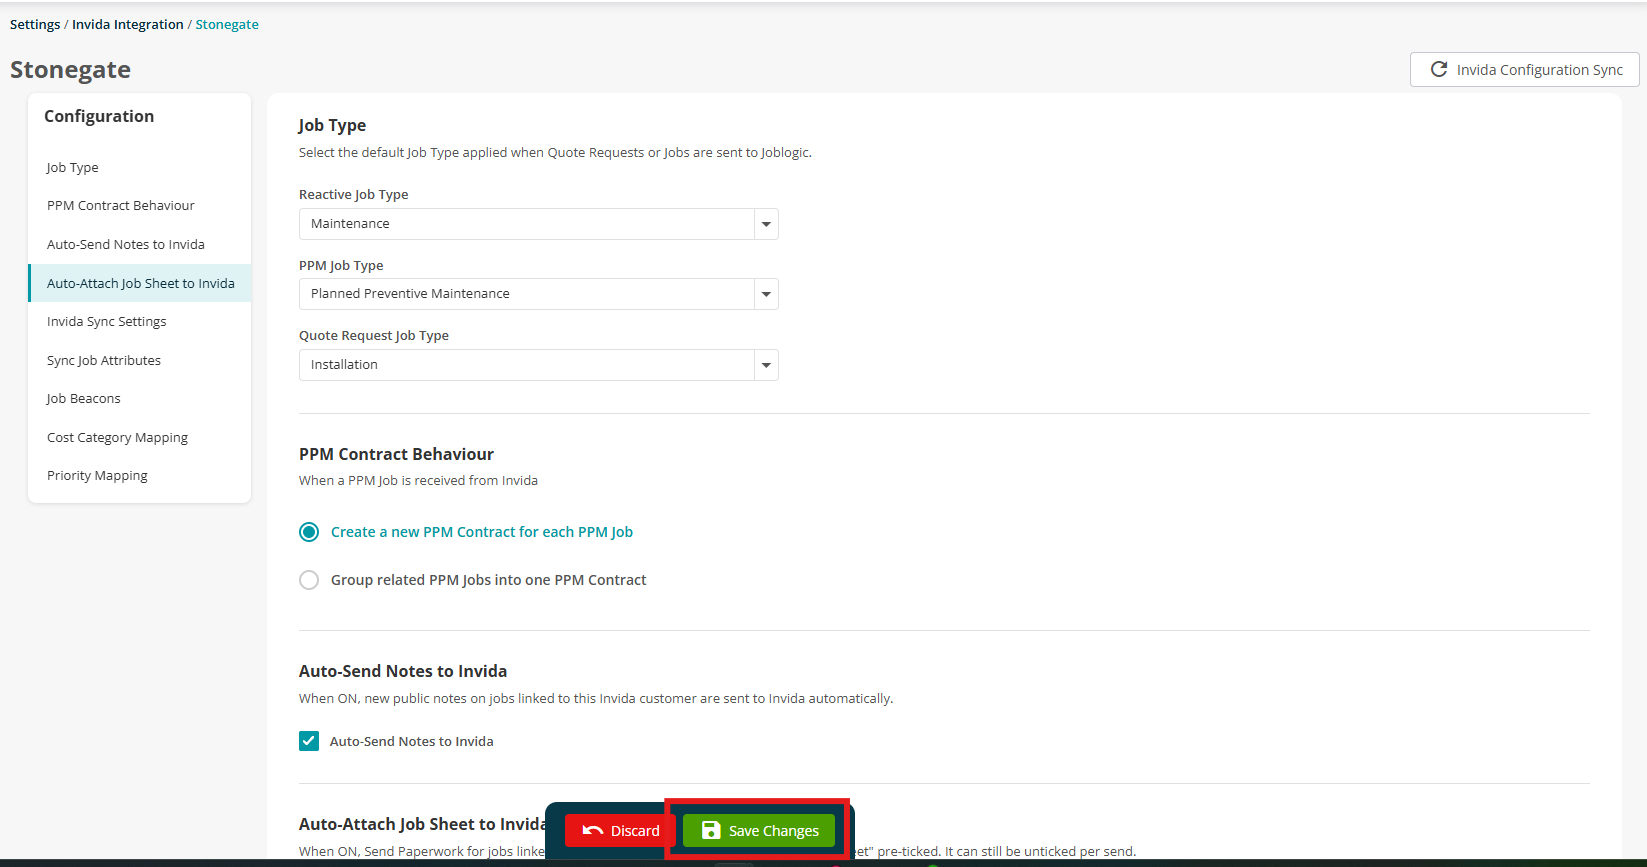
4. Select Save Changes at the bottom of the page.
If Invida's priorities or cost categories have changed, select Invida Configuration Sync first, then review the mappings.
Section | What it controls | Default |
Job Type | The Joblogic job type applied to incoming Reactive jobs and PPM jobs | — |
PPM Contract Behaviour | Create a new PPM Contract for each PPM Job, or Group related PPM Jobs into one PPM Contract (later related jobs are added to it as new visits) | — |
Auto-Send Notes to Invida | Sends new public job notes to Invida automatically | Off |
Auto-Attach Job Sheet to Invida | Opens Send Paperwork with Attach Jobsheet already ticked | Off |
Invida Sync Settings | What is sent to Invida as the work progresses: SLA milestones, engineer attendance, travel and labour time, and which statuses (see below) | — |
Sync Job Attributes | Creates Invida meta fields as job attributes on the Joblogic job | Off |
Cost Category Mapping | How cost categories translate between the two systems (see below) | — |
Section | What it controls | Default |
Priority Mapping | Which Joblogic priority/SLA each Invida priority uses, plus a default priority for each direction when a value can't be matched | — |
Invida Sync Settings
Three switches control what Joblogic sends to Invida. Turning one off only stops sending; the action is still recorded in Joblogic.
Sync Job-Level SLA Milestones to Invida — completes Invida's Attend, Start and Complete SLA targets with the engineer's real times.
Sync Engineer Attendance with timestamps — creates and updates the engineer's attendance on the Invida job.
Sync Engineer Travel and Labour with Timestamps — sends logged travel and labour time as Invida time entries. This needs attendance sync turned on as well, or nothing is sent.
Under Status Updates, tick the visit and subcontractor statuses Invida should receive. An unticked status still updates the visit in Joblogic.
Visit statuses | Subcontractor statuses |
Visit Assigned, Visit Accepted, Travelling, On Site, Left Site, Visit Completed, Visit Rejected, Visit Aborted | Subcontractor Allocated, Subcontractor PO Completed |
Cost Category Mapping
The mapping has two tables, and in both you can point several categories at the same target.
Invida → Joblogic — for costs arriving from Invida. Map Invida Materials and Parts to Material – Equipment and Material – Part to keep them separate.
Joblogic → Invida — for costs sent to Invida, for example Call-out and Overtime both mapped to Overtime.
Each direction has a default cost category, used when a category can't be matched.
Costs move in the same way as between a Joblogic main contractor and subcontractor: Joblogic sends its Sell value, which appears as Cost in Invida, and an Invida Cost arrives as Sell in Joblogic.
Receive and review job requests
When the main contractor allocates a job to you in Invida, it arrives in Joblogic under Jobs > Invida Job Requests and you get a bell notification.
The page has four tabs: Pending Acceptance, Accepted, Rejected and All. Use the search and status filters to find a request.
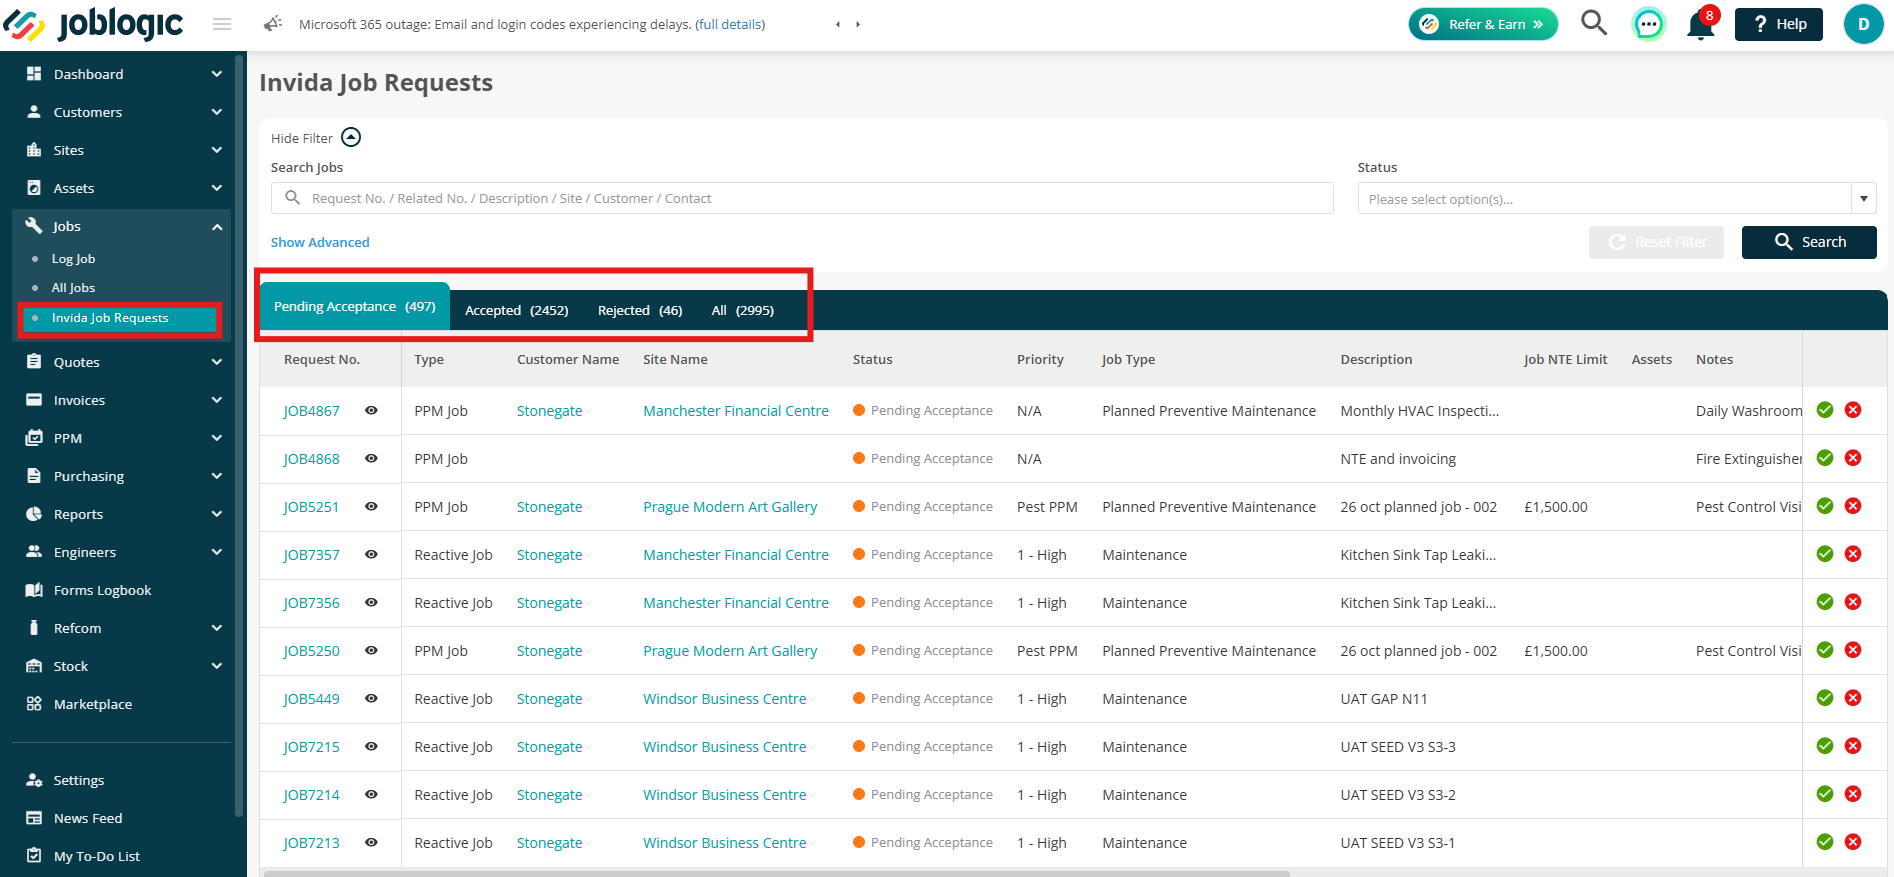
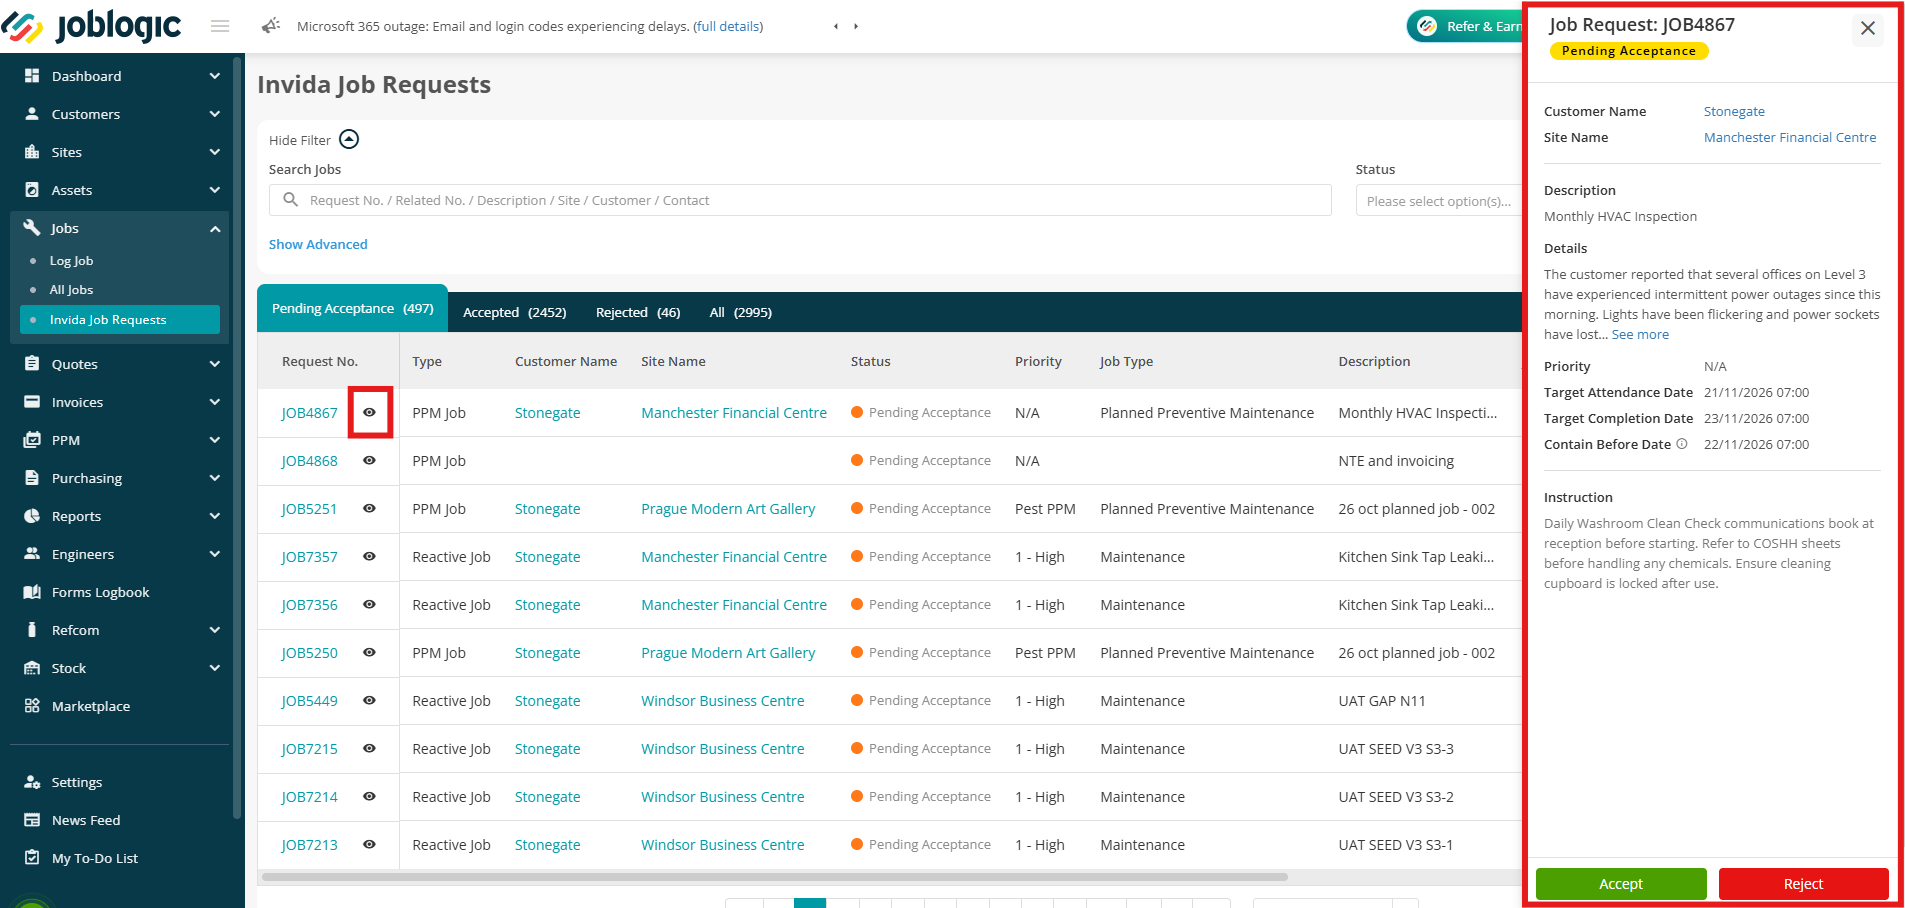
To review a request, select the eye icon next to it. The Quick View shows:
Request type, customer and site
Description, details and instructions
Priority, Target Attendance Date, Target Completion Date and Contain Before date
(the deadline for containing the problem) Assets and notes sent with the request
A request stays locked in Pending Acceptance until you accept or reject it. Until then, you can't allocate or deploy visits, assign engineers, add costs, raise invoices or progress the job.
The customer is the main contractor, and the site is created from the Invida building the work is for. If the customer or site already exists in Joblogic, the job is linked to it.
Notifications
You receive | Bell notification |
A reactive job | Create – Job(s): A new job <Job Number> has been received via Invida. |
A PPM job | Create – Contract(s): A new PPM Contract <Contract Ref> has been received via Invida. |
Job details changed in Invida | Update – Job(s): Job <Job Number> details have been updated via Invida. |
An invoice approved | Update – Invoice(s): Invoice <Invoice Number> has been approved by <Customer Name>. |
You receive | Bell notification |
An invoice rejected | Update – Invoice(s): Invoice <Invoice Number> has been rejected by <Customer Name>. |
Accept or reject a request
Accepting a request creates the job in Joblogic and tells Invida you have taken the work; rejecting it returns the work to the main contractor.
Accept
- Select the tick icon on the request, or Accept in the Quick View.
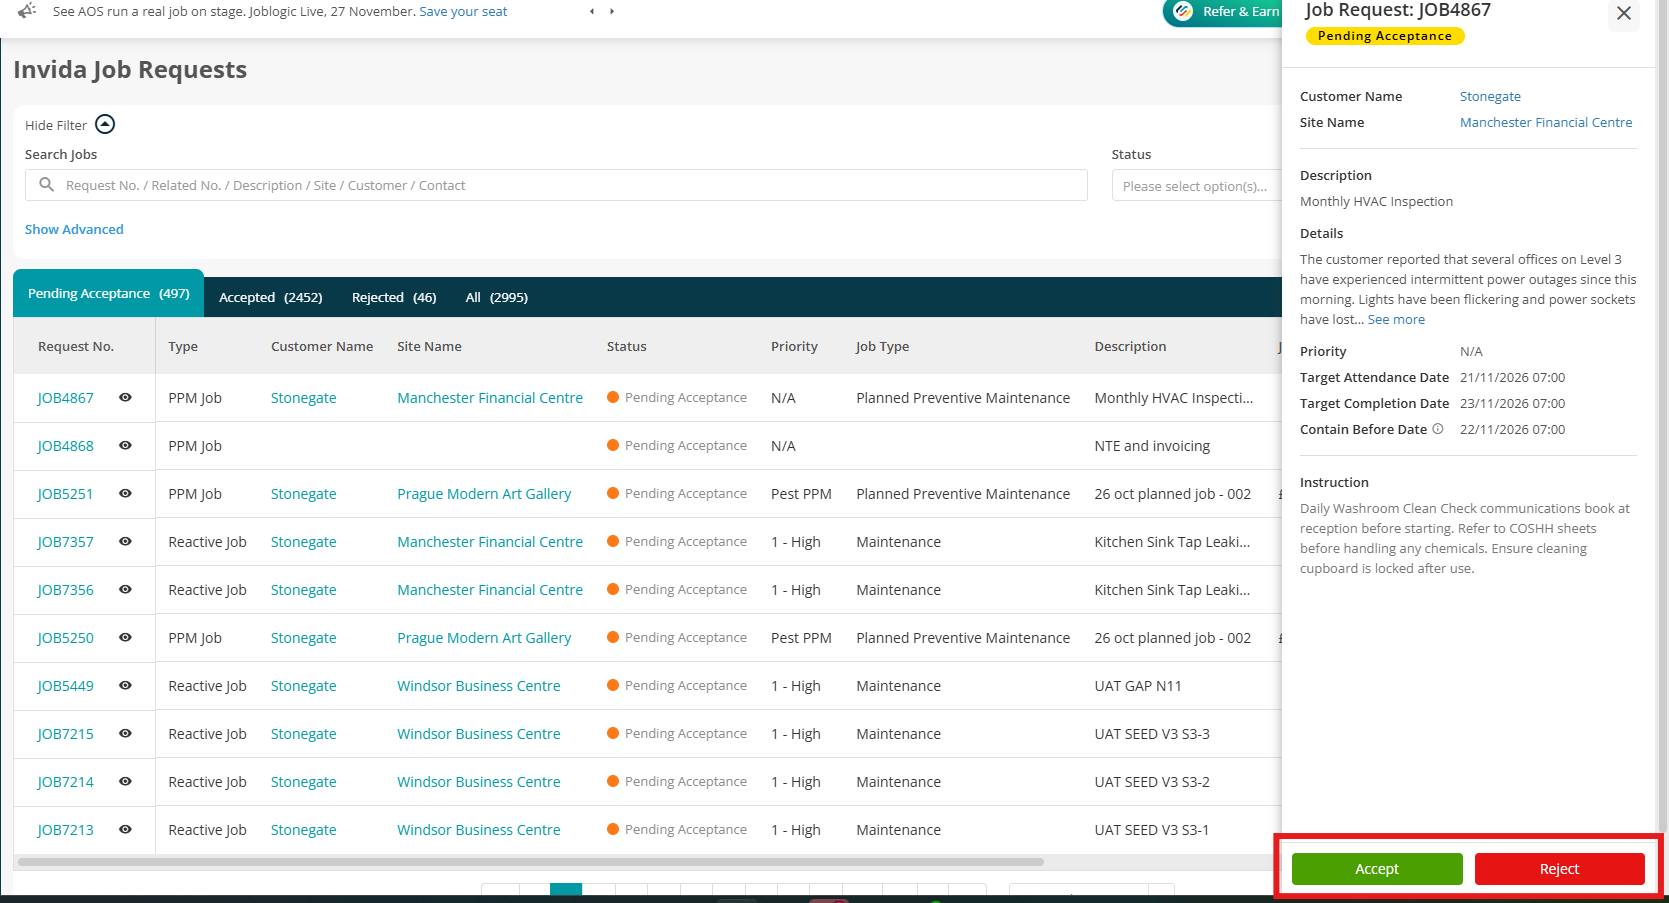
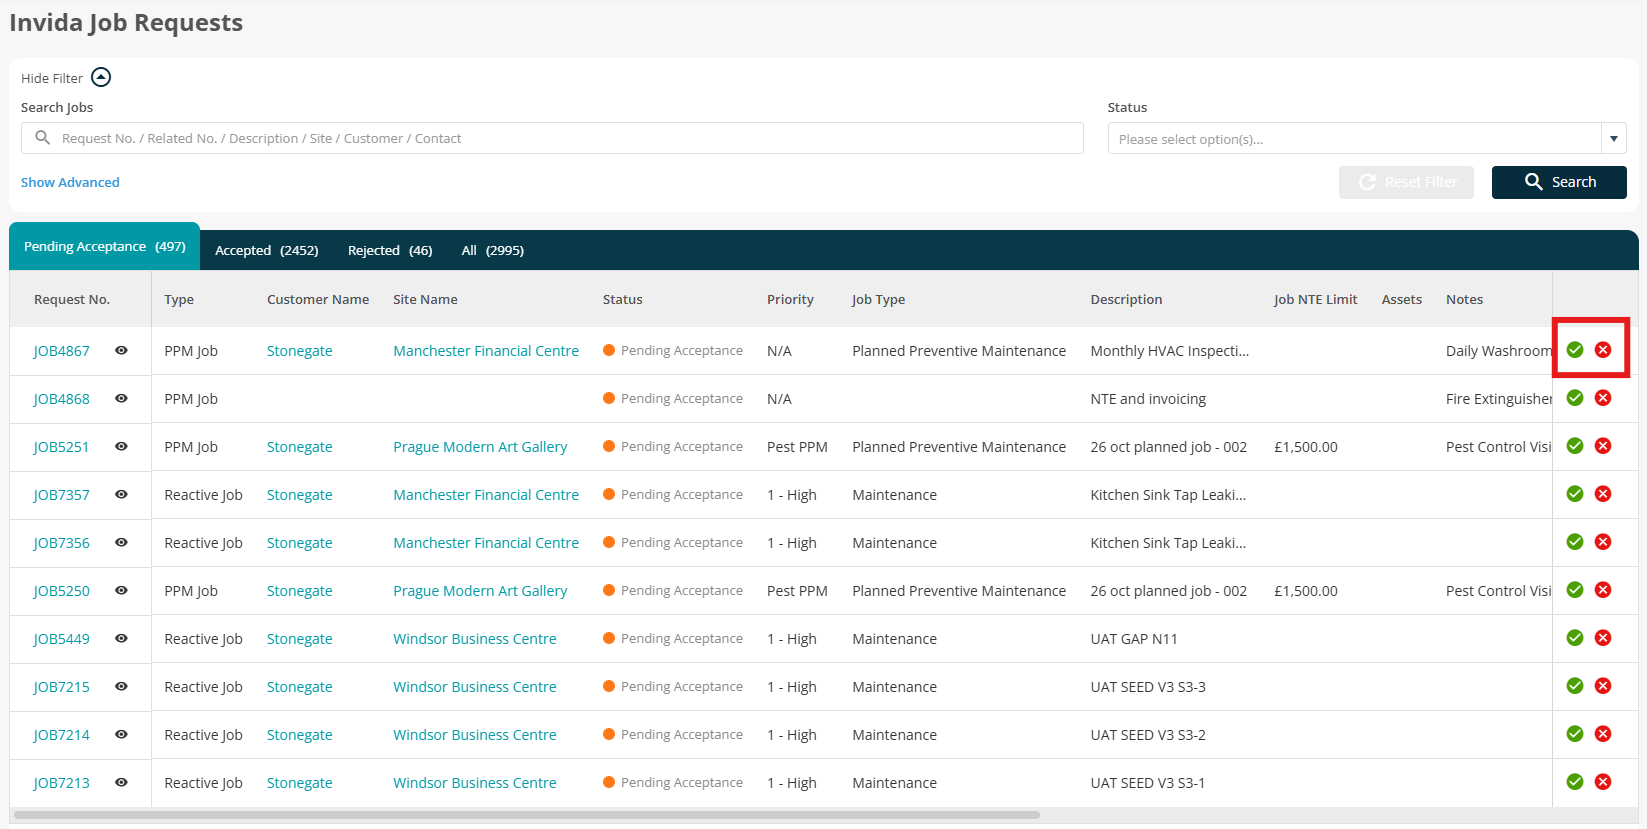
2. Confirm when prompted.
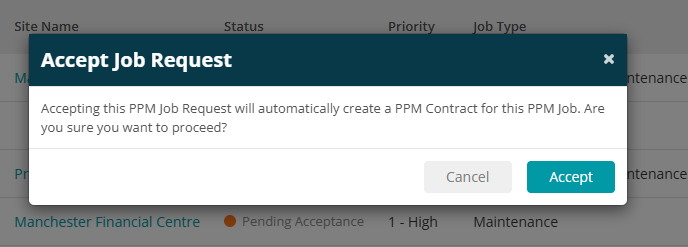
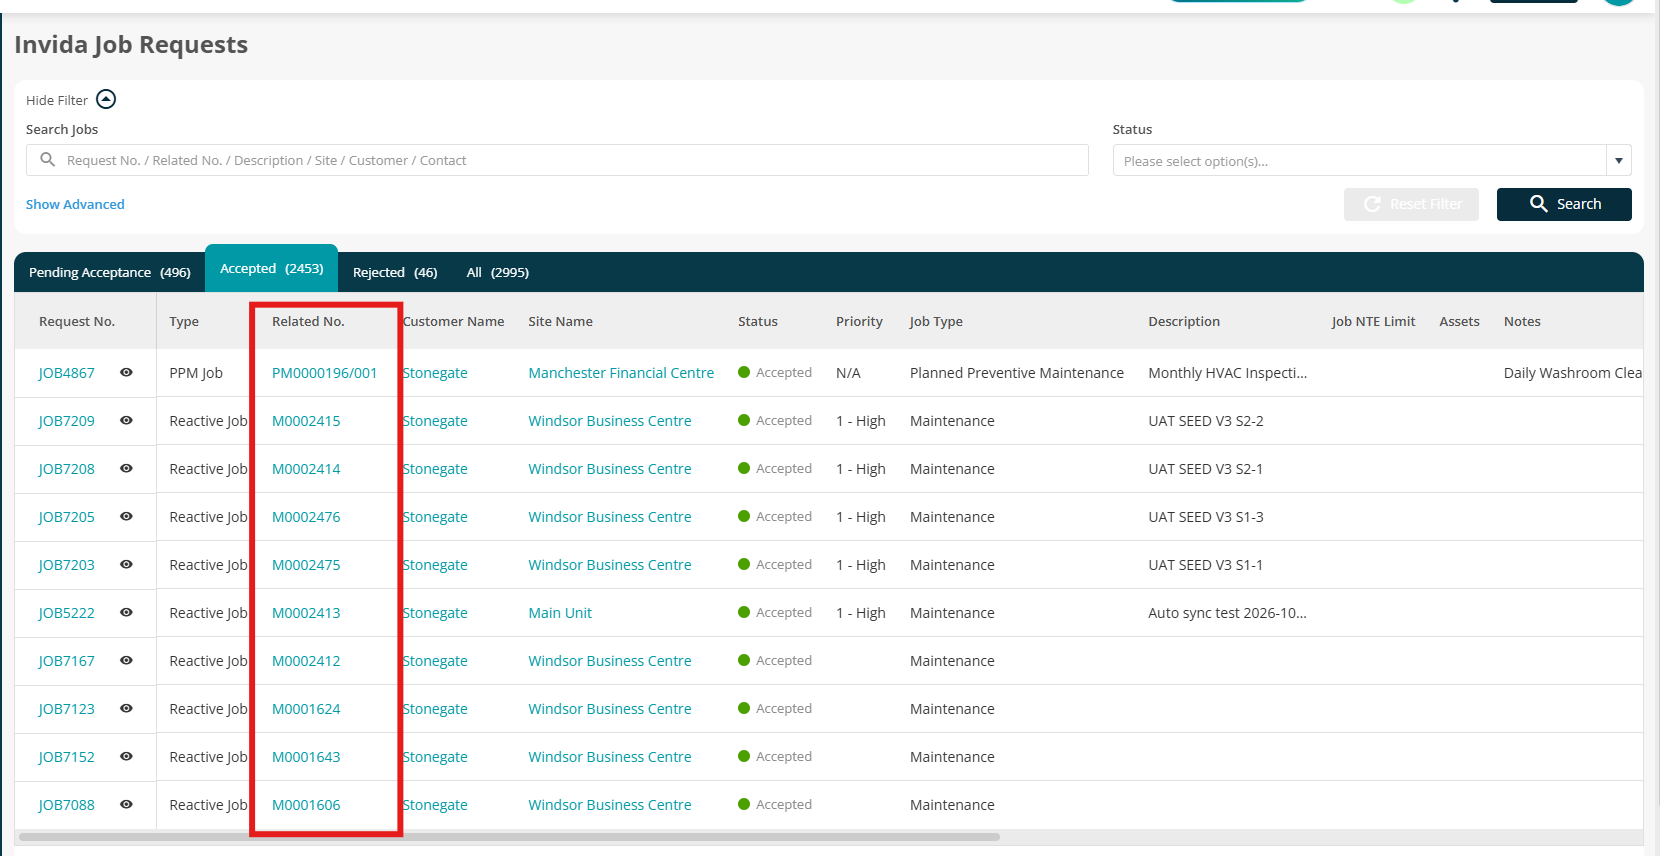
3. The request moves to the Accepted tab. Its Related No. links to the new Joblogic job or PPM record.
The accepted status is sent to Invida, and the job can now be managed as normal.
PPM jobs
A PPM job only appears in Joblogic once Invida releases it, when its "Can't Start Before" date is reached. Reactive jobs arrive straight away.
Accepting a PPM job creates a PPM Contract with its first visit, or adds a visit to an existing contract, depending on your PPM Contract Behaviour setting.
PPM Contracts use the No billing contract type. Start Date and End Date come from Invida's Start Schedule From and Continue Until.
If Invida sends a PPM job as already accepted, it is accepted in Joblogic automatically.
Reject
- Select the X icon on the request, or Reject in the Quick View.
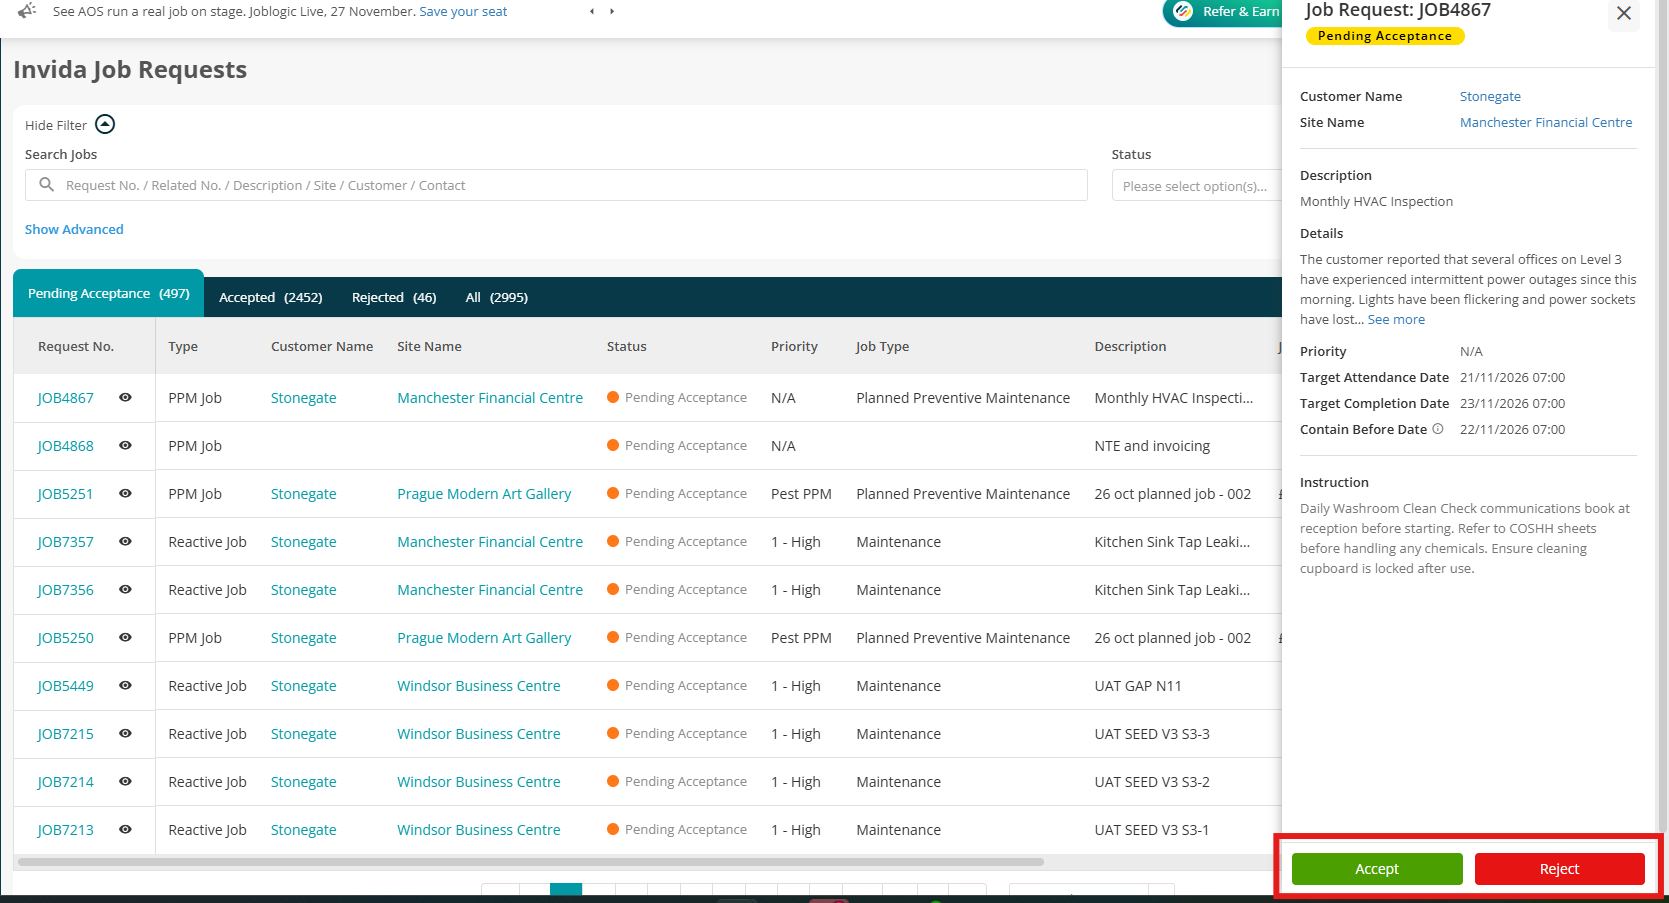
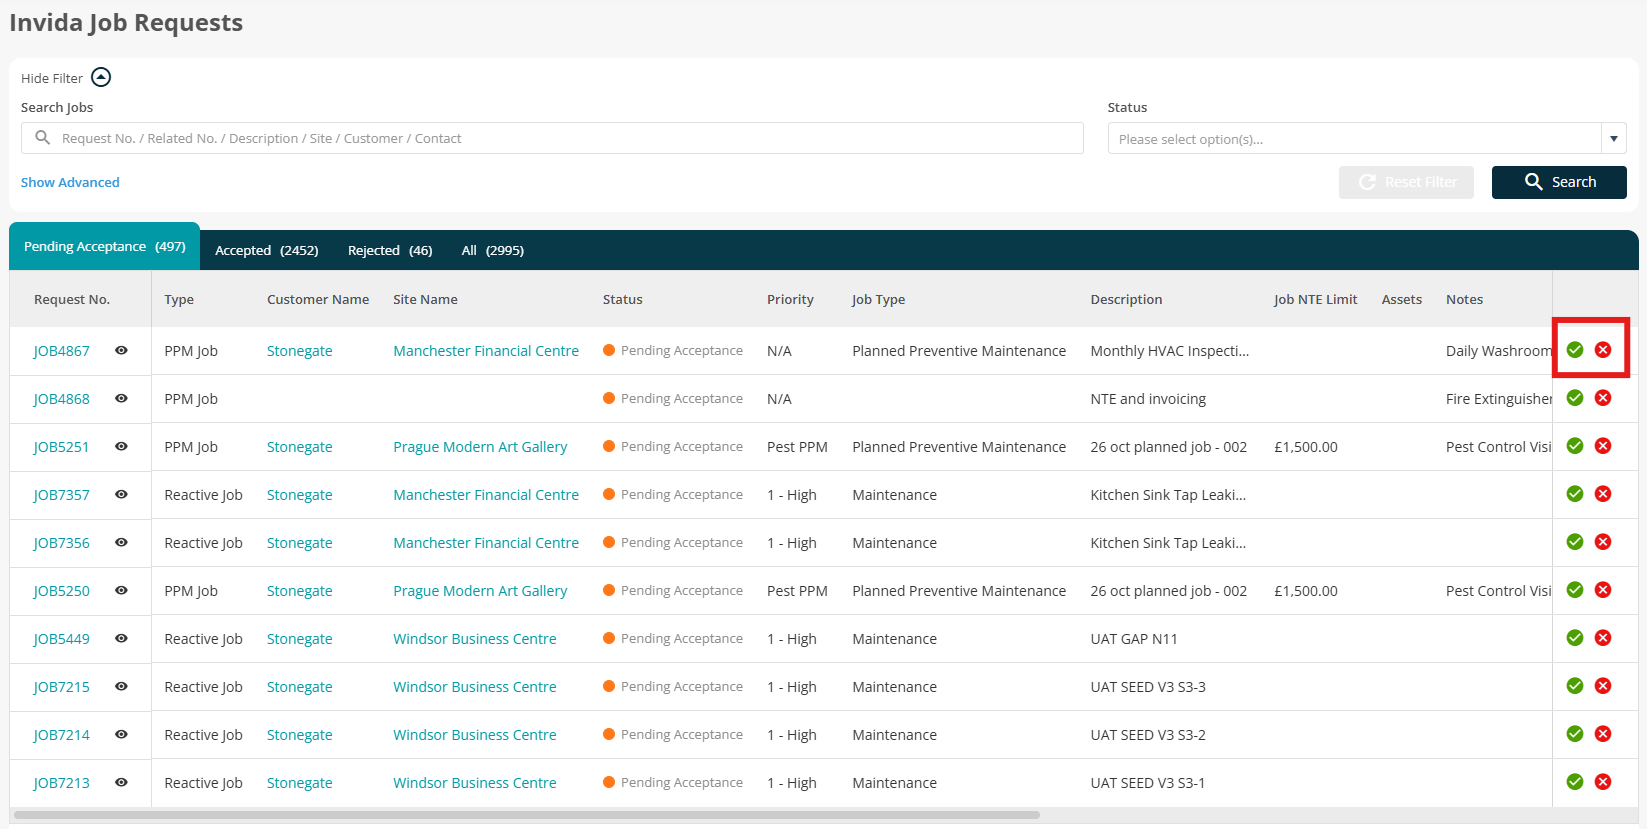
2. Select a rejection reason. A reason is required.
3. Select Reject.
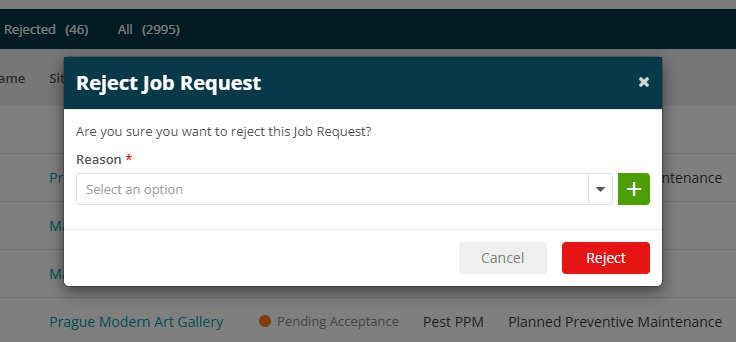
The request moves to the Rejected tab and stays locked. The reason is sent to Invida, where the attendance shows as Aborted. If the main contractor allocates the job to you again, it arrives as a new request.
Rejection reasons
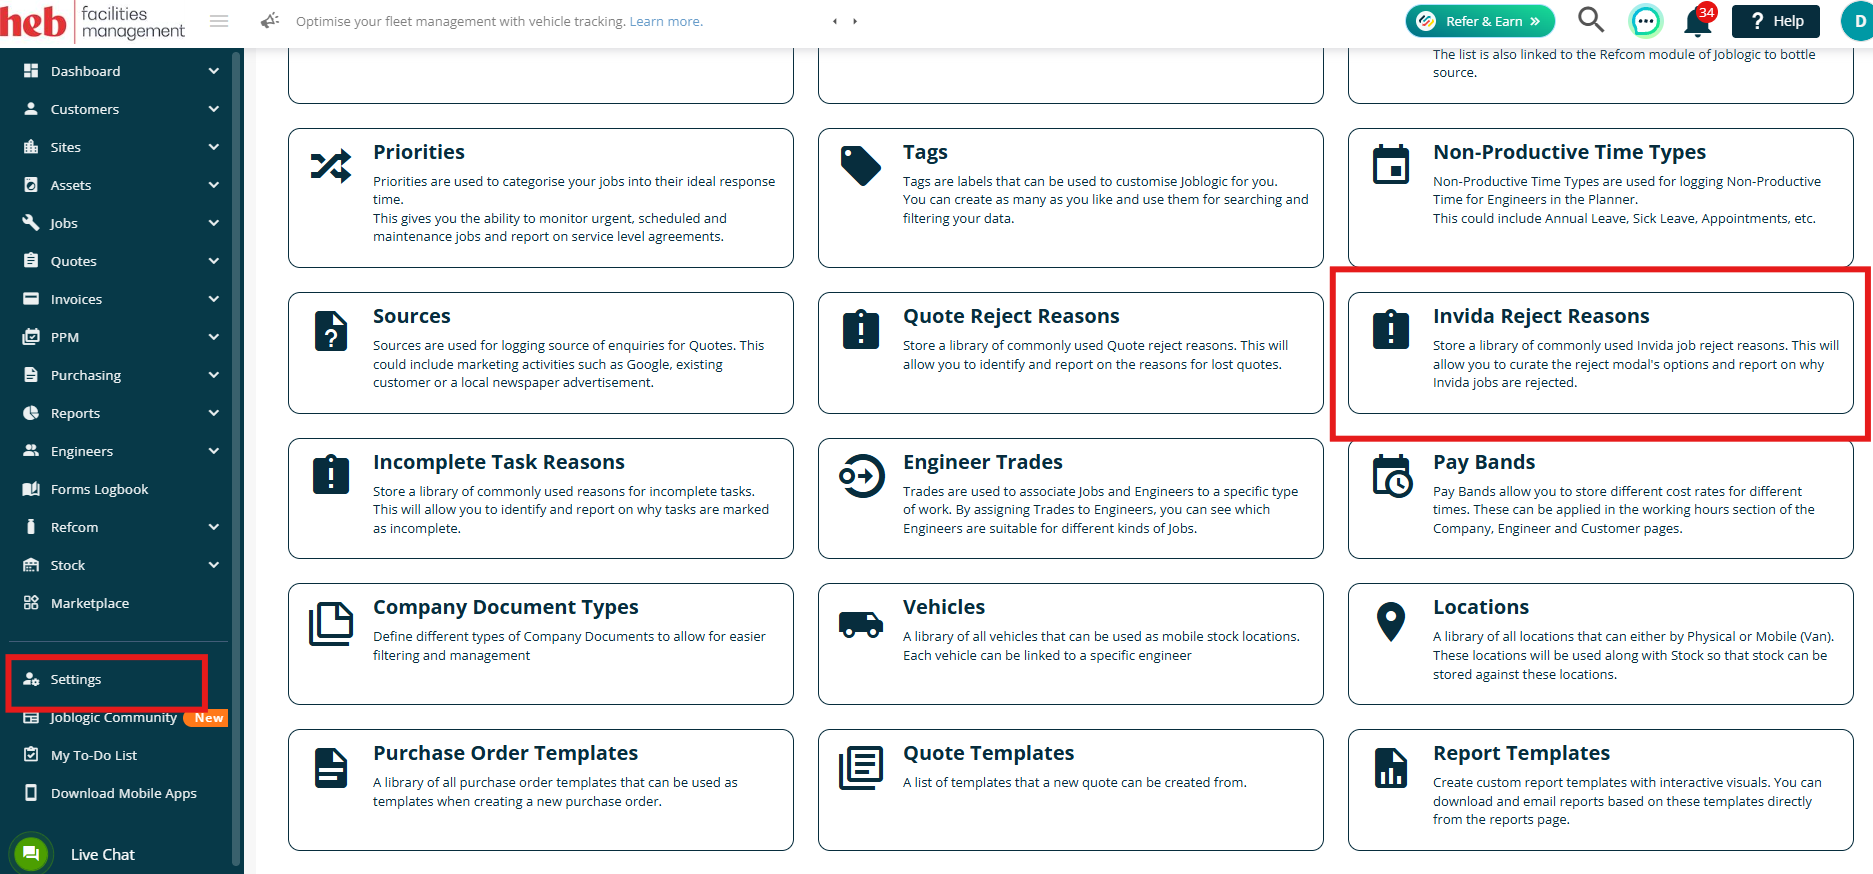
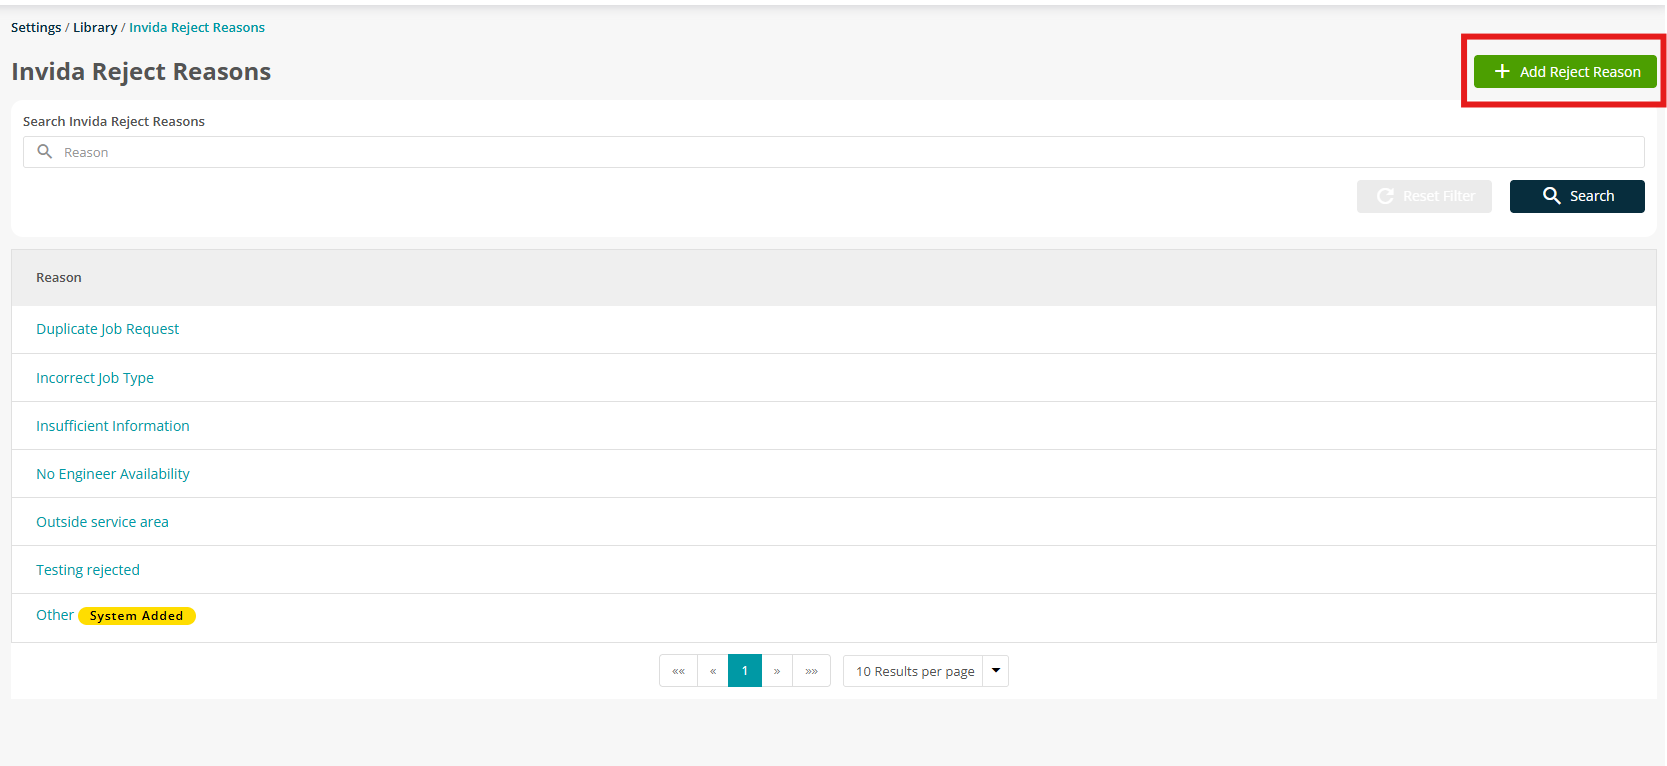
To manage your own reasons, go to Settings > Library > Invida Reject Reasons and select Add Reject Reason. Enter the reason and select Save. You can also add a reason with + in the Reject pop-up. Other is provided by the system.
Deliver the work
Once accepted, an Invida job is delivered with the standard Joblogic workflow: allocate it to an engineer or subcontractor, then plan and deploy the visit.
Assets
Assets sent by Invida are added to the job's site in Joblogic. If the request named a specific asset, only that asset is added; otherwise all assets linked to the Invida building are added. Assign the relevant assets to the job and include them when you send the visit to the engineer.
Job attributes from Invida
With Sync Job Attributes turned on, each Invida meta field (for example an access code or equipment serial number) is added to the job as a job attribute.
The attribute takes its name from Invida and is stored as text. Updates from Invida change the value in place.
Attributes from Invida belong to that job only and can't be edited in Joblogic.
On each job attribute, set Public or Private in the Add/Edit Attribute pop-up. All attributes are Public by default.
Engineers see Public attributes on mobile under Visit Details > Others > Job Details > Job Attributes. Attributes added in Joblogic can be edited there if the engineer has permission.
Two mobile permissions control access: View Job Attributes and Edit Job Attributes. Administrators have both by default; all other roles have neither until you grant them.
Turning the setting off stops future syncing. Attributes already on jobs stay.
Keep Invida updated automatically
As your engineers and subcontractors work, Joblogic updates the Invida job for you, so the main contractor sees progress without phoning you. What is sent depends on the Invida Sync Settings and Status Updates you ticked.
Progress notes
Ticked visit and subcontractor statuses are added to the Invida job as notes.
Subcontractor progress is sent when the job is allocated to the subcontractor and when the subcontractor PO is completed. Job completion is always sent as a note.
Engineer attendance
When a visit is assigned, an attendance entry appears on the Invida job with the engineer's name, contact details and planned visit time. It then follows the visit status:
Joblogic visit status | Invida attendance status |
New | Assigned |
Accepted | Accepted |
Travelling | EnRoute |
On Site | OnSite – Started |
Left Site | Paused |
Left Site and came back | Resumed |
Complete | Complete |
Rejected | Rejected |
Aborted | Aborted |
Abandon Travel | Returns to the previous status; nothing new is sent |
Statuses with no Invida equivalent, such as Left Site (Signature Required) or Signed, are not sent. A reason entered on a rejected or aborted visit appears in the Details column of the Invida attendance.
SLA milestones
Invida SLA target | Completed by |
Attend before | The engineer marking the visit On Site (target: the Target Attendance Date) |
Start | The same On Site time |
Contain before | No Joblogic equivalent. Engineers see the deadline on mobile as Target Contain Before in Visit Details |
Complete before | The engineer marking the visit Complete (target: the Target Completion Date) |
Travel and labour time
Travel and labour time logged on a visit is sent as two separate time entries, each with start and end times and the engineer's name. The main contractor sees them under the Invida job's Assignment > Time Entries and in Invida's Time Entry Report.
Notes, attachments and the jobsheet
Only public Joblogic notes and attachments are ever sent to Invida, and each one is sent once. Public notes added to the Invida job by the main contractor arrive in Joblogic as job notes.
Send Paperwork
Use Send Paperwork at any point on an Invida job, including after it is completed.
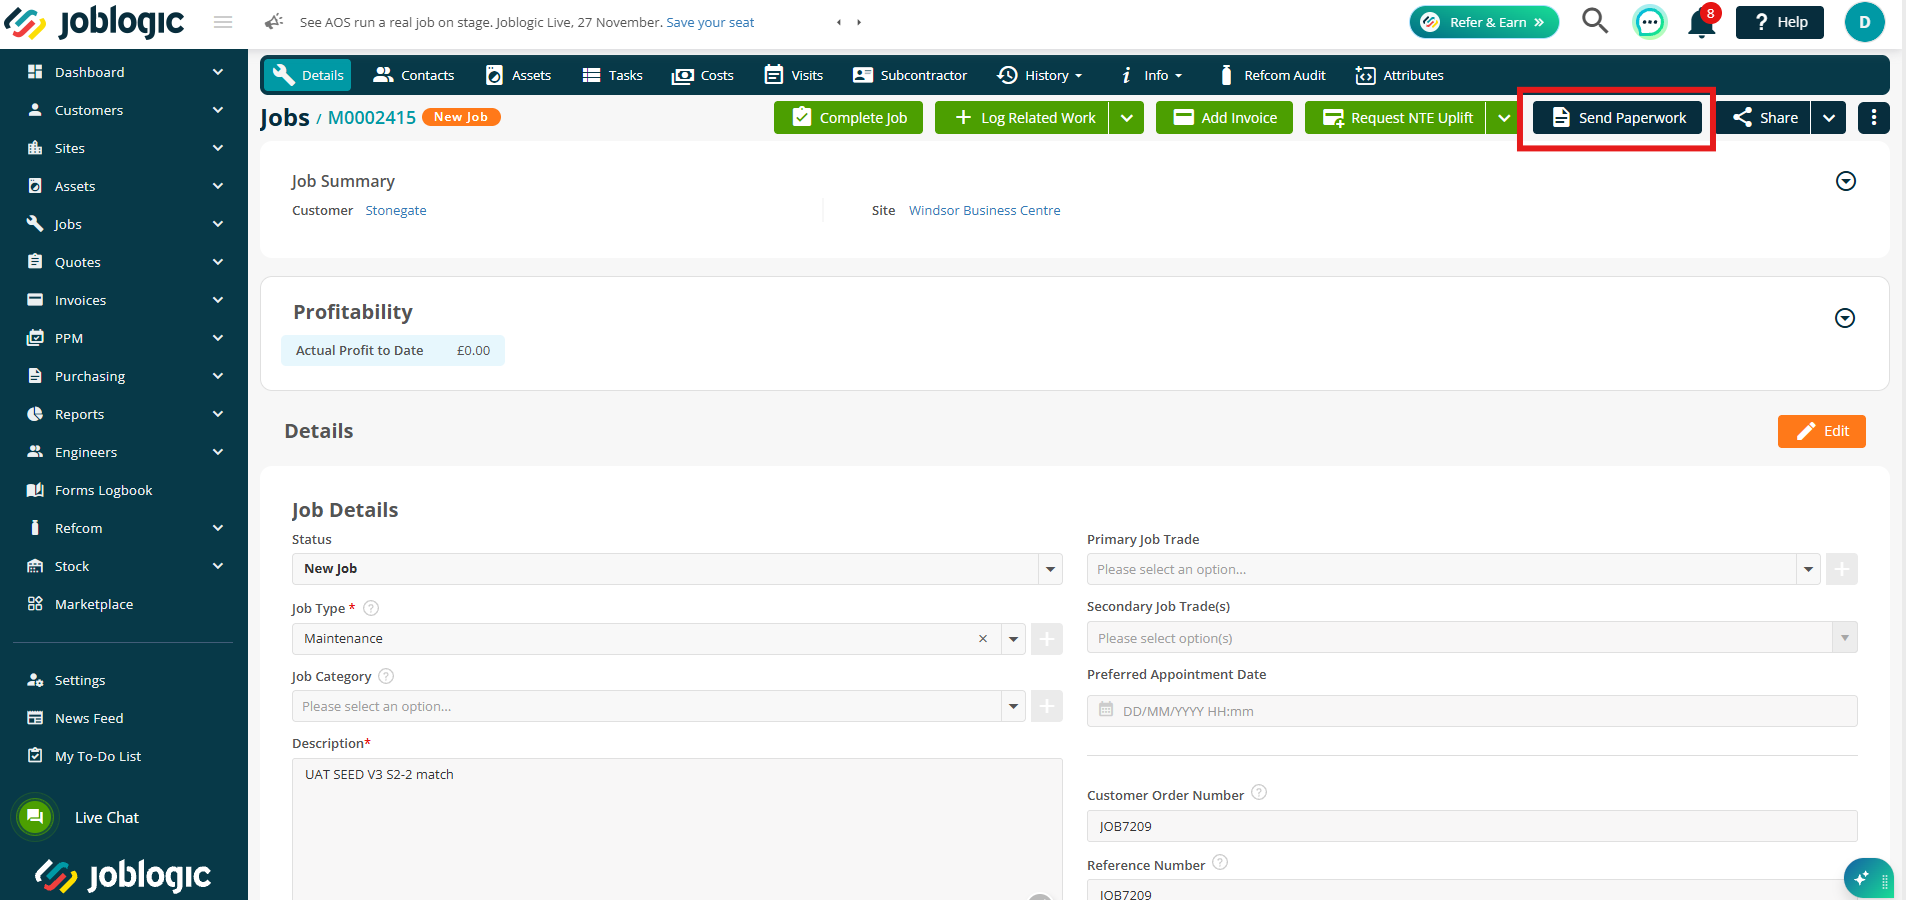
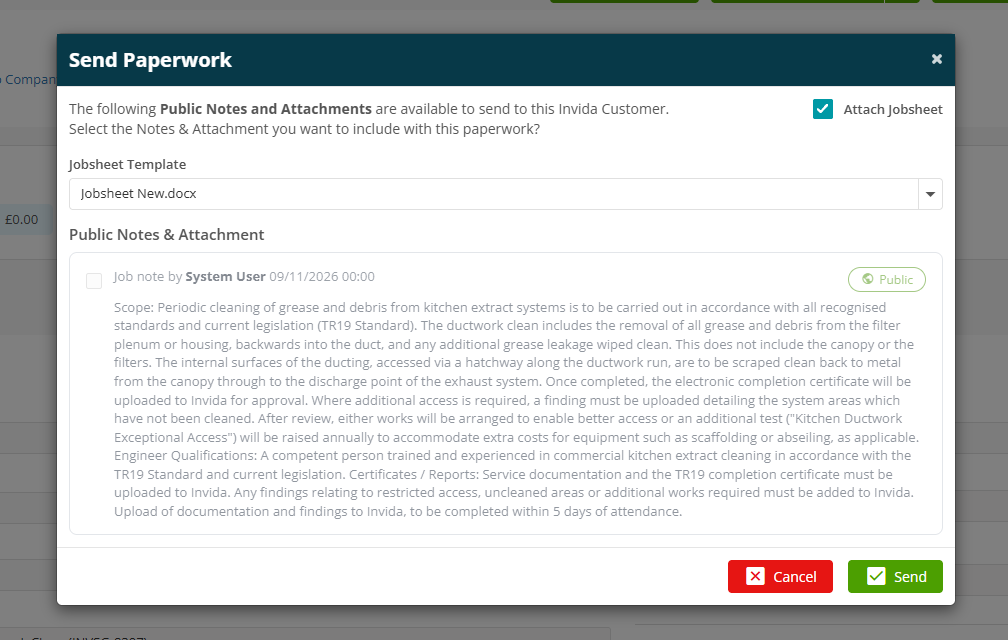
- Open the job and select Send Paperwork.
- Tick Attach Jobsheet to include the jobsheet, and pick the template if needed. The default jobsheet follows the usual order: site, then customer, then system default.
- Select the public notes and attachments to send.
- Select Send.
Notes appear as notes on the Invida job and files as attachments. Items already sent aren't sent again.
With Auto-Send Notes turned on
New public notes go to Invida automatically as soon as they are added, so you don't select them in Send Paperwork. Send Paperwork is then used for the jobsheet.
Costs, NTE limit and invoicing
An Invida job's costs must stay within the NTE (not-to-exceed) limit set by the main contractor, and its invoice stays in Draft until Invida approves it.
NTE limit
A yellow banner on Job Details and Invoice Details shows "Your Approved NTE Limit is <amount>". The limit applies to the Sell value.
A cost that would take the job over the limit can't be added. You'll see: "This cost can't be added — the NTE limit of £{amount} has been reached. Request an uplift to continue."
Request an NTE uplift
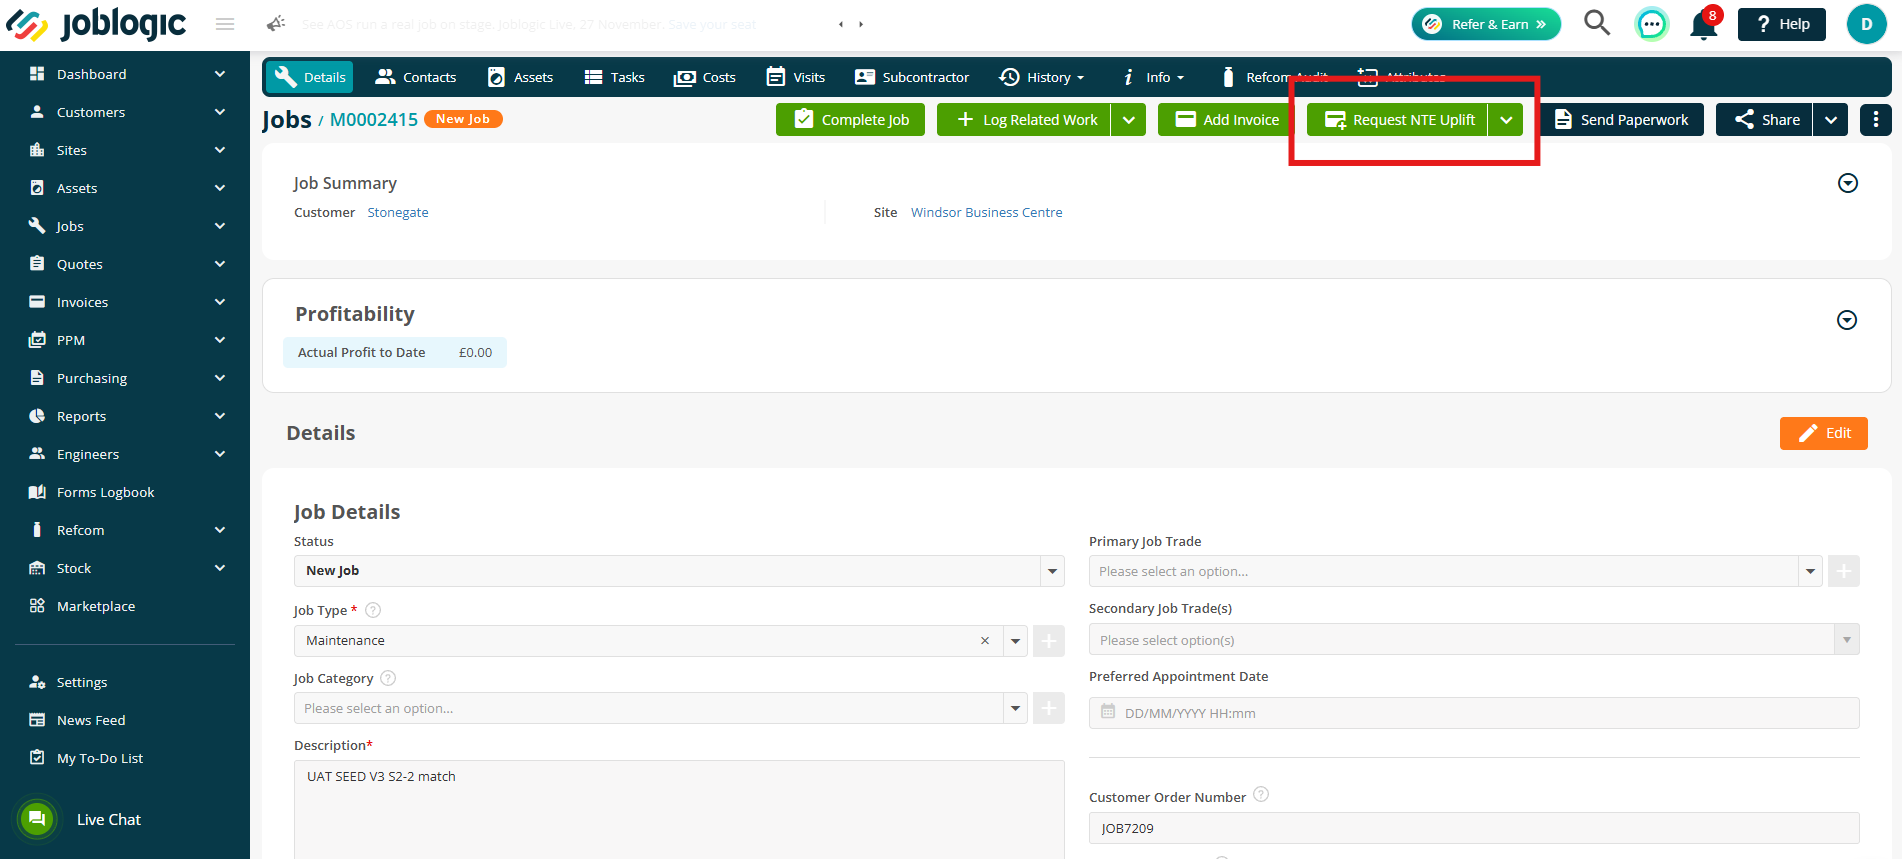
- On Job Details, select Request NTE Uplift next to the NTE limit.
2. Assign each cost line to Incurred Costs to Date or Anticipated Additional.
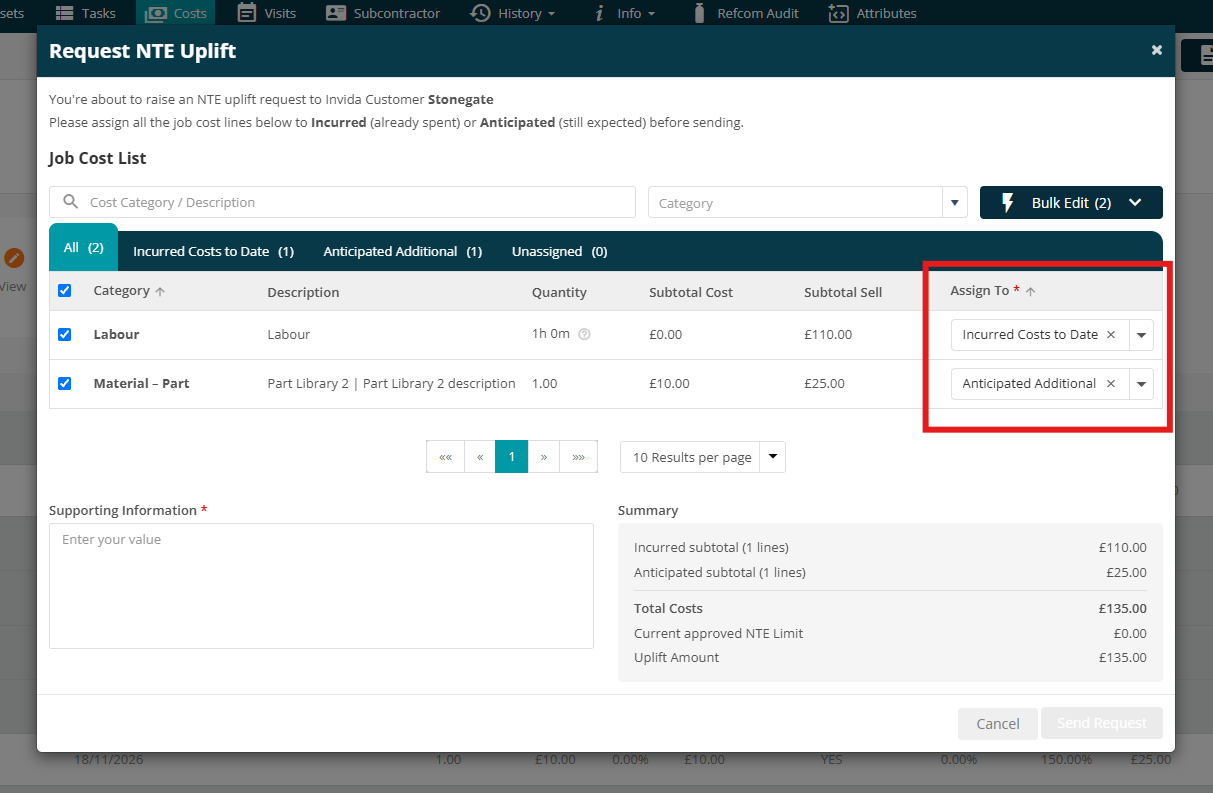
4. Check Estimated Total Costs, which adds up both sections.
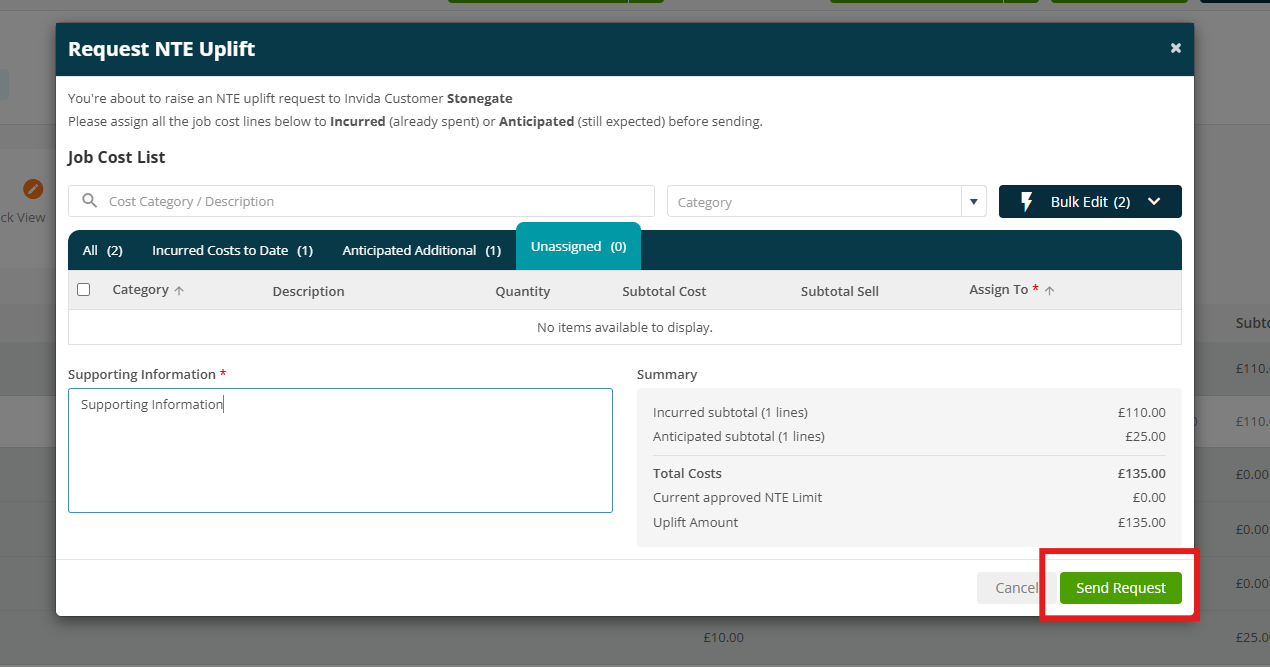
5. Add Supporting Information and select Issue Request.
The request appears in the NTE section of the Invida job. Selecting Request NTE Uplift again shows the status of the request you sent.
Send an invoice for approval
- Raise the invoice as normal. For PPM work, raise it against the PPM job, not the PPM Contract.
- On Invoice Details, select Send for Approval. The button shows on Invida jobs once the invoice is in Draft and approved internally.
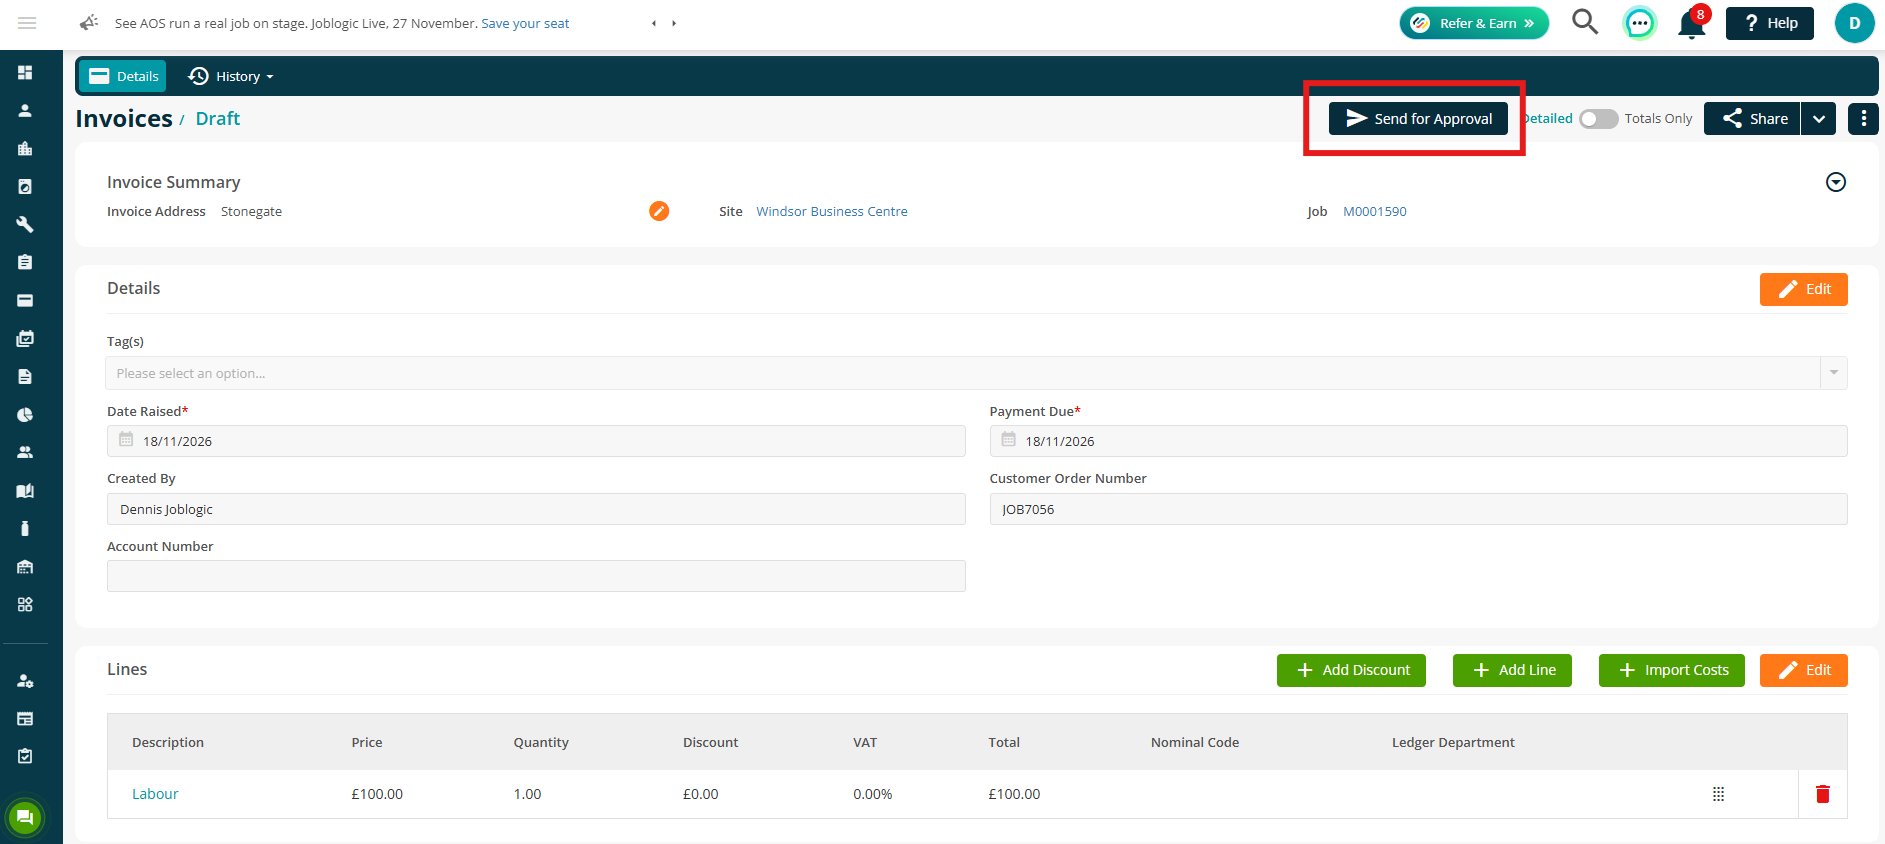
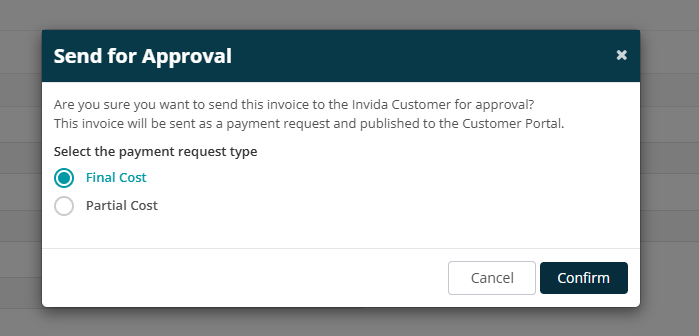
3. Choose Final Cost or Partial Cost. Some main contractors don't accept partial payments; you'll see "Partial Payment is not permissible by contractors."
Send for Approval is unavailable when the invoice has no lines, a line has a zero price, or the total is over the NTE limit. You can send several invoices for one job, each as its own payment request.
Invoice statuses
Status | Means | What you can do |
Draft | Raised in Joblogic | Edit and send for approval |
Pending for Approval | Sent to Invida | Wait for the main contractor |
Invida - Approved | Approved by the main contractor | Nothing; it now passes to your accounts package |
Invida - Rejected | Rejected by the main contractor | Edit and send again |
Invida - Query | Queried; a banner shows the main contractor's message | Edit and send again |
The invoice only reaches your accounts package once it is Invida - Approved. Filter by these statuses on the All Invoices and All Jobs lists.
Quick reference
If… | Check |
A PPM job hasn't arrived yet | Invida only releases it once its "Can't Start Before" date is reached. |
You can't allocate, cost or invoice a job | It is still in Pending Acceptance; accept it first. |
Invida isn't showing attendance or SLA updates | Invida Sync Settings and Status Updates for that Invida customer. |
Time entries aren't reaching Invida | Both Sync Engineer Travel and Labour and Sync Engineer Attendance must be on. |
If… | Check |
A cost is in the wrong category | Cost Category Mapping, and that each direction's default category is set. |
A cost can't be added | The job has reached its NTE limit; request an uplift. |
Send for Approval is greyed out | The invoice has no lines, a zero-price line, or exceeds the NTE limit. |
New Invida priorities or categories are missing | Select Invida Configuration Sync, then update the mappings. |
Engineers can't see job attributes | The attribute is Private, or the engineer's role lacks View Job Attributes. |
For further help, contact Joblogic Support on 0800 326 5561 or support@joblogic.com, or Customer Success at customersuccess@joblogic.com.