Introduction
WarehouseFlow gives authorised warehouse users a simplified way to identify stock and move it between Stock Locations, Racks and Shelves using Barcode and QR Code scanning. Transactions update the existing Joblogic stock records immediately and use the existing stock transfer audit trail.
In this guide, we'll show you how to access WarehouseFlow, scan a location to review its stock, complete individual and bulk stock transfers, and manage Barcode and QR Code values and labels. It also explains the permissions and audit records that support these workflows.
Subscribe to WarehouseFlow
WarehouseFlow is available as a Joblogic Marketplace app. Your Joblogic account must have an active WarehouseFlow subscription before its Mobile functionality can be used.
Subscription: Open WarehouseFlow in Joblogic Marketplace and follow the available subscription process.
Availability: If WarehouseFlow is not available after subscription, ask an administrator to check your permissions and confirm that the Stock module and required stock records are configured.
Before you start
Confirm the following before using WarehouseFlow:
- Your Joblogic account has an active WarehouseFlow subscription.
- Your role has permission to open WarehouseFlow and perform the required operation.
- The Joblogic Stock module is in use.
- The required Stock Locations, Racks, Shelves and stock records already exist and are active.
- The required Barcode or QR Code values have been assigned where scanning is used.
- Your mobile device, tablet or handheld scanner supports the required scanning method.
Important: Barcode and QR Code values must be unique across Joblogic. WarehouseFlow does not provide an offline stock-transfer workflow, so complete transactions while the device can communicate with Joblogic.
Access WarehouseFlow
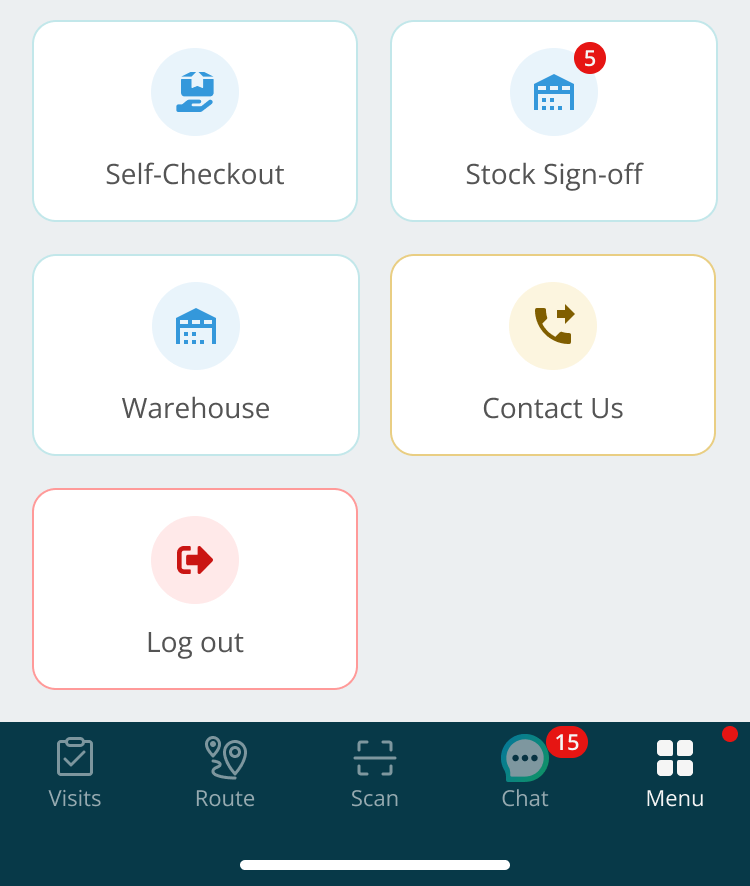
1. Sign in to the Joblogic Mobile App.
2. Select Menu from the bottom navigation bar.
3. Select Warehouse.
From the Mobile menu, select Warehouse.
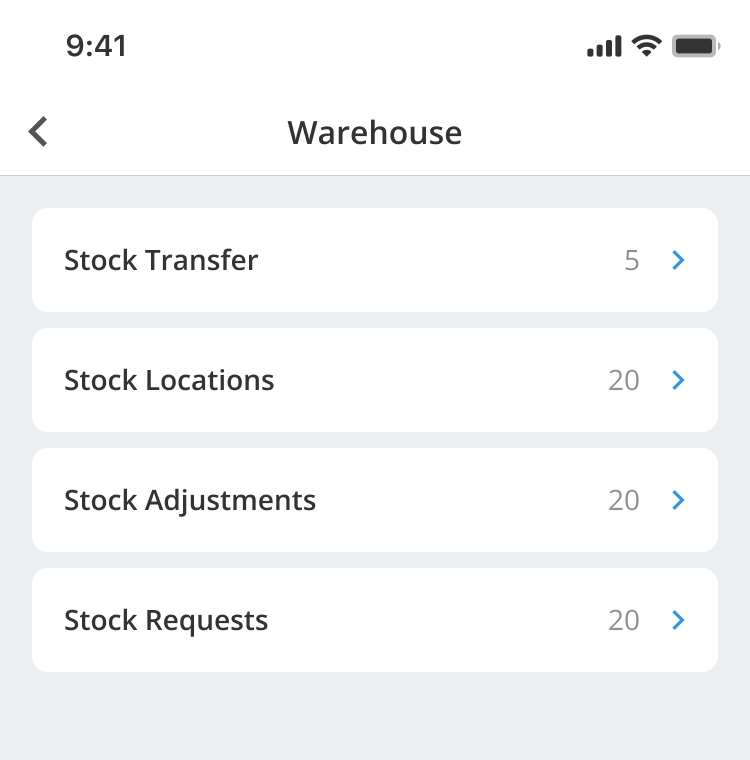
4. Select the required warehouse operation.
WarehouseFlow displays only the functions allowed by your role. If you do not have WarehouseFlow access, the functionality is not available to you.
Open WarehouseFlow to view the operations available to your role.
Scan a location and view its stock
Use the location lookup when you need to confirm which stock items are held at a Stock Location, Rack or Shelf. This workflow is view-only and does not change stock balances.
1. Open the location-scanning option in WarehouseFlow.
2. Scan the location's Barcode or QR Code.
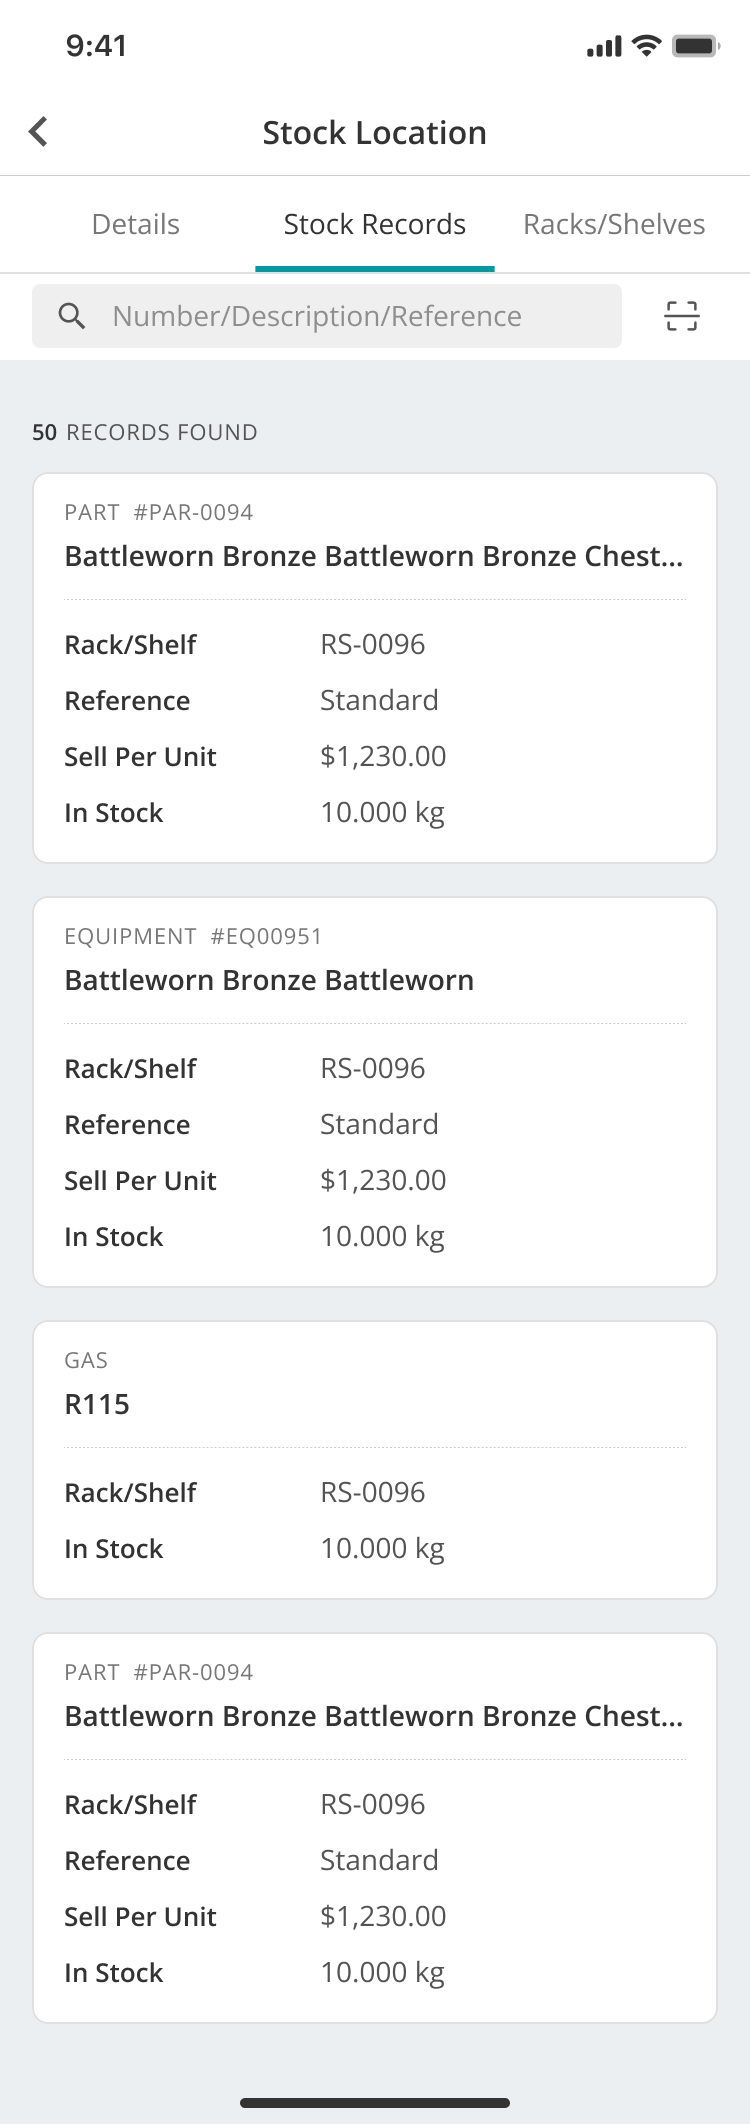
3. Review the stock held at the identified location.
You can also browse the Stock Locations, Racks/Shelves and Stock Records tabs when a code is unavailable. The lists show active records available to the current user.
For each stored item, Joblogic displays:
- Stock Item
- Part Number
- Description
- Available Quantity
Scan the location code and review its current stock contents.
No stock: If the location is valid but contains no stock, Joblogic displays an empty-location message.
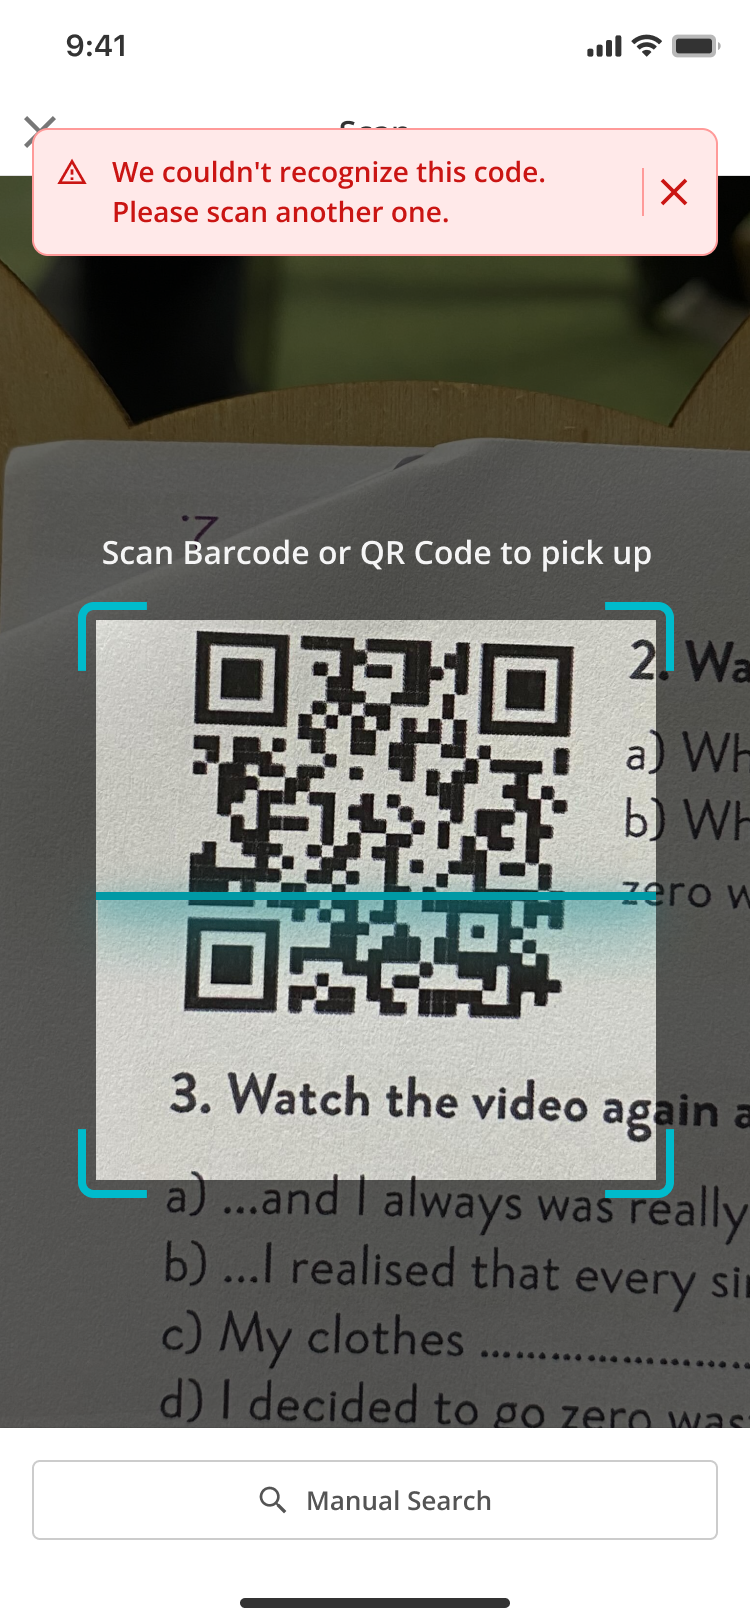
Invalid code: If the scanned Barcode or QR Code does not match an active location, Joblogic displays an error message.
If the code is not recognised, review the message and scan another code.
Transfer stock
WarehouseFlow supports individual and bulk stock transfers between active Stock Locations, Racks and Shelves. A successful transfer updates the source and destination balances immediately.
Start the transfer and scan the source
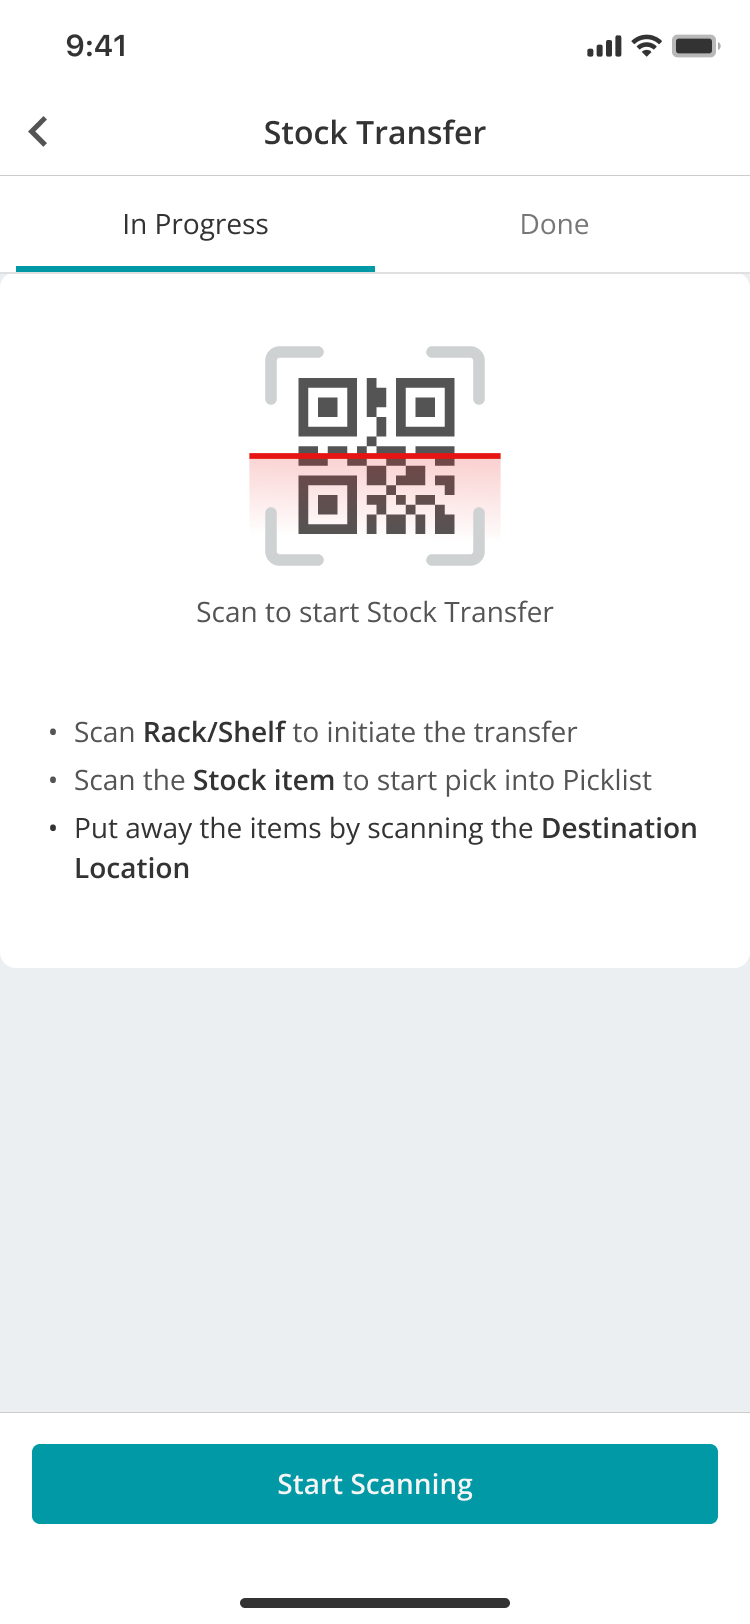
1. Select Stock Transfer.
2. Scan the source Stock Location, Rack or Shelf Barcode or QR Code.
3. Confirm that the correct source and its current stock items are displayed.
Start Stock Transfer and scan the source location.
Select the stock and quantity
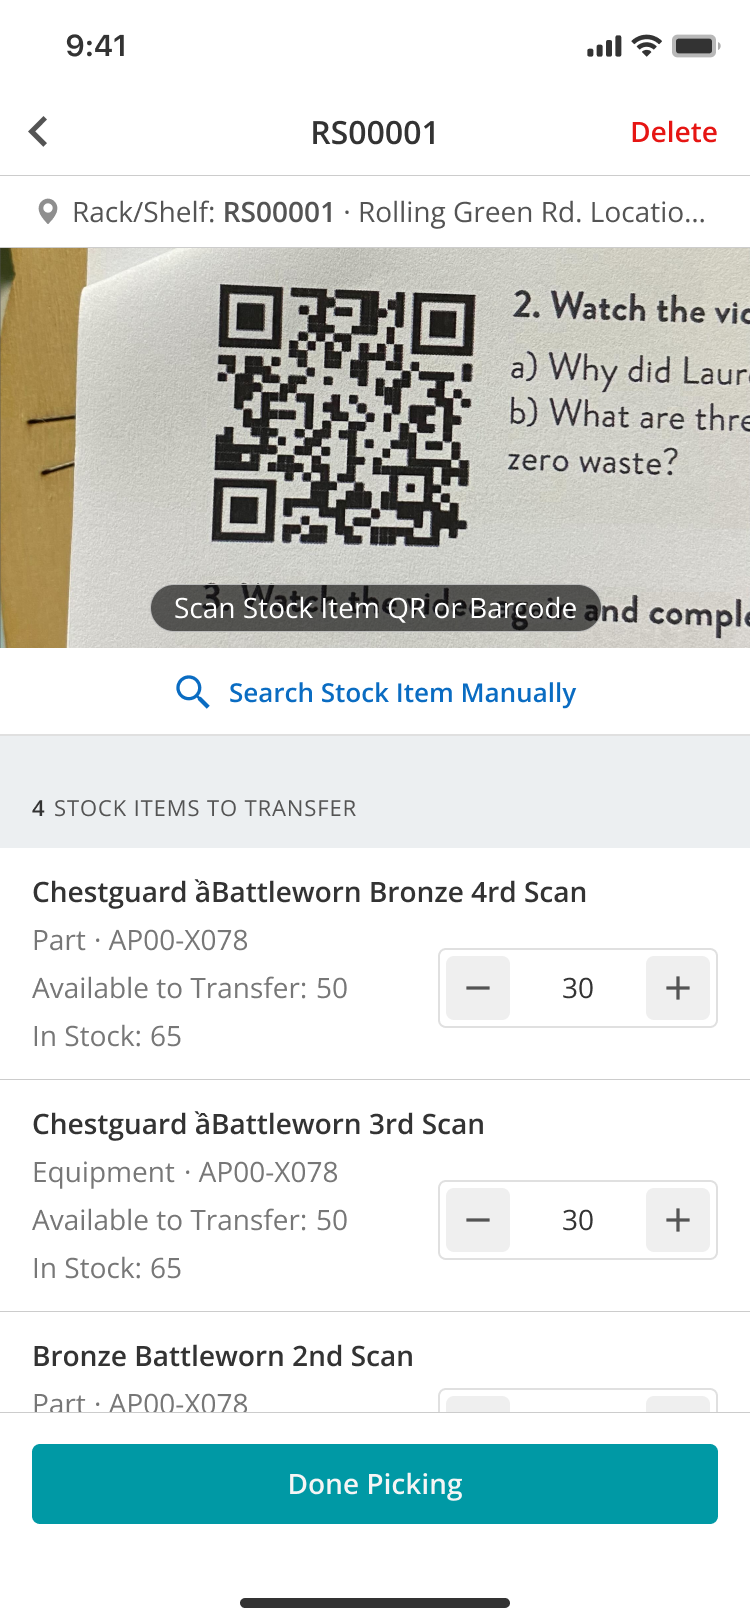
1. Scan the Stock Item Barcode or QR Code.
2. Confirm that the item exists at the selected source.
3. Enter the quantity to transfer.
For a bulk transfer, select each required stock item and enter its transfer quantity before continuing. Partial quantities can be transferred.
A successfully scanned item is added to the picklist with a quantity of one. Scanning the same item again increases its quantity. You can adjust the quantity before continuing.
Scan or select the required stock items and enter the quantities to move.
Scan the destination and complete the transfer
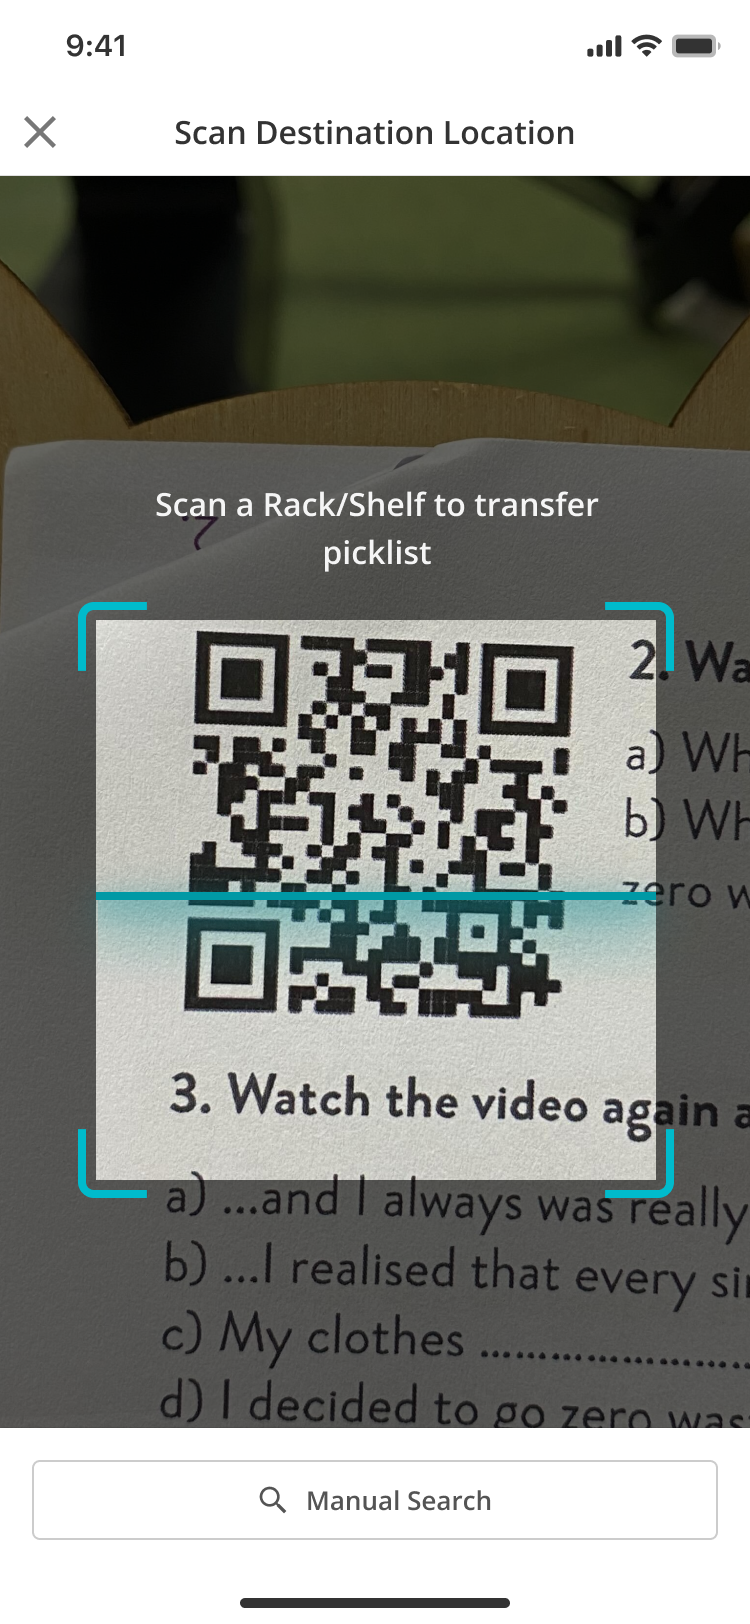
1. Scan the destination Stock Location, Rack or Shelf Barcode or QR Code.
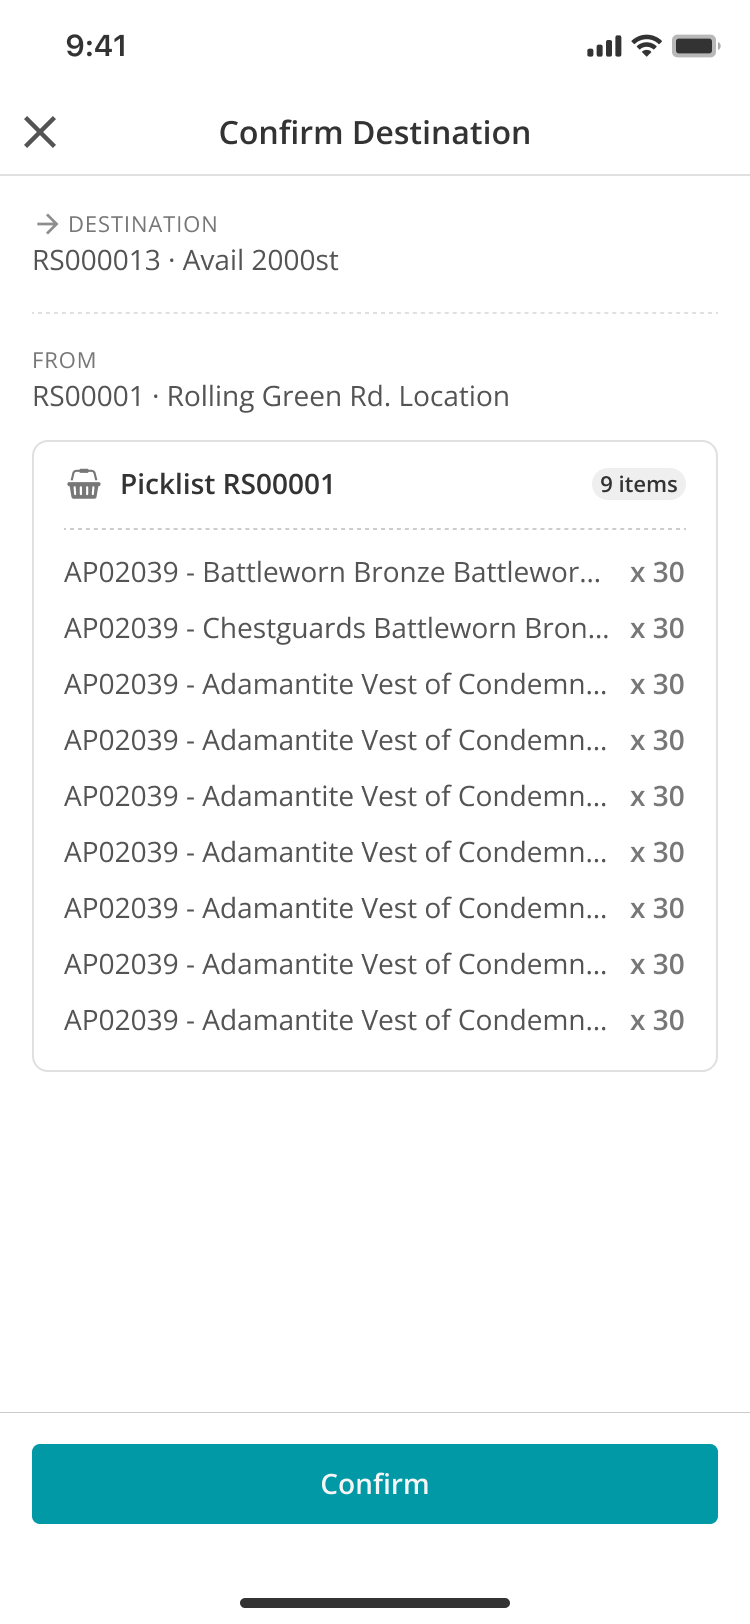
2. Review the source, destination, stock items and quantities.
3. Confirm the transfer.
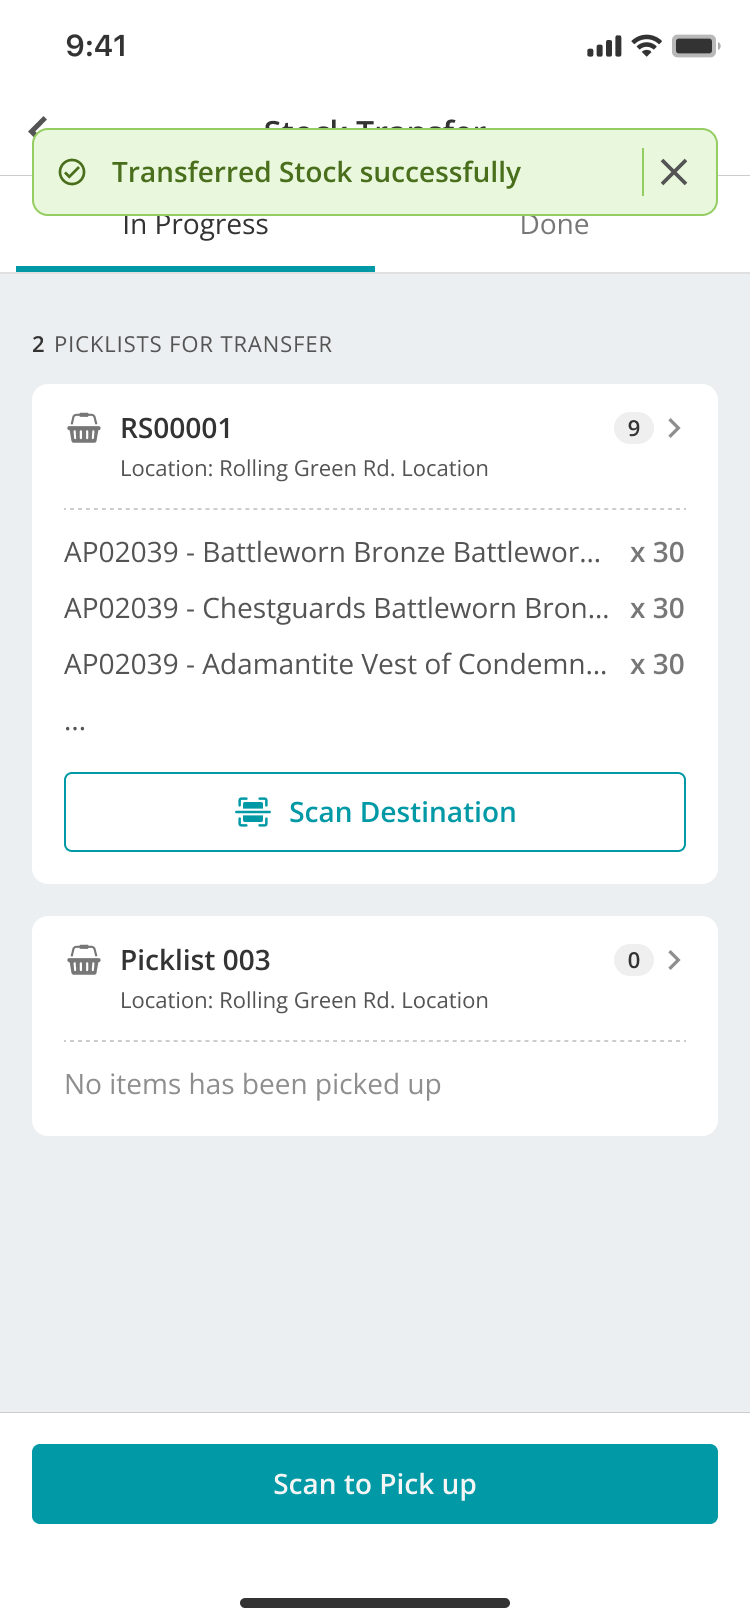
4. Review the successful-transfer confirmation.
Scan the destination Rack or Shelf for the selected picklist.
Review the destination and picklist details, then select Confirm.
After the transfer is completed, Joblogic displays a success message and moves the picklist to Done.
Use manual search
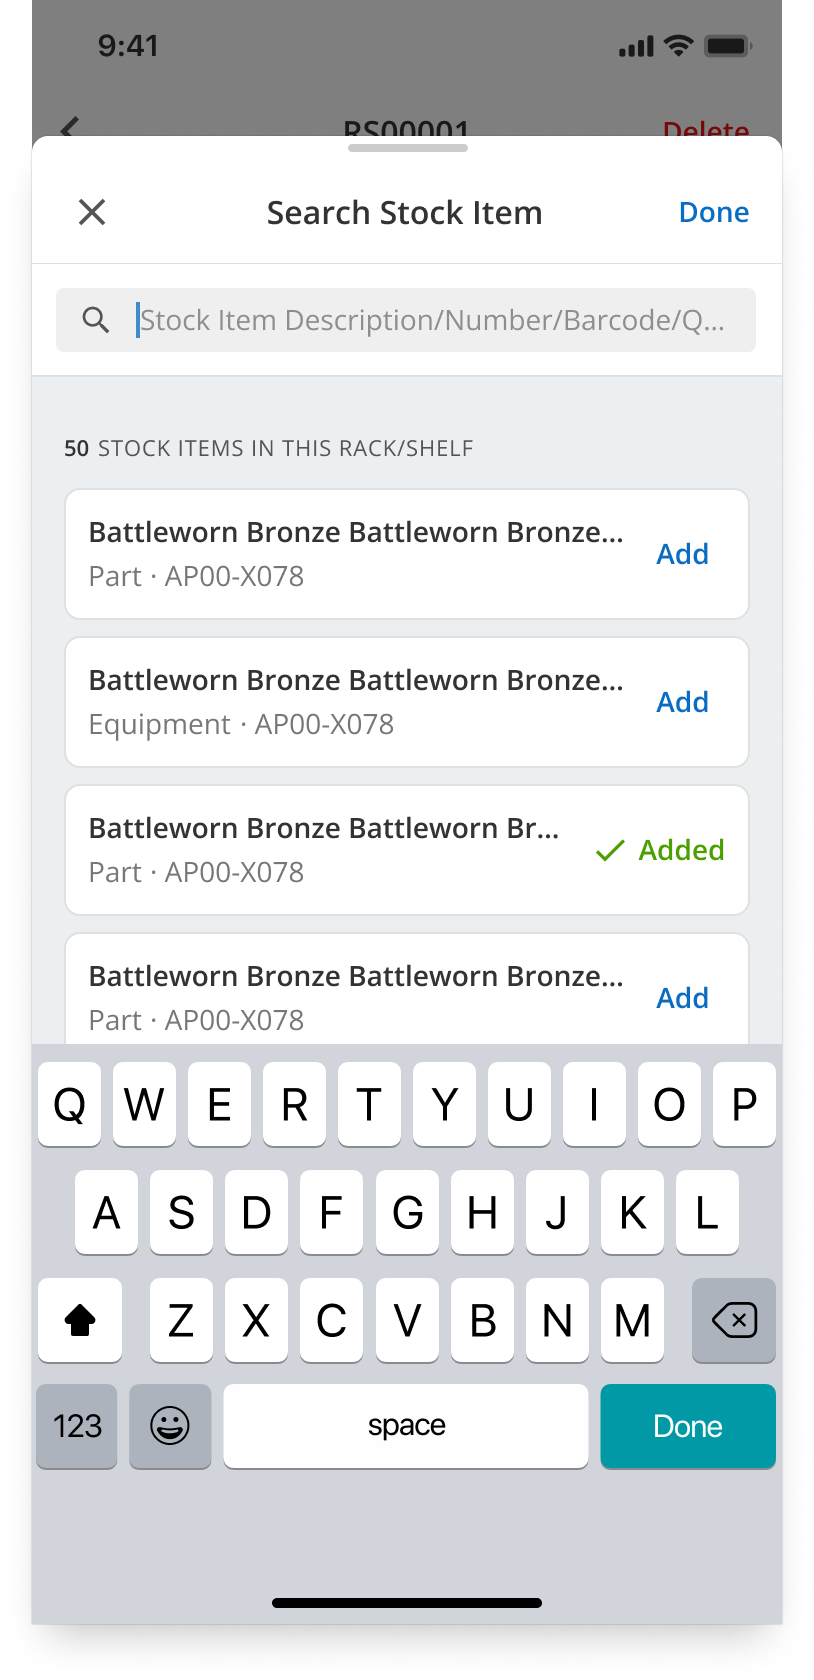
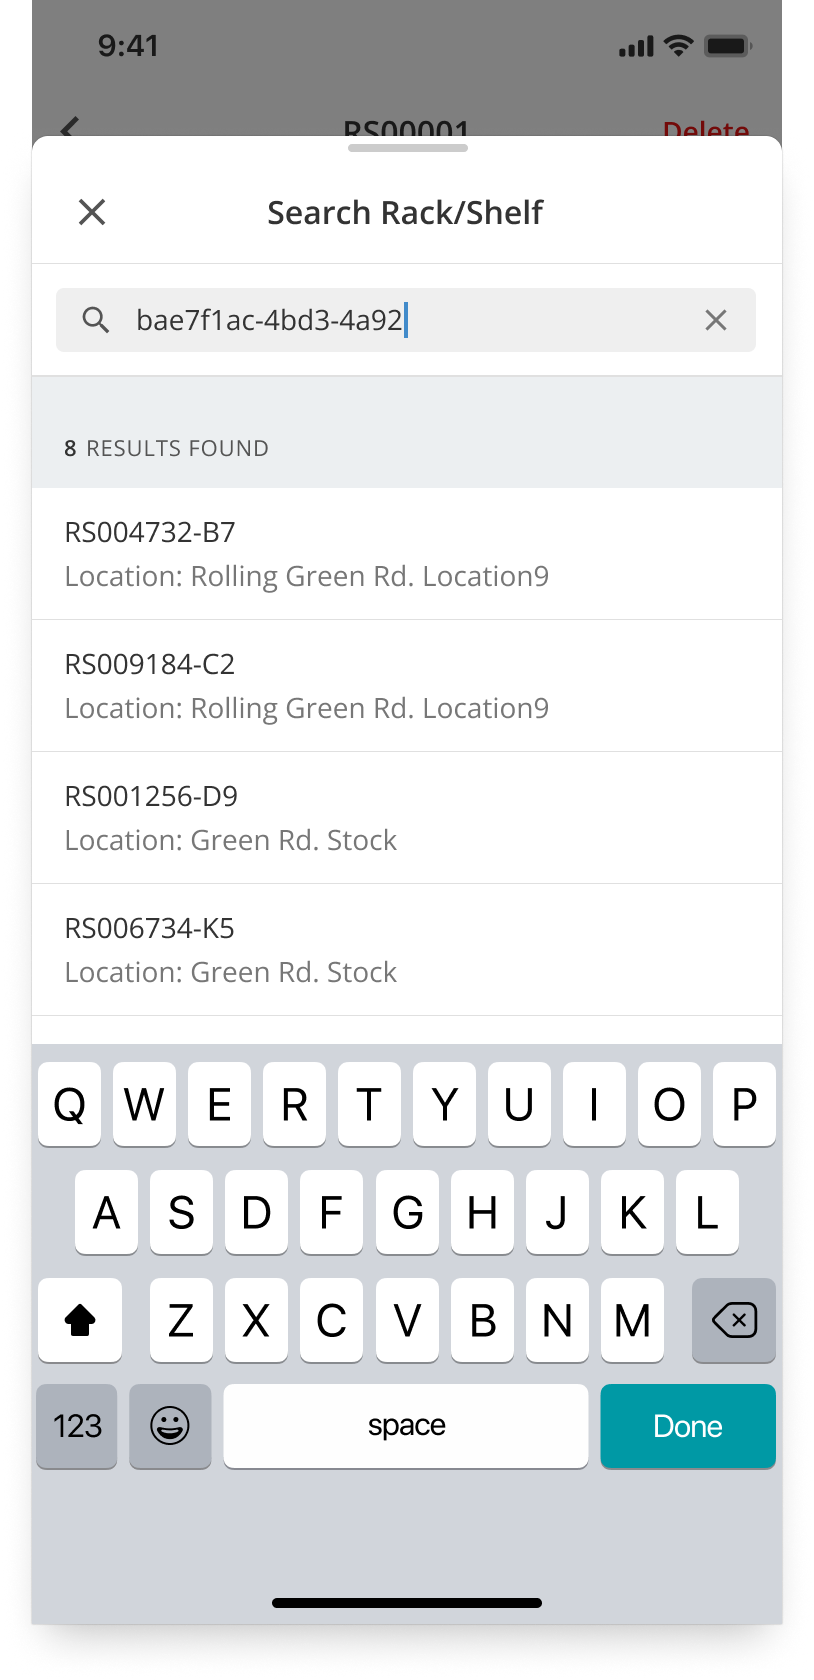
If you cannot scan a code, use the manual search option shown in WarehouseFlow. Search results remain limited to records that are valid for the current stage of the transfer.
- Search for a Stock Item by its description, number, Barcode or QR Code, then select Add.
- Search for the required Rack or Shelf by its name or code, then select the correct result.
Search for a Stock Item and add it to the current picklist.
Search for and select the required Rack or Shelf when a scan is not available.
Delete a picklist: Select Delete from an in-progress picklist and confirm the message when the picklist is no longer required. This removes the picklist; it does not transfer stock.
Review completed transfers
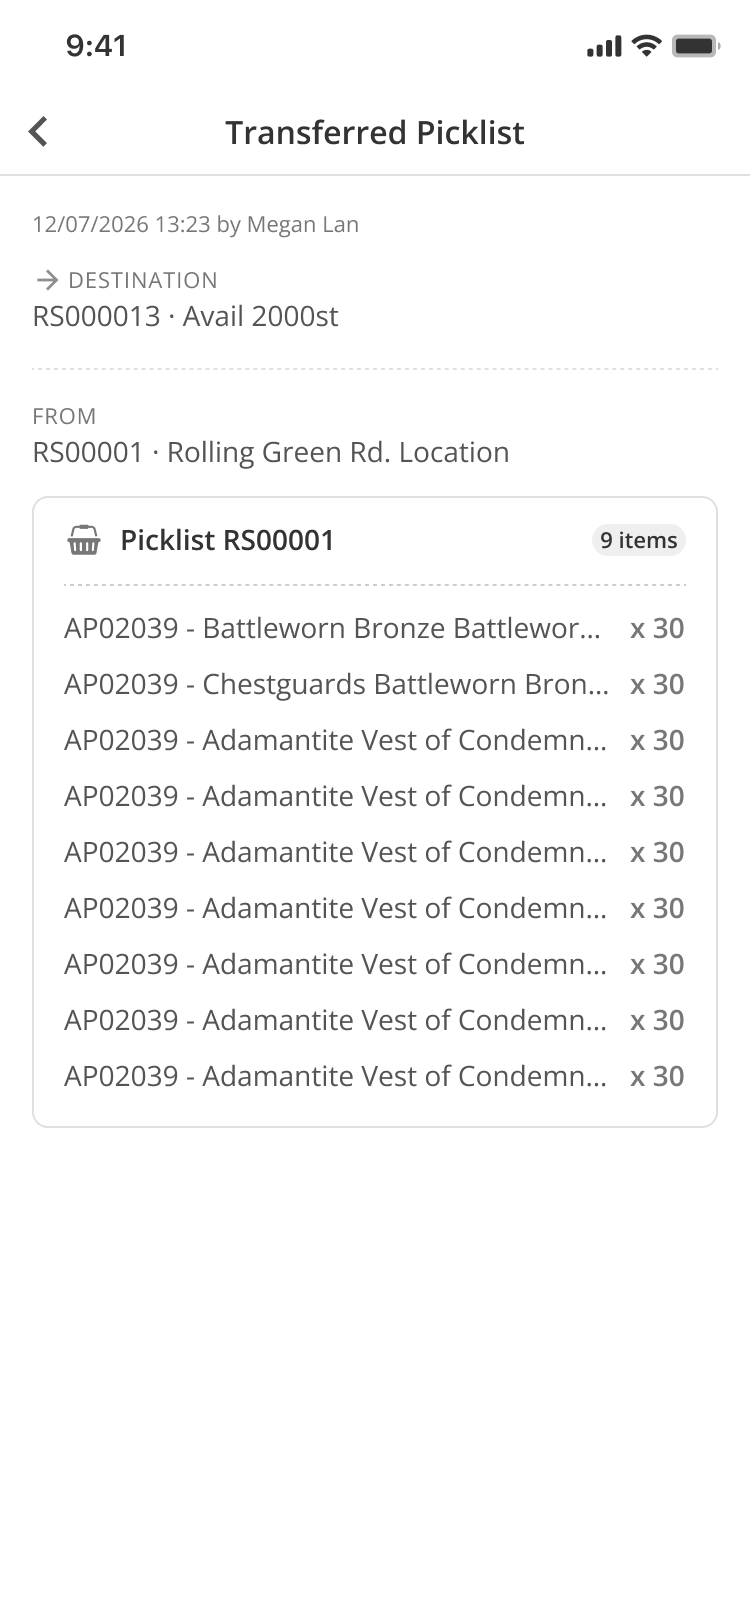
Completed picklists move from In Progress to Done. The Done tab shows the transferred picklists, the source location, item totals and the completion date and time.
Open the Done tab to review completed picklists.
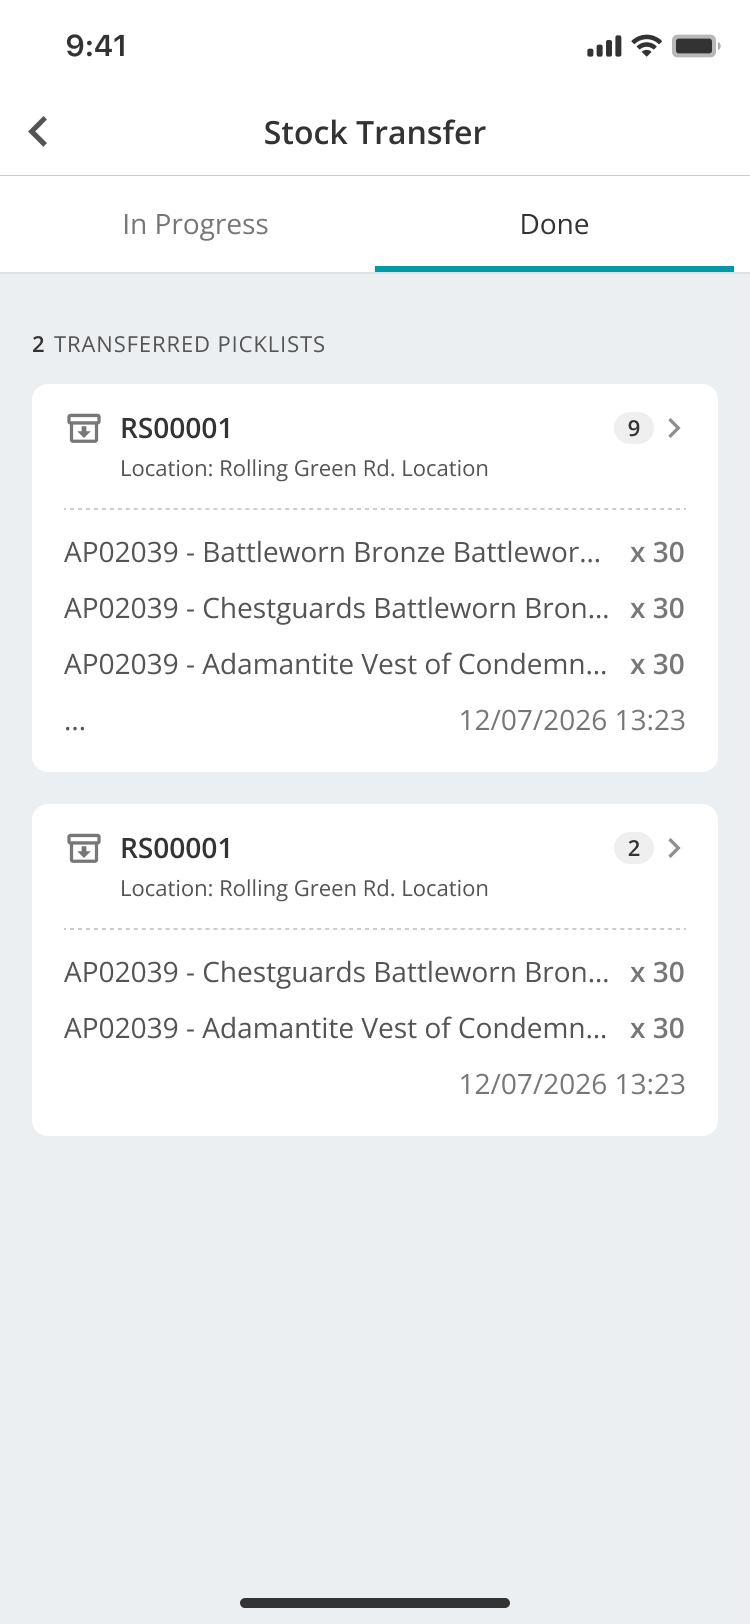
Select a completed picklist to review its source, destination, items, quantities, user and completion time.
Transfer checks
Check | Requirement |
|---|---|
Source | The source must be an active Stock Location, Rack or Shelf. |
Stock item | The selected item must exist at the source location. |
Quantity | The quantity must be greater than zero and cannot exceed the available quantity. |
Destination | The destination must be active and must be different from the source. |
Record status | Suspended Stock Items, Stock Locations, Racks and Shelves cannot be used for a transfer. |
Resolve transfer messages
Message or condition | What to do |
|---|---|
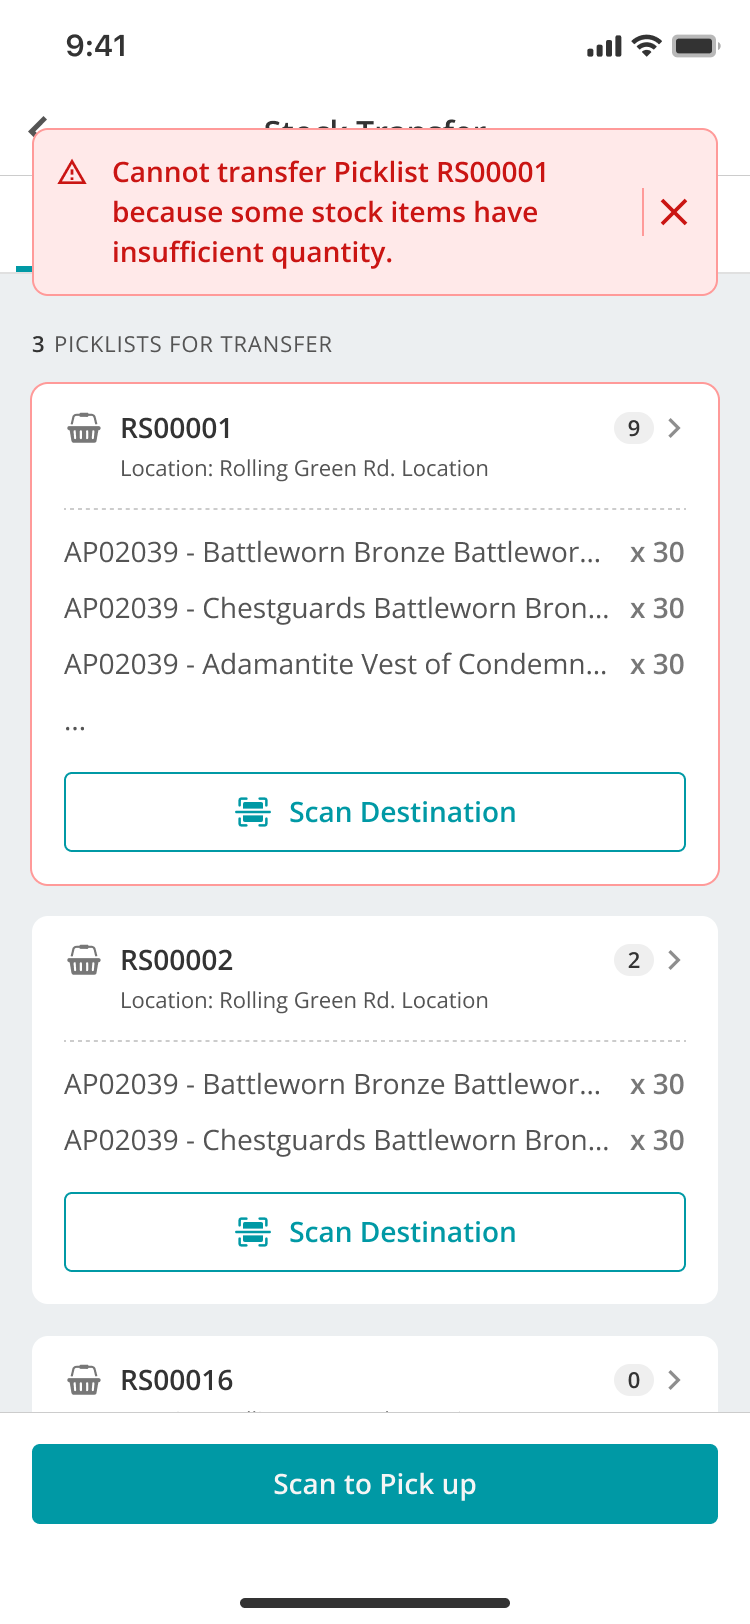
Insufficient quantity | Open the highlighted picklist and reduce or remove the affected item before retrying the transfer. |
Maximum quantity exceeded | Reduce the transfer quantity to the maximum available value shown for the item. |
Item belongs to another Rack or Shelf | Return to the correct source Rack or Shelf, or select the matching stock record from the correct location. |
Suspended record | Use an active Stock Item, Stock Location, Rack or Shelf. Ask an authorised user to review the suspended record if required. |
Rack or Shelf required | Scan or manually select a valid Rack or Shelf for the requested step. |
Unknown code | Check the label, confirm the record has an active Barcode or QR Code, then scan again or use manual search. |
When a picklist contains insufficient stock, open the highlighted picklist and correct its quantities.
Manage Barcodes and QR Codes
Authorised users can manage Barcode and QR Code values from supported records in both Back Office and WarehouseFlow. Supported records include Stock Locations, Racks, Shelves, Stock Items, Parts and Equipment.
Depending on your permissions, you can:
- Add a Barcode or QR Code manually.
- Generate a unique Barcode or QR Code.
- Edit an existing value.
- Delete an existing value.
- Print a Barcode or QR Code label.
Code types: A supported record can contain a Barcode, a QR Code, or both. Printing a label uses the existing value and does not generate a new code.
Manage codes in Back Office
1. Open the required supported record.
2. Add, generate, edit or delete the required Barcode or QR Code.
3. Save the record.
4. Select the print option when a physical label is required.
Open the record's code-management area and complete the required action.
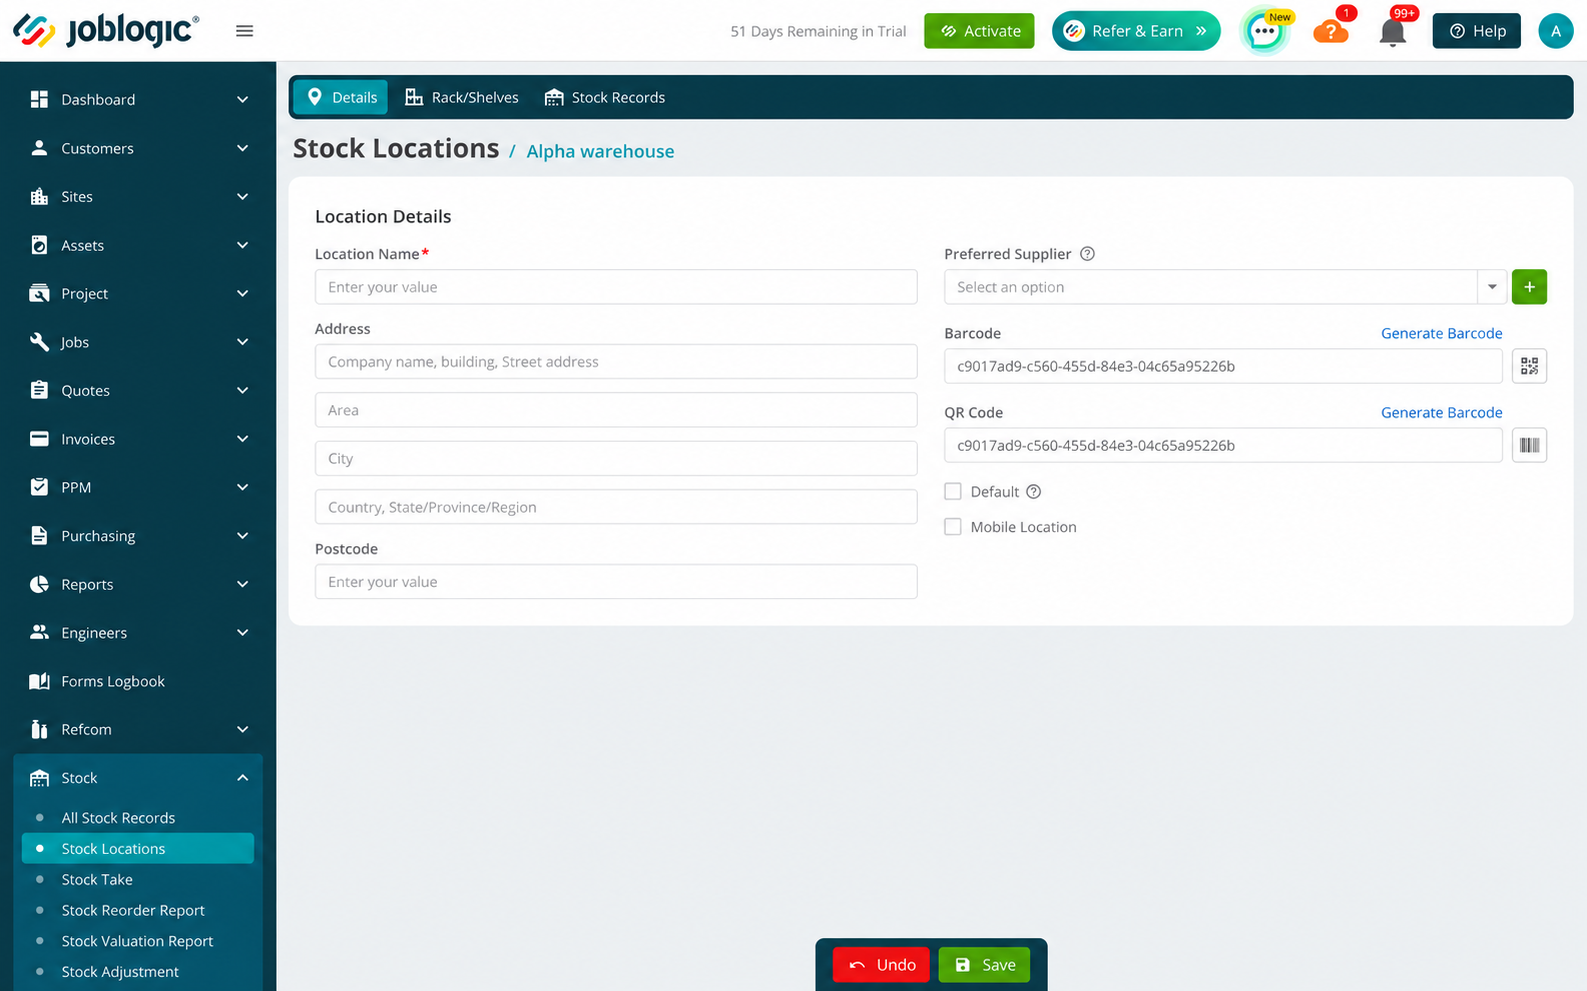
The same code-management options are available on supported Rack, Shelf, stock record, Part and Equipment records.
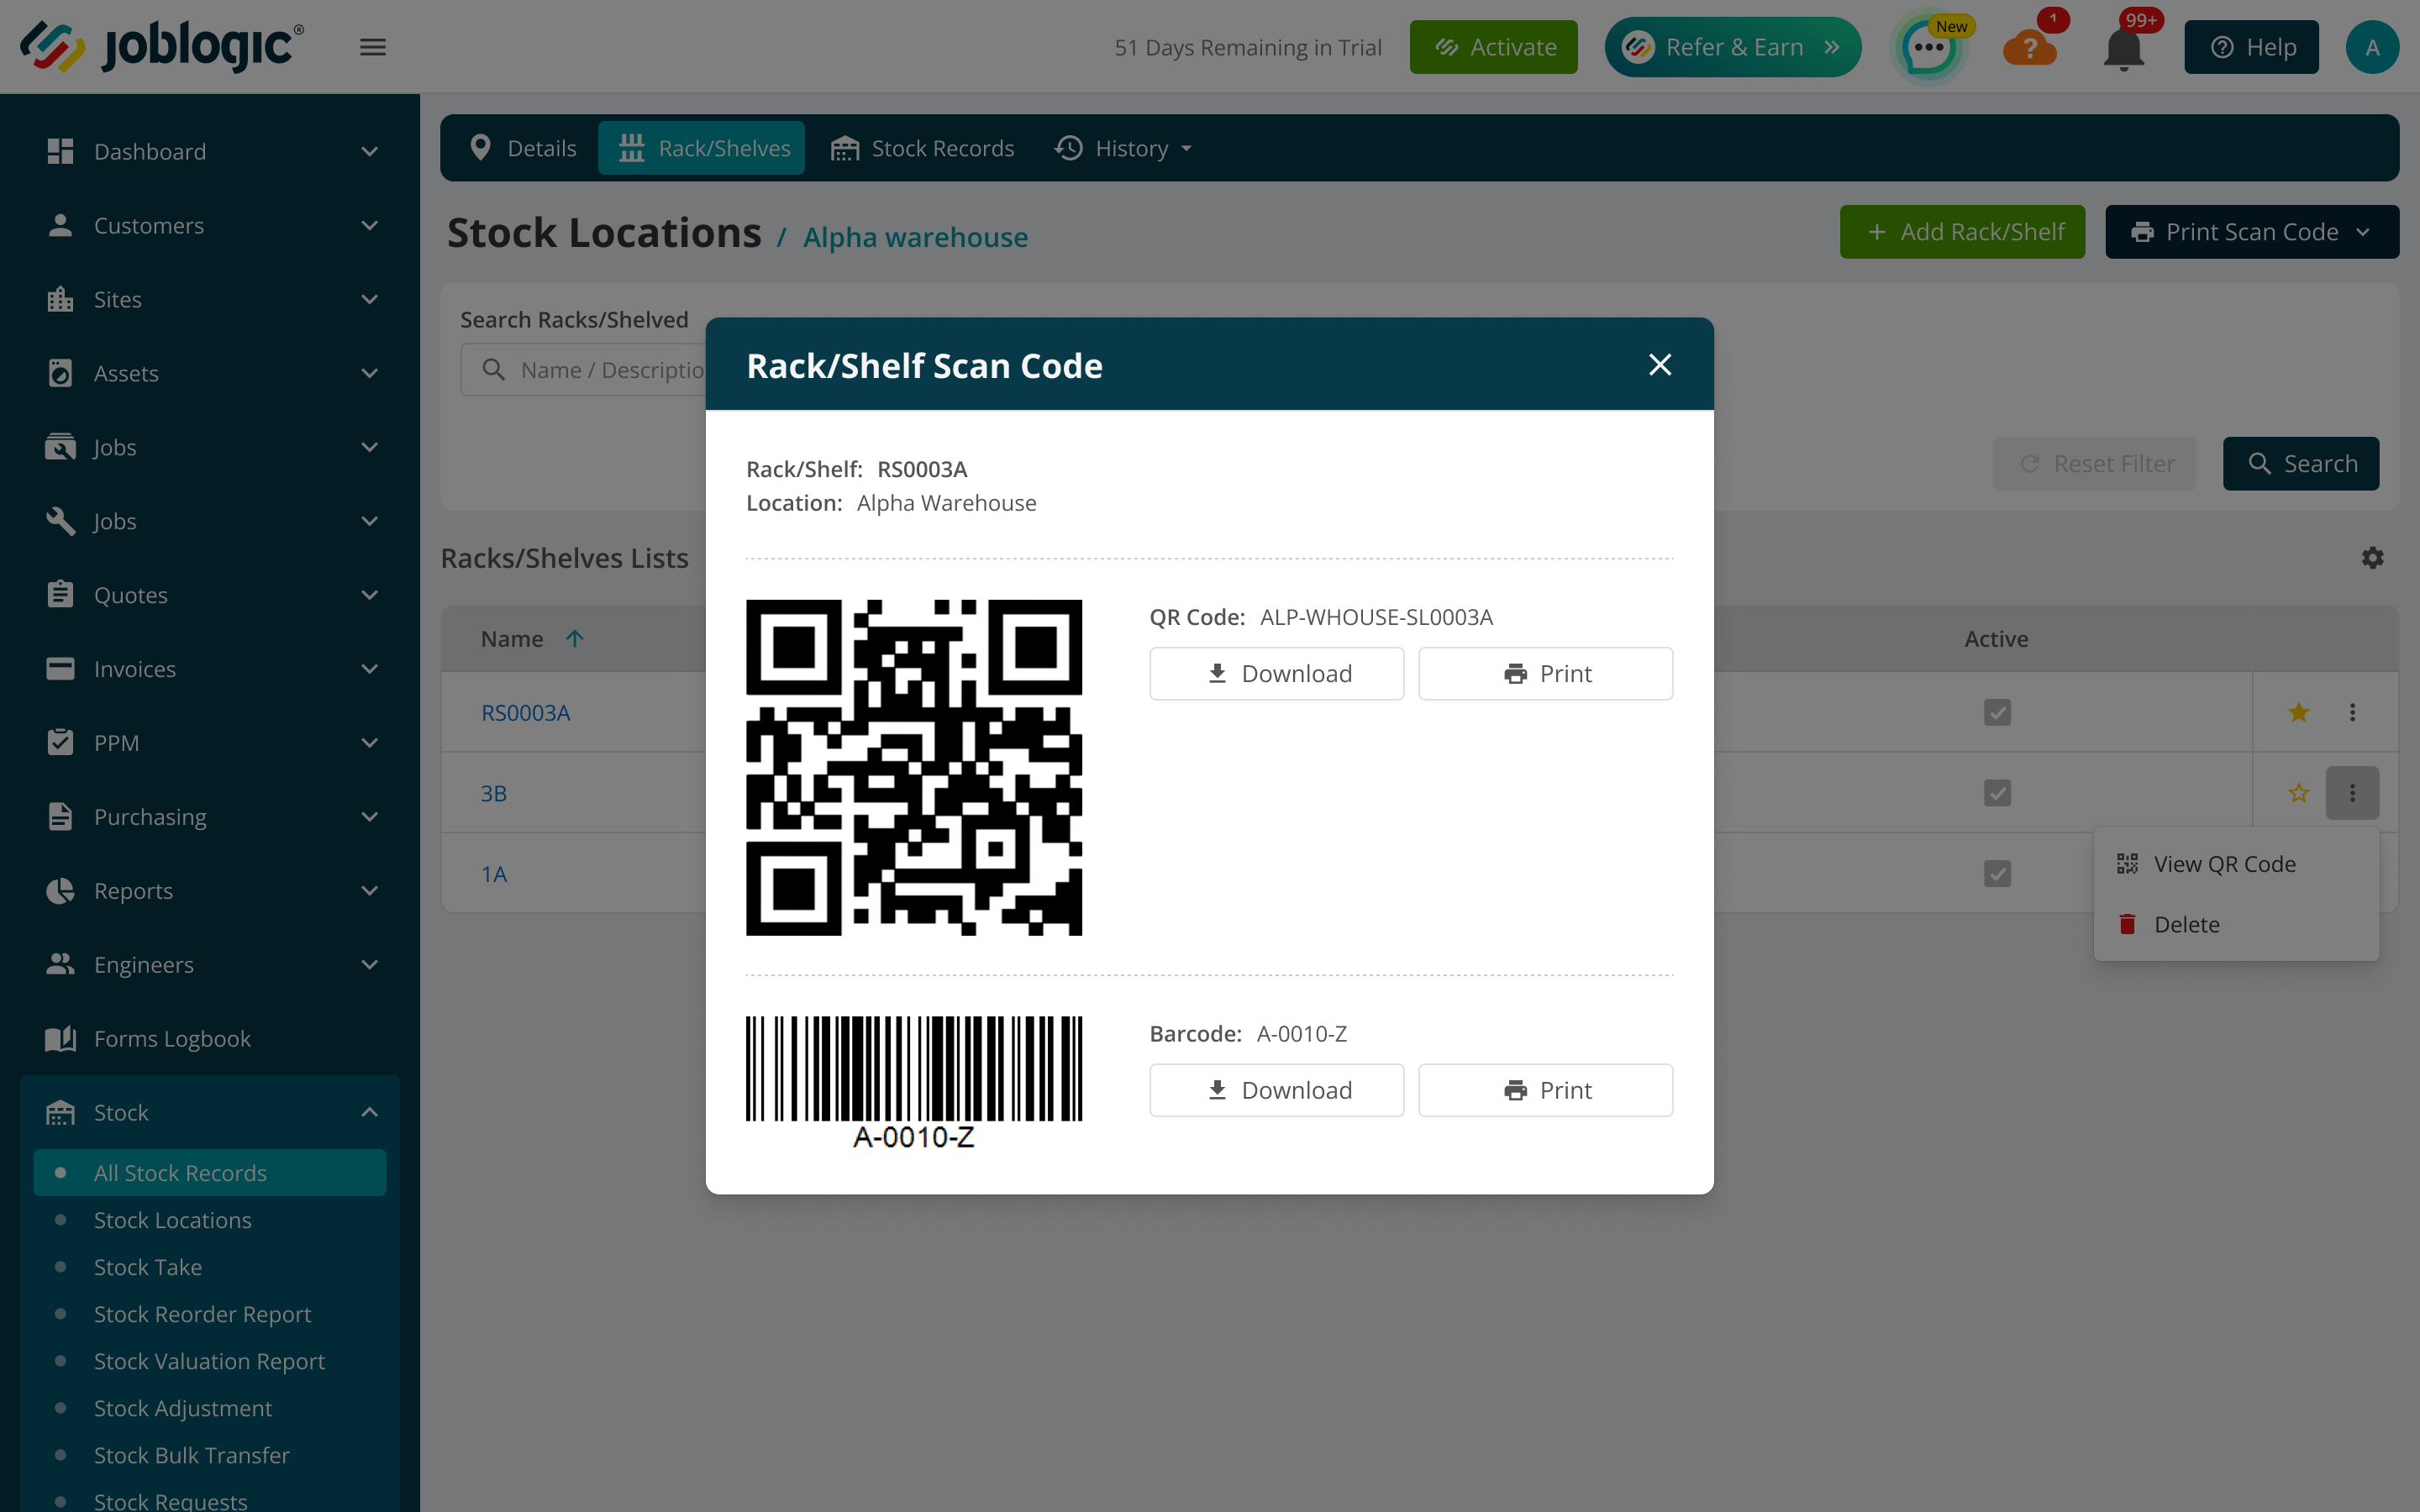
Open View Scan Code on a Rack or Shelf to view, download or print its QR Code and Barcode.
Open a Part record to view, download or print its existing QR Code.
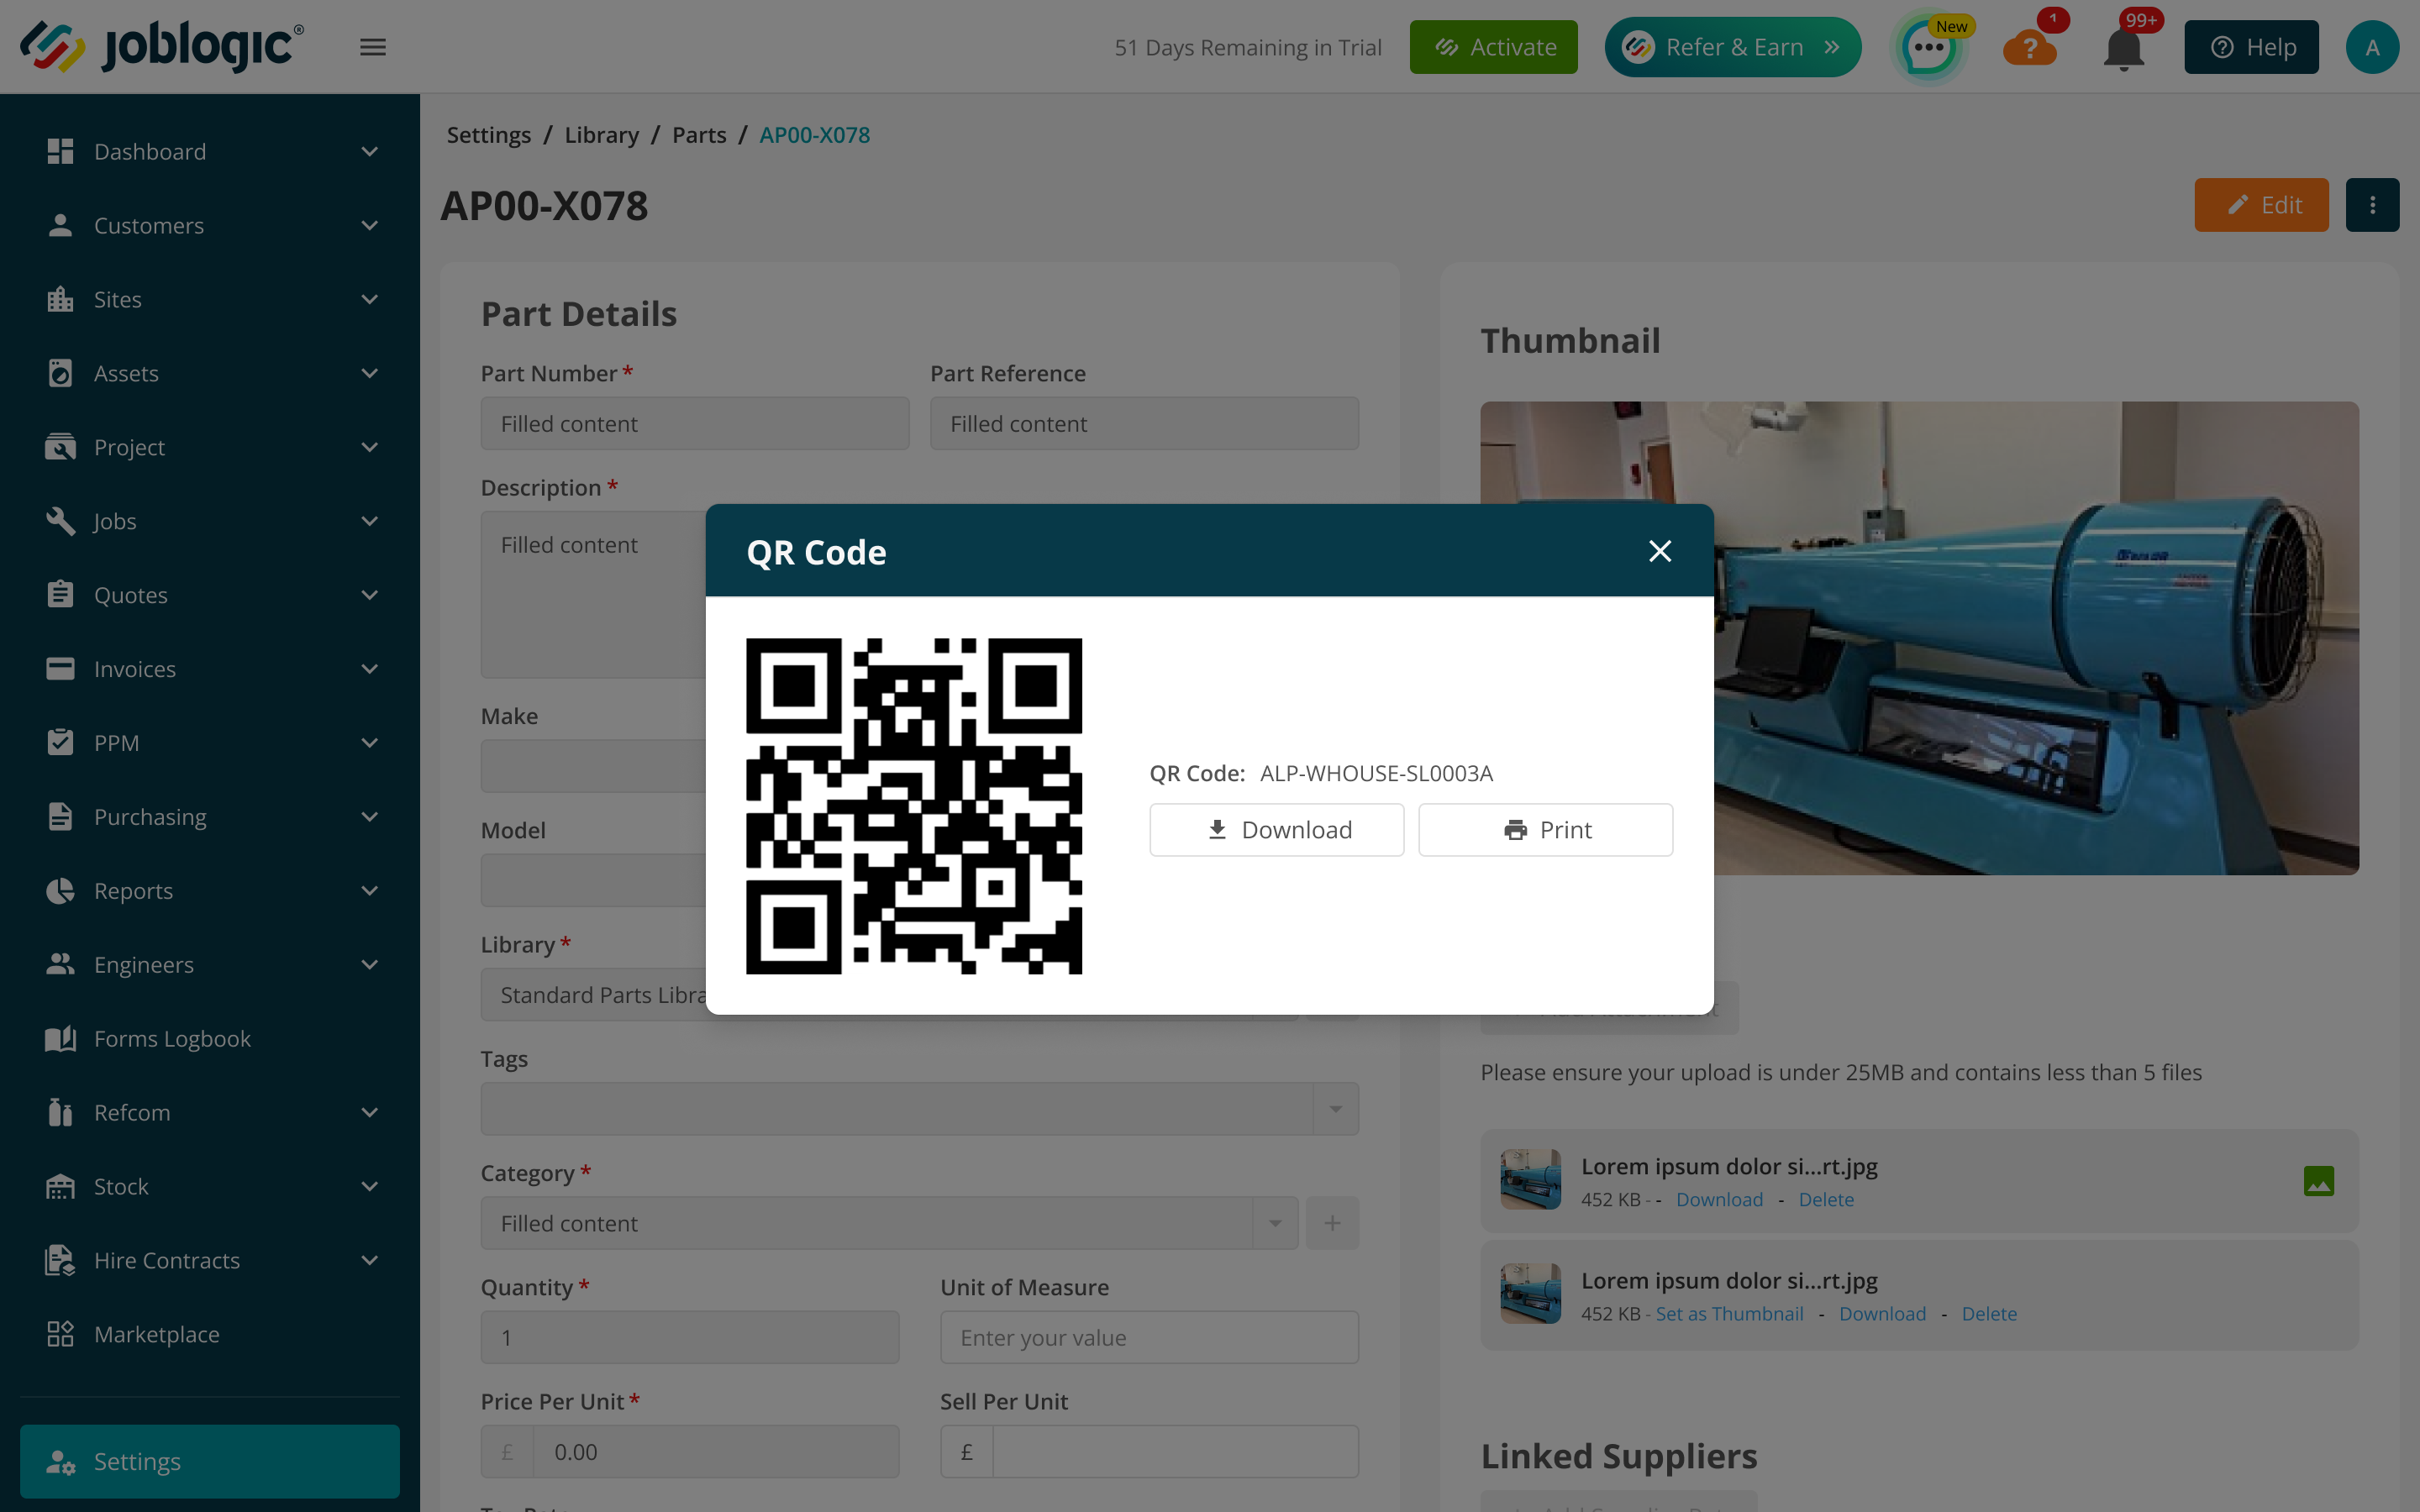
Manage codes in WarehouseFlow
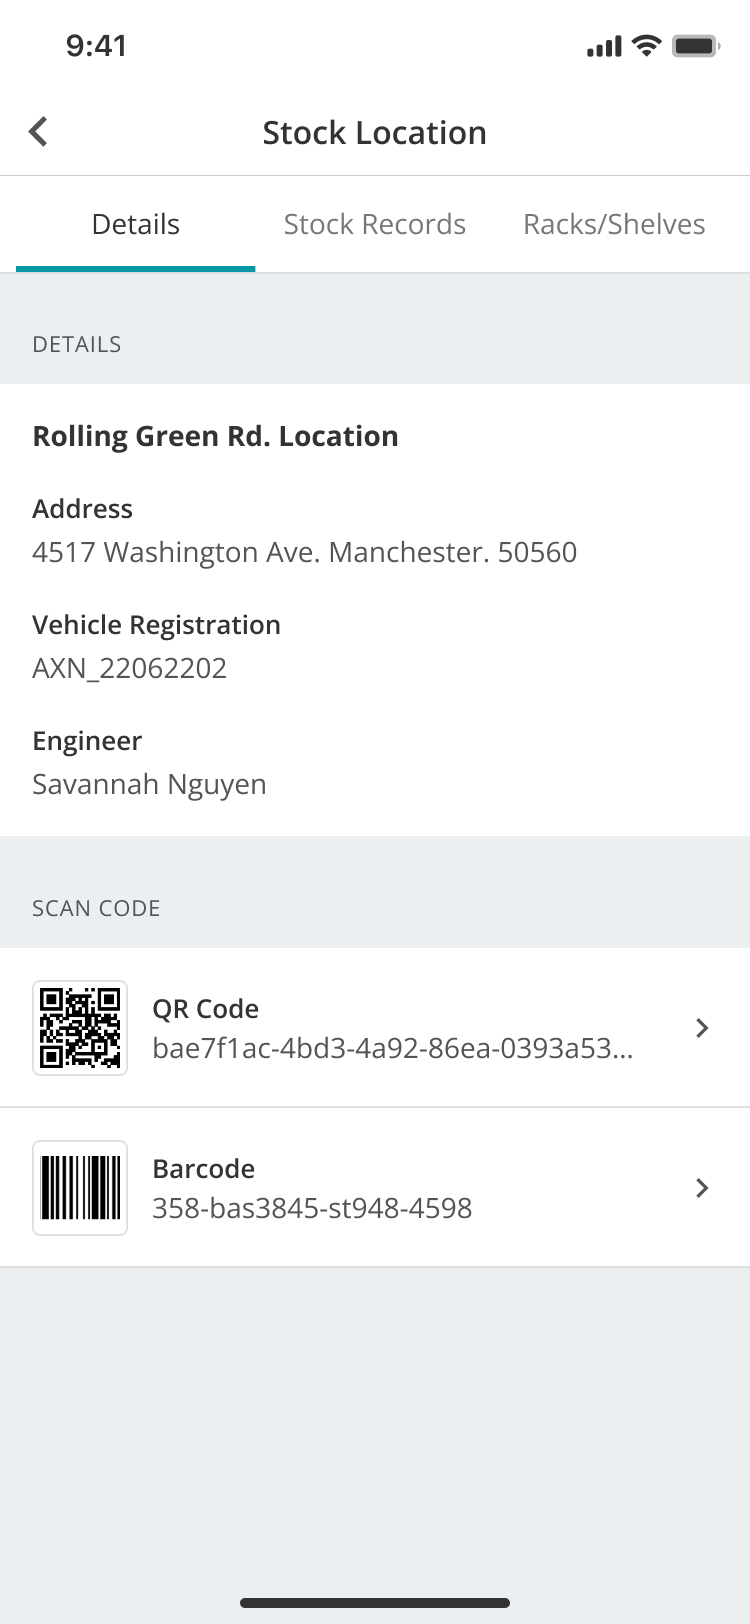
1. Open the required supported record in WarehouseFlow.
2. Add, generate, edit or delete the required Barcode or QR Code.
3. Save the change.
4. Print the existing code when a physical label is required.
Manage the code from the selected record in WarehouseFlow.
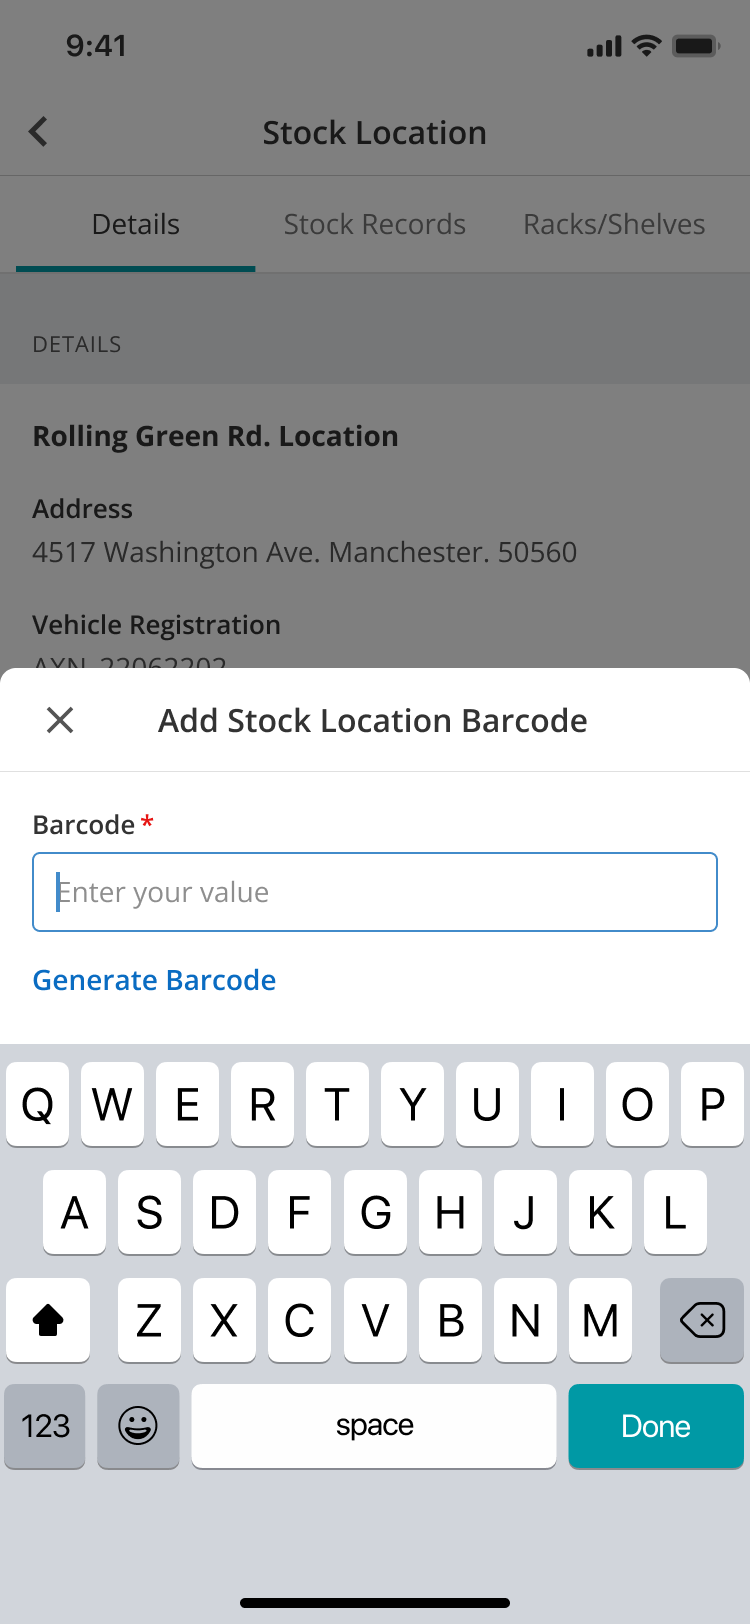
Enter a Barcode manually or select Generate Barcode, then use Done to save the value.
How codes are copied and synchronised
- When a new stock record is created from a Part or Equipment Library record that already has a code, the code is copied to the new stock record.
- Adding a code to a Library record later does not update existing stock records.
- A code created or edited on a stock record does not update the related Library record.
- After creation, the stock record's code can be edited independently.
- Changes to the stock record's code are available in both Back Office and WarehouseFlow.
Resolve a code used in more than one Rack or Shelf
- Location first: scan the Rack or Shelf before the stock item. Joblogic resolves the item within the scanned location.
- Item first: if the code matches stock records in more than one Rack or Shelf, select the correct location when prompted.
Permissions
WarehouseFlow uses Joblogic's existing role and permission framework. Users see only the functions allowed by their role, and administrators have access to all WarehouseFlow functionality.
Permission | What it allows |
|---|---|
WarehouseFlow Access | Open the WarehouseFlow Marketplace app. |
Perform Stock Transfers | Complete individual and bulk stock transfers. |
View Stock Location Contents | Scan a Stock Location, Rack or Shelf and review its current stock. |
Manage Barcodes and QR Codes | Add, generate, edit and delete codes on supported records. |
Print Barcode and QR Code Labels | Print labels from Back Office and WarehouseFlow. |
Assign permissions: Assign the permissions required for each warehouse user's role in Back Office.
If the required code-management permission is missing, WarehouseFlow prevents the action and displays a message. Saved permission changes take effect immediately.
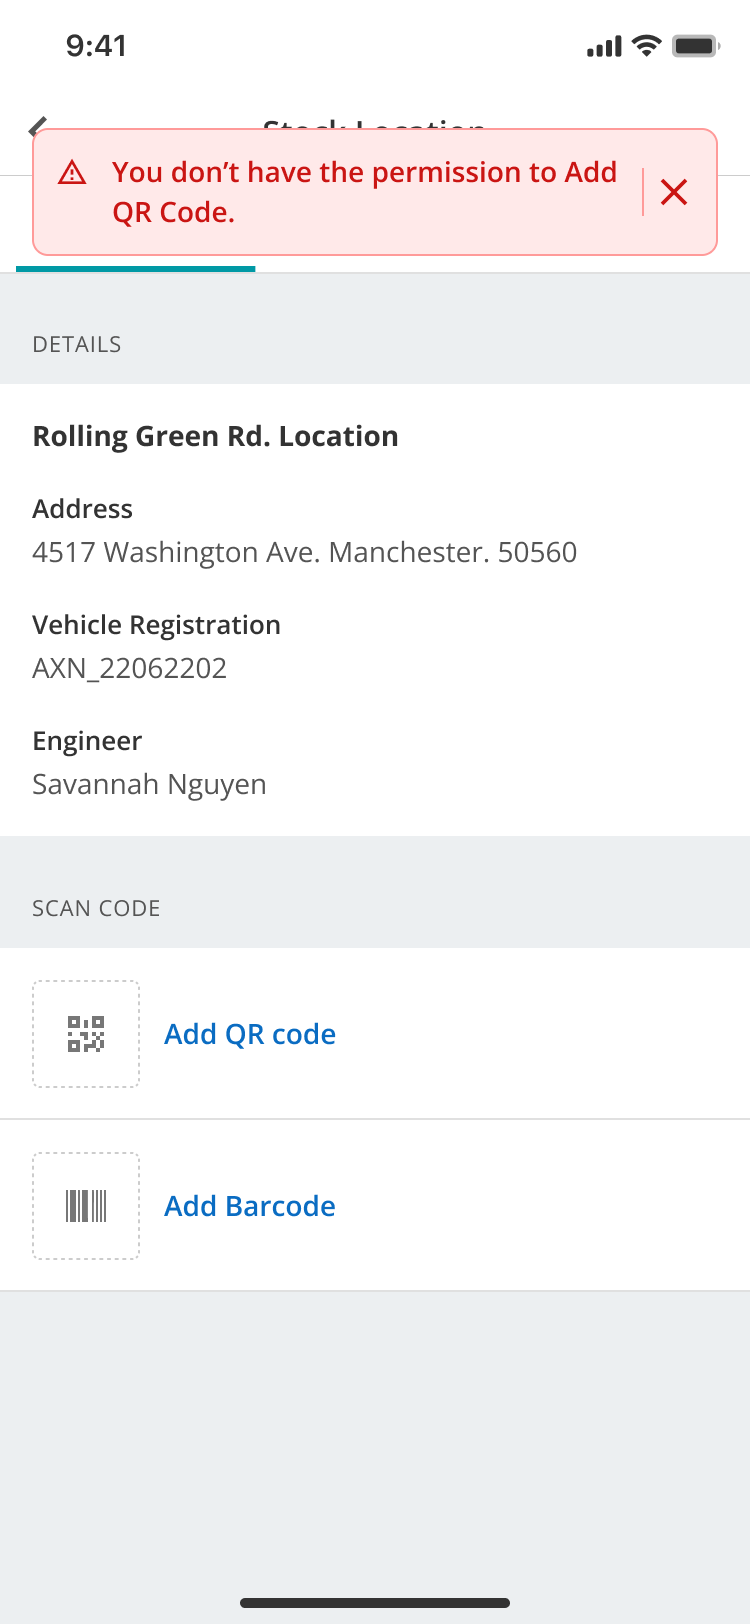
Audit and traceability
WarehouseFlow uses the existing Joblogic stock transfer audit records. It also records Barcode and QR Code maintenance and location scans so authorised users can trace warehouse activity.
Activity | Recorded information |
|---|---|
Stock transfers | Created, bulk created, completed or failed; source, destination, stock item and quantity. |
Code management | Code added, generated, updated, deleted or printed; record type and name, previous value and new value. |
Location lookup | Location scanned or invalid code scanned; location name and type, user, date and time. |
Review activity: Use the existing audit screens to review WarehouseFlow stock transfers, code maintenance and location lookups.
If WarehouseFlow is unavailable
When WarehouseFlow is not subscribed or a user does not have access:
- WarehouseFlow functions are not available to that account or user.
- Existing Back Office stock transfer processes continue to operate normally.
- Existing stock balances, locations and transfer history remain unchanged.
- Existing stock records continue to work without a Barcode or QR Code.
Further Support
For further information or assistance with the above, contact our Support Team on 0800 326 5561 or email support@joblogic.com. Alternatively, our Customer Success Management team can be reached by emailing customersuccess@joblogic.com
Publishing Details
This document was written and produced by Joblogic's Technical Writing team and was last updated in October 2026. Be aware that the information provided may be subject to change following further updates on the matter becoming available or new releases within the system. Additionally, details within the guide may vary depending on your Joblogic account's user permissions and settings or the electronic device being used.