Introduction
The Multi Depot app allows organisations to control access to Joblogic records by depot. Each user can be assigned a default depot and additional accessible depots, ensuring they only see information for the areas of the business they are permitted to access.
Depot scoping applies across the Joblogic Web app, Mobile apps and Direct Sales Marketplace. This helps multi-location organisations separate customers, sites, jobs, stock and financial records while continuing to work from one Joblogic account.
In this guide, we’ll show you how to manage depots and associated stores, configure the default depot filter, assign user permissions and understand how depot changes affect records across the system.
Accessing Multi Depot
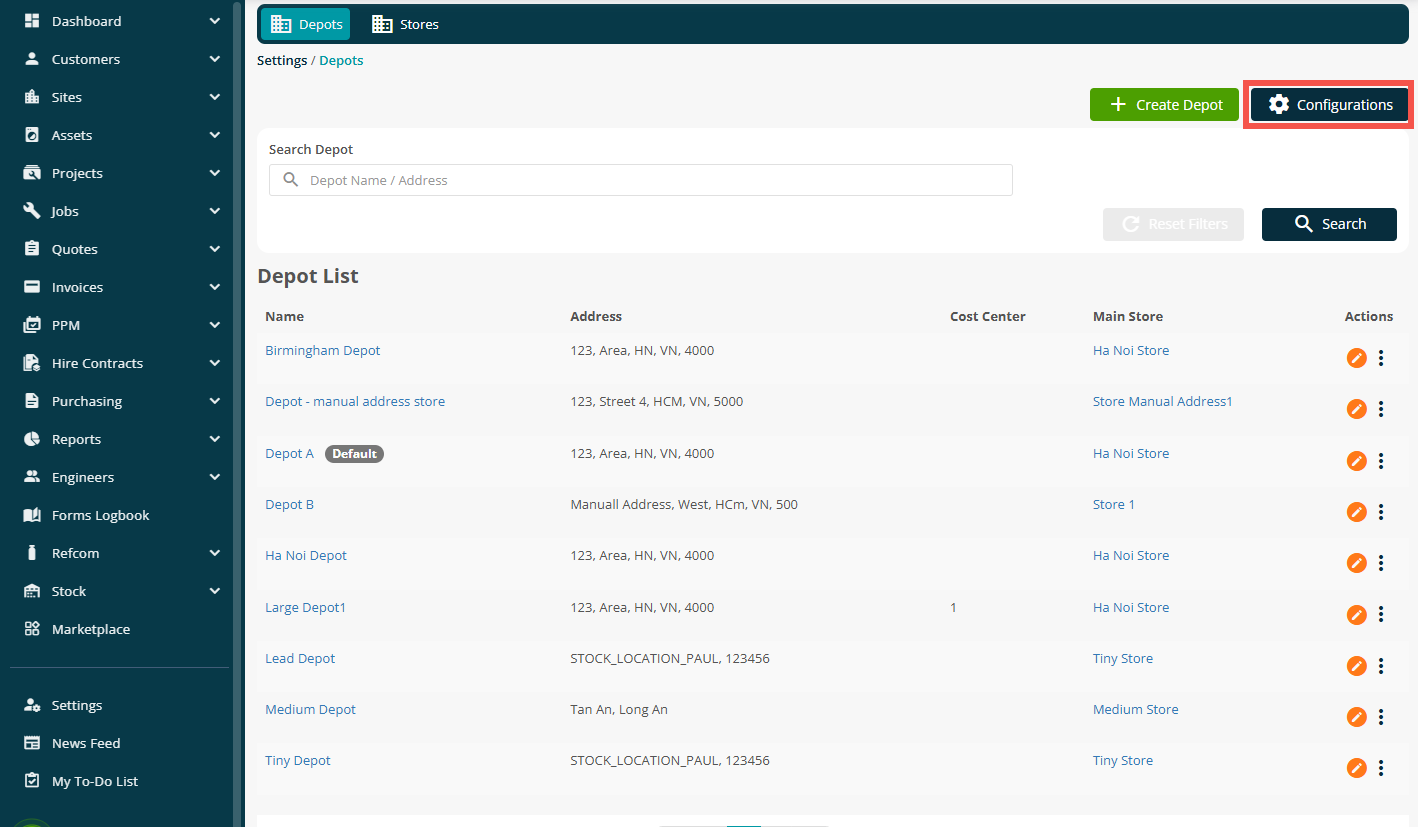
To view your depots, navigate to Settings > Depots.
The Depot List shows each depot’s name, address, cost centre and main store. From this page, you can select a depot to view its details, switch to the Stores tab, or click Configurations to manage depot filtering and user access.
Managing depot details
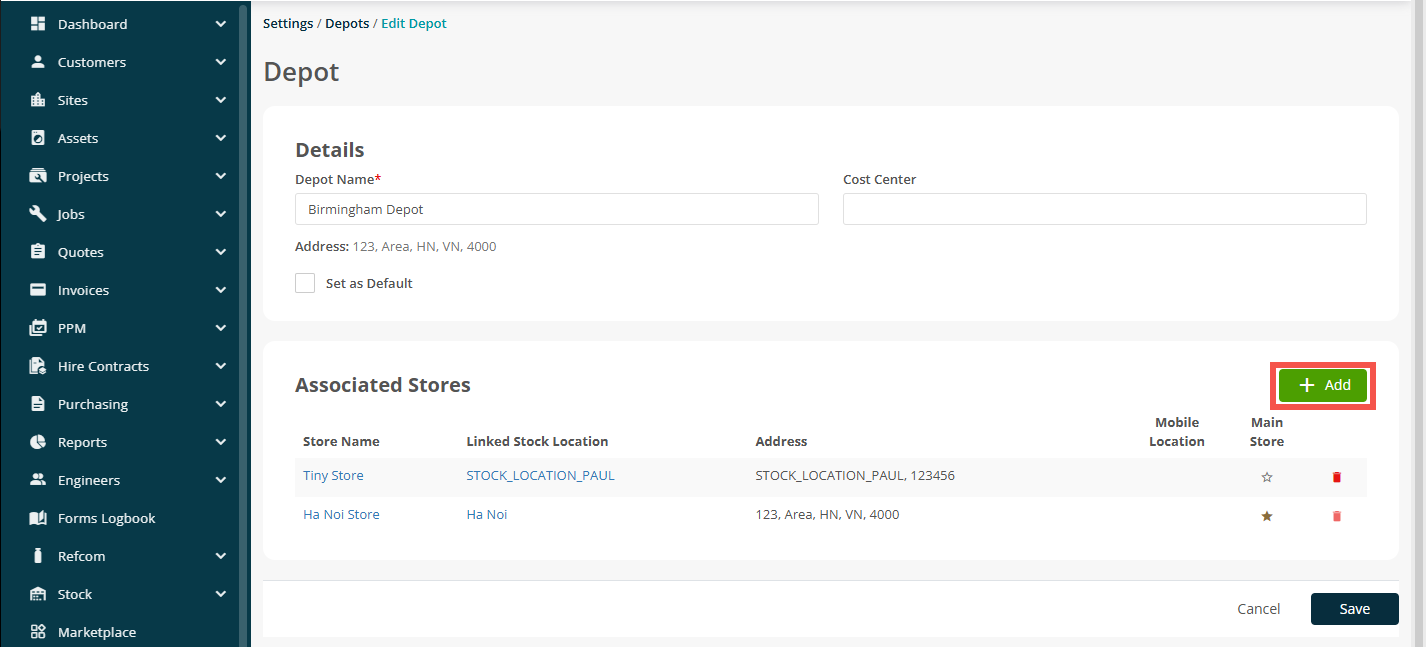
Click the name of a depot to open its details page.
The Details section shows the depot name, address, cost centre and whether the depot is set as the default. The Associated Stores section shows the stores linked to the depot, including the linked stock location and whether a store is marked as the main store.
To associate another store with the depot, click Add.
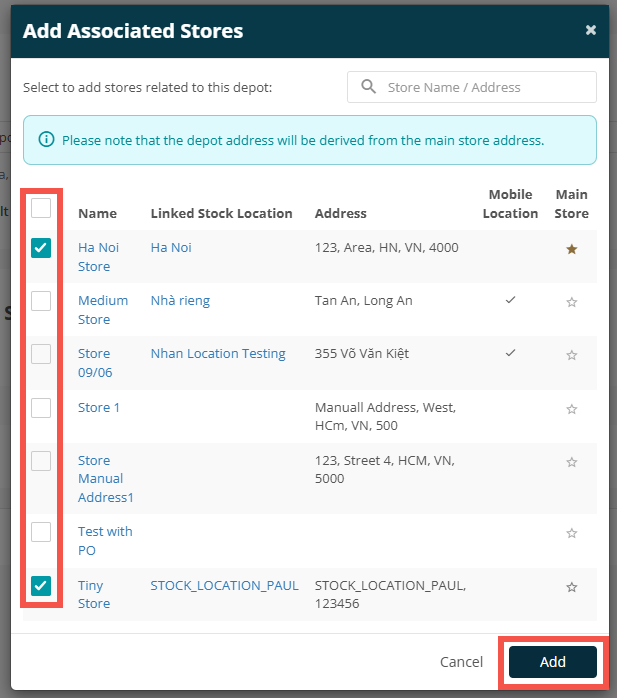
Select one or more stores from the list, then click Add.
Once the stores appear in the Associated Stores section, click Save to finalise your changes.
Note: The depot address may be derived from the address of its main store.
Managing stores
From the Depots page, click the Stores tab.
You can search using the store name, stock location or address. Use the Depot filter to show stores associated with specific depots.
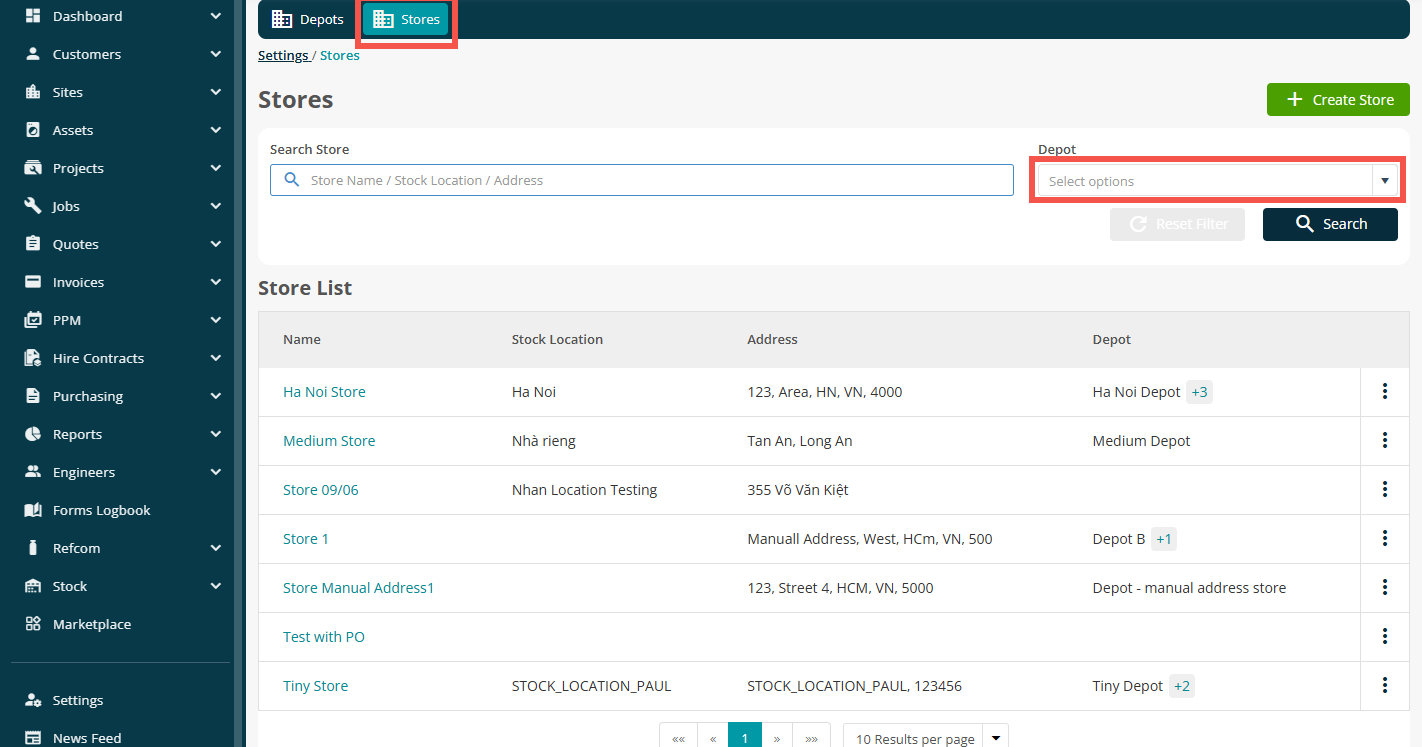
Click a store name to open its details. The Associated Depots section shows every depot linked to the store and identifies where the store is used as the main store.
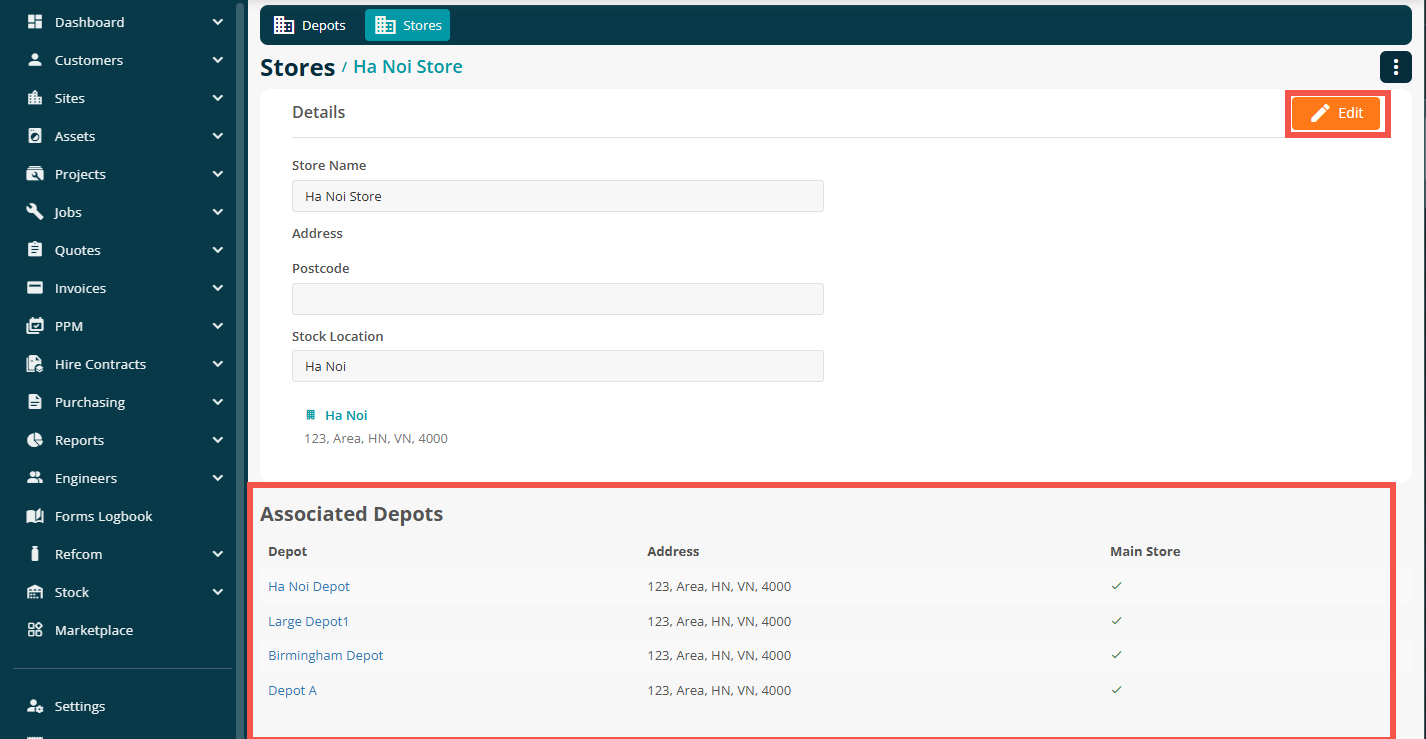
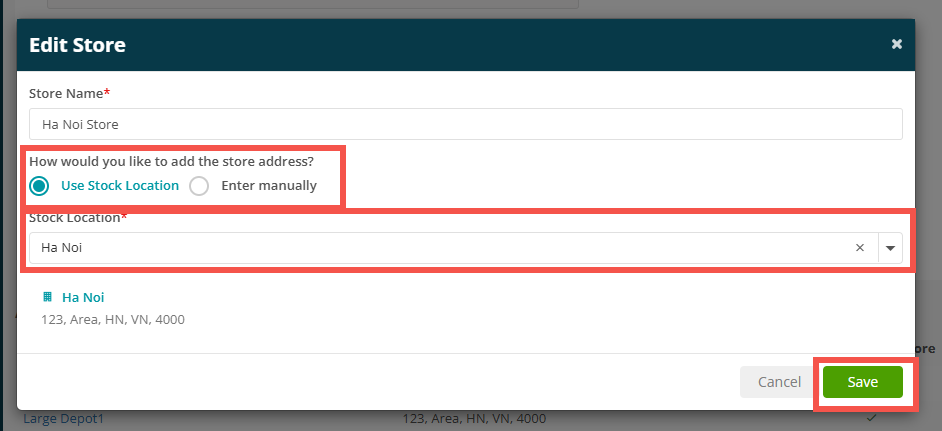
To update the store, click Edit. You can use the address from a linked stock location or enter the address manually. When using a stock location, select the relevant location from the dropdown and then click Save.
Configuring the default depot filter
From the Depot List, click Configurations.
Under Depot Settings, click Edit and choose the default filter configuration used across Joblogic records.
User Depot: Users can access information belonging only to their assigned default depot and any additional depots they have permission to view.
All Depot: Users can see and access all depots within the Joblogic account.

Assigning depot permissions to users
To assign depot permissions, navigate to Settings > Depots.
Make sure the Depots tab is selected, then click Configurations in the top-right corner of the page. On the Configurations page, scroll down to the User Permission section.
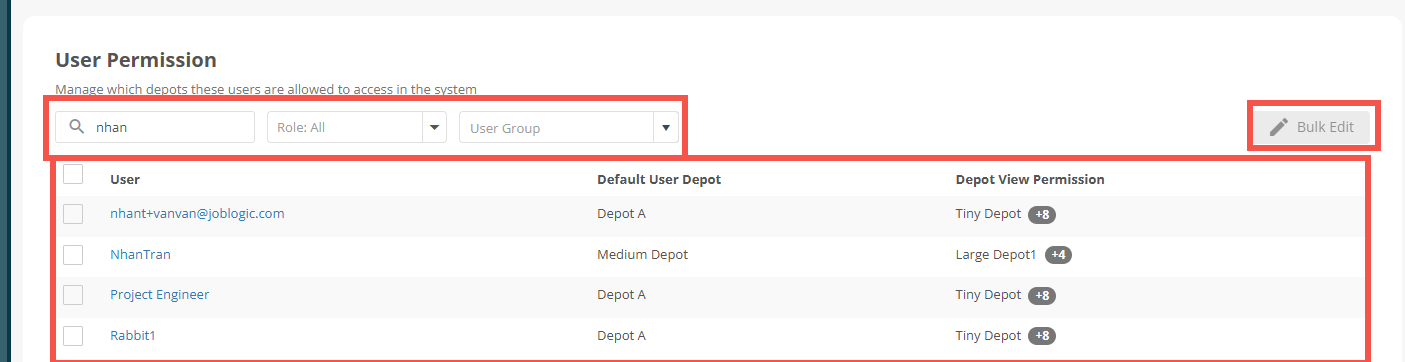
The User Permission section allows you to control which depots each user can access. Use the search bar to find a user, or narrow the list using the Role and User Group filters. The table shows each user’s default depot and their additional depot view permissions.
Click a user’s name to set their Default User Depot and select any additional depots they are allowed to access.
To update several users at the same time, tick the relevant users and click Bulk Edit.
Note: A user’s default depot is their primary depot. Additional accessible depots allow them to view and work with records belonging to those depots as well.
Configuring Marketplace role permissions
Marketplace administrators can control which back-office roles are allowed to use the Multi Depot app.
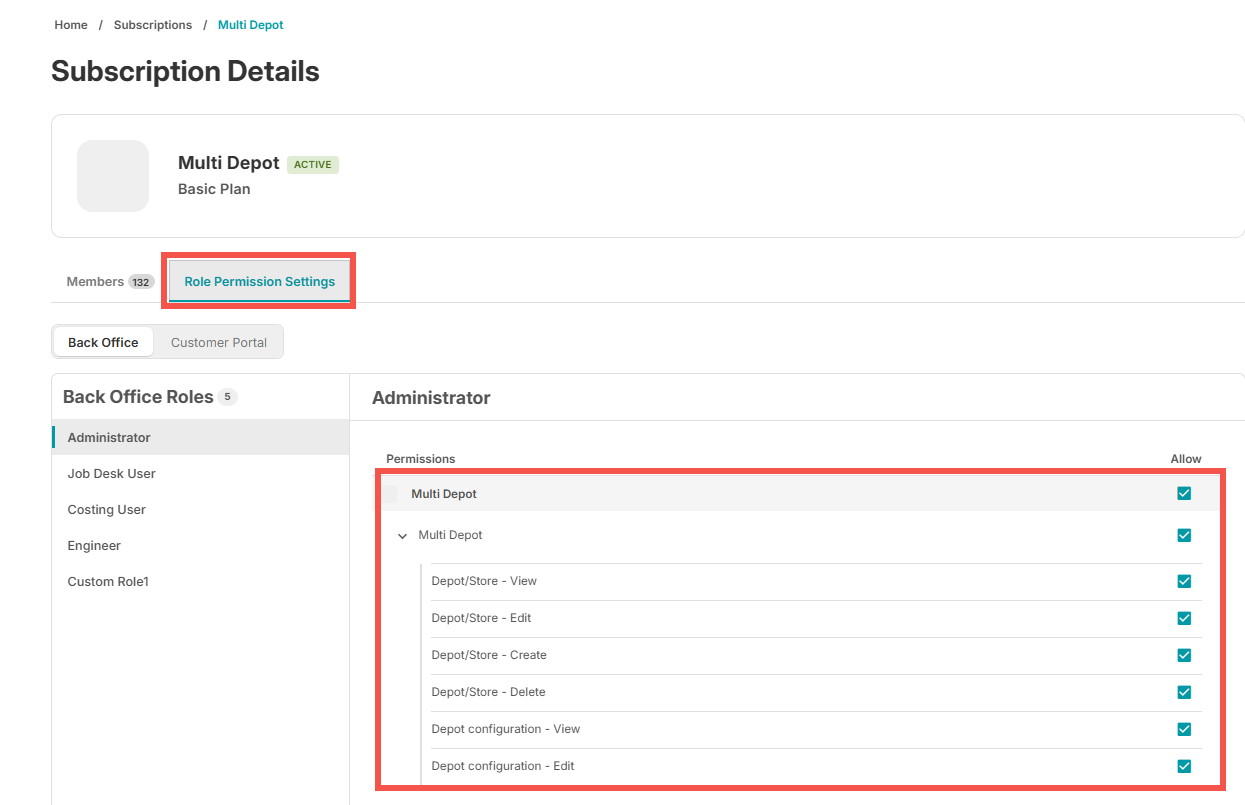
In Marketplace, open My Apps > Multi Depot and select Role Permission Settings. Choose a role, then enable the required permissions.
Permissions are available for viewing, creating, editing and deleting depot and store records, as well as viewing and editing depot configurations.
Filtering customers by depot
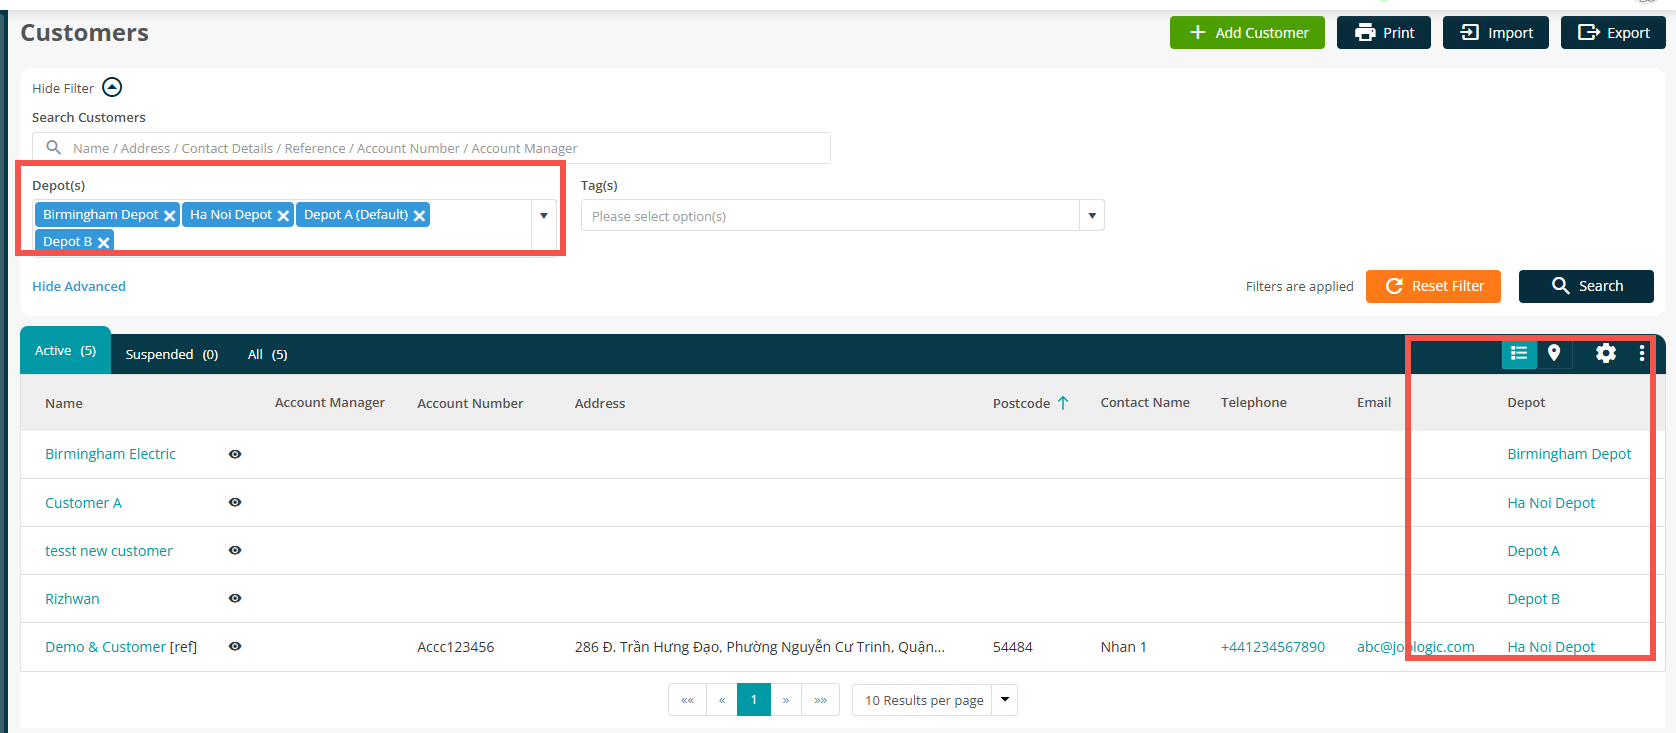
Customer records can be filtered by one or more depots. Navigate to Customers > All Customers and select the relevant depot options in the Depot(s) filter.
The Depot column in the search results shows the depot currently assigned to each customer.
Updating a customer or site depot
When updating a customer, select the required depot from the Depot field.
Enable Downstream Depot Impact when the depot change should also be applied to the customer’s associated sites and records. Leave this option clear when only the customer depot should be updated.

When a site depot is changed with downstream impact enabled, Joblogic updates associated and historical records using the newly configured site depot.
Records that do not already have a depot, such as a Job, Quote or Purchase Order, are assigned the site depot. Records that already have a depot are updated to the new site depot.
Note: Review the change carefully before confirming it, as downstream updates can affect associated and historical records.
Making depot selection mandatory
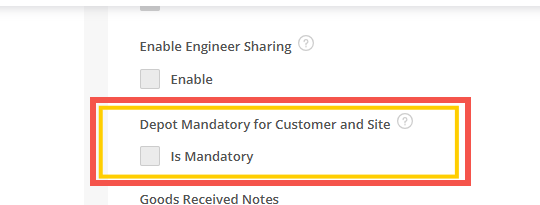
You can require a depot to be selected when customers and sites are created or updated.
Navigate to Settings > System Setup. Under Depot Mandatory for Customer and Site, tick Is Mandatory.
Depot source by entity
The depot shown against a record may be assigned directly, inherited from a related record, or derived from a user, store or stock location. The table below explains the source used for each entity.
Entity | Depot source |
|---|---|
Customer | Own depot assignment |
Site | Own depot assignment |
Purchase Order | Inherited from Site (read-only) |
Stock PO | Own depot assignment |
Multi-job PO | Inherited from linked Sites. The record is visible only when the user can access all depots linked to the Purchase Order; otherwise, it is hidden. |
Subcontractor PO | Inherited from Site (read-only) |
Contract PO | Inherited from Site (read-only) |
GRN | Own depot assignment |
Purchase Invoice | Inherited from Purchase Order |
PPM Contract | Inherited from Site (read-only) |
PPM Quote | Inherited from Site (read-only) |
Stock Location | Derived from Store |
Bulk Stock Transfer | Derived from Stock Location |
Log Job | Inherited from Site (read-only) |
Allocate Engineer | Based on the user depot. Users without a depot are also visible. |
Equipment/Part - Issue from Stock | Derived from Stock Location |
Quote | Inherited from Site (read-only) |
Asset | Inherited from Site (read-only) |
Invoice | Inherited from Site (read-only) |
Hire Contract | Inherited from Site (read-only) |
Hire Quote | Inherited from Site (read-only) |
Sales Order | Inherited from Site (read-only) |
Project | Inherited from Site (read-only) |
Project Quote | Inherited from Site (read-only) |
Form Logbook | Inherited from Job (read-only) |
Planner | Based on the user depot. Users without a depot are also visible. |
Engineer Shift | Based on the user depot. Users without a depot are also visible. |
REFCOM | Own depot assignment |
Timesheet | Based on the user depot. Users without a depot are also visible. |
Hire Assets (tenant assets) | No depot initially. The asset inherits the Site depot when the linked Hire Quote is upgraded. |
Hire assets and quotes
Hire assets do not have a depot when they are first created.
When a Hire Quote is upgraded, the Hire Asset is assigned the depot belonging to the selected site. Equipment and parts added to the Hire Quote display their store depots, and once the quote is upgraded, those items inherit the site depot.
Multi Depot on Mobile and Direct Sales Marketplace
Field engineers using the Mobile apps can see only records belonging to their permitted depots. Customer, site, part, stock, equipment and job type pickers also return only records the engineer is allowed to access.
In Direct Sales Marketplace, depot-scoped users can see only customers, sites, invoices and other records belonging to their permitted depots.
Note: Web and Marketplace users should log off and log on again after a configuration or permission change so the updated access is applied. Mobile permission changes take effect on the engineer’s next request without requiring them to log out.
Further Support
For further information or assistance with the above, contact our Support Team on 0800 326 5561 or email support@joblogic.com. Alternatively, our Customer Success Management team can be reached by emailing customersuccess@joblogic.com
Publishing Details
This document was written and produced by Joblogic’s Technical Writing team and was last updated on the date stated above. Be aware that the information provided may be subject to change following further updates on the matter becoming available or new releases within the system. Additionally, details within the guide may vary depending on your Joblogic account’s user permissions and settings or the electronic device being used.